前言
其实vue 的语法在官网上都有详细的讲解和例子,我这里就不多做什么说明,只是把自己学习这些语法是练习的例子贴出来。另外官网上的例子是一个个的html文件。我这里的是一个的vue 文件,通过不同的路由进行访问。
类似就上图的这种效果吧,没有什么样式,大伙将就看看嘿嘿。好了,下面我们就一起来看下主题的vue 语法吧。
路由
其实不应该先讲路由的,但是想要做这种点击跳转的就是通过路由实现的。其实也很简单,我们只求会用,不求为什要这样吧先。
<router-link :to="{name: 'IfAndFor'}">
条件与循环
</router-link>
可以看到我们通过 router-link 就可以实现跳转。to 表示跳转的地址,name 指跳转的路由。当然这个路由需要我们在src--router--index.js 中配置好,并且有相关的组件才行哟。
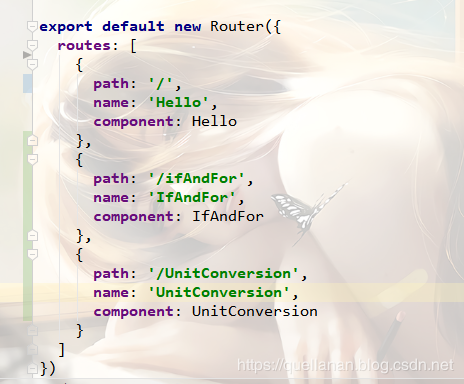
我们要新增路由的话,就在index.js 中增加对应配置就好了,然后就可以通过router-link来实现界面见的跳转。
条件与循环
我们配置好路由后,现在我们来看看v-if 和v-for 我们新建一个组件如下:
<template xmlns:v-bind="http://www.w3.org/1999/xhtml">
<div>
<div id="for">
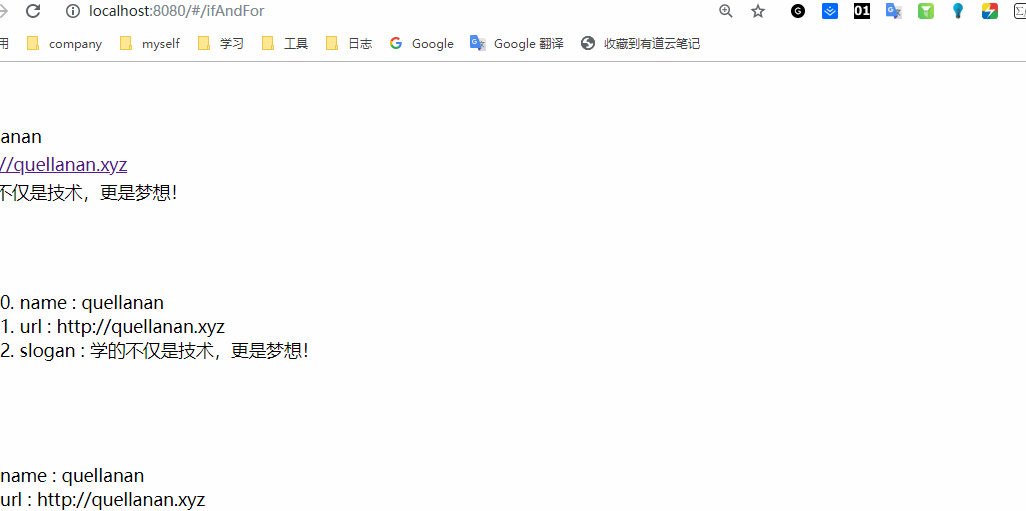
<p>一</p>
<table>
<tr v-for="(value, key, index) in object">
<td v-if="key === 'url'">
<a v-bind:href="value"> {{value}}</a>
</td>
<td v-else>
{{ value }}
</td>
</tr>
</table>
<br>
<p>二</p>
<ul>
<li v-for="(value, key, index) in object">
{{ index }}. {{ key }} : {{ value }}
</li>
</ul>
<br>
<p>二</p>
<ul>
<li v-for="(value, key) in object">
{{ key }} : {{ value }}
</li>
</ul>
</div>
</div>
</template>
<script>
export default {
name: "",
data(){
return {
object: {
name: 'quellanan',
url: 'http://quellanan.xyz',
slogan: '学的不仅是技术,更是梦想!'
}
}
}
}
</script>可以看到我使用了三种方式进行for 循环。index 是索引,key 是键, value 是值。这些其实和Java 中的循环差不多。无非就是通过索引遍历,要不就是通过键值遍历。
v-if 和v-else-if v-else 也是一样的。满足条件就显示组件,知道这样用就可以。
但是有一点,上面代码也发现了,无论是v-if 还是v-for, 都要与某个标签结合使用。单独是无法使用的。
监听事件
听起来很高大上,其实就是一个 watch 方法。
我们写一个单位换算的组件:
<template>
  <div>
      <div style="margin: 20px">
        千米 : <input type = "text" v-model = "kilometers">
        米 : <input type = "text" v-model = "meters">
        <p id="info"></p>
      </div>

      <div style="margin: 20px">
        小时 : <input type = "text" v-model = "hour">
        分钟 : <input type = "text" v-model = "minute">
        秒 : <input type = "text" v-model = "second">
        <br>
        天 : <input type = "text" v-model = "day">
        <br>
        星期 : <input type = "text" v-model = "week">
      </div>
      <div style="margin: 20px">
        <p >计数器: {{ counter }}</p>
        <button @click = "counter++">点我</button>
      </div>
  </div>
</template>

<script>
    export default {
        name: "",
      data(){
          return{
            kilometers : 0,
            meters:0,
            second : 0,
            minute : 0,
            hour : 0,
            day : 0,
            week : 0,
            counter: 0
          }
      },
      watch : {
        kilometers:function(val) {
          this.kilometers = val;
          this.meters = this.kilometers * 1000
        },
        meters : function (val) {
          this.kilometers = val/ 1000;
          this.meters = val;
        },
        week:function(val) {
          this.week = val;
          this.day = this.week * 7;
          this.hour = this.day * 24;
          this.minute = this.hour * 60;
          this.second = this.minute * 60;
        },
        day : function (val) {
          this.day = val;
          this.week = this.day/7;
          this.hour = this.day * 24;
          this.minute = this.hour * 60;
          this.second = this.minute * 60;
        },
        hour : function (val) {
          this.hour = val;
          this.day = this.hour/24;
          this.week = this.day/7;
          this.minute = this.hour * 60;
          this.second = this.minute * 60;
        },
        minute : function (val) {
          this.minute = val;
          this.hour = this.minute/60;
          this.day = this.hour/24;
          this.week = this.day/7;
          this.second = this.minute * 60;
        },
        second : function (val) {
          this.second = val;
          this.minute = this.second/60;
          this.hour = this.minute/60;
          this.day = this.hour/24;
          this.week = this.day/7;
        },
        counter :function(nval, oval) {
          //alert('计数器值的变化 :' + oval + ' 变为 ' + nval + '!');
        }
      }
    };
</script>
v-model 表示数据双向绑定,这个没有什么好说的。data 初始化数据,watch 方法中就是监听函数,监听各自的组件并进行处理。
发送HTTP 请求
我们要做前后端分离,那么通过http 请求访问后端数据是避免不了的。所以我们一起来看下。我这里也是查看资料中的例子。直接拿过来用了。
我们创建一个BlogList.vue 文件,内容如下:
<template>
<div >
<table>
<tr v-for="blog in blogs">
<!--<td @click='show_blog(blog.id)'>{{blog.title}}</td>-->
<td>
<router-link :to="{name: 'Blog', query: {id: blog.id}}">
{{blog.title}}
</router-link>
</td>
</tr>
</table>
</div>
</template>
<script>
export default {
data () {
return {
title: '博客列表页',
blogs: []
}
},
mounted () {
this.$http.get('api/interface/blogs/all').then((response) => {
console.info(response.body)
this.blogs = response.body.blogs
}, (response) => {
console.error(response)
});
},
methods:{
show_blog: function(blog_id) {
this.$router.push({name: 'Blog', query: {id: blog_id}})
}
}
}
</script>
<style >
td {
border-bottom: 1px solid grey;
}
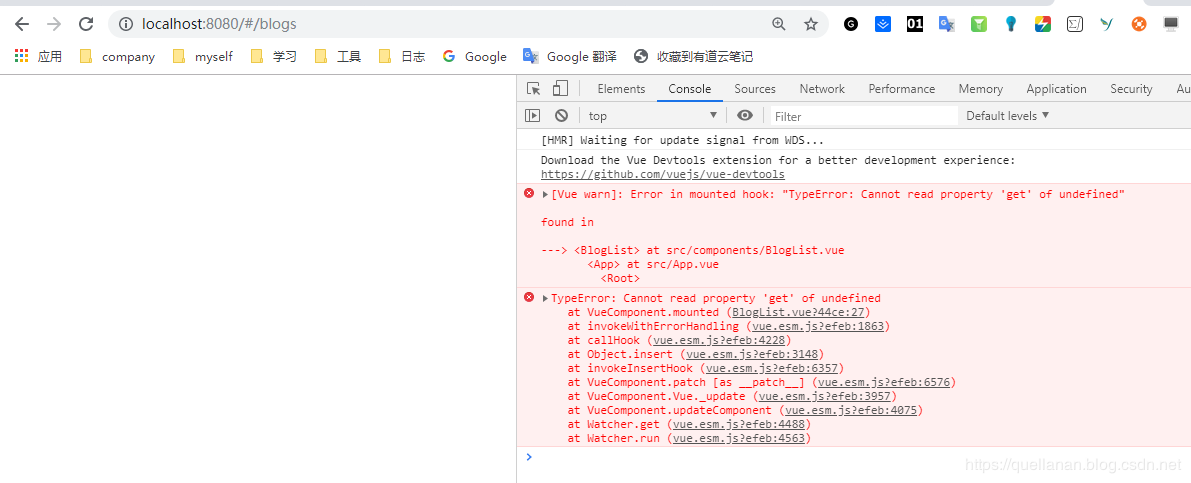
</style>上面的代码可以看到。mounted 方法中发送http 请求。mounted 函数是初始化页面后,将数据渲染到界面上的。
      mounted () {
        this.$http.get('api/interface/blogs/all').then((response) => {
          this.blogs = response.body.blogs
        }, (response) => {
          console.error(response)
        });
      },
我们启动项目,发现报这种错误。这是因为我们项目中没有引入 vue-resource 所以我们需要在项目中引入。
我们在idea 中打开控制台(alt+F12)。
npm install vue-resource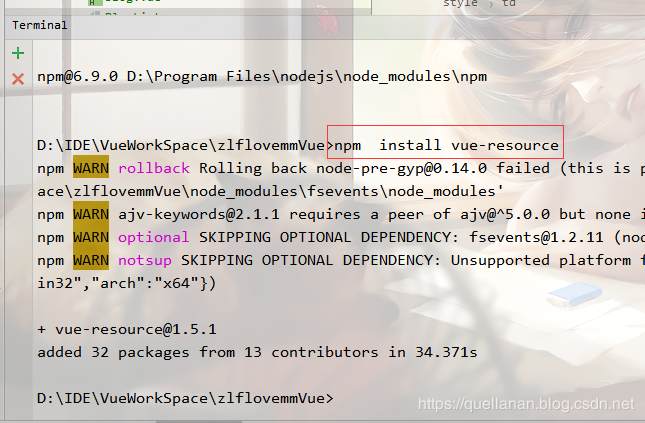
安装好之后,我们在在main.js 中引入它
import VueResource from 'vue-resource'
Vue.use(VueResource)
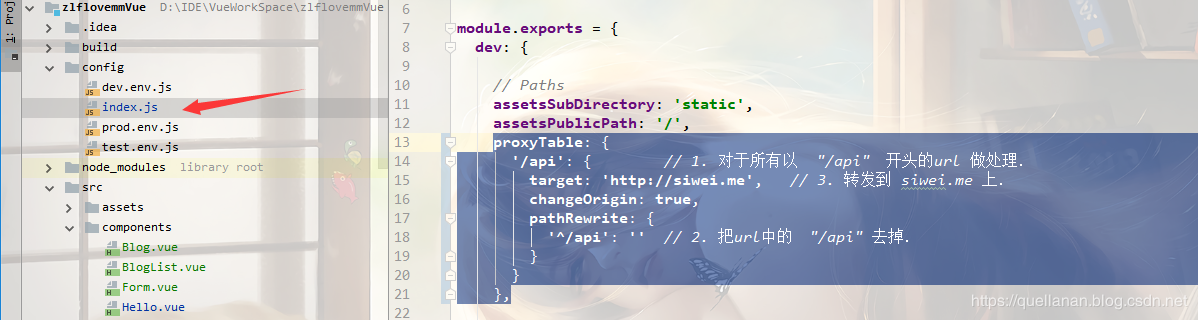
Vue.http.options.emulateJSON = true //允许使用post 请求。在config--index.js 中设置一下代理,模拟一下跨域请求,不然接口访问不了。
proxyTable: {
      '/api': {        // 1. 对于所有以  "/api" 开头的url 做处理.
        target: 'http://siwei.me',   // 3. 转发到 siwei.me 上.
        changeOrigin: true,
        pathRewrite: {
          '^/api': ''  // 2. 把url中的 "/api" 去掉.
        }
      }
    },
好了,我们启动看一下,

后面是获取详情的,上面没有传递参数,获取详情需要传递参数,代码如下:
<template>
  <div >
    <div>
      <p> 标题: {{ blog.title }}  </p>
      <p> 发布于: {{blog.created_at }}</p>
      <div>
        <div v-html='blog.body'></div>
      </div>
    </div>
  </div>
</template>

<script>
  export default {
    data () {
      return {
        blog: {}
      }
    },
    mounted() {
      this.$http.get('api/interface/blogs/show?id='+this.$route.query.id).then((response) => {
        this.blog = response.body.result
      }, (response) => {
        console.error(response)
      });
    }
  }
</script>

<style scoped>

</style>
这是别人的接口,好像不支持post 请求。所以post 请求就先算了,并且这种算是原生的http 请求吧,我们以后使用的时候,可以使用 axios 来发送http 请求。这个我们后面再尝试。
番外
这篇就讲到这吧,都是一些例子。如果要看语法的话,还得看看官网的教程。
代码上传到github:
https://github.com/QuellanAn/zlflovemmVue
后续加油♡
欢迎大家关注个人公众号 "程序员爱酸奶"
分享各种学习资料,包含java,linux,大数据等。资料包含视频文档以及源码,同时分享本人及投递的优质技术博文。
如果大家喜欢记得关注和分享哟❤