-
RAID 磁盘冗余阵列
- 目的:提高可用性,读取速度,安全性
- 通过多盘的协作来达到这一指标
- 但是不经济,提高了公司的支出。除非认为,数据大于费用
-
RAID的种类
- RAID0 数据分布在不同的两块盘上,读取速度快,但是一块损坏另一块也损坏。
- RAID1 数据分布在相同的两块盘上,无损备份。
- RAID5 三块盘组成最小的RAID,但是奇偶校验数据放在除自身盘符外的其他盘上,以备损坏后备份。
- RAID10 是RAID1和RAID0的组合体。四块硬盘先两两组合成RAID1,两块RAID1再组合成RAID0
-
存在的问题:如何umount掉一个挂载盘?
-
部署磁盘阵列。
- 注意,首先需要关闭虚拟机。
- 在vmware中创建硬盘
-
madam( manage multiple devices admin)命令用来管理磁盘阵列。
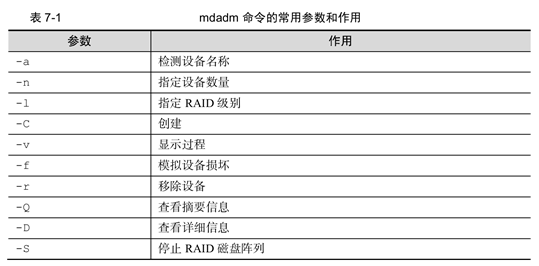
- -C 创建一个RAID阵列卡
- -v显示创建过程。
- -a yes 代表自动创建设备文件
- -n 4 使用4块硬盘部署RAID阵列。
- -l 10 代表使用的是raid10 level
- 创建出来的md0位于/dev
- 使用mkfs格式化成ext4格式
- 最后挂载到对应盘符
- 最后写入到/etc/fstab中使其永久生效。
- 查看磁盘阵列状态 cat /proc/mdstat
-
/etc/fstab文件的含义
- File system specifier -- For disk-based file systems, either a device file name (/dev/sda1), a file system label specification (LABEL=/), or a devlabel-managed symbolic link (/dev/homedisk)
- Mount point -- Except for swap partitions, this field specifies the mount point to be used when the file system is mounted (/boot)
- File system type -- The type of file system present on the specified device (note that auto may be specified to select automatic detection of the file system to be mounted, which is handy for removable media units such as diskette drives)
- Mount options -- A comma-separated list of options that can be used to control mount's behavior (noauto,owner,kudzu)
- Dump frequency -- If the dump backup utility is used, the number in this field controls dump's handling of the specified file system
- File system check order -- Controls the order in which the file system checker fsck checks the integrity of the file systems
-
损坏的磁盘阵列修复
-
发现某块磁盘出了问题后,使用mdadm命令移除磁盘。查看磁盘状态。
- mdadm /dev/md0 -f /dev/sdb 模拟sdb出现问题 、
- mdadm -D /dev/md0 查看整列状态,注意 faulty位置/
- umount 移除整列位于的文件夹
- mdadm /dev/md0 -a /dev/sdb (-a = add 热加入。在无法添加的情况下使用--re-add命令)
- mdadm -D /dev/md0 (-D detail)
-
-
磁盘阵列+备份盘
- mdadm -Cv /dev/md0 -n 3 -l 5 -x 1 /dev/sdb /dev/sdc /dev/sdd /dev/sde
- 其他同上
- 拔出一块硬盘,可以看到备份开始创建。
-
LVM逻辑卷管理
-
为什么叫逻辑卷管理?
- 允许用户对磁盘使用空间进行动态管理。
- 在传统的物理卷之上,创建一个抽象的卷组,已PE为最小单位,来分配空间,这个空间就称之为逻辑卷。
-
主要基础概念
- 物理卷 PV physical volume 物理卷
- 卷组 volume group 物理卷合并形成的容量
- 逻辑卷 logical volume 有基本单元组成的可变容量空间
- 基本单元 physical extent
-
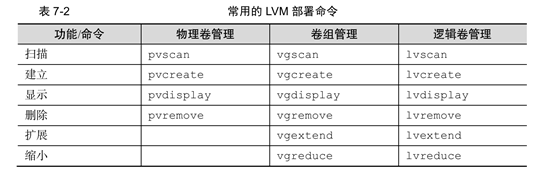
常用的LVM命令
- 重新使用原始快照,添加两块硬盘/
-
初始化 LVM
- pvcreate - Initialize physical volume(s) for use by LVM
-
遇到问题 /dev/sdb 无法被LVM前置化。
- 怎么办?删除sdb1 sb2分区
- 使用fdisk命令 输入d 在输入对应分区
-
vgcreate 卷组名 /dev/sdb /dev/sdc 创建卷组
- vgdisplay 显示卷组状态
-
创建名称为vo 大小为 150M的逻辑卷
- lvcreate -n vo -l 37 storage 创建
- mkfs.ext4 创建出来后格式化并挂在,注意,默认目录在/dev/storage/vo
-
扩容逻辑卷
- lvextend -L 290M /dev/storage/vo 用来扩充逻辑卷的容量。首先需要umount挂载目录
- e2fsck -f /dev/storage/vo 检查磁盘完整性 (check ext2/3/4 file system)
- resize2fs /dev/storage/vo ext2/ext3/ext4 file system resizer 重置容量。
-
缩小逻辑卷
- resize2fs /dev/storage/vo 120M
- lvreduce -L 120M /dev/storage/vo
-
注意扩容和缩小的操作顺序。
- If you wish to shrink an ext2 partition, first use resize2fs to shrink the size of filesystem.Then you may use fdisk(8) to shrink the size of the partition. When shrinking the size of the partition, make sure you do not make it smaller than the new size of the ext2 filesystem!
-
创建逻辑卷快照
-
首先查看卷组详细信息
- vgdisplay
-
写入信息往挂载盘符
-
lvcreate -L 120M -s -n SNAP /dev/storage/vo
- -s 创建一个snapshot
- -L 指定参数大小
- -n name
- 使用lvdisplay查看lv状态
-
-
dd if=/dev/zero of=/linuxprobe/files count=1 bs=100M
- 创建一个垃圾文件至目录
- 查看逻辑卷的占用状态
-
根据SNAP还原,首先先卸载逻辑卷
- lvconvert --merge /dev/storage/SNAP
- 快照卷在完成还原后本身会删除。
-
-
删除逻辑卷
- 不可还原,首先备份完重要信息。
- 取消挂载关联,删除/etc/fstab中的参数。
- 删除逻辑卷 lvremove /dev/storage/vo
- 删除卷组 vgremove storage
- 删除物理卷 pvremove /dev/sdb /dev/sdc
-
- 要点:始终要记得移除的顺序。
-
可能会遇到的问题
- Device XXX excluded by a filter
-
处理方法
- partprobe -s /dev/sdi
- wipefs /dev/sdi
- 找出是否有奇怪的分区在盘上
- 最终目的还是把盘符分区删除并重新格式化。
第七章 RAID阵列和LVM磁盘阵列技术 第7天 7月26日
猜你喜欢
转载自www.cnblogs.com/Black-cat0987/p/12064543.html
今日推荐
周排行