这篇文章主要讲解使用eclipse对Spirng+SpringMVC+Maven+Mybatis+MySQL项目搭建过程,包括里面步骤和里面的配置文件如何配置等等都会详细说明。
如果还没有搭建好环境(主要是Maven+MySQL的配置)的猿友可以参考博主以前的一篇文章:
http://blog.csdn.net/bryant_liu24/article/details/54292770
接下来马上进入项目搭建过程:
1、创建表,并插入数据:
CREATE TABLE `t_user` (
  `USER_ID` int(11) NOT NULL AUTO_INCREMENT,
  `USER_NAME` char(30) NOT NULL,
  `USER_PASSWORD` char(10) NOT NULL,
  PRIMARY KEY (`USER_ID`),
  KEY `IDX_NAME` (`USER_NAME`)
) ENGINE=InnoDB AUTO_INCREMENT=11 DEFAULT CHARSET=utf8
- 1
- 2
- 3
- 4
- 5
- 6
- 7

- 1
- 2
- 3
- 4
- 5
- 6
- 7
INSERT INTO t_user (USER_ID, USER_NAME, USER_PASSWORD) VALUES (1, 'luoguohui', '123456');
INSERT INTO t_user (USER_ID, USER_NAME, USER_PASSWORD) VALUES (2, 'zhangsan', '123456');
- 1
- 2
- 3
- 1
- 2
- 3
2、Maven工程创建
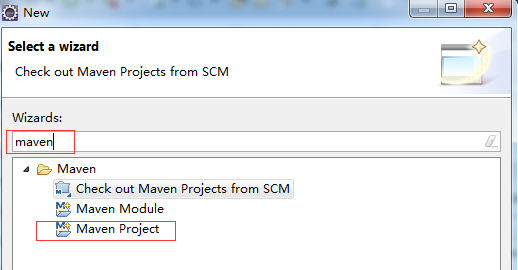
3、选择快速框架
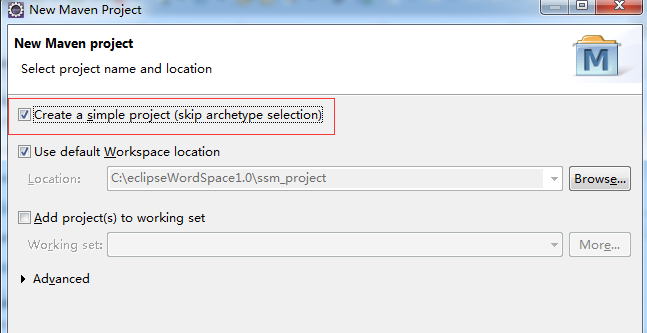
4、输出项目名,包(Packaging,如果只是普通的项目,选jar就好了,如果是web项目就选war,这里是web项目,所以选择war)

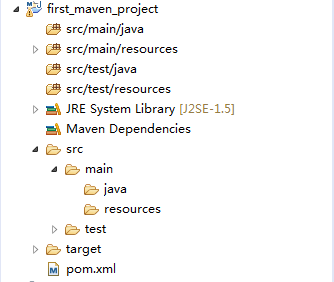
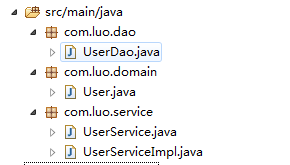
5、创建好的目录如下:
6、添加包的依赖,编辑pom.xml文件添加如下依赖:
<project xmlns="http://maven.apache.org/POM/4.0.0" xmlns:xsi="http://www.w3.org/2001/XMLSchema-instance" xsi:schemaLocation="http://maven.apache.org/POM/4.0.0 http://maven.apache.org/xsd/maven-4.0.0.xsd">
  <modelVersion>4.0.0</modelVersion>
  <groupId>com.luo</groupId>
  <artifactId>first_maven_project</artifactId>
  <version>0.0.1-SNAPSHOT</version>
  <packaging>war</packaging>

  <properties>
        <!-- spring版本号 -->
        <spring.version>3.2.8.RELEASE</spring.version>
        <!-- log4j日志文件管理包版本 -->
        <slf4j.version>1.6.6</slf4j.version>
        <log4j.version>1.2.12</log4j.version>
        <!-- junit版本号 -->
        <junit.version>4.10</junit.version>
        <!-- mybatis版本号 -->
        <mybatis.version>3.2.1</mybatis.version>
  </properties>

  <dependencies>
        <!-- 添加Spring依赖 -->
        <dependency>
            <groupId>org.springframework</groupId>
            <artifactId>spring-core</artifactId>
            <version>${spring.version}</version>
        </dependency>
        <dependency>
            <groupId>org.springframework</groupId>
            <artifactId>spring-webmvc</artifactId>
            <version>${spring.version}</version>
        </dependency>
        <dependency>
            <groupId>org.springframework</groupId>
            <artifactId>spring-context</artifactId>
            <version>${spring.version}</version>
        </dependency>
        <dependency>
            <groupId>org.springframework</groupId>
            <artifactId>spring-context-support</artifactId>
            <version>${spring.version}</version>
        </dependency>
        <dependency>
            <groupId>org.springframework</groupId>
            <artifactId>spring-aop</artifactId>
            <version>${spring.version}</version>
        </dependency>
        <dependency>
            <groupId>org.springframework</groupId>
            <artifactId>spring-aspects</artifactId>
            <version>${spring.version}</version>
        </dependency>
        <dependency>
            <groupId>org.springframework</groupId>
            <artifactId>spring-tx</artifactId>
            <version>${spring.version}</version>
        </dependency>
        <dependency>
            <groupId>org.springframework</groupId>
            <artifactId>spring-jdbc</artifactId>
            <version>${spring.version}</version>
        </dependency>
        <dependency>
            <groupId>org.springframework</groupId>
            <artifactId>spring-web</artifactId>
            <version>${spring.version}</version>
        </dependency>

        <!--单元测试依赖 -->
        <dependency>
            <groupId>junit</groupId>
            <artifactId>junit</artifactId>
            <version>${junit.version}</version>
            <scope>test</scope>
        </dependency>

        <!-- 日志文件管理包 -->
        <!-- log start -->
        <dependency>
            <groupId>log4j</groupId>
            <artifactId>log4j</artifactId>
            <version>${log4j.version}</version>
        </dependency>
        <dependency>
            <groupId>org.slf4j</groupId>
            <artifactId>slf4j-api</artifactId>
            <version>${slf4j.version}</version>
        </dependency>
        <dependency>
            <groupId>org.slf4j</groupId>
            <artifactId>slf4j-log4j12</artifactId>
            <version>${slf4j.version}</version>
        </dependency>
        <!-- log end -->

        <!--spring单元测试依赖 -->
        <dependency>
            <groupId>org.springframework</groupId>
            <artifactId>spring-test</artifactId>
            <version>${spring.version}</version>
            <scope>test</scope>
        </dependency>

        <!--mybatis依赖 -->
        <dependency>
            <groupId>org.mybatis</groupId>
            <artifactId>mybatis</artifactId>
            <version>${mybatis.version}</version>
        </dependency>

        <!-- mybatis/spring包 -->
        <dependency>
            <groupId>org.mybatis</groupId>
            <artifactId>mybatis-spring</artifactId>
            <version>1.2.0</version>
        </dependency>

        <!-- mysql驱动包 -->
        <dependency>
            <groupId>mysql</groupId>
            <artifactId>mysql-connector-java</artifactId>
            <version>5.1.29</version>
        </dependency>
    </dependencies>

</project>
- 1
- 2
- 3
- 4
- 5
- 6
- 7
- 8
- 9
- 10
- 11
- 12
- 13
- 14
- 15
- 16
- 17
- 18
- 19
- 20
- 21
- 22
- 23
- 24
- 25
- 26
- 27
- 28
- 29
- 30
- 31
- 32
- 33
- 34
- 35
- 36
- 37
- 38
- 39
- 40
- 41
- 42
- 43
- 44
- 45
- 46
- 47
- 48
- 49
- 50
- 51
- 52
- 53
- 54
- 55
- 56
- 57
- 58
- 59
- 60
- 61
- 62
- 63
- 64
- 65
- 66
- 67
- 68
- 69
- 70
- 71
- 72
- 73
- 74
- 75
- 76
- 77
- 78
- 79
- 80
- 81
- 82
- 83
- 84
- 85
- 86
- 87
- 88
- 89
- 90
- 91
- 92
- 93
- 94
- 95
- 96
- 97
- 98
- 99
- 100
- 101
- 102
- 103
- 104
- 105
- 106
- 107
- 108
- 109
- 110
- 111
- 112
- 113
- 114
- 115
- 116
- 117
- 118
- 119
- 120
- 121
- 122
- 123
- 124
- 125
7、配置文件:
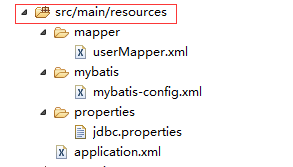
7.1、mybatis包下添加mybatis-config.xml文件(mybatis配置文件):
<?xml version="1.0" encoding="UTF-8"?>
<!DOCTYPE configuration PUBLIC "-//mybatis.org//DTD Config 3.0//EN"
"http://mybatis.org/dtd/mybatis-3-config.dtd">
<configuration>
</configuration>
- 1
- 2
- 3
- 4
- 5
- 1
- 2
- 3
- 4
- 5
7.2、properties包下添加jdbc.properties文件(数据源配置文件):
jdbc_driverClassName=com.mysql.jdbc.Driver
jdbc_url=jdbc:mysql://localhost:3306/luo
jdbc_username=root
jdbc_password=root
- 1
- 2
- 3
- 4
- 1
- 2
- 3
- 4
7.3、mapper包下userMapper.xml配置文件(表映射文件):
<?xml version="1.0" encoding="UTF-8"?>
<!DOCTYPE mapper PUBLIC "-//mybatis.org//DTD Mapper 3.0//EN"
"http://mybatis.org/dtd/mybatis-3-mapper.dtd">
<mapper namespace="com.luo.dao.UserDao">
<!--设置domain类和数据库中表的字段一一对应,注意数据库字段和domain类中的字段名称不致,此处一定要!-->
    <resultMap id="BaseResultMap" type="com.luo.domain.User">
        <id column="USER_ID" property="userId" jdbcType="INTEGER" />
        <result column="USER_NAME" property="userName" jdbcType="CHAR" />
        <result column="USER_PASSWORD" property="userPassword" jdbcType="CHAR" />
    </resultMap>
    <!-- 查询单条记录 -->
    <select id="selectUserById" parameterType="int" resultMap="BaseResultMap">
        SELECT * FROM t_user WHERE USER_ID = #{userId}
    </select>
</mapper>
- 1
- 2
- 3
- 4
- 5
- 6
- 7
- 8
- 9
- 10
- 11
- 12
- 13
- 14
- 15
- 1
- 2
- 3
- 4
- 5
- 6
- 7
- 8
- 9
- 10
- 11
- 12
- 13
- 14
- 15
7.4、spring配置文件application.xml:
<?xml version="1.0" encoding="UTF-8"?>
<beans xmlns="http://www.springframework.org/schema/beans"
    xmlns:xsi="http://www.w3.org/2001/XMLSchema-instance" xmlns:context="http://www.springframework.org/schema/context"
    xmlns:aop="http://www.springframework.org/schema/aop"
    xsi:schemaLocation="
           http://www.springframework.org/schema/beans
           http://www.springframework.org/schema/beans/spring-beans-3.0.xsd
           http://www.springframework.org/schema/aop
           http://www.springframework.org/schema/aop/spring-aop-3.0.xsd
           http://www.springframework.org/schema/context
           http://www.springframework.org/schema/context/spring-context-3.0.xsd">

     <!-- 引入jdbc配置文件 -->
     <bean id="propertyConfigurer" class="org.springframework.beans.factory.config.PropertyPlaceholderConfigurer">
        <property name="locations">
            <list>
               <value>classpath:properties/*.properties</value>
                <!--要是有多个配置文件,只需在这里继续添加即可 -->
            </list>
        </property>
    </bean>


    <!-- 配置数据源 -->
    <bean id="dataSource"
        class="org.springframework.jdbc.datasource.DriverManagerDataSource">
        <!-- 不使用properties来配置 -->
        <!-- <property name="driverClassName" value="com.mysql.jdbc.Driver" />
            <property name="url" value="jdbc:mysql://localhost:3306/learning" />
            <property name="username" value="root" />
            <property name="password" value="christmas258@" /> -->
       <!-- 使用properties来配置 -->
        <property name="driverClassName">
            <value>${jdbc_driverClassName}</value>
        </property>
        <property name="url">
            <value>${jdbc_url}</value>
        </property>
        <property name="username">
            <value>${jdbc_username}</value>
        </property>
        <property name="password">
            <value>${jdbc_password}</value>
        </property>
    </bean>

    <!-- 自动扫描了所有的XxxxMapper.xml对应的mapper接口文件,这样就不用一个一个手动配置Mpper的映射了,只要Mapper接口类和Mapper映射文件对应起来就可以了。 -->
    <bean class="org.mybatis.spring.mapper.MapperScannerConfigurer">
        <property name="basePackage"
            value="com.luo.dao" />
    </bean>

    <!-- 配置Mybatis的文件 ,mapperLocations配置**Mapper.xml文件位置,configLocation配置mybatis-config文件位置-->
    <bean id="sqlSessionFactory" class="org.mybatis.spring.SqlSessionFactoryBean">
        <property name="dataSource" ref="dataSource" />
        <property name="mapperLocations" value="classpath:mapper/*.xml"/>
        <property name="configLocation" value="classpath:mybatis/mybatis-config.xml" />
        <!-- <property name="typeAliasesPackage" value="com.tiantian.ckeditor.model"
            /> -->
    </bean>

    <!-- 自动扫描注解的bean -->
    <context:component-scan base-package="com.luo.service" />

</beans>
- 1
- 2
- 3
- 4
- 5
- 6
- 7
- 8
- 9
- 10
- 11
- 12
- 13
- 14
- 15
- 16
- 17
- 18
- 19
- 20
- 21
- 22
- 23
- 24
- 25
- 26
- 27
- 28
- 29
- 30
- 31
- 32
- 33
- 34
- 35
- 36
- 37
- 38
- 39
- 40
- 41
- 42
- 43
- 44
- 45
- 46
- 47
- 48
- 49
- 50
- 51
- 52
- 53
- 54
- 55
- 56
- 57
- 58
- 59
- 60
- 61
- 62
- 63
- 64
- 65
- 66
- 67
8、接口和类的配置:
8.1、com.luo.domain下添加User.Java文件:
package com.luo.domain;

public class User {

    private Integer userId;
    private String userName;
    private String userPassword;


    public Integer getUserId() {
        return userId;
    }

    public void setUserId(Integer userId) {
        this.userId = userId;
    }

    public String getUserName() {
        return userName;
    }

    public void setUserName(String userName) {
        this.userName = userName;
    }

    public String getUserPassword() {
        return userPassword;
    }

    public void setUserPassword(String userPassword) {
        this.userPassword = userPassword;
    }

}
- 1
- 2
- 3
- 4
- 5
- 6
- 7
- 8
- 9
- 10
- 11
- 12
- 13
- 14
- 15
- 16
- 17
- 18
- 19
- 20
- 21
- 22
- 23
- 24
- 25
- 26
- 27
- 28
- 29
- 30
- 31
- 32
- 33
- 34
- 35
- 1
- 2
- 3
- 4
- 5
- 6
- 7
- 8
- 9
- 10
- 11
- 12
- 13
- 14
- 15
- 16
- 17
- 18
- 19
- 20
- 21
- 22
- 23
- 24
- 25
- 26
- 27
- 28
- 29
- 30
- 31
- 32
- 33
- 34
- 35
8.2、com.luo.dao下添加UserDao.java文件:
package com.luo.dao;

import com.luo.domain.User;

public interface UserDao {

    /**
     * @param userId
     * @return User
     */
    public User selectUserById(Integer userId);

}
- 1
- 2
- 3
- 4
- 5
- 6
- 7
- 8
- 9
- 10
- 11
- 12
- 13
- 14
- 1
- 2
- 3
- 4
- 5
- 6
- 7
- 8
- 9
- 10
- 11
- 12
- 13
- 14
8.3、com.luo.service下添加UserService.java接口和UserServiceImpl实现类:
package com.luo.service;

import com.luo.domain.User;

public interface UserService {
    User selectUserById(Integer userId);
}
- 1
- 2
- 3
- 4
- 5
- 6
- 7
- 8
- 1
- 2
- 3
- 4
- 5
- 6
- 7
- 8
package com.luo.service;

import org.springframework.beans.factory.annotation.Autowired;
import org.springframework.stereotype.Service;
import com.luo.dao.UserDao;
import com.luo.domain.User;

@Service
public class UserServiceImpl implements UserService {

    @Autowired
    private UserDao userDao;

    public User selectUserById(Integer userId) {
        return userDao.selectUserById(userId);

    }
}
- 1
- 2
- 3
- 4
- 5
- 6
- 7
- 8
- 9
- 10
- 11
- 12
- 13
- 14
- 15
- 16
- 17
- 18
- 19
- 1
- 2
- 3
- 4
- 5
- 6
- 7
- 8
- 9
- 10
- 11
- 12
- 13
- 14
- 15
- 16
- 17
- 18
- 19
9、单元测试
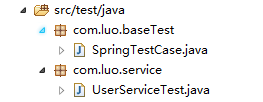
9.1、com.luo.baseTest下添加SpringTestCase.java:
package com.luo.baseTest;

import org.junit.runner.RunWith;
import org.springframework.test.context.ContextConfiguration;
import org.springframework.test.context.junit4.AbstractJUnit4SpringContextTests;
import org.springframework.test.context.junit4.SpringJUnit4ClassRunner;

//指定bean注入的配置文件
@ContextConfiguration(locations = { "classpath:application.xml" })
//使用标准的JUnit @RunWith注释来告诉JUnit使用Spring TestRunner
@RunWith(SpringJUnit4ClassRunner.class)
public class SpringTestCase extends AbstractJUnit4SpringContextTests {

}
- 1
- 2
- 3
- 4
- 5
- 6
- 7
- 8
- 9
- 10
- 11
- 12
- 13
- 14
- 15
- 1
- 2
- 3
- 4
- 5
- 6
- 7
- 8
- 9
- 10
- 11
- 12
- 13
- 14
- 15
9.2、com.luo.service添加UserServiceTest.java:
package com.luo.service;

import org.junit.Test;
import org.springframework.beans.factory.annotation.Autowired;
import com.luo.baseTest.SpringTestCase;
import com.luo.domain.User;

public class UserServiceTest extends SpringTestCase {

    @Autowired
    private UserService userService;

    @Test
    public void selectUserByIdTest(){
        User user = userService.selectUserById(1);
        System.out.println(user.getUserName() + ":" + user.getUserPassword());
    }
}
- 1
- 2
- 3
- 4
- 5
- 6
- 7
- 8
- 9
- 10
- 11
- 12
- 13
- 14
- 15
- 16
- 17
- 18
- 19
- 1
- 2
- 3
- 4
- 5
- 6
- 7
- 8
- 9
- 10
- 11
- 12
- 13
- 14
- 15
- 16
- 17
- 18
- 19
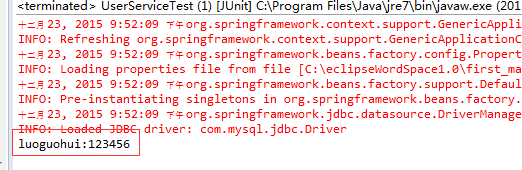
9.3、运行单元测试,UserServiceTest右键Run As –>Junit Test,运行结果:
下面加入springmvc,并转换maven工程为web项目
10、转换成web项目:
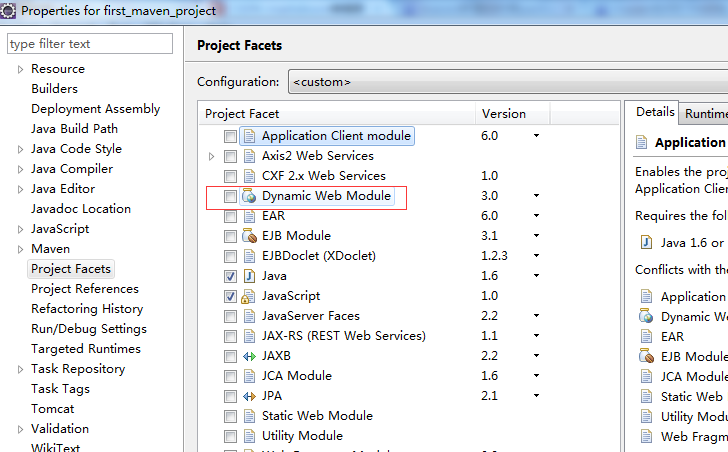
如果上面webapp为空的,说明这个项目还不是web项目:
接下来打开如下页面。将红框里面的勾去掉,确定(OK):
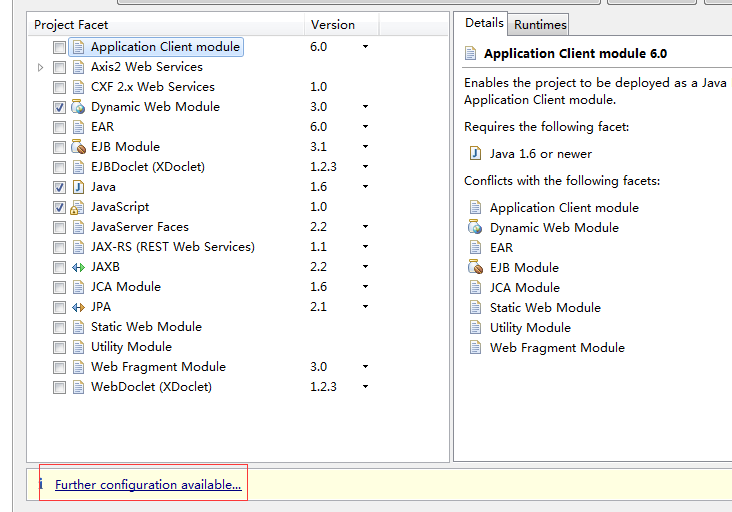
然后重新打开刚刚那个页面,把Dynamic web Module勾上,就会看到红框的内容,点击:
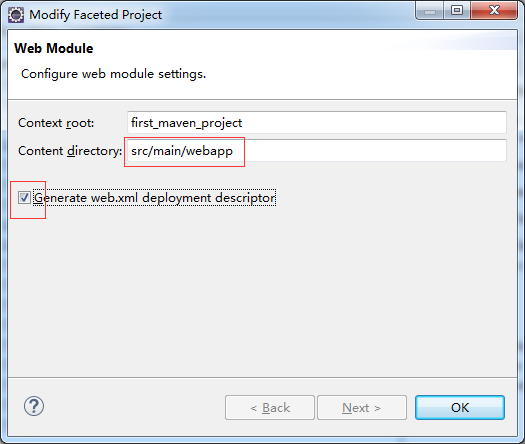
然后配置如下:
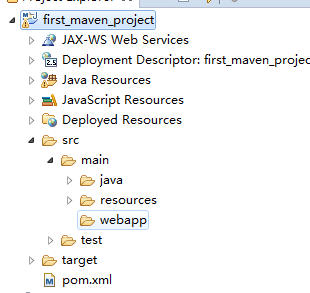
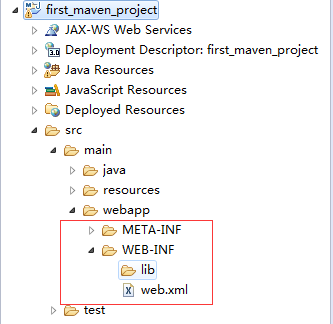
那么webapp下就会生成这些东西:
11、配置springmvc
11.1、pom.xml文件添加依赖,修改后配置如下:
<project xmlns="http://maven.apache.org/POM/4.0.0" xmlns:xsi="http://www.w3.org/2001/XMLSchema-instance" xsi:schemaLocation="http://maven.apache.org/POM/4.0.0 http://maven.apache.org/xsd/maven-4.0.0.xsd">
  <modelVersion>4.0.0</modelVersion>
  <groupId>com.luo</groupId>
  <artifactId>first_maven_project</artifactId>
  <version>0.0.1-SNAPSHOT</version>
  <packaging>war</packaging>

  <properties>
        <!-- spring版本号 -->
        <spring.version>3.2.8.RELEASE</spring.version>
        <!-- junit版本号 -->
        <junit.version>4.10</junit.version>
        <!-- mybatis版本号 -->
        <mybatis.version>3.2.1</mybatis.version>
  </properties>

  <dependencies>
        <!-- 添加Spring依赖 -->
        <dependency>
            <groupId>org.springframework</groupId>
            <artifactId>spring-core</artifactId>
            <version>${spring.version}</version>
        </dependency>
        <dependency>
            <groupId>org.springframework</groupId>
            <artifactId>spring-webmvc</artifactId>
            <version>${spring.version}</version>
        </dependency>
        <dependency>
            <groupId>org.springframework</groupId>
            <artifactId>spring-context</artifactId>
            <version>${spring.version}</version>
        </dependency>
        <dependency>
            <groupId>org.springframework</groupId>
            <artifactId>spring-context-support</artifactId>
            <version>${spring.version}</version>
        </dependency>
        <dependency>
            <groupId>org.springframework</groupId>
            <artifactId>spring-aop</artifactId>
            <version>${spring.version}</version>
        </dependency>
        <dependency>
            <groupId>org.springframework</groupId>
            <artifactId>spring-aspects</artifactId>
            <version>${spring.version}</version>
        </dependency>
        <dependency>
            <groupId>org.springframework</groupId>
            <artifactId>spring-tx</artifactId>
            <version>${spring.version}</version>
        </dependency>
        <dependency>
            <groupId>org.springframework</groupId>
            <artifactId>spring-jdbc</artifactId>
            <version>${spring.version}</version>
        </dependency>
        <dependency>
            <groupId>org.springframework</groupId>
            <artifactId>spring-web</artifactId>
            <version>${spring.version}</version>
        </dependency>

        <!--单元测试依赖 -->
        <dependency>
            <groupId>junit</groupId>
            <artifactId>junit</artifactId>
            <version>${junit.version}</version>
            <scope>test</scope>
        </dependency>

        <!--spring单元测试依赖 -->
        <dependency>
            <groupId>org.springframework</groupId>
            <artifactId>spring-test</artifactId>
            <version>${spring.version}</version>
            <scope>test</scope>
        </dependency>

        <!--mybatis依赖 -->
        <dependency>
            <groupId>org.mybatis</groupId>
            <artifactId>mybatis</artifactId>
            <version>${mybatis.version}</version>
        </dependency>

        <!-- mybatis/spring包 -->
        <dependency>
            <groupId>org.mybatis</groupId>
            <artifactId>mybatis-spring</artifactId>
            <version>1.2.0</version>
        </dependency>

        <!-- mysql驱动包 -->
        <dependency>
            <groupId>mysql</groupId>
            <artifactId>mysql-connector-java</artifactId>
            <version>5.1.29</version>
        </dependency>

        <!-- javaee-api包 注意和项目使用的JDK版本对应 -->
        <dependency>
            <groupId>javax</groupId>
            <artifactId>javaee-api</artifactId>
            <version>6.0</version>
            <scope>provided</scope>
        </dependency>

        <!-- javaee-web-api包 注意和项目使用的JDK版本对应 -->
        <dependency>
            <groupId>javax</groupId>
            <artifactId>javaee-web-api</artifactId>
            <version>6.0</version>
            <scope>provided</scope>
        </dependency>

    </dependencies>

</project>
- 1
- 2
- 3
- 4
- 5
- 6
- 7
- 8
- 9
- 10
- 11
- 12
- 13
- 14
- 15
- 16
- 17
- 18
- 19
- 20
- 21
- 22
- 23
- 24
- 25
- 26
- 27
- 28
- 29
- 30
- 31
- 32
- 33
- 34
- 35
- 36
- 37
- 38
- 39
- 40
- 41
- 42
- 43
- 44
- 45
- 46
- 47
- 48
- 49
- 50
- 51
- 52
- 53
- 54
- 55
- 56
- 57
- 58
- 59
- 60
- 61
- 62
- 63
- 64
- 65
- 66
- 67
- 68
- 69
- 70
- 71
- 72
- 73
- 74
- 75
- 76
- 77
- 78
- 79
- 80
- 81
- 82
- 83
- 84
- 85
- 86
- 87
- 88
- 89
- 90
- 91
- 92
- 93
- 94
- 95
- 96
- 97
- 98
- 99
- 100
- 101
- 102
- 103
- 104
- 105
- 106
- 107
- 108
- 109
- 110
- 111
- 112
- 113
- 114
- 115
- 116
- 117
- 118
- 119
- 120
其实也就增加了下面两个
<!-- javaee-api包 注意和项目使用的JDK版本对应 -->
<dependency>
    <groupId>javax</groupId>
    <artifactId>javaee-api</artifactId>
    <version>6.0</version>
    <scope>provided</scope>
</dependency>

<!-- javaee-web-api包 注意和项目使用的JDK版本对应 -->
<dependency>
    <groupId>javax</groupId>
    <artifactId>javaee-web-api</artifactId>
    <version>6.0</version>
    <scope>provided</scope>
</dependency>
- 1
- 2
- 3
- 4
- 5
- 6
- 7
- 8
- 9
- 10
- 11
- 12
- 13
- 14
- 15
- 1
- 2
- 3
- 4
- 5
- 6
- 7
- 8
- 9
- 10
- 11
- 12
- 13
- 14
- 15
11.2、在src/main/resource中添加springmvc文件夹,然后添加文件spring-mvc.xml,内容如下:
<?xml version="1.0" encoding="UTF-8"?>
<beans xmlns="http://www.springframework.org/schema/beans"
  xmlns:p="http://www.springframework.org/schema/p"
  xmlns:xsi="http://www.w3.org/2001/XMLSchema-instance"
  xmlns:context="http://www.springframework.org/schema/context"
  xmlns:mvc="http://www.springframework.org/schema/mvc"
  xsi:schemaLocation="
    http://www.springframework.org/schema/beans
    http://www.springframework.org/schema/beans/spring-beans-3.2.xsd
    http://www.springframework.org/schema/context
    http://www.springframework.org/schema/context/spring-context-3.2.xsd
    http://www.springframework.org/schema/mvc
    http://www.springframework.org/schema/mvc/spring-mvc-3.2.xsd">

   <mvc:annotation-driven />
   <!-- 扫描controller(controller层注入) -->
   <context:component-scan base-package="com.luo.controller"/>

   <!-- 对模型视图添加前后缀 -->
   <bean id="viewResolver" class="org.springframework.web.servlet.view.InternalResourceViewResolver"
      p:prefix="/WEB-INF/view/" p:suffix=".jsp"/>
</beans>
- 1
- 2
- 3
- 4
- 5
- 6
- 7
- 8
- 9
- 10
- 11
- 12
- 13
- 14
- 15
- 16
- 17
- 18
- 19
- 20
- 21
- 22
- 1
- 2
- 3
- 4
- 5
- 6
- 7
- 8
- 9
- 10
- 11
- 12
- 13
- 14
- 15
- 16
- 17
- 18
- 19
- 20
- 21
- 22
11.3、配置web.xml
<?xml version="1.0" encoding="UTF-8"?>
<web-app xmlns:xsi="http://www.w3.org/2001/XMLSchema-instance"
    xmlns="http://java.sun.com/xml/ns/javaee" xmlns:web="http://java.sun.com/xml/ns/javaee/web-app_2_5.xsd"
    xsi:schemaLocation="http://java.sun.com/xml/ns/javaee http://java.sun.com/xml/ns/javaee/web-app_2_5.xsd"
    id="WebApp_ID" version="2.5">
    <display-name>Archetype Created Web Application</display-name>
   <!-- 起始欢迎界面 -->
    <welcome-file-list>
        <welcome-file>index.jsp</welcome-file>
    </welcome-file-list>

    <!-- 读取spring配置文件 -->
    <context-param>
        <param-name>contextConfigLocation</param-name>
        <param-value>classpath:application.xml</param-value>
    </context-param>
    <!-- 设计路径变量值 -->
    <context-param>
        <param-name>webAppRootKey</param-name>
        <param-value>springmvc.root</param-value>
    </context-param>


    <!-- Spring字符集过滤器 -->
    <filter>
        <filter-name>SpringEncodingFilter</filter-name>
        <filter-class>org.springframework.web.filter.CharacterEncodingFilter</filter-class>
        <init-param>
            <param-name>encoding</param-name>
            <param-value>UTF-8</param-value>
        </init-param>
        <init-param>
            <param-name>forceEncoding</param-name>
            <param-value>true</param-value>
        </init-param>
    </filter>
    <filter-mapping>
        <filter-name>SpringEncodingFilter</filter-name>
        <url-pattern>/*</url-pattern>
    </filter-mapping>

    <listener>
        <listener-class>org.springframework.web.context.ContextLoaderListener</listener-class>
    </listener>

    <!-- springMVC核心配置 -->
    <servlet>
        <servlet-name>dispatcherServlet</servlet-name>
        <servlet-class>org.springframework.web.servlet.DispatcherServlet</servlet-class>
        <init-param>
            <param-name>contextConfigLocation</param-name>
            <!--spingMVC的配置路径  -->
            <param-value>classpath:springmvc/spring-mvc.xml</param-value>
        </init-param>
        <load-on-startup>1</load-on-startup>
    </servlet>
    <!-- 拦截设置 -->
    <servlet-mapping>
        <servlet-name>dispatcherServlet</servlet-name>
        <url-pattern>/</url-pattern>
    </servlet-mapping>

    <!-- 错误跳转页面 -->
    <error-page>
        <!-- 路径不正确 -->
        <error-code>404</error-code>
        <location>/WEB-INF/errorpage/404.jsp</location>
    </error-page>
    <error-page>
        <!-- 没有访问权限,访问被禁止 -->
        <error-code>405</error-code>
        <location>/WEB-INF/errorpage/405.jsp</location>
    </error-page>
    <error-page>
        <!-- 内部错误 -->
        <error-code>500</error-code>
        <location>/WEB-INF/errorpage/500.jsp</location>
    </error-page>
</web-app>
- 1
- 2
- 3
- 4
- 5
- 6
- 7
- 8
- 9
- 10
- 11
- 12
- 13
- 14
- 15
- 16
- 17
- 18
- 19
- 20
- 21
- 22
- 23
- 24
- 25
- 26
- 27
- 28
- 29
- 30
- 31
- 32
- 33
- 34
- 35
- 36
- 37
- 38
- 39
- 40
- 41
- 42
- 43
- 44
- 45
- 46
- 47
- 48
- 49
- 50
- 51
- 52
- 53
- 54
- 55
- 56
- 57
- 58
- 59
- 60
- 61
- 62
- 63
- 64
- 65
- 66
- 67
- 68
- 69
- 70
- 71
- 72
- 73
- 74
- 75
- 76
- 77
- 78
- 79
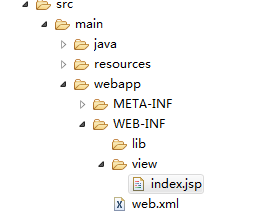
11.4、添加index.jsp,在src/main/webapp/WEB-INF下新建一个文件夹view,添加一个index.jsp,内容如下:
<%@ page language="java" contentType="text/html; charset=UTF-8" pageEncoding="UTF-8"%>
<html>
<body>
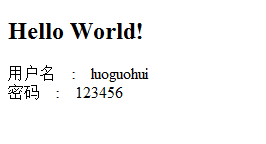
<h2>Hello World!</h2>
用户名: ${user.userName}<br>
密码:${user.userPassword}<br>
</body>
</html>
- 1
- 2
- 3
- 4
- 5
- 6
- 7
- 8
- 1
- 2
- 3
- 4
- 5
- 6
- 7
- 8
11.5、写controller
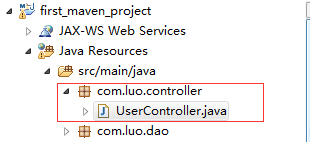
在src/main/java下新建一个包com.luo.controller.然后新建一个类UserController.java,其内容如下
package com.luo.controller;

import javax.annotation.Resource;
import org.springframework.stereotype.Controller;
import org.springframework.web.bind.annotation.RequestMapping;
import org.springframework.web.servlet.ModelAndView;
import com.luo.domain.User;
import com.luo.service.UserService;

@Controller
public class UserController {

    @Resource
    private UserService userService;

    @RequestMapping("/")
    public ModelAndView getIndex(){
        ModelAndView mav = new ModelAndView("index");
        User user = userService.selectUserById(1);
        mav.addObject("user", user);
        return mav;
    }
}
- 1
- 2
- 3
- 4
- 5
- 6
- 7
- 8
- 9
- 10
- 11
- 12
- 13
- 14
- 15
- 16
- 17
- 18
- 19
- 20
- 21
- 22
- 23
- 24
- 1
- 2
- 3
- 4
- 5
- 6
- 7
- 8
- 9
- 10
- 11
- 12
- 13
- 14
- 15
- 16
- 17
- 18
- 19
- 20
- 21
- 22
- 23
- 24
11.6 运行!!!!完成!
12、源码下载
http://download.csdn.net/detail/u013142781/9376381
13、可能会遇到的错
之前有个兄弟按照我的配置,但是发现pom.xml文件报如下错误:
Cannot detect Web Project version. Please specify version of Web Project through <version> configuration property of war plugin. E.g.: <plugin> <artifactId>maven-war-plugin</artifactId> <configuration> <version>3.0<ersion> </configuration> </plugin>
- 1
- 1
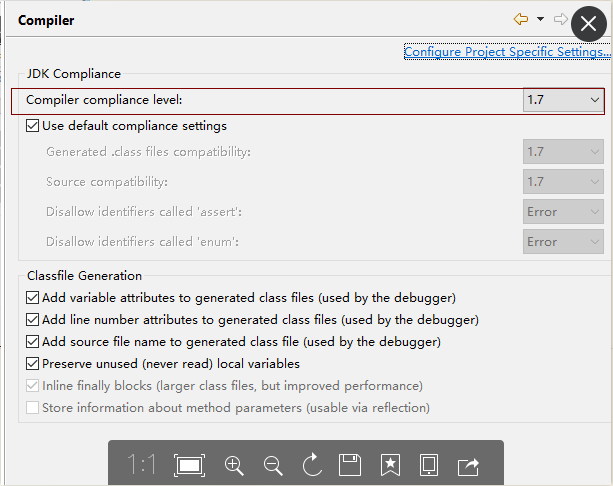
解决方案是,如下的三个地方jdk版本需要保持一致:
1、项目右键->属性->Java Compiler:
2、项目右键->属性->Project Facets:
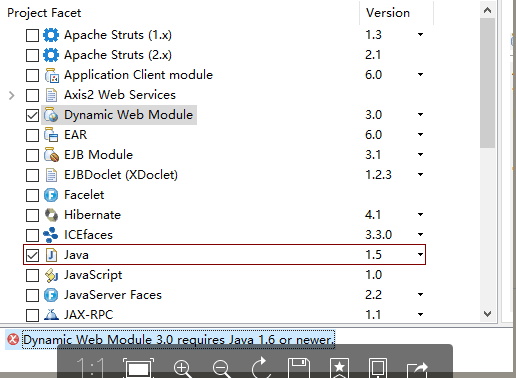
3、如果pom.xml配置了如下的插件的话:
<build>
 <plugins>
    <plugin>
      <artifactId>maven-compiler-plugin</artifactId>
      <configuration>
        <source>1.7</source>
        <target>1.7</target>
      </configuration>
    </plugin>
    <plugin>
      <artifactId>maven-war-plugin</artifactId>
      <version>2.4</version>
      <configuration>
        <version>3.0</version>
      </configuration>
    </plugin>
  </plugins>
  <finalName>webserver</finalName>
</build>
- 1
- 2
- 3
- 4
- 5
- 6
- 7
- 8
- 9
- 10
- 11
- 12
- 13
- 14
- 15
- 16
- 17
- 18
- 19
- 1
- 2
- 3
- 4
- 5
- 6
- 7
- 8
- 9
- 10
- 11
- 12
- 13
- 14
- 15
- 16
- 17
- 18
- 19
这里也要跟上面两个保持一致:
这篇文章主要讲解使用eclipse对Spirng+SpringMVC+Maven+Mybatis+MySQL项目搭建过程,包括里面步骤和里面的配置文件如何配置等等都会详细说明。
如果还没有搭建好环境(主要是Maven+MySQL的配置)的猿友可以参考博主以前的一篇文章:
http://blog.csdn.net/bryant_liu24/article/details/54292770
接下来马上进入项目搭建过程:
1、创建表,并插入数据:
CREATE TABLE `t_user` (
  `USER_ID` int(11) NOT NULL AUTO_INCREMENT,
  `USER_NAME` char(30) NOT NULL,
  `USER_PASSWORD` char(10) NOT NULL,
  PRIMARY KEY (`USER_ID`),
  KEY `IDX_NAME` (`USER_NAME`)
) ENGINE=InnoDB AUTO_INCREMENT=11 DEFAULT CHARSET=utf8
- 1
- 2
- 3
- 4
- 5
- 6
- 7
- 1
- 2
- 3
- 4
- 5
- 6
- 7
INSERT INTO t_user (USER_ID, USER_NAME, USER_PASSWORD) VALUES (1, 'luoguohui', '123456');
INSERT INTO t_user (USER_ID, USER_NAME, USER_PASSWORD) VALUES (2, 'zhangsan', '123456');
- 1
- 2
- 3
- 1
- 2
- 3
2、Maven工程创建
3、选择快速框架
4、输出项目名,包(Packaging,如果只是普通的项目,选jar就好了,如果是web项目就选war,这里是web项目,所以选择war)
5、创建好的目录如下:
6、添加包的依赖,编辑pom.xml文件添加如下依赖:
<project xmlns="http://maven.apache.org/POM/4.0.0" xmlns:xsi="http://www.w3.org/2001/XMLSchema-instance" xsi:schemaLocation="http://maven.apache.org/POM/4.0.0 http://maven.apache.org/xsd/maven-4.0.0.xsd">
  <modelVersion>4.0.0</modelVersion>
  <groupId>com.luo</groupId>
  <artifactId>first_maven_project</artifactId>
  <version>0.0.1-SNAPSHOT</version>
  <packaging>war</packaging>

  <properties>
        <!-- spring版本号 -->
        <spring.version>3.2.8.RELEASE</spring.version>
        <!-- log4j日志文件管理包版本 -->
        <slf4j.version>1.6.6</slf4j.version>
        <log4j.version>1.2.12</log4j.version>
        <!-- junit版本号 -->
        <junit.version>4.10</junit.version>
        <!-- mybatis版本号 -->
        <mybatis.version>3.2.1</mybatis.version>
  </properties>

  <dependencies>
        <!-- 添加Spring依赖 -->
        <dependency>
            <groupId>org.springframework</groupId>
            <artifactId>spring-core</artifactId>
            <version>${spring.version}</version>
        </dependency>
        <dependency>
            <groupId>org.springframework</groupId>
            <artifactId>spring-webmvc</artifactId>
            <version>${spring.version}</version>
        </dependency>
        <dependency>
            <groupId>org.springframework</groupId>
            <artifactId>spring-context</artifactId>
            <version>${spring.version}</version>
        </dependency>
        <dependency>
            <groupId>org.springframework</groupId>
            <artifactId>spring-context-support</artifactId>
            <version>${spring.version}</version>
        </dependency>
        <dependency>
            <groupId>org.springframework</groupId>
            <artifactId>spring-aop</artifactId>
            <version>${spring.version}</version>
        </dependency>
        <dependency>
            <groupId>org.springframework</groupId>
            <artifactId>spring-aspects</artifactId>
            <version>${spring.version}</version>
        </dependency>
        <dependency>
            <groupId>org.springframework</groupId>
            <artifactId>spring-tx</artifactId>
            <version>${spring.version}</version>
        </dependency>
        <dependency>
            <groupId>org.springframework</groupId>
            <artifactId>spring-jdbc</artifactId>
            <version>${spring.version}</version>
        </dependency>
        <dependency>
            <groupId>org.springframework</groupId>
            <artifactId>spring-web</artifactId>
            <version>${spring.version}</version>
        </dependency>

        <!--单元测试依赖 -->
        <dependency>
            <groupId>junit</groupId>
            <artifactId>junit</artifactId>
            <version>${junit.version}</version>
            <scope>test</scope>
        </dependency>

        <!-- 日志文件管理包 -->
        <!-- log start -->
        <dependency>
            <groupId>log4j</groupId>
            <artifactId>log4j</artifactId>
            <version>${log4j.version}</version>
        </dependency>
        <dependency>
            <groupId>org.slf4j</groupId>
            <artifactId>slf4j-api</artifactId>
            <version>${slf4j.version}</version>
        </dependency>
        <dependency>
            <groupId>org.slf4j</groupId>
            <artifactId>slf4j-log4j12</artifactId>
            <version>${slf4j.version}</version>
        </dependency>
        <!-- log end -->

        <!--spring单元测试依赖 -->
        <dependency>
            <groupId>org.springframework</groupId>
            <artifactId>spring-test</artifactId>
            <version>${spring.version}</version>
            <scope>test</scope>
        </dependency>

        <!--mybatis依赖 -->
        <dependency>
            <groupId>org.mybatis</groupId>
            <artifactId>mybatis</artifactId>
            <version>${mybatis.version}</version>
        </dependency>

        <!-- mybatis/spring包 -->
        <dependency>
            <groupId>org.mybatis</groupId>
            <artifactId>mybatis-spring</artifactId>
            <version>1.2.0</version>
        </dependency>

        <!-- mysql驱动包 -->
        <dependency>
            <groupId>mysql</groupId>
            <artifactId>mysql-connector-java</artifactId>
            <version>5.1.29</version>
        </dependency>
    </dependencies>

</project>
- 1
- 2
- 3
- 4
- 5
- 6
- 7
- 8
- 9
- 10
- 11
- 12
- 13
- 14
- 15
- 16
- 17
- 18
- 19
- 20
- 21
- 22
- 23
- 24
- 25
- 26
- 27
- 28
- 29
- 30
- 31
- 32
- 33
- 34
- 35
- 36
- 37
- 38
- 39
- 40
- 41
- 42
- 43
- 44
- 45
- 46
- 47
- 48
- 49
- 50
- 51
- 52
- 53
- 54
- 55
- 56
- 57
- 58
- 59
- 60
- 61
- 62
- 63
- 64
- 65
- 66
- 67
- 68
- 69
- 70
- 71
- 72
- 73
- 74
- 75
- 76
- 77
- 78
- 79
- 80
- 81
- 82
- 83
- 84
- 85
- 86
- 87
- 88
- 89
- 90
- 91
- 92
- 93
- 94
- 95
- 96
- 97
- 98
- 99
- 100
- 101
- 102
- 103
- 104
- 105
- 106
- 107
- 108
- 109
- 110
- 111
- 112
- 113
- 114
- 115
- 116
- 117
- 118
- 119
- 120
- 121
- 122
- 123
- 124
- 125
- 1
- 2
- 3
- 4
- 5
- 6
- 7
- 8
- 9
- 10
- 11
- 12
- 13
- 14
- 15
- 16
- 17
- 18
- 19
- 20
- 21
- 22
- 23
- 24
- 25
- 26
- 27
- 28
- 29
- 30
- 31
- 32
- 33
- 34
- 35
- 36
- 37
- 38
- 39
- 40
- 41
- 42
- 43
- 44
- 45
- 46
- 47
- 48
- 49
- 50
- 51
- 52
- 53
- 54
- 55
- 56
- 57
- 58
- 59
- 60
- 61
- 62
- 63
- 64
- 65
- 66
- 67
- 68
- 69
- 70
- 71
- 72
- 73
- 74
- 75
- 76
- 77
- 78
- 79
- 80
- 81
- 82
- 83
- 84
- 85
- 86
- 87
- 88
- 89
- 90
- 91
- 92
- 93
- 94
- 95
- 96
- 97
- 98
- 99
- 100
- 101
- 102
- 103
- 104
- 105
- 106
- 107
- 108
- 109
- 110
- 111
- 112
- 113
- 114
- 115
- 116
- 117
- 118
- 119
- 120
- 121
- 122
- 123
- 124
- 125
7、配置文件:
7.1、mybatis包下添加mybatis-config.xml文件(mybatis配置文件):
<?xml version="1.0" encoding="UTF-8"?>
<!DOCTYPE configuration PUBLIC "-//mybatis.org//DTD Config 3.0//EN"
"http://mybatis.org/dtd/mybatis-3-config.dtd">
<configuration>
</configuration>
- 1
- 2
- 3
- 4
- 5
- 1
- 2
- 3
- 4
- 5
7.2、properties包下添加jdbc.properties文件(数据源配置文件):
jdbc_driverClassName=com.mysql.jdbc.Driver
jdbc_url=jdbc:mysql://localhost:3306/luo
jdbc_username=root
jdbc_password=root
- 1
- 2
- 3
- 4
- 1
- 2
- 3
- 4
7.3、mapper包下userMapper.xml配置文件(表映射文件):
<?xml version="1.0" encoding="UTF-8"?>
<!DOCTYPE mapper PUBLIC "-//mybatis.org//DTD Mapper 3.0//EN"
"http://mybatis.org/dtd/mybatis-3-mapper.dtd">
<mapper namespace="com.luo.dao.UserDao">
<!--设置domain类和数据库中表的字段一一对应,注意数据库字段和domain类中的字段名称不致,此处一定要!-->
    <resultMap id="BaseResultMap" type="com.luo.domain.User">
        <id column="USER_ID" property="userId" jdbcType="INTEGER" />
        <result column="USER_NAME" property="userName" jdbcType="CHAR" />
        <result column="USER_PASSWORD" property="userPassword" jdbcType="CHAR" />
    </resultMap>
    <!-- 查询单条记录 -->
    <select id="selectUserById" parameterType="int" resultMap="BaseResultMap">
        SELECT * FROM t_user WHERE USER_ID = #{userId}
    </select>
</mapper>
- 1
- 2
- 3
- 4
- 5
- 6
- 7
- 8
- 9
- 10
- 11
- 12
- 13
- 14
- 15
- 1
- 2
- 3
- 4
- 5
- 6
- 7
- 8
- 9
- 10
- 11
- 12
- 13
- 14
- 15
7.4、spring配置文件application.xml:
<?xml version="1.0" encoding="UTF-8"?>
<beans xmlns="http://www.springframework.org/schema/beans"
    xmlns:xsi="http://www.w3.org/2001/XMLSchema-instance" xmlns:context="http://www.springframework.org/schema/context"
    xmlns:aop="http://www.springframework.org/schema/aop"
    xsi:schemaLocation="
           http://www.springframework.org/schema/beans
           http://www.springframework.org/schema/beans/spring-beans-3.0.xsd
           http://www.springframework.org/schema/aop
           http://www.springframework.org/schema/aop/spring-aop-3.0.xsd
           http://www.springframework.org/schema/context
           http://www.springframework.org/schema/context/spring-context-3.0.xsd">

     <!-- 引入jdbc配置文件 -->
     <bean id="propertyConfigurer" class="org.springframework.beans.factory.config.PropertyPlaceholderConfigurer">
        <property name="locations">
            <list>
               <value>classpath:properties/*.properties</value>
                <!--要是有多个配置文件,只需在这里继续添加即可 -->
            </list>
        </property>
    </bean>


    <!-- 配置数据源 -->
    <bean id="dataSource"
        class="org.springframework.jdbc.datasource.DriverManagerDataSource">
        <!-- 不使用properties来配置 -->
        <!-- <property name="driverClassName" value="com.mysql.jdbc.Driver" />
            <property name="url" value="jdbc:mysql://localhost:3306/learning" />
            <property name="username" value="root" />
            <property name="password" value="christmas258@" /> -->
       <!-- 使用properties来配置 -->
        <property name="driverClassName">
            <value>${jdbc_driverClassName}</value>
        </property>
        <property name="url">
            <value>${jdbc_url}</value>
        </property>
        <property name="username">
            <value>${jdbc_username}</value>
        </property>
        <property name="password">
            <value>${jdbc_password}</value>
        </property>
    </bean>

    <!-- 自动扫描了所有的XxxxMapper.xml对应的mapper接口文件,这样就不用一个一个手动配置Mpper的映射了,只要Mapper接口类和Mapper映射文件对应起来就可以了。 -->
    <bean class="org.mybatis.spring.mapper.MapperScannerConfigurer">
        <property name="basePackage"
            value="com.luo.dao" />
    </bean>

    <!-- 配置Mybatis的文件 ,mapperLocations配置**Mapper.xml文件位置,configLocation配置mybatis-config文件位置-->
    <bean id="sqlSessionFactory" class="org.mybatis.spring.SqlSessionFactoryBean">
        <property name="dataSource" ref="dataSource" />
        <property name="mapperLocations" value="classpath:mapper/*.xml"/>
        <property name="configLocation" value="classpath:mybatis/mybatis-config.xml" />
        <!-- <property name="typeAliasesPackage" value="com.tiantian.ckeditor.model"
            /> -->
    </bean>

    <!-- 自动扫描注解的bean -->
    <context:component-scan base-package="com.luo.service" />

</beans>
- 1
- 2
- 3
- 4
- 5
- 6
- 7
- 8
- 9
- 10
- 11
- 12
- 13
- 14
- 15
- 16
- 17
- 18
- 19
- 20
- 21
- 22
- 23
- 24
- 25
- 26
- 27
- 28
- 29
- 30
- 31
- 32
- 33
- 34
- 35
- 36
- 37
- 38
- 39
- 40
- 41
- 42
- 43
- 44
- 45
- 46
- 47
- 48
- 49
- 50
- 51
- 52
- 53
- 54
- 55
- 56
- 57
- 58
- 59
- 60
- 61
- 62
- 63
- 64
- 65
- 66
- 67
- 1
- 2
- 3
- 4
- 5
- 6
- 7
- 8
- 9
- 10
- 11
- 12
- 13
- 14
- 15
- 16
- 17
- 18
- 19
- 20
- 21
- 22
- 23
- 24
- 25
- 26
- 27
- 28
- 29
- 30
- 31
- 32
- 33
- 34
- 35
- 36
- 37
- 38
- 39
- 40
- 41
- 42
- 43
- 44
- 45
- 46
- 47
- 48
- 49
- 50
- 51
- 52
- 53
- 54
- 55
- 56
- 57
- 58
- 59
- 60
- 61
- 62
- 63
- 64
- 65
- 66
- 67
8、接口和类的配置:
8.1、com.luo.domain下添加User.Java文件:
package com.luo.domain;

public class User {

    private Integer userId;
    private String userName;
    private String userPassword;


    public Integer getUserId() {
        return userId;
    }

    public void setUserId(Integer userId) {
        this.userId = userId;
    }

    public String getUserName() {
        return userName;
    }

    public void setUserName(String userName) {
        this.userName = userName;
    }

    public String getUserPassword() {
        return userPassword;
    }

    public void setUserPassword(String userPassword) {
        this.userPassword = userPassword;
    }

}
- 1
- 2
- 3
- 4
- 5
- 6
- 7
- 8
- 9
- 10
- 11
- 12
- 13
- 14
- 15
- 16
- 17
- 18
- 19
- 20
- 21
- 22
- 23
- 24
- 25
- 26
- 27
- 28
- 29
- 30
- 31
- 32
- 33
- 34
- 35
- 1
- 2
- 3
- 4
- 5
- 6
- 7
- 8
- 9
- 10
- 11
- 12
- 13
- 14
- 15
- 16
- 17
- 18
- 19
- 20
- 21
- 22
- 23
- 24
- 25
- 26
- 27
- 28
- 29
- 30
- 31
- 32
- 33
- 34
- 35
8.2、com.luo.dao下添加UserDao.java文件:
package com.luo.dao;

import com.luo.domain.User;

public interface UserDao {

    /**
     * @param userId
     * @return User
     */
    public User selectUserById(Integer userId);

}
- 1
- 2
- 3
- 4
- 5
- 6
- 7
- 8
- 9
- 10
- 11
- 12
- 13
- 14
- 1
- 2
- 3
- 4
- 5
- 6
- 7
- 8
- 9
- 10
- 11
- 12
- 13
- 14
8.3、com.luo.service下添加UserService.java接口和UserServiceImpl实现类:
package com.luo.service;

import com.luo.domain.User;

public interface UserService {
    User selectUserById(Integer userId);
}
- 1
- 2
- 3
- 4
- 5
- 6
- 7
- 8
- 1
- 2
- 3
- 4
- 5
- 6
- 7
- 8
package com.luo.service;

import org.springframework.beans.factory.annotation.Autowired;
import org.springframework.stereotype.Service;
import com.luo.dao.UserDao;
import com.luo.domain.User;

@Service
public class UserServiceImpl implements UserService {

    @Autowired
    private UserDao userDao;

    public User selectUserById(Integer userId) {
        return userDao.selectUserById(userId);

    }
}
- 1
- 2
- 3
- 4
- 5
- 6
- 7
- 8
- 9
- 10
- 11
- 12
- 13
- 14
- 15
- 16
- 17
- 18
- 19
- 1
- 2
- 3
- 4
- 5
- 6
- 7
- 8
- 9
- 10
- 11
- 12
- 13
- 14
- 15
- 16
- 17
- 18
- 19
9、单元测试
9.1、com.luo.baseTest下添加SpringTestCase.java:
package com.luo.baseTest;

import org.junit.runner.RunWith;
import org.springframework.test.context.ContextConfiguration;
import org.springframework.test.context.junit4.AbstractJUnit4SpringContextTests;
import org.springframework.test.context.junit4.SpringJUnit4ClassRunner;

//指定bean注入的配置文件
@ContextConfiguration(locations = { "classpath:application.xml" })
//使用标准的JUnit @RunWith注释来告诉JUnit使用Spring TestRunner
@RunWith(SpringJUnit4ClassRunner.class)
public class SpringTestCase extends AbstractJUnit4SpringContextTests {

}
- 1
- 2
- 3
- 4
- 5
- 6
- 7
- 8
- 9
- 10
- 11
- 12
- 13
- 14
- 15
- 1
- 2
- 3
- 4
- 5
- 6
- 7
- 8
- 9
- 10
- 11
- 12
- 13
- 14
- 15
9.2、com.luo.service添加UserServiceTest.java:
package com.luo.service;

import org.junit.Test;
import org.springframework.beans.factory.annotation.Autowired;
import com.luo.baseTest.SpringTestCase;
import com.luo.domain.User;

public class UserServiceTest extends SpringTestCase {

    @Autowired
    private UserService userService;

    @Test
    public void selectUserByIdTest(){
        User user = userService.selectUserById(1);
        System.out.println(user.getUserName() + ":" + user.getUserPassword());
    }
}
- 1
- 2
- 3
- 4
- 5
- 6
- 7
- 8
- 9
- 10
- 11
- 12
- 13
- 14
- 15
- 16
- 17
- 18
- 19
- 1
- 2
- 3
- 4
- 5
- 6
- 7
- 8
- 9
- 10
- 11
- 12
- 13
- 14
- 15
- 16
- 17
- 18
- 19
9.3、运行单元测试,UserServiceTest右键Run As –>Junit Test,运行结果:
下面加入springmvc,并转换maven工程为web项目
10、转换成web项目:
如果上面webapp为空的,说明这个项目还不是web项目:
接下来打开如下页面。将红框里面的勾去掉,确定(OK):
然后重新打开刚刚那个页面,把Dynamic web Module勾上,就会看到红框的内容,点击:
然后配置如下:
那么webapp下就会生成这些东西:
11、配置springmvc
11.1、pom.xml文件添加依赖,修改后配置如下:
<project xmlns="http://maven.apache.org/POM/4.0.0" xmlns:xsi="http://www.w3.org/2001/XMLSchema-instance" xsi:schemaLocation="http://maven.apache.org/POM/4.0.0 http://maven.apache.org/xsd/maven-4.0.0.xsd">
  <modelVersion>4.0.0</modelVersion>
  <groupId>com.luo</groupId>
  <artifactId>first_maven_project</artifactId>
  <version>0.0.1-SNAPSHOT</version>
  <packaging>war</packaging>

  <properties>
        <!-- spring版本号 -->
        <spring.version>3.2.8.RELEASE</spring.version>
        <!-- junit版本号 -->
        <junit.version>4.10</junit.version>
        <!-- mybatis版本号 -->
        <mybatis.version>3.2.1</mybatis.version>
  </properties>

  <dependencies>
        <!-- 添加Spring依赖 -->
        <dependency>
            <groupId>org.springframework</groupId>
            <artifactId>spring-core</artifactId>
            <version>${spring.version}</version>
        </dependency>
        <dependency>
            <groupId>org.springframework</groupId>
            <artifactId>spring-webmvc</artifactId>
            <version>${spring.version}</version>
        </dependency>
        <dependency>
            <groupId>org.springframework</groupId>
            <artifactId>spring-context</artifactId>
            <version>${spring.version}</version>
        </dependency>
        <dependency>
            <groupId>org.springframework</groupId>
            <artifactId>spring-context-support</artifactId>
            <version>${spring.version}</version>
        </dependency>
        <dependency>
            <groupId>org.springframework</groupId>
            <artifactId>spring-aop</artifactId>
            <version>${spring.version}</version>
        </dependency>
        <dependency>
            <groupId>org.springframework</groupId>
            <artifactId>spring-aspects</artifactId>
            <version>${spring.version}</version>
        </dependency>
        <dependency>
            <groupId>org.springframework</groupId>
            <artifactId>spring-tx</artifactId>
            <version>${spring.version}</version>
        </dependency>
        <dependency>
            <groupId>org.springframework</groupId>
            <artifactId>spring-jdbc</artifactId>
            <version>${spring.version}</version>
        </dependency>
        <dependency>
            <groupId>org.springframework</groupId>
            <artifactId>spring-web</artifactId>
            <version>${spring.version}</version>
        </dependency>

        <!--单元测试依赖 -->
        <dependency>
            <groupId>junit</groupId>
            <artifactId>junit</artifactId>
            <version>${junit.version}</version>
            <scope>test</scope>
        </dependency>

        <!--spring单元测试依赖 -->
        <dependency>
            <groupId>org.springframework</groupId>
            <artifactId>spring-test</artifactId>
            <version>${spring.version}</version>
            <scope>test</scope>
        </dependency>

        <!--mybatis依赖 -->
        <dependency>
            <groupId>org.mybatis</groupId>
            <artifactId>mybatis</artifactId>
            <version>${mybatis.version}</version>
        </dependency>

        <!-- mybatis/spring包 -->
        <dependency>
            <groupId>org.mybatis</groupId>
            <artifactId>mybatis-spring</artifactId>
            <version>1.2.0</version>
        </dependency>

        <!-- mysql驱动包 -->
        <dependency>
            <groupId>mysql</groupId>
            <artifactId>mysql-connector-java</artifactId>
            <version>5.1.29</version>
        </dependency>

        <!-- javaee-api包 注意和项目使用的JDK版本对应 -->
        <dependency>
            <groupId>javax</groupId>
            <artifactId>javaee-api</artifactId>
            <version>6.0</version>
            <scope>provided</scope>
        </dependency>

        <!-- javaee-web-api包 注意和项目使用的JDK版本对应 -->
        <dependency>
            <groupId>javax</groupId>
            <artifactId>javaee-web-api</artifactId>
            <version>6.0</version>
            <scope>provided</scope>
        </dependency>

    </dependencies>

</project>
- 1
- 2
- 3
- 4
- 5
- 6
- 7
- 8
- 9
- 10
- 11
- 12
- 13
- 14
- 15
- 16
- 17
- 18
- 19
- 20
- 21
- 22
- 23
- 24
- 25
- 26
- 27
- 28
- 29
- 30
- 31
- 32
- 33
- 34
- 35
- 36
- 37
- 38
- 39
- 40
- 41
- 42
- 43
- 44
- 45
- 46
- 47
- 48
- 49
- 50
- 51
- 52
- 53
- 54
- 55
- 56
- 57
- 58
- 59
- 60
- 61
- 62
- 63
- 64
- 65
- 66
- 67
- 68
- 69
- 70
- 71
- 72
- 73
- 74
- 75
- 76
- 77
- 78
- 79
- 80
- 81
- 82
- 83
- 84
- 85
- 86
- 87
- 88
- 89
- 90
- 91
- 92
- 93
- 94
- 95
- 96
- 97
- 98
- 99
- 100
- 101
- 102
- 103
- 104
- 105
- 106
- 107
- 108
- 109
- 110
- 111
- 112
- 113
- 114
- 115
- 116
- 117
- 118
- 119
- 120
- 1
- 2
- 3
- 4
- 5
- 6
- 7
- 8
- 9
- 10
- 11
- 12
- 13
- 14
- 15
- 16
- 17
- 18
- 19
- 20
- 21
- 22
- 23
- 24
- 25
- 26
- 27
- 28
- 29
- 30
- 31
- 32
- 33
- 34
- 35
- 36
- 37
- 38
- 39
- 40
- 41
- 42
- 43
- 44
- 45
- 46
- 47
- 48
- 49
- 50
- 51
- 52
- 53
- 54
- 55
- 56
- 57
- 58
- 59
- 60
- 61
- 62
- 63
- 64
- 65
- 66
- 67
- 68
- 69
- 70
- 71
- 72
- 73
- 74
- 75
- 76
- 77
- 78
- 79
- 80
- 81
- 82
- 83
- 84
- 85
- 86
- 87
- 88
- 89
- 90
- 91
- 92
- 93
- 94
- 95
- 96
- 97
- 98
- 99
- 100
- 101
- 102
- 103
- 104
- 105
- 106
- 107
- 108
- 109
- 110
- 111
- 112
- 113
- 114
- 115
- 116
- 117
- 118
- 119
- 120
其实也就增加了下面两个
<!-- javaee-api包 注意和项目使用的JDK版本对应 -->
<dependency>
    <groupId>javax</groupId>
    <artifactId>javaee-api</artifactId>
    <version>6.0</version>
    <scope>provided</scope>
</dependency>

<!-- javaee-web-api包 注意和项目使用的JDK版本对应 -->
<dependency>
    <groupId>javax</groupId>
    <artifactId>javaee-web-api</artifactId>
    <version>6.0</version>
    <scope>provided</scope>
</dependency>
- 1
- 2
- 3
- 4
- 5
- 6
- 7
- 8
- 9
- 10
- 11
- 12
- 13
- 14
- 15
- 1
- 2
- 3
- 4
- 5
- 6
- 7
- 8
- 9
- 10
- 11
- 12
- 13
- 14
- 15
11.2、在src/main/resource中添加springmvc文件夹,然后添加文件spring-mvc.xml,内容如下:
<?xml version="1.0" encoding="UTF-8"?>
<beans xmlns="http://www.springframework.org/schema/beans"
  xmlns:p="http://www.springframework.org/schema/p"
  xmlns:xsi="http://www.w3.org/2001/XMLSchema-instance"
  xmlns:context="http://www.springframework.org/schema/context"
  xmlns:mvc="http://www.springframework.org/schema/mvc"
  xsi:schemaLocation="
    http://www.springframework.org/schema/beans
    http://www.springframework.org/schema/beans/spring-beans-3.2.xsd
    http://www.springframework.org/schema/context
    http://www.springframework.org/schema/context/spring-context-3.2.xsd
    http://www.springframework.org/schema/mvc
    http://www.springframework.org/schema/mvc/spring-mvc-3.2.xsd">

   <mvc:annotation-driven />
   <!-- 扫描controller(controller层注入) -->
   <context:component-scan base-package="com.luo.controller"/>

   <!-- 对模型视图添加前后缀 -->
   <bean id="viewResolver" class="org.springframework.web.servlet.view.InternalResourceViewResolver"
      p:prefix="/WEB-INF/view/" p:suffix=".jsp"/>
</beans>
- 1
- 2
- 3
- 4
- 5
- 6
- 7
- 8
- 9
- 10
- 11
- 12
- 13
- 14
- 15
- 16
- 17
- 18
- 19
- 20
- 21
- 22
- 1
- 2
- 3
- 4
- 5
- 6
- 7
- 8
- 9
- 10
- 11
- 12
- 13
- 14
- 15
- 16
- 17
- 18
- 19
- 20
- 21
- 22
11.3、配置web.xml
<?xml version="1.0" encoding="UTF-8"?>
<web-app xmlns:xsi="http://www.w3.org/2001/XMLSchema-instance"
    xmlns="http://java.sun.com/xml/ns/javaee" xmlns:web="http://java.sun.com/xml/ns/javaee/web-app_2_5.xsd"
    xsi:schemaLocation="http://java.sun.com/xml/ns/javaee http://java.sun.com/xml/ns/javaee/web-app_2_5.xsd"
    id="WebApp_ID" version="2.5">
    <display-name>Archetype Created Web Application</display-name>
   <!-- 起始欢迎界面 -->
    <welcome-file-list>
        <welcome-file>index.jsp</welcome-file>
    </welcome-file-list>

    <!-- 读取spring配置文件 -->
    <context-param>
        <param-name>contextConfigLocation</param-name>
        <param-value>classpath:application.xml</param-value>
    </context-param>
    <!-- 设计路径变量值 -->
    <context-param>
        <param-name>webAppRootKey</param-name>
        <param-value>springmvc.root</param-value>
    </context-param>


    <!-- Spring字符集过滤器 -->
    <filter>
        <filter-name>SpringEncodingFilter</filter-name>
        <filter-class>org.springframework.web.filter.CharacterEncodingFilter</filter-class>
        <init-param>
            <param-name>encoding</param-name>
            <param-value>UTF-8</param-value>
        </init-param>
        <init-param>
            <param-name>forceEncoding</param-name>
            <param-value>true</param-value>
        </init-param>
    </filter>
    <filter-mapping>
        <filter-name>SpringEncodingFilter</filter-name>
        <url-pattern>/*</url-pattern>
    </filter-mapping>

    <listener>
        <listener-class>org.springframework.web.context.ContextLoaderListener</listener-class>
    </listener>

    <!-- springMVC核心配置 -->
    <servlet>
        <servlet-name>dispatcherServlet</servlet-name>
        <servlet-class>org.springframework.web.servlet.DispatcherServlet</servlet-class>
        <init-param>
            <param-name>contextConfigLocation</param-name>
            <!--spingMVC的配置路径  -->
            <param-value>classpath:springmvc/spring-mvc.xml</param-value>
        </init-param>
        <load-on-startup>1</load-on-startup>
    </servlet>
    <!-- 拦截设置 -->
    <servlet-mapping>
        <servlet-name>dispatcherServlet</servlet-name>
        <url-pattern>/</url-pattern>
    </servlet-mapping>

    <!-- 错误跳转页面 -->
    <error-page>
        <!-- 路径不正确 -->
        <error-code>404</error-code>
        <location>/WEB-INF/errorpage/404.jsp</location>
    </error-page>
    <error-page>
        <!-- 没有访问权限,访问被禁止 -->
        <error-code>405</error-code>
        <location>/WEB-INF/errorpage/405.jsp</location>
    </error-page>
    <error-page>
        <!-- 内部错误 -->
        <error-code>500</error-code>
        <location>/WEB-INF/errorpage/500.jsp</location>
    </error-page>
</web-app>
- 1
- 2
- 3
- 4
- 5
- 6
- 7
- 8
- 9
- 10
- 11
- 12
- 13
- 14
- 15
- 16
- 17
- 18
- 19
- 20
- 21
- 22
- 23
- 24
- 25
- 26
- 27
- 28
- 29
- 30
- 31
- 32
- 33
- 34
- 35
- 36
- 37
- 38
- 39
- 40
- 41
- 42
- 43
- 44
- 45
- 46
- 47
- 48
- 49
- 50
- 51
- 52
- 53
- 54
- 55
- 56
- 57
- 58
- 59
- 60
- 61
- 62
- 63
- 64
- 65
- 66
- 67
- 68
- 69
- 70
- 71
- 72
- 73
- 74
- 75
- 76
- 77
- 78
- 79
- 1
- 2
- 3
- 4
- 5
- 6
- 7
- 8
- 9
- 10
- 11
- 12
- 13
- 14
- 15
- 16
- 17
- 18
- 19
- 20
- 21
- 22
- 23
- 24
- 25
- 26
- 27
- 28
- 29
- 30
- 31
- 32
- 33
- 34
- 35
- 36
- 37
- 38
- 39
- 40
- 41
- 42
- 43
- 44
- 45
- 46
- 47
- 48
- 49
- 50
- 51
- 52
- 53
- 54
- 55
- 56
- 57
- 58
- 59
- 60
- 61
- 62
- 63
- 64
- 65
- 66
- 67
- 68
- 69
- 70
- 71
- 72
- 73
- 74
- 75
- 76
- 77
- 78
- 79
11.4、添加index.jsp,在src/main/webapp/WEB-INF下新建一个文件夹view,添加一个index.jsp,内容如下:
<%@ page language="java" contentType="text/html; charset=UTF-8" pageEncoding="UTF-8"%>
<html>
<body>
<h2>Hello World!</h2>
用户名: ${user.userName}<br>
 密码:${user.userPassword}<br>
</body>
</html>
- 1
- 2
- 3
- 4
- 5
- 6
- 7
- 8
- 1
- 2
- 3
- 4
- 5
- 6
- 7
- 8
11.5、写controller
在src/main/java下新建一个包com.luo.controller.然后新建一个类UserController.java,其内容如下
package com.luo.controller;

import javax.annotation.Resource;
import org.springframework.stereotype.Controller;
import org.springframework.web.bind.annotation.RequestMapping;
import org.springframework.web.servlet.ModelAndView;
import com.luo.domain.User;
import com.luo.service.UserService;

@Controller
public class UserController {

    @Resource
    private UserService userService;

    @RequestMapping("/")
    public ModelAndView getIndex(){
        ModelAndView mav = new ModelAndView("index");
        User user = userService.selectUserById(1);
        mav.addObject("user", user);
        return mav;
    }
}
- 1
- 2
- 3
- 4
- 5
- 6
- 7
- 8
- 9
- 10
- 11
- 12
- 13
- 14
- 15
- 16
- 17
- 18
- 19
- 20
- 21
- 22
- 23
- 24
- 1
- 2
- 3
- 4
- 5
- 6
- 7
- 8
- 9
- 10
- 11
- 12
- 13
- 14
- 15
- 16
- 17
- 18
- 19
- 20
- 21
- 22
- 23
- 24
11.6 运行!!!!完成!
12、源码下载
http://download.csdn.net/detail/u013142781/9376381
13、可能会遇到的错
之前有个兄弟按照我的配置,但是发现pom.xml文件报如下错误:
Cannot detect Web Project version. Please specify version of Web Project through <version> configuration property of war plugin. E.g.: <plugin> <artifactId>maven-war-plugin</artifactId> <configuration> <version>3.0<ersion> </configuration> </plugin>
- 1
- 1
解决方案是,如下的三个地方jdk版本需要保持一致:
1、项目右键->属性->Java Compiler:
2、项目右键->属性->Project Facets:
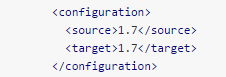
3、如果pom.xml配置了如下的插件的话:
<build>
 <plugins>
    <plugin>
      <artifactId>maven-compiler-plugin</artifactId>
      <configuration>
        <source>1.7</source>
        <target>1.7</target>
      </configuration>
    </plugin>
    <plugin>
      <artifactId>maven-war-plugin</artifactId>
      <version>2.4</version>
      <configuration>
        <version>3.0</version>
      </configuration>
    </plugin>
  </plugins>
  <finalName>webserver</finalName>
</build>
- 1
- 2
- 3
- 4
- 5
- 6
- 7
- 8
- 9
- 10
- 11
- 12
- 13
- 14
- 15
- 16
- 17
- 18
- 19
- 1
- 2
- 3
- 4
- 5
- 6
- 7
- 8
- 9
- 10
- 11
- 12
- 13
- 14
- 15
- 16
- 17
- 18
- 19
这里也要跟上面两个保持一致: