1.启动类里面添加注解@EnableScheduling ,例如:
@SpringBootApplication
@EnableScheduling
@MapperScan("com.example.liuyi.mapper")
public class LiuyiApplication {

   public static void main(String[] args) {
      SpringApplication.run(LiuyiApplication.class, args);
   }

}
2.方法添加注解@Scheduled ,并且实现类上要有组件的注解@Component,
例如cron的使用场景:
@Component
public class TaskTest {

    /**
     * 定义一个按时间执行的定时任务,每隔5秒执行1次,
    cron表达式配置了在哪一刻执行任务,会在配置的任务开始时间判断任务是否可以执行,如果能则执行,不能则会跳过本次执行;
     */
    @Scheduled(cron = "0/5 * * * * ?")
    public void doEat() throws InterruptedException {
        System.out.println("开始吃饭啦"+new Date());
        Thread.sleep(7*1000);
        System.out.println("结束吃饭啦" +new Date());
    }

fixedDelay的使用场景
/**
 * fixedDelay是设定上一个任务结束后多久执行下一个任务,也就是fixedDelay只关心上一任务的结束时间和下一任务的开始时间。
 */
@Scheduled(fixedDelay = 5*1000)
public void doPlay() throws InterruptedException {
    System.out.println("开始玩啦"+new Date());
    Thread.sleep(7*1000);
    System.out.println("结束玩啦"+new Date());
}

fixedRate的使用场景/**
* 定义一个按频率执行的任务
* 两个任务的开始时间间隔是5s,当到达任务的开始执行时间,但上一个任务却没有完成时,
* spring会等待上一个任务执行完,并立即开始执行本次任务。
*/
@Scheduled(fixedRate = 1000 * 5)
public void doJob() throws InterruptedException {
System.out.println("开始工作啦"+new Date());
Thread.sleep(7*1000);
System.out.println("结束工作啦" + new Date());
}

注意点:
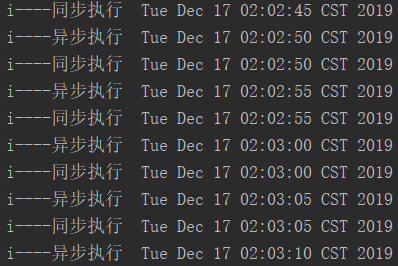
1.SpringBoot 默认就是定时任务同步执行的,只要将@Scheduled添加到需要配置的任务方法上,下次任务执行开始将在本次任务执行完毕后才开始
同一任务的异步执行需要在方法体上加@Async注解
/**
 * 同步执行
 * @throws InterruptedException
 */
@Scheduled(cron = "*/20 * * * * ?")
public void ipWriter() throws InterruptedException {
    for(int i=0;i<20;i++){
        System.out.println("i----同步执行  "+new Date());
Thread.sleep(5000);
}
}

/**
 * 异步执行
 * @throws InterruptedException
 */
@Async
@Scheduled(cron = "*/20 * * * * ?")
public void ipWriterSync() throws InterruptedException {
    for(int i=0;i<20;i++){
        System.out.println("i----异步执行  "+new Date());
Thread.sleep(5000);
}
}
2.多任务并发执行,在使用SpringBoot配置定时任务的过程中,使用@Scheduled配置了多个定时任务,但是在项目启动的时候每次只会启动一个定时任务,
因为 ThreadPoolTaskScheduler的源码默认开启的线程数是 1 ,所以每次只能执行一个定时任务,以下是部分源码
public class ThreadPoolTaskScheduler extends ExecutorConfigurationSupport implements AsyncListenableTaskExecutor, SchedulingTaskExecutor, TaskScheduler {
    private volatile int poolSize = 1;

    public void setPoolSize(int poolSize) {
        Assert.isTrue(poolSize > 0, "'poolSize' must be 1 or higher");
        this.poolSize = poolSize;
        if (this.scheduledExecutor instanceof ScheduledThreadPoolExecutor) {
            ((ScheduledThreadPoolExecutor)this.scheduledExecutor).setCorePoolSize(poolSize);
}

    }
}
在启动的时候重新配置,创建BeanConfig类,注意,需要在类上添加@Component注解,项目启动的时候类中的@Bean注解才会被扫描到,使配置生效
@Component
public class ThreadPoolTaskSchedulerConfig {
    @Bean
    public TaskScheduler taskScheduler() {
        ThreadPoolTaskScheduler taskScheduler = new ThreadPoolTaskScheduler();
        taskScheduler.setPoolSize(2);//我这里设置的线程数是2,可以根据需求调整
        return taskScheduler;
    }

}
public class ThreadPoolTaskScheduler extends ExecutorConfigurationSupport implements AsyncListenableTaskExecutor, SchedulingTaskExecutor, TaskScheduler { private volatile int poolSize = 1; public void setPoolSize(int poolSize) { Assert.isTrue(poolSize > 0, "'poolSize' must be 1 or higher"); this.poolSize = poolSize; if (this.scheduledExecutor instanceof ScheduledThreadPoolExecutor) { ((ScheduledThreadPoolExecutor)this.scheduledExecutor).setCorePoolSize(poolSize); } }}————————————————版权声明:本文为CSDN博主「Demo_Liu」的原创文章,遵循 CC 4.0 BY-SA 版权协议,转载请附上原文出处链接及本声明。原文链接:https://blog.csdn.net/Demo_Liu/article/details/85335414