1. nfs存储的单点问题
如果nfs服务器宕机了,则所有的nfs客户机都会受到影响。一旦宕机,会丢失部分用户的数据。为了解决单点问题,需要实现共享存储的实时备份,即:将nfs服务端共享目录下的数据实时备份到备份服务器(或其它存储设备),以保证数据的完整性。
2. NFS共享数据的实时同步推送备份
公司有两台web服务器一直在对外提供服务,但随着业务的发展用户越来越多,网站的功能也越来越强大,各种图片,视频等占用硬盘空间越来越大。
于是,领导将web服务器的数据直接存储到NFS服务器上作为存储使用;并且为了防止NFS服务器发生单点故障,领导希望将web服务器存储的内容实时同步到Rsync备份服务器上。现在由你来计划完成领导的需求。
具体要求如下:
- NFS服务器的要求如下:
- 服务器的共享目录名为/data目录;
- 权限要求只能内网网段访问且可读可写,时时同步;
- 为了方便管理人员管理,需要指定NFS虚拟账户为zuma,uid=888,gid=888
- 所有访问者的身份都压缩为最低身份
- 将/data目录里的内容同步时时推送到备份服务器的/data目录里(inotify+rsync)
- web服务器将NFS共享目录统一挂载到/var/html/www目录下
思路:
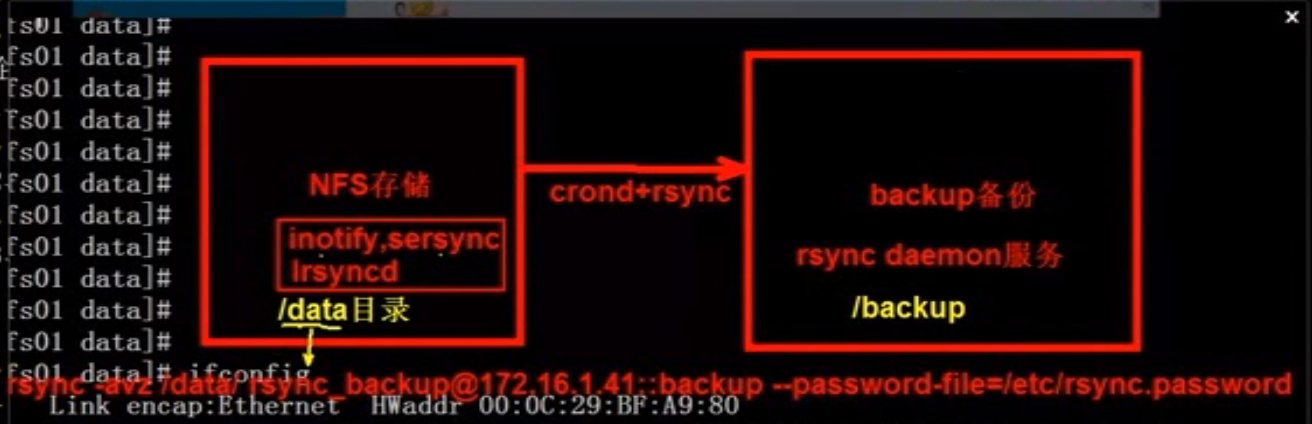
1. NFS存储服务器和Rsync备份服务器,Rsync服务器部署运行rsync --daemon服务,NFS服务器作为Rsync的客户端,可以通过rsync -avz /data [email protected]::nfsbackup/ --password-file=/etc/rsync.password命令,将/data目录的文件备份到Rsync备份服务器。
2. NFS存储服务器部署完成,正常运行情况下。
3. NFS存储服务器和Rsync备份服务器之间,通过crond+rsync服务,通过定时任务的备份服务,将数据备份到Rsync备份服务器
4. 想要实现实时备份,则在NFS存储服务器上通过inotify,sersync或irsync服务,监控NFS存储服务器共享目录的磁盘的block的变化,触发推动执行同步。
2.1 环境准备
操作系统和内核版本
[root@web01-8 ~]# cat /etc/redhat-release
CentOS release 6.7 (Final)
[root@web01-8 ~]# uname -r
2.6.32-573.el6.x86_64
角色-ip
| 角色 | 主机名 | eth0(外网) | eth1(内网) |
|---|---|---|---|
| C1-NFS服务器 | nfs01 | 10.0.0.31 | 192.168.0.31 |
| C2-Rsync存储服务器 | backup | 10.0.0.41 | 192.168.0.41 |
2.2 NFS服务的部署
部署过程详情见:https://www.cnblogs.com/zoe233/p/11973710.html
【NFS服务端】

# 系统环境
[root@nfs-31 mnt]# cat /etc/redhat-release
CentOS release 6.10 (Final)
[root@nfs-31 mnt]# uname -r
2.6.32-573.el6.x86_64
[root@nfs-31 mnt]# uname -m
x86_64

# 查看rpcbind和nfs服务,并设置开机自启动
[root@nfs-31 mnt]# rpm -qa nfs-utils rpcbind
rpcbind-0.2.0-16.el6.x86_64
nfs-utils-1.2.3-78.el6_10.1.x86_64

[root@nfs-31 mnt]# /etc/init.d/rpcbind status
rpcbind 已停
[root@nfs-31 mnt]# /etc/init.d/rpcbind start
正在启动 rpcbind:                                         [确定]

[root@nfs-31 mnt]# /etc/init.d/nfs status
rpc.svcgssd 已停
rpc.mountd 已停
nfsd 已停
rpc.rquotad 已停
[root@nfs-31 mnt]# /etc/init.d/nfs start
启动 NFS 服务:                                            [确定]
关掉 NFS 配额:                                            [确定]
启动 NFS mountd:                                          [确定]
启动 NFS 守护进程:                                        [确定]
正在启动 RPC idmapd:                                      [确定]

[root@nfs-31 mnt]# chkconfig --list rpcbind
rpcbind         0:关闭  1:关闭  2:启用  3:启用  4:启用  5:启用  6:关闭
[root@nfs-31 mnt]# chkconfig --list nfs
nfs             0:关闭  1:关闭  2:启用  3:启用  4:启用  5:启用  6:关闭

[root@nfs-31 mnt]# tail -3 /etc/rc.local  # chkconfig和/etc/rc.local的配置二选一即可。
# start up nfs service
/etc/init.d/rpcbind start
/etc/init.d/nfs start


# 创建需要共享的目录并授权
mkdir /data -p
grep nfsnobody /etc/passwd
chown -R nfsnobody.nfsnobody /data
ls -ld /data


# 配置NFS服务配置文件,并且在本地查看挂载信息
[root@nfs-31 mnt]# cat /etc/exports
# shared /data by zoe for test at 20191205
/data 192.168.0.0/24(rw,sync)

[root@nfs-31 mnt]# exportfs -rv # 加载配置,可以用来检查配置文件是否合法
exporting 192.168.0.0/24:/data

# 在NFS服务器本地查看挂载情况
showmount -e 192.168.0.31
showmount -e localhost

# 通过查看nfs服务器配置文件的参数(包括默认加载的参数)
[root@nfs-31 mnt]# cat /var/lib/nfs/etab
/data   192.168.0.0/24(rw,sync,wdelay,hide,nocrossmnt,secure,root_squash,no_all_squash,no_subtree_check,secure_locks,acl,anonuid=65534,anongid=65534,sec=sys,rw,root_squash,no_all_squash)
在本地服务器端,同时又作为客户端进行挂载测试:
[root@nfs-31 mnt]# mount -t nfs 192.168.0.31:/data /mnt
[root@nfs-31 mnt]# df -h
Filesystem          Size  Used Avail Use% Mounted on
/dev/sda3           6.9G  1.9G  4.7G  28% /
tmpfs               499M     0  499M   0% /dev/shm
/dev/sda1           190M   67M  114M  37% /boot
192.168.0.31:/data  6.9G  1.9G  4.7G  28% /mnt
成功将nfs的共享目录挂载在/mnt目录下。
【NFS客户端】
在所有的NFS客户端上执行的操作都是相同的。
# 系统环境
[root@backup-41 ~]# cat /etc/redhat-release
CentOS release 6.10 (Final)
[root@backup-41 ~]# uname -r
2.6.32-573.el6.x86_64
[root@backup-41 ~]# uname -m
x86_64

# 检查安装包
[root@backup-41 ~]# rpm -qa rpcbind
rpcbind-0.2.0-16.el6.x86_64
# 为了使用showmount等功能,所有客户端最好也安装NFS软件,但不启动NFS服务
rpm -qa nfs-utils

# 启动rpc服务(不需要启动NFS服务)
[root@backup-41 ~]# /etc/init.d/rpcbind status
rpcbind is stopped
[root@backup-41 ~]# /etc/init.d/rpcbind start
Starting rpcbind:                                          [  OK  ]

[root@backup-41 ~]# showmount -e 192.168.0.31
Export list for 192.168.0.31:
/data 192.168.0.0/24

# 挂载NFS共享目录/data
[root@backup-41 ~]# mount -t nfs 192.168.0.31:/data /mnt
[root@backup-41 ~]# df -h
Filesystem          Size  Used Avail Use% Mounted on
/dev/sda3           6.9G  1.9G  4.7G  28% /
tmpfs               499M     0  499M   0% /dev/shm
/dev/sda1           190M   67M  114M  37% /boot
192.168.0.31:/data  6.9G  1.9G  4.7G  28% /mnt

# 测试
[root@backup-41 mnt]# cd /mnt
[root@backup-41 mnt]# ls
[root@backup-41 mnt]# mkdir /mnt/backup/rpcbind/test -p
[root@backup-41 mnt]# ls
backup  file

# 在nfs服务端查看共享目录/data
[root@nfs-31 mnt]# ls /data
backup  file
将rpcbind服务和挂载加入开机自启动:
[root@backup-41 mnt]# tail -3 /etc/rc.local
# rpcbind start and mount shared directory ip:/data
/etc/init.d/rpcbind start
/bin/mount -t nfs 192.168.0.31:/data /mnt
2.3 Rsync服务的部署
部署过程详情参见:https://www.cnblogs.com/zoe233/p/11962110.html
本节可以将nfs的备份数据统一放在某个模块下,所以可以通过修改配置文件/etc/rsyncd.conf添加模块
[root@backup-41 192.168.0.8]# tail -20 /etc/rsyncd.conf

ignore errors
read only = false
list = false
hosts allow = 192.168.0.31/24
hosts deny = 0.0.0.0/32
auth users = rsync_backup
secrets file = /etc/rsync.password

######
[backup]
path = /backup/

[multi_module_1]
path = /multi_module_1/

[nfsbackup]
path = /nfsbackup/

## rsync_config____end ##
在配置文件里添加模块[nfsbackup]。
注意:多个模块的信息相同的,可以统一放在模块上方,如ignore errors等参数。
重启rsync --daemon服务。
[root@backup-41 192.168.0.8]# pkill rsync
[root@backup-41 192.168.0.8]# lsof -i tcp:873
[root@backup-41 192.168.0.8]# rsync --daemon
[root@backup-41 192.168.0.8]# lsof -i tcp:873
COMMAND   PID USER   FD   TYPE DEVICE SIZE/OFF NODE NAME
rsync   16317 root    3u  IPv4 211440      0t0  TCP *:rsync (LISTEN)
rsync   16317 root    5u  IPv6 211441      0t0  TCP *:rsync (LISTEN)
根据新模块nfsbackup的配置要求,创建/nfsbackup目录,以及设置目录的属主和属组。
[root@backup-41 192.168.0.8]# mkdir /nfsbackup -p
[root@backup-41 192.168.0.8]# chown -R rsync.rsync /nfsbackup
[root@backup-41 192.168.0.8]# ll -d /nfsbackup/
drwxr-xr-x 2 rsync rsync 4096 Dec 12 13:00 /nfsbackup/
2.4 inotify
inotify的具体内容查看:https://www.cnblogs.com/zoe233/p/12035383.html
2.4.1 inotify安装
查看当前系统是否支持inotify
[root@nfs-31 data]# uname -r
2.6.32-573.el6.x86_64
[root@nfs-31 data]# ls -l /proc/sys/fs/inotify/
total 0
-rw-r--r-- 1 root root 0 Dec 12 18:59 max_queued_events
-rw-r--r-- 1 root root 0 Dec 12 18:59 max_user_instances
-rw-r--r-- 1 root root 0 Dec 12 18:59 max_user_watches  # 显示这三个文件则证明支持inotify
安装inotify软件:
[root@nfs-31 inotify]# rpm -qa inotify-tools
[root@nfs-31 inotify]# yum install inotify-tools -y  # Error: Nothing to do
安装失败,用wget获取源,再用yum安装:
wget -O /etc/yum.repos.d/epel.repo http://mirrors.aliyun.com/repo/epel-6.repo
yum -y install inotify-tools
[root@nfs-31 inotify]# rpm -qa inotify-tools
inotify-tools-3.14-2.el6.x86_64
一共安装了2个工具,即inotifywait和inotifywatch。
- inotifywait:在被监控的文件或目录上等待特定文件系统事件(open,close,delete等)发生,执行后处于阻塞状态,适合shell脚本中使用。
- inotifywatch:收集被监视的文件系统使用度统计数据,指文件系统事件发生的次数统计。
2.4.2 inotifywatch命令
比较重要的参数的含义:
| inotifywait参数 | 含义说明 |
|---|---|
| -r --recursive | 递归查询目录 |
| -q --quiet | 打印很少的信息,仅仅打印监控事件的信息 |
| -m,--monitor | 始终保持事件监听状态 |
| --exclude | 排除文件或目录时,不区分大小写。 |
| --timefmt | 指定时间输出的格式 |
| --format | 打印使用指定的输出类似格式字符串 |
| -e,--event | 通过此参数可以指定需要监控的事件,如下一个列表所示 |
-e,--event 事件的各种事件含义:
| Events | 含义 |
|---|---|
| access | 文件或目录被读取 |
| modify | 文件或目录内容被修改 |
| attrib | 文件或目录属性被改变 |
| close | 文件或目录封闭,无论读/写模式 |
| open | 文件或目录被打开 |
| moved_to | 文件或目录被移动至另外一个目录 |
| move | 文件或目录被移动到另一个目录或从另一个目录移动至当前目录 |
| create | 文件或目录被创建在当前目录 |
| delete | 文件或目录被删除 |
| umount | 文件系统被卸载 |
--format 的格式意义:
- %w 发生事件的监视文件的名称
- This will be replaced with the name of the Watched file on which an event occurred.
- %f 当一个事件发生在一个目录中时,它将被替换为导致该事件发生的文件名。否则,将替换为空字符串。
- When an event occurs within a directory, this will be replaced with the name of the File which caused the event to occur. Otherwise, this will be replaced with an empty string.
- %e 发生的事件,以逗号分隔。
- Replaced with the Event(s) which occurred, comma-separated.
- %Xe 发生的事件,用“X”中的任何字符分隔。
- Replaced with the Event(s) which occurred, separated by whichever character is in the place of ‘X’.
- %T 替换为--timefmt选项指定格式的当前时间,该格式字符串应适合传递给strftime(3)。
- Replaced with the current Time in the format specified by the --timefmt option, which should be a format string suitable for passing to strftime(3).
2.4.3 人工测试同步
开启两个窗口
测试create事件
在第一个窗口开启inotifywait,监听/backup目录:
[root@nfs-31 inotify]# inotifywait -mrq --timefmt '%y/%m/%d %H:%M' --format '%T %w%f' -e create /backup
# 命令说明:
# -mrq:-m 实时监听,-r递归监控整个目录,包括子目录,-q 只输出简短信息
# --timefmt:指定输出的时间格式
# --format:输出输出的格式
# -e create:指定监控的事件类型,监控创建create事件
第二个窗口,进入/backup目录,创建两个文件,触发create事件
[root@nfs-31 backup]# cd /backup
[root@nfs-31 backup]# touch inotifywait_create_event_1
[root@nfs-31 backup]# touch inotifywait_create_event_2
触发事件后,查看第一个窗口会发现,屏幕输出了创建事件的内容(时间和创建的文件路径加名称)
[root@nfs-31 inotify]# inotifywait -mrq --timefmt '%y/%m/%d %H:%M' --format '%T %w%f' -e create /backup
19/12/12 19:26 /backup/inotifywait_create_event_1
19/12/12 19:41 /backup/inotifywait_create_event_2
2.4.4 编写inotify实时监控脚本
[root@nfs-31 /]# cd /server/scripts
[root@nfs-31 scripts]# ls
backup.sh
[root@nfs-31 scripts]# vi inotifywait_nfs_to_backup.sh
[root@nfs-31 scripts]# cat inotifywait_nfs_to_backup.sh
#!/bin/bash


Path=/data
backup_Server=192.168.0.41

/usr/bin/inotifywait -mrq --format '%w%f' -e close_write,delete $Path|while read line
do
    if [ -f $line ];then
        rsync -az $line --delete rsync_backup@$backup_Server::nfsbackup --password-file=/etc/rsync.password
    else
        cd $Path &&\
        rsync -az ./ --delete rsync_backup@$backup_Server::nfsbackup --password-file=/etc/rsync.password
    fi
done
脚本可以加入开机启动:
echo "/bin/sh /server/scripts/inotifywait_nfs_to_backup.sh &" >> /etc/rc.local
提示:
-
一个& 代表从后台开始运行该条命令