参考: https://biscuitos.github.io/blog/ARM-BOOT/
zImage 重定位之后实践
zImage 重定位之后,ARM 将 pc 指针指向了重定位 zImage restart 处继续执行,执行 代码如下:
restart:        adr     r0, LC0
                ldmia   r0, {r1, r2, r3, r6, r10, r11, r12}
                ldr     sp, [r0, #28]

                /*
                 * We might be running at a different address. We need
                 * to fix up various pointers.
                 */
                sub     r0, r0, r1              @ caclculate the delta offset
                add     r6, r6, r0              @ _edata
                add     r10, r10, r0            @ inflated kernel size location

                /*
                 * The kernel build system appends the size of the
                 * decompressed kernel at the end of the compressed data
                 * in little-endian form.
                 */
                ldrb    r9, [r10, #0]
                ldrb    lr, [r10, #1]
                orr     r9, r9, lr, lsl #8
                ldrb    lr, [r10, #2]
                ldrb    r10, [r10, #3]
                orr     r9, r9, lr, lsl #16
                orr     r9, r9, r10, lsl #24

#ifndef CONFIG_ZBOOT_ROM
                /* malloc space is above the relocated stack (64k max) */
                add     sp, sp, r0
                add     r10, sp, #0x10000
#endif
                mov     r5, #0                  @ init dtb size to 0
代码基本逻辑与 zImage 一直,细节请参看上面内容,重定位之后,会重新执行一遍 restart 之后的代码。这段代码的主要任务就是通过 zImage 的 LC0 表计算出目前各个必要信息的地址, 并调整这些地址到一个正确的重定位地址。通过上面的代码,可以获得重定位之后 zImage 的结束地址,以及 Image 的长度。这里不做过多讲解,接下来的代码是:
/*
 * Check to see if we will overwrite ourselves.
 *   r4  = final kernel address (possibly with LSB set)
 *   r9  = size of decompressed image
 *   r10 = end of this image, including bss/stack/malloc space if non XIP
 * We basically want:
 *   r4 - 16k page directory >= r10 -> OK
 *   r4 + image lenght <= address of wont_overwrite -> OK
 * Note: the possible LSB in r4 is harmless here.
 */
                add     r10, r10, #16384
                cmp     r4, r10
                bhs     wont_overwrite
                add     r10, r4, r9
                adr     r9, wont_overwrite
                cmp     r10, r9
                bls     wont_overwrite
从上面的运行可知,此处 r10 寄存器存储了堆栈再加 64K 的地址,也就是堆栈加 malloc 之后的地址。然后跟 r4 寄存器对比,r4 寄存器是真正内核运行的起始地址。因为重定位 的原因,r4 的值决定比 r10 小,因此第一次 r4 与 r10 比较的结果不会导致 “bhs wont_overwrite” 执行。接着将 r4 寄存器和 r9 寄存器之和存储到 r10 寄存器, 这里 r10 寄存器代表真正内核运行的结束地址,又将 wont_overwrite 重定位之后的地址 赋值给 r9,通过对比 r10 和 r9 之间的大小,此时由于 zImage 已经重定位,r10 的值一定小于 r9, 那么执行 “bls wont_overwrite” 跳转到 wont_overwrite 处 继续执行。
接下来的代码如下:
wont_overwrite:
/*
 * If delta is zero, we are running at the address we were linked at.
 *   r0  = delta
 *   r2  = BSS start
 *   r3  = BSS end
 *   r4  = kernel execution address (possibly with LSB set)
 *   r5  = appended dtb size (0 if not present)
 *   r7  = architecture ID
 *   r8  = atags pointer
 *   r11 = GOT start
 *   r12 = GOT end
 *   sp  = stack pointer
 */
                orrs    r1, r0, r5
                beq     not_relocated

                add     r11, r11, r0
                add     r12, r12, r0
这段代码的任务就是确定自己是否重定位了,已经校正重定位之后的地址。在运行这段代码之前, 再次确定了此时每个寄存器的含义,r0 指向 LC0 表,也是 LC0 表内各项的偏移基地址; r2 寄存器指向 zImage 的 BSS 段的起始地址;r3 寄存器指向了 zImage 的 BSS 段的终止地址, r4 指向了内核运行的起始地址;r5 指向了 DTB 的大小;r7 存储体系相关的 ID 信息;r8 指向了 uboot 传递给内核的 atags 参数;r11 指向了 zImage 的 GOT 表的起始地址;r12 指向了 GOT 表的终止地址。sp 指向了重定位之后堆栈地址。
代码首先调用 orrs 指令将 r0 的值与 r5 相或,结果存储到 r1 寄存器中,如果结果为零, 那么跳转到 not_relocated 处继续执行;如果结果不为零,那么继续执行下面代码。接着调整 r11 和 r12 寄存器重定位之后的值。
根据调试结果,代码继续执行下面代码:
#ifndef CONFIG_ZBOOT_ROM
                /*
                 * If we're running fully PIC == CONFIG_ZBOOT_ROM = n,
                 * we need to fix up pointers into the BSS region.
                 * Note that the stack pointer has already been fixed up.
                 */
                add     r2, r2, r0
                add     r3, r3, r0

                /*
                 * Relocate all entries in the GOT table.
                 * Bump bss entries to _edata + dtb size
                 */
1:              ldr     r1, [r11, #0]           @ relocate entries in the GOT
                add     r1, r1, r0              @ This fixes up C references
                cmp     r1, r2                  @ if entry >= bss_start &&
                cmphs   r3, r1                  @       bss_end > entry
                addhi   r1, r1, r5              @    entry += dtb size
                str     r1, [r11], #4           @ next entry
                cmp     r11, r12
                blo     1b

                /* bump our bss pointers too */
                add     r2, r2, r5
                add     r3, r3, r5
#endif
这段代码的主要任务是校正 GOT 表的入口项,由于代码完全支持 PIC 的,所有重定位之后, 需要校正所有的 GOT 表入口项,但 BSS 段除外。代码首先通过命令 “ldr r1, [r11, #0]” 获得 GOT 表入口项的地址,然后将该地址校正为重定位之后的地址。连续使用两个 cmp 指令 确定该入口地址是否位于 BSS 段内,如果不在 BSS 段内,那么将 r1 入口项的地址加上 DTB 的值;如果不在,那么不做特殊处理;接着调用 str 将校正后的入口地址重写到 GOT 表内, 然后将 r11 指向下一个 GOT 表的入口。如果当前 GOT 表入口小于 GOT 表的结束地址,那么 跳转到 1b 处继续校正下一个 GOT 表入口。最后,也校正了 BSS 段的起始地址和终止地址, 更多 GOT 表原理实践可以查看:
接下来运行的代码如下:
not_relocated:  mov     r0, #0
1:              str     r0, [r2], #4
                str     r0, [r2], #4
                str     r0, [r2], #4
                str     r0, [r2], #4
                cmp     r2, r3
                blo     1b
这段代码的主要任务就是清除 BSS 段的内容。调用 str 指令,将 r2 对应的地址写入 0, 然后 r2 地址增加 4,重复操作 4 次之后对比当前 r2 地址是否小于 r3,如果小于,那么 继续重复 1。
接着执行代码如下:
                /*
                 * Did we skip the cache setup earlier?
                 * That is indicated by the LSB in r4
                 * Do it now if so.
                 */
                tst     r4, #1
                bic     r4, r4, #1
                blne    cache_on
这段代码的主要任务就是判断 cache 是否已经启动,如果没有就开启 cache。从之前的代码 可以知道,如果 cache 没有被开启,r4 寄存器的最低位会被置位。代码通过 tst 指令 查看 r4 寄存器的最低位情况,并使用 bic 指令清除最低位,因为这里一定要确保 cache 打开, 如果 cache 没有启用,那么会调用命令 “blne cache_on” 启用 cache。
此时 cache 已经启用,所以不会跳转到 cache_on 处执行。 接下来执行的代码是:
/*
 * The C runtime environment should now be setup sufficiently.
 * Set up some pointers, and start decompressing.
 *   r4  = kernel execution address
 *   r7  = architecture ID
 *   r8  = atags pointer
 */
                mov     r0, r4
                mov     r1, sp                  @ malloc space above stack
                add     r2, sp, #0x10000        @ 64k max
                mov     r3, r7
                bl      decompress_kernel
这段代码是为运行 C 函数 decompress_kernel 做准备。首先在执行代码之前,r4 寄存器指向了 内核执行的起始地址,r7 存储体系相关的 ID;r8 指向了 atags 参数。汇编调用 C 函数其中一种规则 就是 C 函数从左到右的第一个参数通过 r0 寄存器传递,C 函数的第二个参数通过 r1 寄存器传递, 依次类推。decompress_kernel 需要四个参数。代码首先将 r0 设置为内核执行的起始地址, 然后将堆栈的地址赋值给 r1 寄存器,再将 64 K 的空间赋值给 r2 寄存器,最后将 r7 的值 赋值给 r3 寄存器,通过上面的设置之后,最后调用 bl 指令跳转到 decompress_kernel 处 继续执行。记下来执行的代码位于 arch/arm/boot/compressed/misc.c 中,如下:
void decompress_kernel(unsigned long output_start,
                        unsigned long free_mem_ptr_p,
                unsigned long free_mem_ptr_end_p, int arch_id)
{
        int ret;

        output_data             = (unsigned char *)output_start;
        free_mem_ptr            = free_mem_ptr_p;
        free_mem_end_ptr        = free_mem_ptr_end_p;
        __machine_arch_type     = arch_id;

        arch_decomp_setup();

        putstr("Uncompressing Linux...");

        ret = do_decompress(input_data, input_data_end - input_data,
                            output_data, error);
        if (ret)
                error("decompressor returned an error");
        else
                putstr(" done, booting the kernel.\n");
}
decompress_kernel 函数的功能很简单,就是把 Image 从 zImage 中解压出来。通过 传入的参数,可以知道内核被解压到 output_start 位置,并将这个参数传递给全局变量 output_data。定义了两个全局变量 free_mem_ptr 和 free_mem_end_ptr 供解压程序使 用的内存空间。arch_id 将值传递给全局变量 __machine_arch_type。接下来就是调用 arch_decomp_setup() 函数做平台相关的解压设置。最后调 do_decompress() 函数进行 解压工作。开发者可以将 decompress_kernel 作为断点进行 GDB 调试,调试之前,使用 bless 二进制查看工具查看内核的数据内容,使用命令:
bless arch/arm/boot/Image查看 Image 起始处的数据如下图:

查看 Image 结尾处的数据如下图:

接着调用 GDB 查看实际运行效果,根据上图,特别查看 do_decompress() 函数运行前后, 内存 0x60008000 和 0x60b6911a 处内存内容的变化情况,实际调试如下图:
(gdb) b decompress_kernel
Breakpoint 1 at 0x60b698f4: file arch/arm/boot/compressed/misc.c, line 82.
(gdb) c
Continuing.

Breakpoint 1, decompress_kernel (output_start=1610645504,
    free_mem_ptr_p=1627022200, free_mem_ptr_end_p=1627087736, arch_id=2272)
    at arch/arm/boot/compressed/misc.c:82
warning: Source file is more recent than executable.
82    {
(gdb) n
85        output_data        = (unsigned char *)output_start;
(gdb)
86        free_mem_ptr        = free_mem_ptr_p;
(gdb)
87        free_mem_end_ptr    = free_mem_ptr_end_p;
(gdb)
88        __machine_arch_type    = arch_id;
(gdb) x/16x 0x60008000
0x60008000:    0x00000000    0x00000000    0x00000000    0x00000000
0x60008010:    0x00000000    0x00000000    0x00000000    0x00000000
0x60008020:    0x00000000    0x00000000    0x00000000    0x00000000
0x60008030:    0x00000000    0x00000000    0x00000000    0x00000000
(gdb) x/16x 0x60b6911a
0x60b6911a:    0x00000000    0x00000000    0x00000000    0x00000000
0x60b6912a:    0x00000000    0x00000000    0x00000000    0x00000000
0x60b6913a:    0x00000000    0x00000000    0x00000000    0x00000000
0x60b6914a:    0x00000000    0x00000000    0x00000000    0x00000000
(gdb) n
92        putstr("Uncompressing Linux...");
(gdb) n
94        ret = do_decompress(input_data, input_data_end - input_data,
(gdb) n
96        if (ret)
(gdb) x/16x 0x60008000
0x60008000:    0xeb043156    0xe10f9000    0xe229901a    0xe319001f
0x60008010:    0xe3c9901f    0xe38990d3    0x1a000004    0xe3899c01
0x60008020:    0xe28fe00c    0xe16ff009    0xe12ef30e    0xe160006e
0x60008030:    0xe121f009    0xee109f10    0xeb03e973    0xe1b0a005
(gdb) x/16x 0x60b6911a
0x60b6911a:    0xa3680000    0xb9b08071    0x012f8094    0x00000000
0x60b6912a:    0x00000000    0x00000000    0x00000000    0x00000000
0x60b6913a:    0x00000000    0x00000000    0x00000000    0x00000000
0x60b6914a:    0x00000000    0x00000000    0x00000000    0x00000000
(gdb)
从上面实践结果可以看出,当执行 do_decompress() 函数之前,0x60008000 和 0x60b6911a 的内存都是 0。但当执行完 do_decompress() 函数之后,0x60008000 和 0x60b6911a 的内容与上图中 Image 的开始和结束处的内容一致,因此内核解压正确。接着继续 分析一下 do_decompress() 函数,函数定义在 arch/arm/boot/decompress.c
// SPDX-License-Identifier: GPL-2.0
#define _LINUX_STRING_H_

#include <linux/compiler.h>     /* for inline */
#include <linux/types.h>        /* for size_t */
#include <linux/stddef.h>       /* for NULL */
#include <linux/linkage.h>
#include <asm/string.h>
#include "misc.h"

#define STATIC static
#define STATIC_RW_DATA  /* non-static please */

#define Assert(cond,msg)
#define Trace(x)
#define Tracev(x)
#define Tracevv(x)
#define Tracec(x)
#define Tracecv(c,v)

/* Not needed, but used in some headers pulled in by decompressors */
extern char *strstr(const char *s1, const char *s2);
extern size_t strlen(const char *s);
extern int memcmp(const void *cs, const void *ct, size_t count);

#ifdef CONFIG_KERNEL_GZIP
#include "../../../../lib/decompress_inflate.c"
#endif

int do_decompress(u8 *input, int len, u8 *output, void (*error)(char *x))
{
        return __decompress(input, len, NULL, NULL, output, 0, NULL, error);
}
整个文件很简单,就是将 gzip 对应的库函数直接在预处理阶段包含到这个文件里,然后通过 调用库函数 __decompress() 进行解压,如果开发者感兴趣 gzip 解压的过程,可以查看 文件 lib/decompress_inflate.c,这里不做解释。
至此,内核已经正确的解压到指定位置,zImage 再做一些收尾工作之后就将 CPU 的执行权移交 给真正内核。接下来要执行的代码是:
                bl      cache_clean_flush
                bl      cache_off
在将 CPU 执行权交给真正内核之前,需要将 MMU 关闭,并刷新 cache。cache_clean_flush 之前就讨论过,源码分析请看 cache_clean_flush。至于 cache_off, 其实现过程和 cache_on 类似,也是从 armv7 的 CACHE 表中读取对应的 off 操作,最终会调用: __armv7_mmu_cache_off,
__armv7_mmu_cache_off:
                mrc     p15, 0, r0, c1, c0
#ifdef CONFIG_MMU
                bic     r0, r0, #0x000d
#else
                bic     r0, r0, #0x000c
#endif
                mcr     p15, 0, r0, c1, c0      @ turn MMU and cache off
                mov     r12, lr
                bl      __armv7_mmu_cache_flush
                mov     r0, #0
代码原理很简单,就是将 SCTR 控制器中,关于 CACHE 和 MMU 的位设置成指定状态, SCTR 寄存器的位图如下:
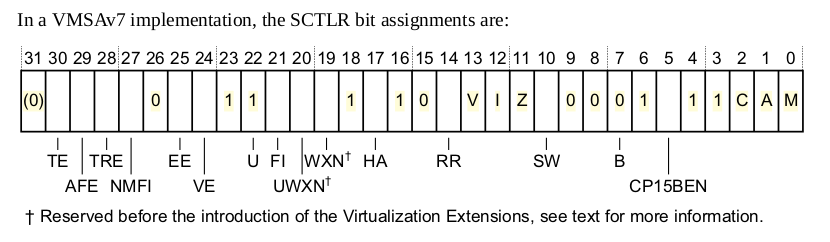
首先调用 mcr 指令获得 SCTR 寄存器的值,存储到 r0 寄存器中,然后执行 bic 指令,将 bit0, bit2 和 bit3 清零,并写入到 SCTR 寄存器中,这样就关闭了 MMU 和 cache, 接着将返回地址存储到 r12 寄存器中。调用 __armv7_mmu_cache_flush,刷新 LoC 数据缓存 的数据,接下来执行的代码是:
#ifdef CONFIG_MMU
                mcr     p15, 0, r0, c8, c7, 0   @ invalidate whole TLB
#endif
                mcr     p15, 0, r0, c7, c5, 6   @ invalidate BTC
                mcr     p15, 0, r0, c7, c10, 4  @ DSB
                mcr     p15, 0, r0, c7, c5, 4   @ ISB
                mov     pc, r12
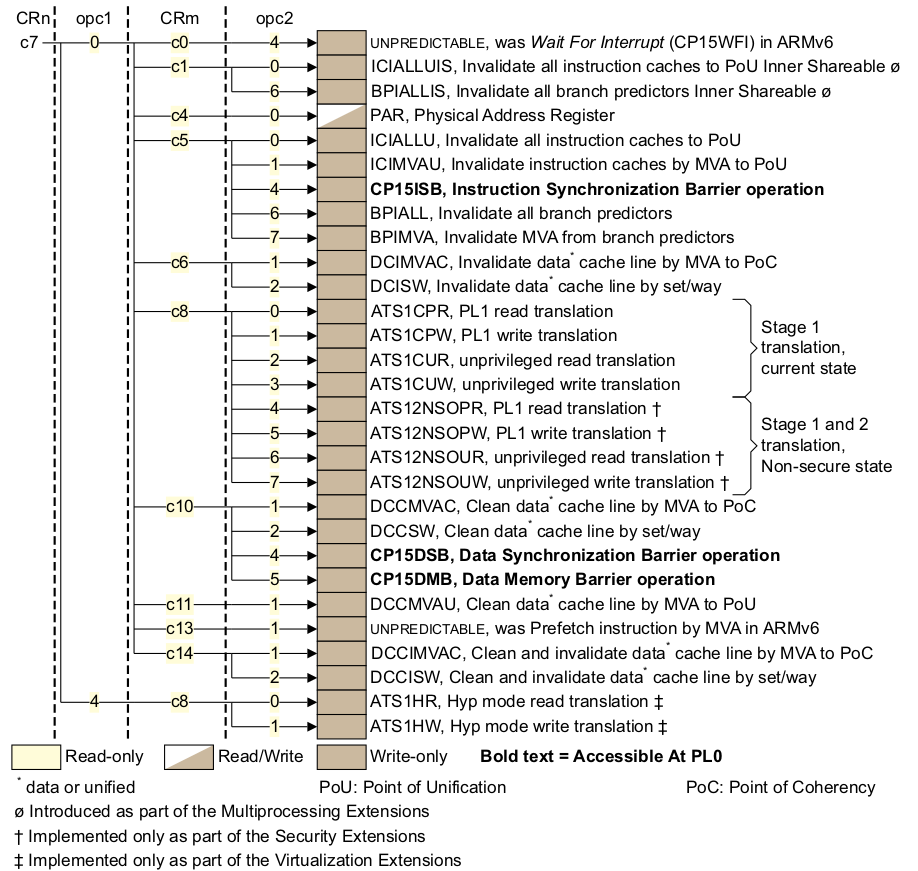
函数继续调用 mcr 执行向 CP15 C8 寄存器写值,此时布局如下:

选中了 TLBIALL 寄存器,当往寄存器执行写操作时会将所有的 TLB 无效。接着调用 mcr 执行 操作 CP15 c7 寄存器,此时寄存器布局如下:
选中了 BPILL 寄存器,当向寄存器写入值之后会使分支预取无效。最后执行两次内存屏障 DSB 和 ISB 将所有指令和设置同步到最新。最后将 r12 寄存器的传给 pc 实现返回到调用点。
至此,zImage 的收尾工作已经完成,接下来 zImage 将执行权转交给真正的内核。zImage 最后 的任务就是将执行权移交给真正的 kernel,执行代码如下:
#ifdef CONFIG_ARM_VIRT_EXT
                mrs     r0, spsr                @ Get saved CPU boot mode
                and     r0, r0, #MODE_MASK
                cmp     r0, #HYP_MODE           @ if not booted in HYP mode...
                bne     __entry_kernel
#endif


__entry_kernel:
                mov     r0, #0                  @ must be 0
                mov     r1, r7                  @ restore architecture number
                mov     r2, r8                  @ restore atags pointer
 ARM(           mov     pc, r4          )       @ call kernel
zImage 首先判断当前模式是否是 HYP 模式,如果不是就直接跳转到 __entry_kernel 处执行。__entry_kernel 没有做其他特别的处理,就是设置 r0 寄存器为 0, r1 寄存器 为与体系相关的 ID,r2 设置为 atags 的参数,就直接将内核执行的起始地址 r4 寄存器内 的值直接传递给 PC,那么 PC 直接跳转到 0x60008000 处开始执行,至此 zImage 将 CPU 执行权全部移交给内核。