linux下静默安装weblogic 12
1.创建用户和组
groupadd web
useradd -g web -m -d /opt/weblogic weblogic
passwd weblogic
chown -R weblogic:web /opt/weblogic/
2.安装jdk1.8或jdk1.7
3.编辑/etc/oraInst.loc,内容如下:
inst_group=web
inventory_loc=/opt/weblogic/oraInventory
4.切换到weblogic用户:su - weblogic
5.上传安装文件到用户目录:rz 【fmw_12.2.1.3.0_wls.jar】
6.授权:chmod 777 /opt/weblogic/fmw_12.1.3.0.0_wls.jar
7.在用户目录创建文件:vim wls.rsp,内容如下:
[ENGINE]
#DO NOT CHANGE THIS.
Response File Version=1.0.0.0.0
[GENERIC]
#The oracle home location. This can be an existing Oracle Home or a new Oracle Home
ORACLE_HOME=/opt/weblogic/Oracle/Middleware
#Set this variable value to the Installation Type selected. e.g. WebLogic Server, Coherence, Complete with Examples.
INSTALL_TYPE=WebLogic Server
#Provide the My Oracle Support Username. If you wish to ignore Oracle Configuration Manager configuration provide empty string for user name.
MYORACLESUPPORT_USERNAME=
#Provide the My Oracle Support Password
MYORACLESUPPORT_PASSWORD=<SECURE VALUE>
#Set this to true if you wish to decline the security updates. Setting this to true and providing empty string for My Oracle Support username will ignore the Oracle Configuration Manager configuration
DECLINE_SECURITY_UPDATES=true
#Set this to true if My Oracle Support Password is specified
SECURITY_UPDATES_VIA_MYORACLESUPPORT=false
#Provide the Proxy Host
PROXY_HOST=
#Provide the Proxy Port
PROXY_PORT=
#Provide the Proxy Username
PROXY_USER=
#Provide the Proxy Password
PROXY_PWD=<SECURE VALUE>
#Type String (URL format) Indicates the OCM Repeater URL which should be of the format [scheme[Http/Https]]://[repeater host]:[repeater port]
COLLECTOR_SUPPORTHUB_URL=
8.授权:chmod 664 wls.rsp
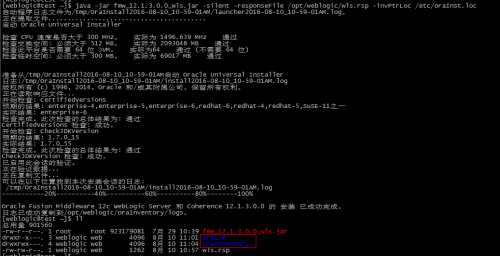
9.安装:java -jar fmw_12.2.1.3.0_wls.jar -silent -responseFile /opt/weblogic/wls.rsp -invPtrLoc /etc/oraInst.loc
10.
11.创建域domain
12.创建目录:mkdir -p /opt/weblogic/Oracle/Middleware/user_projects/domains/base_domain/
13.创建文件:vim create_domain.rsp,文件内容如下:
read template from "/opt/weblogic/Oracle/Middleware/wlserver/common/templates/wls/wls.jar";
set JavaHome "/opt/weblogic/jdk1.8.0_121";
set ServerStartMode "dev";
find Server "AdminServer" as AdminServer;
set AdminServer.ListenAddress "";
set AdminServer.ListenPort "8001";
set AdminServer.SSL.Enabled "true";
set AdminServer.SSL.ListenPort "8002";
//We can directly create a new managed server.
create Server "base" as BASE;
set BASE.ListenAddress "";
set BASE.ListenPort "8003";
//set BASE.SSL.Enabled "true";
//set BASE.SSL.ListenPort "8004″;
//Create Machine
create Machine "base" as Machinename;
//use templates default weblogic user
find User "weblogic" as u1;
set u1.password "weblogic123";
//create a new user
create User "weblogic2" as u2;
set u2.password "weblogic123";
write domain to "/opt/weblogic/Oracle/Middleware/user_projects/domains/base_domain/";
// The domain name will be "demo-domain"
close template;
14.切换目录:cd /opt/weblogic/Oracle/Middleware/wlserver/common/bin
15.执行命令:./config.sh -mode=silent -silent_script=/opt/weblogic/create_domain.rsp -logfile=/opt/weblogic/create_domain.log
16.
17.weblogic启动:
cd Oracle/Middleware/user_projects/domains/base_domain/bin/
nohup ./startWebLogic.sh >nohup_console.log &
nohup ./startNodeManager.sh >nohup_node.log &
18.访问控制台:http://ip:8001/console
19.事情就这样完成了。