sentinel-目录
        主从复制高可用
        安装配置
        实现原理
        架构说明
        客户端连接
        常见开发运维问题
一、主从复制高可用
1、主从复制的作用?
为主提供一个备份,当主服务器挂掉后,可以为客户端提供主服务器中完整的数据;
为主服务器进行分流,将读操作放到从节点上。
2、主从复制高可用存在的问题?
手动故障转移
写能力和存储能力受限
3、手动故障转移:

![]()
如图,假如这时候master挂掉了, master向slave的复制也被断掉了,这对于我们连接master的客户端肯定会连接或者读写失败的。这对于连接或读写分离的策略,这里的读是正常的,但是数据的更新却是无法保证的。
解决方案:
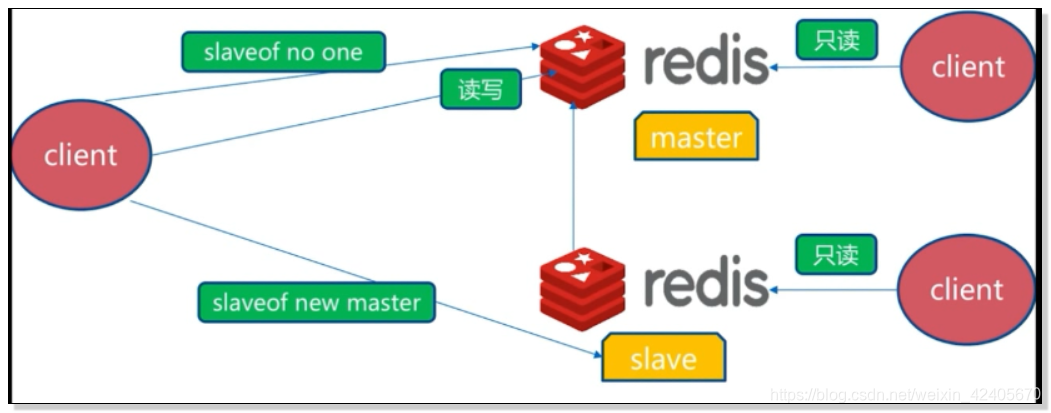
![]()
发生以上问题后,要进行故障转移。首先,要选中一个客户端slave,让它执行slaveof no one,让它成为master;然后对于其余的slave让它们执行slaveof new master 从而向新的master进行数据同步,这样就完成了生成一个新的master和向它复制的过程。
同时,我们的客户端slave也会去读取新的master。
二、 redis sentinel
1、 Redis Sentinel架构:

![]()
首先,Redis Sentinel包含多个redis节点,其中包括一主一从或者一主多从等多个节点;同样包含有多个sentinel节点。
sentinel节点主要用于对redis节点的状态进行故障判断,对redis进行故障转移的处理以及对客户端进行通知的处理。
对于一个节点的失败是可以达到公平性,还可以保证高可用,因为当前某个sentinel节点挂了,还可以保证整个Senetinel结构是完美的。
2、Redis Sentinel故障转移:

![]()
- 多个Sentinel发现并确认master有问题
- 选举出一个sentinel作为领导
- 选出一个slave作为master
- 通知其余slave成为新的master的slave
- 通知客户端主从变化
- 等待老的master复活成为新master的slave
整个过程其实就是从手动故障配置转移改成由sentinel进行故障发现、故障处理转移、故障通知的机制。

![]()
Redis Sentinel可以进行多套master~slave的机制的监控;每套master~slave会使用一个master-name进行标识。
三、redis sentinel 安装
1、安装与配置
1)配置开启主从节点
2) 配置开启sentinel监控主节点。(sentinel是特殊的redis)
3)实际应该多机器
4)详细配置节点
2、案例:

![]()
有个master:master-7000,两个slave: slave-7001,slave-7002:
1)Redis主节点:
启动:
redis-server redis-7000.conf
配置:
port 7000
daemonnize yes
pidfile /var/run/redis-7000.pid
logfile "7000.log"
2) Redis从节点
启动 :
redis-server redis-7001.conf
redis-server redis-7002.conf
配置:
slave-1:
port 7001
daemonnize yes
pidfile /var/run/redis-7001.pid
logfile "7001.log"
dir "/opt/soft/redis/data/"
slaveof 127.0.0.1 7000
slave-2:
port 7002
daemonnize yes
pidfile /var/run/redis-7002.pid
logfile "7002.log"
dir "/opt/soft/redis/data/"
slaveof 127.0.0.1 7000
3、sentinel主要配置
port ${port}
dir "/opt/soft/redis/data/"
logfile "${port}.log"
sentinel monitor mymaster 127.0.0.1 7000 2
sentinel down-after-milliseconds mymaster 30000
sentinel parallel-syncs mymaster 1
sentinel failover-timeout mymaster 180000
四、redis sentine安装演示1
1、配置主节点配置文件: redis-7000.conf
[root@VM_0_14_centos conf]# ll
total 0
[root@VM_0_14_centos conf]# vim redis-7000.conf
1)配置参数:
port 7000
daemonize yes
pidfile /var/run/redis-7000.pid
logfile "7000.log"
dir "/usr/local/redis/data/"
2)将redis-7000复制为从节点rediss-7001、redis-7002
[root@VM_0_14_centos conf]# sed "s/7000/7001/g" redis-7000.conf > redis-7001.conf
[root@VM_0_14_centos conf]# sed "s/7000/7002/g" redis-7000.conf > redis-7002.conf
[root@VM_0_14_centos conf]# ll
total 12
-rw-r--r-- 1 root root 106 Nov 11 14:53 redis-7000.conf
-rw-r--r-- 1 root root 106 Nov 11 14:54 redis-7001.conf
-rw-r--r-- 1 root root 106 Nov 11 14:54 redis-7002.conf
3)让redis-7001、redis-7002指向redis-7000主节点:
[root@VM_0_14_centos conf]# echo "slaveof 127.0.0.1 7000" >> redis-7001.conf
[root@VM_0_14_centos conf]#
[root@VM_0_14_centos conf]# echo "slaveof 127.0.0.1 7000" >> redis-7002.conf
[root@VM_0_14_centos conf]# ll
total 12
-rw-r--r-- 1 root root 106 Nov 11 14:53 redis-7000.conf
-rw-r--r-- 1 root root 129 Nov 11 14:55 redis-7001.conf
-rw-r--r-- 1 root root 129 Nov 11 14:55 redis-7002.conf
[root@VM_0_14_centos conf]# cat redis-7000.conf
port 7000
daemonize yes
pidfile /var/run/redis-7000.pid
logfile "7000.log"
dir "/usr/local/redis/data/"
[root@VM_0_14_centos conf]# cat redis-7001.conf
port 7001
daemonize yes
pidfile /var/run/redis-7001.pid
logfile "7001.log"
dir "/usr/local/redis/data/"
slaveof 127.0.0.1 7000
[root@VM_0_14_centos conf]# cat redis-7002.conf
port 7002
daemonize yes
pidfile /var/run/redis-7002.pid
logfile "7002.log"
dir "/usr/local/redis/data/"
slaveof 127.0.0.1 7000
2、启动主、从节点:
[root@VM_0_14_centos conf]# redis-server redis-7000.conf
[root@VM_0_14_centos conf]# redis-cli -p 7000 ping
PONG
[root@VM_0_14_centos conf]# redis-server redis-7001.conf
[root@VM_0_14_centos conf]# redis-cli -p 7001 ping
PONG
[root@VM_0_14_centos conf]# redis-server redis-7002.conf
[root@VM_0_14_centos conf]# redis-cli -p 7002 ping
PONG
3、查看主从节点端口及相关配置信息:

![]()
五、 redis sentinel 安装2
安装配置redis-sentinel:
1、创建sentinel.conf文件:
port 26379
dir /tmp
sentinel monitor mymaster 192.168.1.108 6379 2
sentinel auth-pass mymaster MySUPER--secret-0123passw0rd
sentinel down-after-milliseconds mymaster 30000
sentinel parallel-syncs mymaster 1
sentinel failover-timeout mymaster 180000
2、复制创建 redis-sentinel-26379.conf文件:
cat sentinel.conf | grep -v "#" | grep -v "^$" > redis-sentinel-26379.conf
3、主节点参数配置:
port 26379
daemonize yes
dir /usr/local/redis/data/
logfile "26379.log"
sentinel monitor mymaster 127.0.0.1 7000 2
sentinel down-after-milliseconds mymaster 30000
sentinel parallel-syncs mymaster 1
sentinel failover-timeout mymaster 180000
4、启动redis-sentinel-26379主节点:
[root@VM_0_14_centos conf]# /usr/bin/redis-sentinel redis-sentinel-26379.conf
5、查看主节点状态:
[root@VM_0_14_centos conf]# ps -ef | grep redis-sentinel
root 31610 1 0 15:31 ? 00:00:00 /usr/bin/redis-sentinel *:26379 [sentinel]
root 31699 25301 0 15:32 pts/0 00:00:00 grep --color=auto redis-sentinel
6、从sentinel端口26379启动:
[root@VM_0_14_centos conf]# redis-cli -p 26379
127.0.0.1:26379>
7、为两个从节点配置sentinel:
[root@VM_0_14_centos conf]# sed "s/26379/26380/g" redis-sentinel-26379.conf > redis-sentinel-26380.conf
[root@VM_0_14_centos conf]# sed "s/26379/26381/g" redis-sentinel-26379.conf > redis-sentinel-26381.conf
8、启动从节点的sentinel:
[root@VM_0_14_centos conf]# /usr/bin/redis-sentinel redis-sentinel-26380.conf
[root@VM_0_14_centos conf]# /usr/bin/redis-sentinel redis-sentinel-26381.conf
9、状态查看;
[root@VM_0_14_centos conf]# ps -ef | grep redis-sentinel
root 31610 1 0 15:31 ? 00:00:00 /usr/bin/redis-sentinel *:26379 [sentinel]
root 32545 1 0 15:38 ? 00:00:00 /usr/bin/redis-sentinel *:26380 [sentinel]
root 32556 1 0 15:38 ? 00:00:00 /usr/bin/redis-sentinel *:26381 [sentinel]
root 32582 25301 0 15:38 pts/0 00:00:00 grep --color=auto redis-sentinel
[root@VM_0_14_centos conf]# redis-cli -p 26381127.0.0.1:26381> info# Server
redis_version:3.0.7
redis_git_sha1:00000000
redis_git_dirty:0
redis_build_id:d709ac81eddea5b3
redis_mode:sentinel
os:Linux 4.9.87-linuxkit-aufs x86_64
arch_bits:64
multiplexing_api:epoll
gcc_version:4.8.5
process_id:202
run_id:0120cece7bbd3c8c6ae3f7c8530e7608efda863e
tcp_port:26381
uptime_in_seconds:62
uptime_in_days:0
hz:16
lru_clock:14510388
config_file:/opt/soft/redis-3.0.7/config/redis-sentinel-26381.conf
# Sentinel
sentinel_masters:1
sentinel_tilt:0
sentinel_running_scripts:0
sentinel_scripts_queue_length:0
master0:name=mymaster,status=ok,address=127.0.0.1:7000,slaves=2,sentinels=3
[root@VM_0_14_centos conf]# redis-cli -p 26380 info sentinel# Sentinel
sentinel_masters:1
sentinel_tilt:0
sentinel_running_scripts:0
sentinel_scripts_queue_length:0
master0:name=mymaster,status=ok,address=127.0.0.1:7000,slaves=2,sentinels=3
六、 java 客服端
- 请求响应流程
- Jedis
- Redis-py
- 直连?
1.服务高可用?
2.客户端高可用?
1、客户端实现基本原理-step1

![]()
首先,我们要获取所有的sentinel节点,因为我们不知道哪个sentinel节点是活的,哪个sentnel节点已经宕机,所以我们要获取所有的sentinel节点的集合。同时,我要获取所以的master,就需要获取所有的master-name。
然后去遍历sentinel集合,找到可用的sentinel节点,也就是可以被ping通的节点。
2、客户端实现基本原理-step2

![]()
通过sentinel节点的集合和masterName去sentine-k中去查询并返回可用master节点的真正可用信息。
3、客户端实现基本原理-step3

![]()
当我们的客户端获取到master节点的时候,它会执行一次role或rol replication进行一次验证,从而验证该节点是否是真的master节点

![]()
如果master节点发生了变化,那么,sentinel是感知的。因为谁是真正的master,是由他来决定的。
Sentinel和客户端进行通知的机制:它们内部采用的是发布订阅的方式实现的。

![]()
4、客户端接入流程:
1) Sentinel 地址集合
2)masterName
3)不是代理模式
5、Jedis的使用:
JedisSentinelPool senntinelPool = new JedisSentinelPool(masterName,sentinelSet,poolConfig,timeout);
Jedis jedis = null;
try {
    jedis = redisSentinelPool.getResource();
    //jedis command
}catch(Exception e){ logger.error(e.getMessage(),e); }finally( if(jedis != null) jedis.close(): }