| 项目 |
内容 |
| 这个作业属于哪个课程 |
<任课教师博客主页链接>https://www.cnblogs.com/nwnu-daizh/ |
| 这个作业的要求在哪里 |
<作业链接地址>https://www.cnblogs.com/nwnu-daizh/p/11953993.html |
| 作业学习目标 |
(1)掌握GUI布局管理器用法; (2)掌握Java Swing文本输入组件用途及常用API; (3)掌握Java Swing选择输入组件用途及常用API。 |
第一部分:第十二章本周理论知识
1.模型-视图-控制器模式
模型:储存内容
视图:显示内容
控制器:处理用户输入
2.布局管理
- 局管理器(FlowLayout) :JPanel对象的默认布局管理器为FlowLayout,组件加入JPanel中总是处于中央,一行可以排列多个组件,如果一行的空间容纳不下所有的组件则换行。当顶层窗口缩放时,JPanel中组件的大小不会随之缩放。
- 边框布局管理器(BorderLayout) 是JFrame的内容窗格的默认布局管理器,可以选择将空间放在内容窗格的东、南、西、北、中。 且将组件加入其中时,组件会充满其对应的整个区域,如果在这个方位再加入一个组件,会覆盖原本存在的组件。当顶层窗口缩放时,东南西北的组件不会随之变化,中部的组件会等比例变化。 如果要在某方法并排加入几个组件,则可以先将组件加入JPanel中,再放入边框布局管理器。
BorderLayout的常量定义为字符串 frame.add(new JButton("Yes"),BorderLayout.SOUTH);
- 网格布局(Grid Layout) 布局类似于表格,每个单元大小一致,当顶层窗口缩放时组件大小也随之变化,但是尺寸比例保持一致。
frame.SetLayout(new GridLayout(4,4));//形成4x4的网格
frame.add(new JButton("1"));
GridLayout(int r,int c) 参数之一可以为0,但是不能同时为0
GridLayout(int r,int c,int hgap,int vgap) hgap表示单元之间的水平间距,vgap表示单元之间的垂直间距
3.文本输入
- 扩展于JTextComponent的JTextField和JTextArea 。JTextField和JTextArea都用于文本输入,其中JTextField接收单行文本的输入,而JTextArea可接收多行文本的输入。列数为文本域的宽度,如果希望文本域最多能输入N个字符,则将宽度设置为N:JTextField text = new JTextField("Input Here",20);
第二个构造函数可以指定文本区显示的行数和列数。如果需要设置滚动条,则需要将文本区加入JScrollPane中,再讲JScrollPane插入容器。
JTextArea area = new TextArea(4,10);
JScrollPane pane = new JScrollPane(area);
panel.add(pane);
- 扩展于JTextField的JPasswordField
接受单行输入,输入字符被特殊字符掩盖
- JLabel
没有任何修饰,不能响应用户输入,只是容纳文本的组件。可以设置标签的显示文字、图标以及对其方式
其中对其方式是SwingConstants里的常量,如LEFT/RIGHT/CENTER等
JLabel label = new JLabel("User Name:",SwingConstants.RIGHT);
4.选择组件
- JCheckBox :复选框自动带有标签和图标,在构造时可以提供,当用户选中复选框时会触发动作事件。
JCheckBox box = new JCheckBox("Bold");
box.setSelected(true);
- 单选钮(JRadioButton) :自带标签和图标。单选钮只能多选其一,要打到这种效果需要把所有的单选钮加入ButtonGroup的对象里,从而使得新按钮被按下时,取消前一个选中的按钮的状态。ButtonGroup直接扩展于Object类,所以单选钮需加入容器中进行布局,ButtonGroup和容器(如JPanel)是相互独立的。
选中时触发动作事件。
- 边框(Border) :任何继承自JComponent的组件都可以使用边框(void setBorder(Border b))。常用的方法是将组件放入容器中,然后容器使用边框。是通过调用BorderFactory的静态方法构建边框。
同时可以为边框设置标题:
Border etch = BorderFactory.createEtchedBorder();
Border title = BorderFactory.createTitleBorder(etch,"Title");
panel.setBorder(title);
- 组合框
JComboBox< T>是泛型类,构建时需注意。
组合框不仅有下拉选择的功能,还具有文本框编辑的功能。
获得当前选中内容:
combo.getItemAt(combo.getSelectedIndex());
//Object getItemAt(int index)
当用户从组合框中选中一个选项时,组合框就会产生一个动作事件。
- 条(JSlider)
滑动条在构造时默认是横向,如果需要纵向滑动条:
JSlider s = new JSlider(SwingConstants.VERTICAL,min,max,initialValue);
当滑动条滑动时,会触发ChangeEvent,需要调用addChangeListener()并且安装一个实现了ChangeListener接口的对象。这个接口只有一个StateChanged方法
//得到滑动条的当前值
ChangeListener listen = event ->{
JSlider s = (JSlider)event.getSource();
int val = s.getValue();
...
};
如果需要显示滑动条的刻度,则setPaintTicks(true);
如果要将滑动条强制对准刻度,则setSnapToTicks(true);
如果要为滑动条设置标签,则需要先构建一个Hashtable< Integer,Component>,将数字与标签对应起来,再调用setLabelTable(Dictionary label);
5.复杂的布局管理
- GridBagLayout(网格组布局) 即没有限制的网格布局,行和列的尺寸可以改变,且单元格可以合并
过程:
1)建议一个GridBagLayout对象,不需要指定行列数
2)将容器setLayout为GBL对象
3)为每个组件建立GridBagConstraints对象,即约束组件的大小以及排放方式
4)通过add(component,constraints)增加组件
使用帮助类来管理约束会方便很多。
- 不使用布局管理器
frame.setLayout(null);
JButton btn = new JButton("Yes");
frame.add(btn);
btn.setBounds(10,10,100,30);
//void setBounds(int x,int y,int width,int height)//x,y表示左上角的坐标,width/height表示组件宽和高,Component类的方法
- 组件的遍历顺序(焦点的顺序):从左至右从上到下
component.setFocusable(false);//组件不设置焦点
6.菜单
分为JMenuBar/JMenu/JMenuItem,当选择菜单项时会触发一个动作事件,需要注册监听器监听
7.对话框:对话框分为模式对话框和无模对话框,模式对话框就是未处理此对话框之前不允许与其他窗口交互。
- JOptionPane:提供了四个用静态方法(showxxxx)显示的对话框:
- 构造对话框的步骤: 1)选择对话框类型(消息、确认、选择、输入) 2)选择消息类型(String/Icon/Component/Object[]/任何其他对象)
3)选择图标(ERROR_MESSAGE/INFORMATION_MESSAGE/WARNING_MESSAGE/QUESTION_MESSAGE/PLAIN_MESSAGE)
4)对于确认对话框,选择按钮类型(DEFAULT_OPTION/YES_NO_OPTION/YES_NO_CANCEL_OPTION/OK_CANCEL_OPTION)
5)对于选项对话框,选择选项(String/Icon/Component)
6)对于输入对话框,选择文本框或组合框
确认对话框和选择对话框调用后会返回按钮值或被选的选项的索引值 - JDialog类 :可以自己创建对话框,需调用超类JDialog类的构造器
public aboutD extends JDialog
{
public aboutD(JFrame owner)
{
super(owner,"About Text",true);
....
}
}
构造JDialog类后需要setVisible才能时窗口可见
if(dialog == null)
dialog = new JDialog();
dialog.setVisible(true);
- 文件对话框(JFileChooser类)
- 颜色对话框(JColorChooser类)
第二部分:实验部分
实验1: 导入第12章示例程序,测试程序并进行组内讨论。
测试程序1
l 在elipse IDE中运行教材479页程序12-1,结合运行结果理解程序;
l 掌握布局管理器的用法;
l 理解GUI界面中事件处理技术的用途。
l 在布局管理应用代码处添加注释;
代码注释如下:
Calculator.java:
|
1
2
3
4
5
6
7
8
9
10
11
12
13
14
15
16
17
18
19
20
21
|
package
calculator;
import
java.awt.*;
import
javax.swing.*;
/**
* @version 1.35 2018-04-10
* @author Cay Horstmann
*/
public
class
Calculator
{
public
static
void
main(String[] args)
{
EventQueue.invokeLater(() -> {
var frame =
new
CalculatorFrame();
frame.setTitle(
"Calculator"
);
frame.setDefaultCloseOperation(JFrame.EXIT_ON_CLOSE);
//设置用户在此窗体上发起 "close" 时默认执行的操作
frame.setVisible(
true
);
});
}
}
|
CalculatorPanel.java:
|
1
2
3
4
5
6
7
8
9
10
11
12
13
14
15
16
17
18
19
20
21
22
23
24
25
26
27
28
29
30
31
32
33
34
35
36
37
38
39
40
41
42
43
44
45
46
47
48
49
50
51
52
53
54
55
56
57
58
59
60
61
62
63
64
65
66
67
68
69
70
71
72
73
74
75
76
77
78
79
80
81
82
83
84
85
86
87
88
89
90
91
92
93
94
95
96
97
98
99
100
101
102
103
104
105
106
107
108
109
110
111
112
113
114
115
116
117
118
119
120
121
122
123
124
125
126
127
128
129
130
131
132
133
134
135
136
137
138
139
140
141
142
|
package
calculator;
import
java.awt.*;
import
java.awt.event.*;
import
javax.swing.*;
/**
* A panel with calculator buttons and a result display.
*/
public
class
CalculatorPanel
extends
JPanel
{
private
JButton display;
private
JPanel panel;
private
double
result;
private
String lastCommand;
private
boolean
start;
private
JButton display1;
//无参构造器
public
CalculatorPanel()
{
setLayout(
new
BorderLayout());
//设置布局为边框布局,边框布局分东南西北中5个方位来添加控件。
result =
0
;
lastCommand =
"="
;
start =
true
;
// add the display
display =
new
JButton(
"0"
);
//初始数值为0
display.setEnabled(
false
);
//设置 Action 的启用状态
add(display, BorderLayout.NORTH);
//添加display,放在北方
display1 =
new
JButton(
"00"
);
display1.setEnabled(
false
);
//设置 Action 的启用状态
add(display1, BorderLayout.EAST);
//添加display,放在东方
var insert =
new
InsertAction();
var command =
new
CommandAction();
// add the buttons in a 4 x 4 grid
panel =
new
JPanel();
//设置窗口布局为网络布局样式
panel.setLayout(
new
GridLayout(
4
,
4
));
addButton(
"7"
, insert);
addButton(
"8"
, insert);
addButton(
"9"
, insert);
addButton(
"/"
, command);
addButton(
"4"
, insert);
addButton(
"5"
, insert);
addButton(
"6"
, insert);
addButton(
"*"
, command);
addButton(
"1"
, insert);
addButton(
"2"
, insert);
addButton(
"3"
, insert);
addButton(
"-"
, command);
addButton(
"0"
, insert);
addButton(
"."
, insert);
addButton(
"="
, command);
addButton(
"+"
, command);
add(panel, BorderLayout.CENTER);
//居中方位
}
/**
* Adds a button to the center panel.
* @param label the button label
* @param listener the button listener
*/
private
void
addButton(String label, ActionListener listener)
{
var button =
new
JButton(label);
button.addActionListener(listener);
//事件监听器
panel.add(button);
}
/**
* This action inserts the button action string to the end of the display text.
*/
//内部类
private
class
InsertAction
implements
ActionListener
{
//actionPerformed方法接受ActionEvent参数
public
void
actionPerformed(ActionEvent event)
{
String input = event.getActionCommand();
if
(start)
{
display.setText(
""
);
start =
false
;
}
display.setText(display.getText() + input);
}
}
/**
* This action executes the command that the button action string denotes.
*/
private
class
CommandAction
implements
ActionListener
{
public
void
actionPerformed(ActionEvent event)
{
String command = event.getActionCommand();
if
(start)
{
if
(command.equals(
"-"
))
{
display.setText(command);
start =
false
;
}
else
lastCommand = command;
}
else
{
calculate(Double.parseDouble(display.getText()));
lastCommand = command;
start =
true
;
}
}
}
/**
* Carries out the pending calculation.
* @param x the value to be accumulated with the prior result.
*/
public
void
calculate(
double
x)
{
if
(lastCommand.equals(
"+"
)) result += x;
else
if
(lastCommand.equals(
"-"
)) result -= x;
else
if
(lastCommand.equals(
"*"
)) result *= x;
else
if
(lastCommand.equals(
"/"
)) result /= x;
else
if
(lastCommand.equals(
"="
)) result = x;
display.setText(
""
+ result);
}
}
|
CalculatorFrame.java:
|
1
2
3
4
5
6
7
8
9
10
11
12
13
14
15
|
package
calculator;
import
javax.swing.*;
/**
* A frame with a calculator panel.
*/
public
class
CalculatorFrame
extends
JFrame
{
public
CalculatorFrame()
{
add(
new
CalculatorPanel());
//添加面板
pack();
//使用组件首选大小
}
}
|
运行结果如图:
实验测试如图:
测试程序2
l 在elipse IDE中调试运行教材486页程序12-2,结合运行结果理解程序;
l 掌握文本组件的用法;
l 记录示例代码阅读理解中存在的问题与疑惑。
代码注释如下:
TextComponentTest.java:
|
1
2
3
4
5
6
7
8
9
10
11
12
13
14
15
16
17
18
19
20
21
|
package
text;
import
java.awt.*;
import
javax.swing.*;
/**
* @version 1.42 2018-04-10
* @author Cay Horstmann
*/
public
class
TextComponentTest
{
public
static
void
main(String[] args)
{
EventQueue.invokeLater(() -> {
var frame =
new
TextComponentFrame();
frame.setTitle(
"TextComponentTest"
);
frame.setDefaultCloseOperation(JFrame.EXIT_ON_CLOSE);
frame.setVisible(
true
);
});
}
}
|
TextComponentFrame.java:
|
1
2
3
4
5
6
7
8
9
10
11
12
13
14
15
16
17
18
19
20
21
22
23
24
25
26
27
28
29
30
31
32
33
34
35
36
37
38
39
40
41
42
43
44
45
46
47
48
49
50
51
52
53
54
55
56
57
58
59
|
package
text;
import
java.awt.BorderLayout;
import
java.awt.GridLayout;
import
javax.swing.JButton;
import
javax.swing.JFrame;
import
javax.swing.JLabel;
import
javax.swing.JPanel;
import
javax.swing.JPasswordField;
import
javax.swing.JScrollPane;
import
javax.swing.JTextArea;
import
javax.swing.JTextField;
import
javax.swing.SwingConstants;
/**
* A frame with sample text components.
*/
public
class
TextComponentFrame
extends
JFrame
{
public
static
final
int
TEXTAREA_ROWS =
8
;
public
static
final
int
TEXTAREA_COLUMNS =
20
;
public
TextComponentFrame()
{
var textField =
new
JTextField();
var passwordField =
new
JPasswordField();
//在框架北方建立有JTextField,JPasswordField组件的面板
var northPanel =
new
JPanel();
northPanel.setLayout(
new
GridLayout(
2
,
2
));
//网格布局
northPanel.add(
new
JLabel(
"User name: "
, SwingConstants.RIGHT));
northPanel.add(textField);
northPanel.add(
new
JLabel(
"Password: "
, SwingConstants.RIGHT));
northPanel.add(passwordField);
add(northPanel, BorderLayout.NORTH);
//在框架中央建立JTextArea组件的滚动窗格
var textArea =
new
JTextArea(TEXTAREA_ROWS, TEXTAREA_COLUMNS);
var scrollPane =
new
JScrollPane(textArea);
add(scrollPane, BorderLayout.CENTER);
// add button to append text into the text area
var southPanel =
new
JPanel();
var insertButton =
new
JButton(
"Insert"
);
southPanel.add(insertButton);
//lambda表达式监听动作
insertButton.addActionListener(event ->
textArea.append(
"User name: "
+ textField.getText() +
" Password: "
+
new
String(passwordField.getPassword()) +
"\n"
));
add(southPanel, BorderLayout.SOUTH);
pack();
}
}
|
测试程序3
l 在elipse IDE中调试运行教材489页程序12-3,结合运行结果理解程序;
l 掌握复选框组件的用法;
l 记录示例代码阅读理解中存在的问题与疑惑。
代码注释如下:
CheckBoxTest.java:
|
1
2
3
4
5
6
7
8
9
10
11
12
13
14
15
16
17
18
19
20
21
|
package
checkBox;
import
java.awt.*;
import
javax.swing.*;
/**
* @version 1.35 2018-04-10
* @author Cay Horstmann
*/
public
class
CheckBoxTest
{
public
static
void
main(String[] args)
{
EventQueue.invokeLater(() -> {
var frame =
new
CheckBoxFrame();
frame.setTitle(
"CheckBoxTest"
);
frame.setDefaultCloseOperation(JFrame.EXIT_ON_CLOSE);
frame.setVisible(
true
);
});
}
}
|
CheckBoxFrame.java:
|
1
2
3
4
5
6
7
8
9
10
11
12
13
14
15
16
17
18
19
20
21
22
23
24
25
26
27
28
29
30
31
32
33
34
35
36
37
38
39
40
41
42
43
44
45
46
47
48
49
50
51
52
53
54
|
package
checkBox;
import
java.awt.*;
import
java.awt.event.*;
import
javax.swing.*;
/**
* A frame with a sample text label and check boxes for selecting font
* attributes.
*/
public
class
CheckBoxFrame
extends
JFrame
{
private
JLabel label;
private
JCheckBox bold;
private
JCheckBox italic;
private
static
final
int
FONTSIZE =
24
;
public
CheckBoxFrame()
{
// add the sample text label
label =
new
JLabel(
"The quick brown fox jumps over the lazy dog."
);
//用相应的文本构造了JLable组件
label.setFont(
new
Font(
"Serif"
, Font.BOLD, FONTSIZE));
//设置lable的字体
add(label, BorderLayout.CENTER);
//边框布局:居中位置
// this listener sets the font attribute of
// the label to the check box state
//Lambda表达式
ActionListener listener = event -> {
int
mode =
0
;
if
(bold.isSelected()) mode += Font.BOLD;
if
(italic.isSelected()) mode += Font.ITALIC;
label.setFont(
new
Font(
"Serif"
, mode, FONTSIZE));
};
// add the check boxes
var buttonPanel =
new
JPanel();
//创建复选框
bold =
new
JCheckBox(
"Bold"
);
bold.addActionListener(listener);
//添加监听事件
bold.setSelected(
true
);
//setSelected()方法原定或取消复选框
buttonPanel.add(bold);
italic =
new
JCheckBox(
"Italic"
);
italic.addActionListener(listener);
buttonPanel.add(italic);
add(buttonPanel, BorderLayout.SOUTH);
pack();
}
}
|
运行结果如图:
加粗:

倾斜:
加粗,倾斜:

测试程序4
l 在elipse IDE中调试运行教材491页程序12-4,运行结果理解程序;
l 掌握单选按钮组件的用法;
l 记录示例代码阅读理解中存在的问题与疑惑。
代码注释如下:
RadioButtonTest.java:
|
1
2
3
4
5
6
7
8
9
10
11
12
13
14
15
16
17
18
19
20
21
|
package
radioButton;
import
java.awt.*;
import
javax.swing.*;
/**
* @version 1.35 2018-04-10
* @author Cay Horstmann
*/
public
class
RadioButtonTest
{
public
static
void
main(String[] args)
{
EventQueue.invokeLater(() -> {
var frame =
new
RadioButtonFrame();
frame.setTitle(
"RadioButtonTest"
);
frame.setDefaultCloseOperation(JFrame.EXIT_ON_CLOSE);
frame.setVisible(
true
);
});
}
}
|
RadioButtonFrame.java:
|
1
2
3
4
5
6
7
8
9
10
11
12
13
14
15
16
17
18
19
20
21
22
23
24
25
26
27
28
29
30
31
32
33
34
35
36
37
38
39
40
41
42
43
44
45
46
47
48
49
50
51
52
53
54
55
56
57
58
|
package
radioButton;
import
java.awt.*;
import
java.awt.event.*;
import
javax.swing.*;
/**
* A frame with a sample text label and radio buttons for selecting font sizes.
*/
public
class
RadioButtonFrame
extends
JFrame
{
private
JPanel buttonPanel;
private
ButtonGroup group;
private
JLabel label;
private
static
final
int
DEFAULT_SIZE =
36
;
public
RadioButtonFrame()
{
// add the sample text label
label =
new
JLabel(
"The quick brown fox jumps over the lazy dog."
);
label.setFont(
new
Font(
"Serif"
, Font.PLAIN, DEFAULT_SIZE));
add(label, BorderLayout.CENTER);
// add the radio buttons
buttonPanel =
new
JPanel();
group =
new
ButtonGroup();
//构造ButtonGroup对象
addRadioButton(
"Small"
,
8
);
addRadioButton(
"Medium"
,
12
);
addRadioButton(
"Large"
,
18
);
addRadioButton(
"Extra large"
,
36
);
add(buttonPanel, BorderLayout.SOUTH);
pack();
}
/**
* Adds a radio button that sets the font size of the sample text.
* @param name the string to appear on the button
* @param size the font size that this button sets
*/
public
void
addRadioButton(String name,
int
size)
{
boolean
selected = size == DEFAULT_SIZE;
var button =
new
JRadioButton(name, selected);
group.add(button);
//将JRadioButton类型的对象添加到按钮组中
buttonPanel.add(button);
// this listener sets the label font size
//定义动作监听器:把字体大小设置为特定值
ActionListener listener = event -> label.setFont(
new
Font(
"Serif"
, Font.PLAIN, size));
button.addActionListener(listener);
}
}
|
运行结果如图:

测试程序5
l 在elipse IDE中调试运行教材494页程序12-5,结合运行结果理解程序;
l 掌握边框的用法;
l 记录示例代码阅读理解中存在的问题与疑惑。
代码注释如下:
BorderTest.java:
|
1
2
3
4
5
6
7
8
9
10
11
12
13
14
15
16
17
18
19
20
21
|
package
border;
import
java.awt.*;
import
javax.swing.*;
/**
* @version 1.35 2018-04-10
* @author Cay Horstmann
*/
public
class
BorderTest
{
public
static
void
main(String[] args)
{
EventQueue.invokeLater(() -> {
var frame =
new
BorderFrame();
frame.setTitle(
"BorderTest"
);
frame.setDefaultCloseOperation(JFrame.EXIT_ON_CLOSE);
frame.setVisible(
true
);
});
}
}
|
BorderFrame.java:
|
1
2
3
4
5
6
7
8
9
10
11
12
13
14
15
16
17
18
19
20
21
22
23
24
25
26
27
28
29
30
31
32
33
34
35
36
37
38
39
40
41
42
43
44
45
46
47
48
|
package
border;
import
java.awt.*;
import
javax.swing.*;
import
javax.swing.border.*;
/**
* A frame with radio buttons to pick a border style.
*/
public
class
BorderFrame
extends
JFrame
{
private
JPanel demoPanel;
private
JPanel buttonPanel;
private
ButtonGroup group;
public
BorderFrame()
{
demoPanel =
new
JPanel();
buttonPanel =
new
JPanel();
group =
new
ButtonGroup();
//调用BorderFactory的静态方法创建边框,不同效果的设置(见运行截图说明)
addRadioButton(
"Lowered bevel"
, BorderFactory.createLoweredBevelBorder());
addRadioButton(
"Raised bevel"
, BorderFactory.createRaisedBevelBorder());
addRadioButton(
"Etched"
, BorderFactory.createEtchedBorder());
addRadioButton(
"Line"
, BorderFactory.createLineBorder(Color.BLUE));
addRadioButton(
"Matte"
, BorderFactory.createMatteBorder(
10
,
10
,
10
,
10
, Color.BLUE));
addRadioButton(
"Empty"
, BorderFactory.createEmptyBorder());
//将带有标题的蚀刻边框添加到面板上
Border etched = BorderFactory.createEtchedBorder();
Border titled = BorderFactory.createTitledBorder(etched,
"Border types"
);
//给边框添加标题Border types
buttonPanel.setBorder(titled);
setLayout(
new
GridLayout(
2
,
1
));
//两行一列的网格布局
add(buttonPanel);
add(demoPanel);
pack();
}
public
void
addRadioButton(String buttonName, Border b)
{
var button =
new
JRadioButton(buttonName);
button.addActionListener(event -> demoPanel.setBorder(b));
group.add(button);
buttonPanel.add(button);
}
}
|
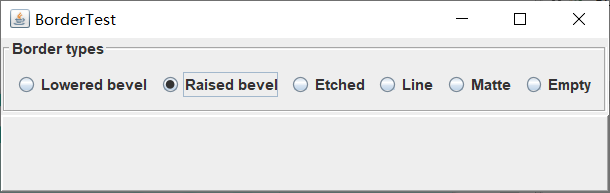
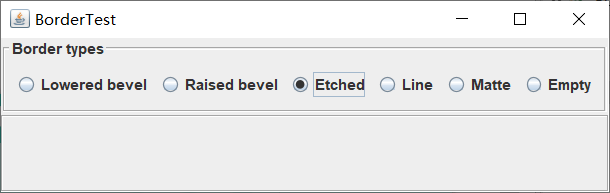
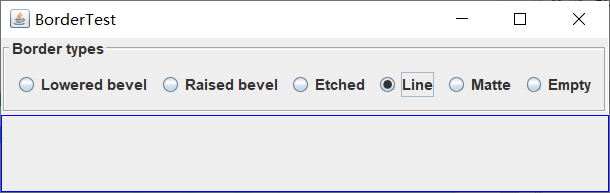
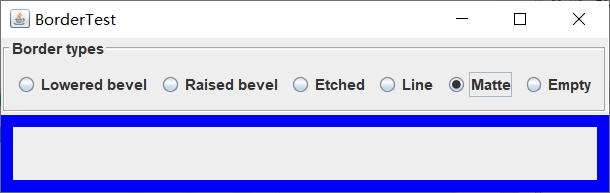
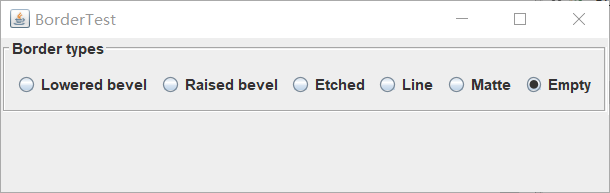
运行结果如图:
设置凹面的效果:
设置凸面的效果:
设置蚀刻的效果:
设置线条边界,指定为蓝色:
设置垫子边界,指定为蓝色:
设置空边界:
测试程序6
l 在elipse IDE中调试运行教材498页程序12-6,结合运行结果理解程序;
l 掌握组合框组件的用法;
l 记录示例代码阅读理解中存在的问题与疑惑。
代码注释如下:
ComboBoxTest.java:
|
1
2
3
4
5
6
7
8
9
10
11
12
13
14
15
16
17
18
19
20
21
|
package
comboBox;
import
java.awt.*;
import
javax.swing.*;
/**
* @version 1.36 2018-04-10
* @author Cay Horstmann
*/
public
class
ComboBoxTest
{
public
static
void
main(String[] args)
{
EventQueue.invokeLater(() -> {
var frame =
new
ComboBoxFrame();
frame.setTitle(
"ComboBoxTest"
);
frame.setDefaultCloseOperation(JFrame.EXIT_ON_CLOSE);
frame.setVisible(
true
);
});
}
}
|
ComboBoxFrame.java:
|
1
2
3
4
5
6
7
8
9
10
11
12
13
14
15
16
17
18
19
20
21
22
23
24
25
26
27
28
29
30
31
32
33
34
35
36
37
38
39
40
41
42
43
44
45
46
47
48
49
50
51
52
|
package
comboBox;
import
java.awt.BorderLayout;
import
java.awt.Font;
import
javax.swing.JComboBox;
import
javax.swing.JFrame;
import
javax.swing.JLabel;
import
javax.swing.JPanel;
/**
* A frame with a sample text label and a combo box for selecting font faces.
*/
public
class
ComboBoxFrame
extends
JFrame
{
private
JComboBox<String> faceCombo;
private
JLabel label;
private
static
final
int
DEFAULT_SIZE =
24
;
public
ComboBoxFrame()
{
// add the sample text label
label =
new
JLabel(
"The quick brown fox jumps over the lazy dog."
);
label.setFont(
new
Font(
"Serif"
, Font.PLAIN, DEFAULT_SIZE));
add(label, BorderLayout.CENTER);
// make a combo box and add face names
//创建组合框
faceCombo =
new
JComboBox<>();
faceCombo.addItem(
"Serif"
);
faceCombo.addItem(
"SansSerif"
);
faceCombo.addItem(
"Monospaced"
);
faceCombo.addItem(
"Dialog"
);
faceCombo.addItem(
"DialogInput"
);
// the combo box listener changes the label font to the selected face name
faceCombo.addActionListener(event ->
label.setFont(
new
Font(faceCombo.getItemAt(faceCombo.getSelectedIndex()),
Font.PLAIN, DEFAULT_SIZE)));
// add combo box to a panel at the frame's southern border
var comboPanel =
new
JPanel();
comboPanel.add(faceCombo);
add(comboPanel, BorderLayout.SOUTH);
pack();
}
}
|
运行结果如图:

实验2:结对编程练习
利用所掌握的GUI技术,设计一个用户信息采集程序,要求如下:
(1) 用户信息输入界面如下图所示:
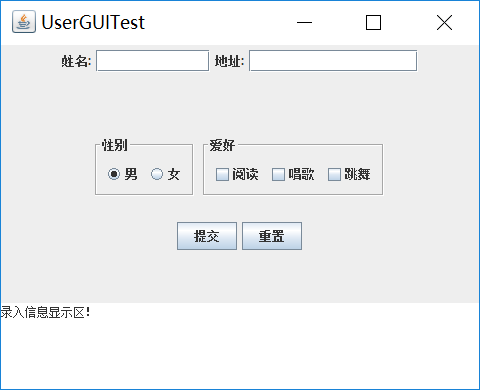
(2) 用户点击提交按钮时,用户输入信息显示在录入信息显示区,格式如下:
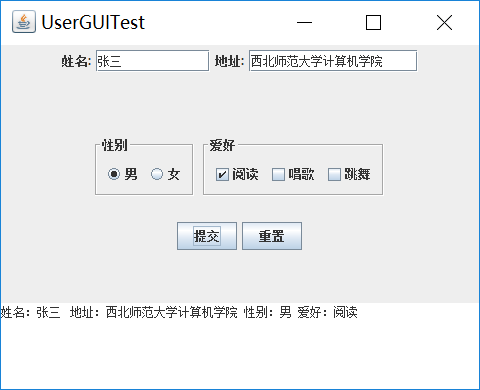
(3) 用户点击重置按钮后,清空用户已输入信息;
(4) 点击窗口关闭,程序退出。
实验要求:
1) 程序设计思路简述;
首先定义4*1网格,第一面板设置为1*4网格,分别添加姓名标签,文本域,地址标签,文本域。第二个面板设置为1*2网络,分别添加了两个面板,第一个面板设置单选框,第二个面板设置复选框。第三个面板定义了两个按钮,第四个面板添加一个文本区。通过点击提交按钮,对按钮事件设置了动作监听器,点击提交显示相关信息,点击重置按钮,全部信息清零。
2) 符合编程规范的程序代码;
代码如下:
UserGUITest .java:
|
1
2
3
4
5
6
7
8
9
10
11
12
13
14
15
16
17
|
packageUserGUITest;
importjava.awt.*;
importjavax.swing.*;
publicclassUserGUITest{
publicstaticvoidmain(String[]args)
{
EventQueue.invokeLater(()->{
varframe=newUserGUITFrame();
frame.setTitle(
"UserGUITest"
);
frame.setDefaultCloseOperation(JFrame.EXIT_ON_CLOSE);
frame.setVisible(
true
);
});
}
}
|
UserGUITFrame.java:
|
1
2
3
4
5
6
7
8
9
10
11
12
13
14
15
16
17
18
19
20
21
22
23
24
25
26
27
28
29
30
31
32
33
34
35
36
37
38
39
40
41
42
43
44
45
46
47
48
49
50
51
52
53
54
55
56
57
58
59
60
61
62
63
64
65
66
67
68
69
70
71
72
73
74
75
76
77
78
79
80
81
82
83
84
85
86
87
88
89
90
91
92
93
94
95
96
97
98
99
100
101
102
103
104
105
106
107
108
109
110
111
112
113
114
115
116
117
118
119
120
121
122
123
124
125
126
127
128
129
130
131
132
133
134
135
136
137
|
packageUserGUITest;
importjava.awt.BorderLayout;
importjava.awt.Component;
importjava.awt.Dimension;
importjava.awt.FlowLayout;
importjava.awt.GridLayout;
importjava.awt.Label;
importjava.awt.TextArea;
importjava.awt.TextField;
importjava.awt.event.ActionEvent;
importjava.awt.event.ActionListener;
importjavax.swing.BorderFactory;
importjavax.swing.ButtonGroup;
importjavax.swing.JButton;
importjavax.swing.JCheckBox;
importjavax.swing.JFrame;
importjavax.swing.JLabel;
importjavax.swing.JPanel;
importjavax.swing.JRadioButton;
importjavax.swing.JScrollPane;
importjavax.swing.JTextArea;
importjavax.swing.JTextField;
importjavax.swing.SwingConstants;
importjavax.swing.border.Border;
publicclassUserGUITFrameextendsJFrame{
publicstaticfinalintTEXTAREA_ROWS=
3
;
publicstaticfinalintTEXTAREA_COLUMNS=
7
;
publicUserGUITFrame(){
setSize(
520
,
470
);
setLayout(newGridLayout(
4
,
1
));
JPanelfirstpanel=newJPanel();
firstpanel.setLayout(newGridLayout(
1
,
4
));
firstpanel.setLayout(
null
);
JLabellabel1=newJLabel(
"姓名:"
);
JTextFieldtextField1=newJTextField();
JLabellabel2=newJLabel(
"地址:"
);
JTextFieldtextField2=newJTextField();
label1.setBounds(
60
,
17
,
70
,
20
);
textField1.setBounds(
110
,
10
,
130
,
35
);
label2.setBounds(
250
,
17
,
70
,
20
);
textField2.setBounds(
300
,
10
,
130
,
35
);
firstpanel.add(label1);
firstpanel.add(textField1);
firstpanel.add(label2);
firstpanel.add(textField2);
JPanelsecondpanel=newJPanel();
secondpanel.setLayout(newGridLayout(
1
,
2
));
secondpanel.setLayout(
null
);
JPanelsecondpanel1=newJPanel();
secondpanel1.setPreferredSize(newDimension(
160
,
70
));
ButtonGroupgroup=newButtonGroup();
JRadioButtonnan=newJRadioButton(
"男"
);
JRadioButtonnv=newJRadioButton(
"女"
);
group.add(nan);
group.add(nv);
secondpanel1.add(nan);
secondpanel1.add(nv);
Borderetched1=BorderFactory.createEtchedBorder();
Bordertitle1=BorderFactory.createTitledBorder(etched1,
"性别"
);
secondpanel1.setBorder(title1);
JPanelsecondpanel2=newJPanel();
JCheckBoxread=newJCheckBox(
"阅读"
);
JCheckBoxsing=newJCheckBox(
"唱歌"
);
JCheckBoxjump=newJCheckBox(
"跳舞"
);
secondpanel2.add(read);
secondpanel2.add(sing);
secondpanel2.add(jump);
Borderetched2=BorderFactory.createEtchedBorder();
Bordertitle2=BorderFactory.createTitledBorder(etched2,
"爱好"
);
secondpanel2.setBorder(title2);
secondpanel1.setBounds(
60
,
15
,
160
,
75
);
secondpanel2.setBounds(
245
,
15
,
200
,
75
);
secondpanel.add(secondpanel1);
secondpanel.add(secondpanel2);
JPanelthirdpanel=newJPanel();
JButtonqd=
new
JButton(
"提交"
);
JButtoncz=
new
JButton(
"重置"
);
thirdpanel.add(qd);
thirdpanel.add(cz);
JTextAreatextArea=newJTextArea(
"录入信息显示区!"
,TEXTAREA_ROWS,TEXTAREA_COLUMNS);
JScrollPanefifthpanel=newJScrollPane(textArea);
add(firstpanel);
add(secondpanel);
add(thirdpanel);
add(fifthpanel);
qd.addActionListener(newActionListener(){
publicvoidactionPerformed(ActionEvente){
Stringxingbie=
"性别:"
;
if
(nan.isSelected()){
xingbie+=
"男"
;
}
if
(nv.isSelected()){
xingbie+=
"女"
;
}
Stringaihao=
"爱好:"
;
if
(read.isSelected()){
aihao+=
"阅读"
;
}
if
(sing.isSelected()){
aihao+=
"唱歌"
;
}
if
(jump.isSelected()){
aihao+=
"跳舞"
;
}
textArea.setText(
null
);
textArea.append(
"姓名:"
+textField1.getText()+
""
+
"地址:"
+textField2.getText()+
""
+xingbie+
""
+aihao+
'\n'
);
}
});
cz.addActionListener(newActionListener(){
publicvoidactionPerformed(ActionEvente){
textField1.setText(
null
);
textField2.setText(
null
);
read.setSelected(
false
);
sing.setSelected(
false
);
jump.setSelected(
false
);
group.clearSelection();
textArea.setText(
"录入信息显示区!"
);
}
});
}
}
|
3) 程序运行功能界面截图;
提交前:

实验总结:
在这一章的理论学习和代码测试以及结对编程,让我对布局管理以及各组件的设置方法的应用有了由浅到深的理解与掌握.
测试程序3
l 在elipse IDE中调试运行教材489页程序12-3,结合运行结果理解程序;
l 掌握复选框组件的用法;
l 记录示例代码阅读理解中存在的问题与疑惑。
代码注释如下:
CheckBoxTest.java:
|
1
2
3
4
5
6
7
8
9
10
11
12
13
14
15
16
17
18
19
20
21
|
package
checkBox;
import
java.awt.*;
import
javax.swing.*;
/**
* @version 1.35 2018-04-10
* @author Cay Horstmann
*/
public
class
CheckBoxTest
{
public
static
void
main(String[] args)
{
EventQueue.invokeLater(() -> {
var frame =
new
CheckBoxFrame();
frame.setTitle(
"CheckBoxTest"
);
frame.setDefaultCloseOperation(JFrame.EXIT_ON_CLOSE);
frame.setVisible(
true
);
});
}
}
|
CheckBoxFrame.java:
|
1
2
3
4
5
6
7
8
9
10
11
12
13
14
15
16
17
18
19
20
21
22
23
24
25
26
27
28
29
30
31
32
33
34
35
36
37
38
39
40
41
42
43
44
45
46
47
48
49
50
51
52
53
54
|
package
checkBox;
import
java.awt.*;
import
java.awt.event.*;
import
javax.swing.*;
/**
* A frame with a sample text label and check boxes for selecting font
* attributes.
*/
public
class
CheckBoxFrame
extends
JFrame
{
private
JLabel label;
private
JCheckBox bold;
private
JCheckBox italic;
private
static
final
int
FONTSIZE =
24
;
public
CheckBoxFrame()
{
// add the sample text label
label =
new
JLabel(
"The quick brown fox jumps over the lazy dog."
);
//用相应的文本构造了JLable组件
label.setFont(
new
Font(
"Serif"
, Font.BOLD, FONTSIZE));
//设置lable的字体
add(label, BorderLayout.CENTER);
//边框布局:居中位置
// this listener sets the font attribute of
// the label to the check box state
//Lambda表达式
ActionListener listener = event -> {
int
mode =
0
;
if
(bold.isSelected()) mode += Font.BOLD;
if
(italic.isSelected()) mode += Font.ITALIC;
label.setFont(
new
Font(
"Serif"
, mode, FONTSIZE));
};
// add the check boxes
var buttonPanel =
new
JPanel();
//创建复选框
bold =
new
JCheckBox(
"Bold"
);
bold.addActionListener(listener);
//添加监听事件
bold.setSelected(
true
);
//setSelected()方法原定或取消复选框
buttonPanel.add(bold);
italic =
new
JCheckBox(
"Italic"
);
italic.addActionListener(listener);
buttonPanel.add(italic);
add(buttonPanel, BorderLayout.SOUTH);
pack();
}
}
|
运行结果如图:
加粗:
倾斜:
加粗,倾斜:
测试程序4
l 在elipse IDE中调试运行教材491页程序12-4,运行结果理解程序;
l 掌握单选按钮组件的用法;
l 记录示例代码阅读理解中存在的问题与疑惑。
代码注释如下:
RadioButtonTest.java:
|
1
2
3
4
5
6
7
8
9
10
11
12
13
14
15
16
17
18
19
20
21
|
package
radioButton;
import
java.awt.*;
import
javax.swing.*;
/**
* @version 1.35 2018-04-10
* @author Cay Horstmann
*/
public
class
RadioButtonTest
{
public
static
void
main(String[] args)
{
EventQueue.invokeLater(() -> {
var frame =
new
RadioButtonFrame();
frame.setTitle(
"RadioButtonTest"
);
frame.setDefaultCloseOperation(JFrame.EXIT_ON_CLOSE);
frame.setVisible(
true
);
});
}
}
|
RadioButtonFrame.java:
|
1
2
3
4
5
6
7
8
9
10
11
12
13
14
15
16
17
18
19
20
21
22
23
24
25
26
27
28
29
30
31
32
33
34
35
36
37
38
39
40
41
42
43
44
45
46
47
48
49
50
51
52
53
54
55
56
57
58
|
package
radioButton;
import
java.awt.*;
import
java.awt.event.*;
import
javax.swing.*;
/**
* A frame with a sample text label and radio buttons for selecting font sizes.
*/
public
class
RadioButtonFrame
extends
JFrame
{
private
JPanel buttonPanel;
private
ButtonGroup group;
private
JLabel label;
private
static
final
int
DEFAULT_SIZE =
36
;
public
RadioButtonFrame()
{
// add the sample text label
label =
new
JLabel(
"The quick brown fox jumps over the lazy dog."
);
label.setFont(
new
Font(
"Serif"
, Font.PLAIN, DEFAULT_SIZE));
add(label, BorderLayout.CENTER);
// add the radio buttons
buttonPanel =
new
JPanel();
group =
new
ButtonGroup();
//构造ButtonGroup对象
addRadioButton(
"Small"
,
8
);
addRadioButton(
"Medium"
,
12
);
addRadioButton(
"Large"
,
18
);
addRadioButton(
"Extra large"
,
36
);
add(buttonPanel, BorderLayout.SOUTH);
pack();
}
/**
* Adds a radio button that sets the font size of the sample text.
* @param name the string to appear on the button
* @param size the font size that this button sets
*/
public
void
addRadioButton(String name,
int
size)
{
boolean
selected = size == DEFAULT_SIZE;
var button =
new
JRadioButton(name, selected);
group.add(button);
//将JRadioButton类型的对象添加到按钮组中
buttonPanel.add(button);
// this listener sets the label font size
//定义动作监听器:把字体大小设置为特定值
ActionListener listener = event -> label.setFont(
new
Font(
"Serif"
, Font.PLAIN, size));
button.addActionListener(listener);
}
}
|
运行结果如图:
测试程序5
l 在elipse IDE中调试运行教材494页程序12-5,结合运行结果理解程序;
l 掌握边框的用法;
l 记录示例代码阅读理解中存在的问题与疑惑。
代码注释如下:
BorderTest.java:
|
1
2
3
4
5
6
7
8
9
10
11
12
13
14
15
16
17
18
19
20
21
|
package
border;
import
java.awt.*;
import
javax.swing.*;
/**
* @version 1.35 2018-04-10
* @author Cay Horstmann
*/
public
class
BorderTest
{
public
static
void
main(String[] args)
{
EventQueue.invokeLater(() -> {
var frame =
new
BorderFrame();
frame.setTitle(
"BorderTest"
);
frame.setDefaultCloseOperation(JFrame.EXIT_ON_CLOSE);
frame.setVisible(
true
);
});
}
}
|
BorderFrame.java:
|
1
2
3
4
5
6
7
8
9
10
11
12
13
14
15
16
17
18
19
20
21
22
23
24
25
26
27
28
29
30
31
32
33
34
35
36
37
38
39
40
41
42
43
44
45
46
47
48
|
package
border;
import
java.awt.*;
import
javax.swing.*;
import
javax.swing.border.*;
/**
* A frame with radio buttons to pick a border style.
*/
public
class
BorderFrame
extends
JFrame
{
private
JPanel demoPanel;
private
JPanel buttonPanel;
private
ButtonGroup group;
public
BorderFrame()
{
demoPanel =
new
JPanel();
buttonPanel =
new
JPanel();
group =
new
ButtonGroup();
//调用BorderFactory的静态方法创建边框,不同效果的设置(见运行截图说明)
addRadioButton(
"Lowered bevel"
, BorderFactory.createLoweredBevelBorder());
addRadioButton(
"Raised bevel"
, BorderFactory.createRaisedBevelBorder());
addRadioButton(
"Etched"
, BorderFactory.createEtchedBorder());
addRadioButton(
"Line"
, BorderFactory.createLineBorder(Color.BLUE));
addRadioButton(
"Matte"
, BorderFactory.createMatteBorder(
10
,
10
,
10
,
10
, Color.BLUE));
addRadioButton(
"Empty"
, BorderFactory.createEmptyBorder());
//将带有标题的蚀刻边框添加到面板上
Border etched = BorderFactory.createEtchedBorder();
Border titled = BorderFactory.createTitledBorder(etched,
"Border types"
);
//给边框添加标题Border types
buttonPanel.setBorder(titled);
setLayout(
new
GridLayout(
2
,
1
));
//两行一列的网格布局
add(buttonPanel);
add(demoPanel);
pack();
}
public
void
addRadioButton(String buttonName, Border b)
{
var button =
new
JRadioButton(buttonName);
button.addActionListener(event -> demoPanel.setBorder(b));
group.add(button);
buttonPanel.add(button);
}
}
|
运行结果如图:
设置凹面的效果:
设置凸面的效果:
设置蚀刻的效果:
设置线条边界,指定为蓝色:
设置垫子边界,指定为蓝色:
设置空边界:
测试程序6
l 在elipse IDE中调试运行教材498页程序12-6,结合运行结果理解程序;
l 掌握组合框组件的用法;
l 记录示例代码阅读理解中存在的问题与疑惑。
代码注释如下:
ComboBoxTest.java:
|
1
2
3
4
5
6
7
8
9
10
11
12
13
14
15
16
17
18
19
20
21
|
package
comboBox;
import
java.awt.*;
import
javax.swing.*;
/**
* @version 1.36 2018-04-10
* @author Cay Horstmann
*/
public
class
ComboBoxTest
{
public
static
void
main(String[] args)
{
EventQueue.invokeLater(() -> {
var frame =
new
ComboBoxFrame();
frame.setTitle(
"ComboBoxTest"
);
frame.setDefaultCloseOperation(JFrame.EXIT_ON_CLOSE);
frame.setVisible(
true
);
});
}
}
|
ComboBoxFrame.java:
|
1
2
3
4
5
6
7
8
9
10
11
12
13
14
15
16
17
18
19
20
21
22
23
24
25
26
27
28
29
30
31
32
33
34
35
36
37
38
39
40
41
42
43
44
45
46
47
48
49
50
51
52
|
package
comboBox;
import
java.awt.BorderLayout;
import
java.awt.Font;
import
javax.swing.JComboBox;
import
javax.swing.JFrame;
import
javax.swing.JLabel;
import
javax.swing.JPanel;
/**
* A frame with a sample text label and a combo box for selecting font faces.
*/
public
class
ComboBoxFrame
extends
JFrame
{
private
JComboBox<String> faceCombo;
private
JLabel label;
private
static
final
int
DEFAULT_SIZE =
24
;
public
ComboBoxFrame()
{
// add the sample text label
label =
new
JLabel(
"The quick brown fox jumps over the lazy dog."
);
label.setFont(
new
Font(
"Serif"
, Font.PLAIN, DEFAULT_SIZE));
add(label, BorderLayout.CENTER);
// make a combo box and add face names
//创建组合框
faceCombo =
new
JComboBox<>();
faceCombo.addItem(
"Serif"
);
faceCombo.addItem(
"SansSerif"
);
faceCombo.addItem(
"Monospaced"
);
faceCombo.addItem(
"Dialog"
);
faceCombo.addItem(
"DialogInput"
);
// the combo box listener changes the label font to the selected face name
faceCombo.addActionListener(event ->
label.setFont(
new
Font(faceCombo.getItemAt(faceCombo.getSelectedIndex()),
Font.PLAIN, DEFAULT_SIZE)));
// add combo box to a panel at the frame's southern border
var comboPanel =
new
JPanel();
comboPanel.add(faceCombo);
add(comboPanel, BorderLayout.SOUTH);
pack();
}
}
|
运行结果如图:
实验2:结对编程练习
利用所掌握的GUI技术,设计一个用户信息采集程序,要求如下:
(1) 用户信息输入界面如下图所示:
(2) 用户点击提交按钮时,用户输入信息显示在录入信息显示区,格式如下:
(3) 用户点击重置按钮后,清空用户已输入信息;
(4) 点击窗口关闭,程序退出。
实验要求:
1) 程序设计思路简述;
首先定义4*1网格,第一面板设置为1*4网格,分别添加姓名标签,文本域,地址标签,文本域。第二个面板设置为1*2网络,分别添加了两个面板,第一个面板设置单选框,第二个面板设置复选框。第三个面板定义了两个按钮,第四个面板添加一个文本区。通过点击提交按钮,对按钮事件设置了动作监听器,点击提交显示相关信息,点击重置按钮,全部信息清零。
2) 符合编程规范的程序代码;
代码如下:
UserGUITest .java:
UserGUITFrame.java:
3) 程序运行功能界面截图;
提交前: