一.什么是爬虫
#1、什么是上网?爬虫要做的是什么?
    我们所谓的上网便是由用户端计算机发送请求给目标计算机,将目标计算机的数据下载到本地的过程。
    #1.1 只不过,用户获取网络数据的方式是:
      浏览器提交请求->下载网页代码->解析/渲染成页面。

```
#1.2 而爬虫程序要做的就是:
  模拟浏览器发送请求->下载网页代码->只提取有用的数据->存放于数据库或文件中

#1.1与1.2的区别在于:
```

      我们的爬虫程序只提取网页代码中对我们有用的数据

#2、总结爬虫
    #2.1 爬虫的比喻:
      如果我们把互联网比作一张大的蜘蛛网,那一台计算机上的数据便是蜘蛛网上的一个猎物,而爬虫程序就是一只小蜘蛛,沿着蜘蛛网抓取自己想要的猎物/数据

```
#2.2 爬虫的定义:
```

      向网站发起请求,获取资源后分析并提取有用数据的程序

```
#2.3 爬虫的价值:
  互联网中最有价值的便是数据,比如天猫商城的商品信息,链家网的租房信息,雪球网的证券投资信息等等,这些数据都代表了各个行业的真金白银,可以说,谁掌握了行业内的第一手数据,谁就成了整个行业的主宰,如果把整个互联网的数据比喻为一座宝藏,那我们的爬虫课程就是来教大家如何来高效地挖掘这些宝藏,掌握了爬虫技能,你就成了所有互联网信息公司幕后的老板,换言之,它们都在免费为你提供有价值的数据。
二.爬虫的基本流程
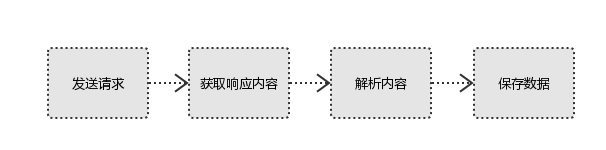
#1、发起请求
使用http库向目标站点发起请求,即发送一个Request
Request包含:请求头、请求体等

#2、获取响应内容
如果服务器能正常响应,则会得到一个Response
Response包含:html,json,图片,视频等

#3、解析内容
解析html数据:正则表达式,第三方解析库如Beautifulsoup,pyquery等
解析json数据:json模块
解析二进制数据:以b的方式写入文件

#4、保存数据
数据库
文件
三.请求与响应
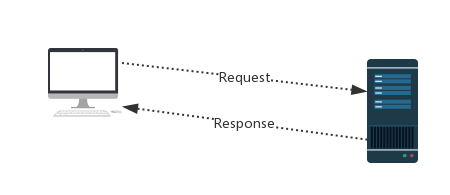
#http协议:http://www.cnblogs.com/linhaifeng/articles/8243379.html

#Request:用户将自己的信息通过浏览器(socket client)发送给服务器(socket server)

#Response:服务器接收请求,分析用户发来的请求信息,然后返回数据(返回的数据中可能包含其他链接,如:图片,js,css等)

#ps:浏览器在接收Response后,会解析其内容来显示给用户,而爬虫程序在模拟浏览器发送请求然后接收Response后,是要提取其中的有用数据。
四.请求库之requests库
1.requests库简介
#介绍:使用requests可以模拟浏览器的请求,比起之前用到的urllib,requests模块的api更加便捷(本质就是封装了urllib3)

#注意:requests库发送请求将网页内容下载下来以后,并不会执行js代码,这需要我们自己分析目标站点然后发起新的request请求

#安装:pip3 install requests

#各种请求方式:常用的就是requests.get()和requests.post()
>>> import requests
>>> r = requests.get('https://api.github.com/events')
>>> r = requests.post('http://httpbin.org/post', data = {'key':'value'})
>>> r = requests.put('http://httpbin.org/put', data = {'key':'value'})
>>> r = requests.delete('http://httpbin.org/delete')
>>> r = requests.head('http://httpbin.org/get')
>>> r = requests.options('http://httpbin.org/get')
2.基于get请求
#GET请求
HTTP默认的请求方法就是GET
     * 没有请求体
     * 数据必须在1K之内!
     * GET请求数据会暴露在浏览器的地址栏中

GET请求常用的操作:
       1. 在浏览器的地址栏中直接给出URL,那么就一定是GET请求
       2. 点击页面上的超链接也一定是GET请求
       3. 提交表单时,表单默认使用GET请求,但可以设置为POST
2.1基本请求
import requests
response=requests.get('http://dig.chouti.com/')
print(response.text)
2.2带参数的get请求,自己拼接的
#在请求头内将自己伪装成浏览器,否则百度不会正常返回页面内容
import requests
response=requests.get('https://www.baidu.com/s?wd=python&pn=1',
                      headers={
                        'User-Agent':'Mozilla/5.0 (Windows NT 6.1; WOW64) AppleWebKit/537.36 (KHTML, like Gecko) Chrome/62.0.3202.75 Safari/537.36',
                      })
print(response.text)


#如果查询关键词是中文或者有其他特殊符号,则不得不进行url编码
from urllib.parse import urlencode
wd='egon老师'
encode_res=urlencode({'k':wd},encoding='utf-8')
keyword=encode_res.split('=')[1]
print(keyword)
# 然后拼接成url
url='https://www.baidu.com/s?wd=%s&pn=1' %keyword

response=requests.get(url,
                      headers={
                        'User-Agent':'Mozilla/5.0 (Windows NT 6.1; WOW64) AppleWebKit/537.36 (KHTML, like Gecko) Chrome/62.0.3202.75 Safari/537.36',
                      })
res1=response.text
2.3params参数拼接
#上述操作可以用requests模块的一个params参数搞定,本质还是调用urlencode
from urllib.parse import urlencode
wd='egon老师'
pn=1

response=requests.get('https://www.baidu.com/s',
                      params={
                          'wd':wd,
                          'pn':pn
                      },
                      headers={
                        'User-Agent':'Mozilla/5.0 (Windows NT 6.1; WOW64) AppleWebKit/537.36 (KHTML, like Gecko) Chrome/62.0.3202.75 Safari/537.36',
                      })
res2=response.text

#验证结果,打开a.html与b.html页面内容一样
with open('a.html','w',encoding='utf-8') as f:
    f.write(res1)
with open('b.html', 'w', encoding='utf-8') as f:
    f.write(res2)
2.4get请求请求头内的参数
#通常我们在发送请求时都需要带上请求头,请求头是将自身伪装成浏览器的关键,常见的有用的请求头如下
Host
Referer #大型网站通常都会根据该参数判断请求的来源
User-Agent #客户端
Cookie #Cookie信息虽然包含在请求头里,但requests模块有单独的参数来处理他,headers={}内就不要放它了
#添加headers(浏览器会识别请求头,不加可能会被拒绝访问,比如访问https://www.zhihu.com/explore)
import requests
response=requests.get('https://www.zhihu.com/explore')
response.status_code #500

#自己定制headers
headers={
    'User-Agent':'Mozilla/5.0 (Linux; Android 6.0; Nexus 5 Build/MRA58N) AppleWebKit/537.36 (KHTML, like Gecko) Chrome/46.0.2490.76 Mobile Safari/537.36',

}
respone=requests.get('https://www.zhihu.com/explore',
                     headers=headers)
print(respone.status_code) #200
扫描二维码关注公众号,回复:
7975889 查看本文章

2.5get请求带cookies
#登录github,然后从浏览器中获取cookies,以后就可以直接拿着cookie登录了,无需输入用户名密码
#用户名:egonlin 邮箱[email protected] 密码lhf@123

import requests

Cookies={   'user_session':'wGMHFJKgDcmRIVvcA14_Wrt_3xaUyJNsBnPbYzEL6L0bHcfc',
}

response=requests.get('https://github.com/settings/emails',
             cookies=Cookies) #github对请求头没有什么限制,我们无需定制user-agent,对于其他网站可能还需要定制

print('[email protected]' in response.text) #True
3.基于post请求
#POST请求
(1). 数据不会出现在地址栏中
(2). 数据的大小没有上限
(3). 有请求体
(4). 请求体中如果存在中文,会使用URL编码!

#!!!requests.post()用法与requests.get()完全一致,特殊的是requests.post()有一个data参数,用来存放请求体数据
3.1发送post请求,模拟浏览器的登录
'''
一 目标站点分析
    浏览器输入https://github.com/login
    然后输入错误的账号密码,抓包
    发现登录行为是post提交到:https://github.com/session
    而且请求头包含cookie
    而且请求体包含:
        commit:Sign in
        utf8:✓
        authenticity_token:lbI8IJCwGslZS8qJPnof5e7ZkCoSoMn6jmDTsL1r/m06NLyIbw7vCrpwrFAPzHMep3Tmf/TSJVoXWrvDZaVwxQ==
        login:egonlin
        password:123


二 流程分析
    先GET:https://github.com/login拿到初始cookie与authenticity_token
    返回POST:https://github.com/session, 带上初始cookie,带上请求体(authenticity_token,用户名,密码等)
    最后拿到登录cookie

```
ps:如果密码时密文形式,则可以先输错账号,输对密码,然后到浏览器中拿到加密后的密码,github的密码是明文
```

'''

import requests
import re

#第一次请求
r1=requests.get('https://github.com/login')
r1_cookie=r1.cookies.get_dict() #拿到初始cookie(未被授权)
authenticity_token=re.findall(r'name="authenticity_token".*?value="(.*?)"',r1.text)[0] #从页面中拿到CSRF TOKEN

#第二次请求:带着初始cookie和TOKEN发送POST请求给登录页面,带上账号密码
data={
    'commit':'Sign in',
    'utf8':'✓',
    'authenticity_token':authenticity_token,
    'login':'[email protected]',
    'password':'alex3714'
}
r2=requests.post('https://github.com/session',
             data=data,
             cookies=r1_cookie
             )

login_cookie=r2.cookies.get_dict()

#第三次请求:以后的登录,拿着login_cookie就可以,比如访问一些个人配置
r3=requests.get('https://github.com/settings/emails',
                cookies=login_cookie)

print('[email protected]' in r3.text) #True
import requests
import re

session=requests.session()
#第一次请求
r1=session.get('https://github.com/login')
authenticity_token=re.findall(r'name="authenticity_token".*?value="(.*?)"',r1.text)[0] #从页面中拿到CSRF TOKEN

#第二次请求
data={
    'commit':'Sign in',
    'utf8':'✓',
    'authenticity_token':authenticity_token,
    'login':'[email protected]',
    'password':'alex3714'
}
r2=session.post('https://github.com/session',
             data=data,
             )

#第三次请求
r3=session.get('https://github.com/settings/emails')

print('[email protected]' in r3.text) #True
补充
requests.post(url='xxxxxxxx',
              data={'xxx':'yyy'}) #没有指定请求头,#默认的请求头:application/x-www-form-urlencoed

#如果我们自定义请求头是application/json,并且用data传值, 则服务端取不到值
requests.post(url='',
              data={'':1,},
              headers={
                  'content-type':'application/json'
              })

requests.post(url='',
              json={'':1,},
              ) #默认的请求头:application/json