LAMP组合的编译安装:
httpd*php
modules:把php编译成httpd的DSO对象
prefork:libphp5
event,worker : libphp5-zts
cgi
fpm(fastcgi): php作为独立的服务
注:httpd对fastcgi协议的支持
httpd-2.2 :需要额外安装fcgi模块
httpd-2.4:自带fcgi模块
[root@localhost src]# yum groupinstall 'Development Tools' 'Server Platform Development' -y #此命令CentOS7不支持这种格式,没有这样分组
1.1、安装apr
wget http://archive.apache.org/dist/apr/apr-1.5.0.tar.gz tar xvf apr-1.5.1.tar.gz cd apr-1.5.1/
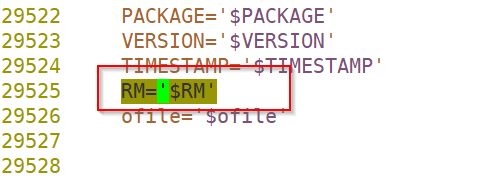
vim configure
把RM='$RM'修改成RM='$RM -f' ./configure --prefix=/usr/local/apr make && make install
问题:
rm: cannot remove `libtoolT': No such file or directory
config.status: executing default commands
修改成'$RM -f'
1.2、安装apr-util
 wget http://archive.apache.org/dist/apr/apr-util-1.5.3.tar.gz
 tar xvf apr-util-1.5.3.tar.gz
 cd apr-util-1.5.3/
 ./configure --prefix=/usr/local/apr-util --with-apr=/usr/local/apr
 #with-apr要指明apr的安装目录,apr-util要依赖apr编译
 make && make install
1.3、httpd编译依赖的包yum安装即可
yum -y install pcre-devel
wget http://archive.apache.org/dist/httpd/httpd-2.4.33.tar.gz

#tar xvf httpd-2.4.33.tar.gz

#cd httpd-2.4.33
./configure \
--prefix=/usr/local/httpd \
--sysconfdir=/etc/httpd24 \
--enable-so \
--enable-ssl \
--enable-cgi \
--enable-rewrite \
--with-zlib \
--with-pcre \
--with-apr=/usr/local/apr \
--with-apr-util=/usr/local/apr-util \
--enable-modules=most \
--enable-mpms-shared=all \
--with-mpm=event
1.5、启动脚本
[root@localhost init.d]#cd /etc/rc.d/init.d/
[root@localhost init.d]# cp httpd httpd24
[root@localhost init.d]# vim httpd24
目的:避免与yum安装的apache起冲突 修改如下脚本路径即可:

注:PidFile 文件默认在此路径下/usr/local/httpd/logs/
而启动脚本的pidfile=${PIDFILE-/var/run/httpd/logs/httpd24.pid}
[root@localhost init.d]# chkconfig --add httpd24
[root@localhost init.d]# chkconfig --list httpd24
httpd24 0:关闭 1:关闭 2:关闭 3:关闭 4:关闭 5:关闭 6:关闭
[root@localhost init.d]#
[root@localhost init.d]# chkconfig --level 234 httpd24 on
[root@localhost init.d]# chkconfig --list httpd24
httpd24 0:关闭 1:关闭 2:启用 3:启用 4:启用 5:关闭 6:关闭
[root@localhost init.d]# httpd -t #此处不是编译的httpd
Syntax OK
[root@localhost init.d]# hash -r #移除所有缓存
[root@localhost httpd]# echo 'export PATH=/usr/local/httpd/bin:$PATH' > /etc/profile.d/httpd24.sh
[root@localhost httpd]# source /etc/profile.d/httpd24.sh
[root@localhost httpd]# httpd -t
Syntax OK
[root@localhost httpd]# hash #此处才能看出是此次编译的httpd
hits command
1 /usr/bin/vim
2 /usr/local/httpd/bin/httpd
[root@localhost httpd]# service httpd24 start
正在启动 httpd: [确定]
[root@localhost httpd]# ps -ef |grep httpd #event模型
root 56432 1 1 00:05 ? 00:00:00 /usr/local/httpd/bin/httpd
daemon 56434 56432 0 00:05 ? 00:00:00 /usr/local/httpd/bin/httpd
daemon 56435 56432 0 00:05 ? 00:00:00 /usr/local/httpd/bin/httpd
daemon 56436 56432 0 00:05 ? 00:00:00 /usr/local/httpd/bin/httpd
root 56520 56350 0 00:06 pts/0 00:00:00 grep httpd
[root@localhost httpd]# httpd -M
Loaded Modules:
core_module (static)
so_module (static)
http_module (static)
mpm_event_module (shared)
authn_file_module (shared)
authn_core_module (shared)
authz_host_module (shared)
authz_groupfile_module (shared)
authz_user_module (shared)
authz_core_module (shared)
access_compat_module (shared)
auth_basic_module (shared)
reqtimeout_module (shared)
filter_module (shared)
mime_module (shared)
log_config_module (shared)
env_module (shared)
headers_module (shared)
setenvif_module (shared)
version_module (shared)
unixd_module (shared)
status_module (shared)
autoindex_module (shared)
dir_module (shared)
alias_module (shared)
配置文件启动用:
#LoadModule deflate_module modules/mod_deflate.so
二、MySQL二进制安装
卸载系统自带MySQL开发库
[root@localhost src]# rpm -qa|grep mysql
mysql-libs-5.1.73-5.el6_6.x86_64
[root@localhost src]# ps -ef |grep mysql
root 56615 56350 0 00:19 pts/0 00:00:00 grep mysql
[root@localhost src]# rpm -e --nodeps mysql-libs-5.1.73-5.el6_6.x86_64
[root@localhost src]# wget -c http://downloads.mysql.com/archives/get/file/mysql-5.6.40-linux-glibc2.12-x86_64.tar.gz
[root@localhost src]# tar -zxvf mysql-5.6.40-linux-glibc2.12-x86_64.tar.gz -C /usr/local/
[root@localhost local]# ln -sv ./mysql-5.6.40-linux-glibc2.12-x86_64 /usr/local/mysql
#创建数据库存放目录
[root@localhost local]# mkdir -pv /mydata/data
mkdir: 已创建目录 "/mydata"
mkdir: 已创建目录 "/mydata/data"
[root@localhost local]# chown -R mysql:mysql /mydata/data
#修改/usr/local/mysql的属主属组
[root@localhost local]#cd mysql
[root@localhost mysql]# chown -R mysql:mysql ./*
#创建mysql用户
[root@lynk ~]# groupadd -r -g 306 mysql
[root@lynk ~]# useradd -M -s /sbin/nologin -g 306 -u 306 mysql
#添加环境变量
[root@lynk local]# echo 'export PATH=/usr/local/mysql/bin:$PATH' > /etc/profile.d/mysql.sh
[root@lynk local]# . /etc/profile.d/mysql.sh
[root@lynk local]# echo $PATH
/usr/local/mysql/bin:/usr/local/apache/bin:/usr/local/sbin:/usr/local/bin:/usr/sbin:/usr/bin:/root/bin
#初始化数据库
[root@localhost mysql]# ./scripts/mysql_install_db --user=mysql --basedir=/usr/local/mysql --datadir=/mydata/data
#生成配置文件
[root@lynk local]# cat > /etc/my.cnf <<EOF

[mysqld]
basedir = /usr/local/mysql
datadir = /mydata/data
socket = /tmp/mysql.sock
port = 3306
pid-file = /mydata/data/mysql.pid
user = mysql
skip-name-resolve
EOF
参考即可
[client]
port = 3306
socket = /opt/mysql/data/mysql.sock
default_character_set=utf8

[mysqld]
server_id = 1
user = mysql
port = 3306
socket = /opt/mysql/data/mysql.sock
character-set-server = utf8
basedir = /usr/local/mysql
datadir = /opt/mysql/data
lower_case_table_names = 1
default_storage_engine = innodb
innodb_file_per_table = 1
innodb_buffer_pool_size = 1G #(大小为物理内存的80%)
skip_external_locking
federated
sort_buffer_size = 2M
key_buffer_size=800M
read_buffer_size = 256K
read_rnd_buffer_size=2M
table_open_cache = 1000
max_connections = 1000
max_allowed_packet = 50M
innodb_flush_log_at_trx_commit = 1
innodb_lock_wait_timeout = 50
wait_timeout = 600
interactive_timeout = 600
log_bin = mysql-bin
log-error = /opt/mysql/data/mysql-error.log
max_binlog_size = 1G
long_query_time = 2
slow-query-log = 1
slow_query_log_file = /opt/mysql/data/mysql-slow.log
expire_logs_days = 3
log_bin_trust_function_creators = 1

[mysqldump]
quick
max_allowed_packet = 500M

[mysql]
no-auto-rehash
default-character-set = utf8

原文链接:https://blog.csdn.net/weixin_38629769/article/details/86153762
#配置服务启动脚本
[root@lynk local]# cp -a /usr/local/mysql/support-files/mysql.server /etc/init.d/mysqld

[root@lynk local]# sed -ri 's#^(basedir=).*#\1/usr/local/mysql#g' /etc/init.d/mysqld

[root@lynk local]# sed -ri 's#^(datadir=).*#\1/mydata/data#g' /etc/init.d/mysqld
导出MySQL头文件
[root@lynk local]# ln -sv /usr/local/mysql/include/ /usr/local/include/mysql
[root@localhost local]# echo "/usr/local/mysql/lib" > /etc/ld.so.conf.d/mysql.conf
[root@localhost local]# ldconfig
#开启端口
[root@localhost rc.d]# iptables -I INPUT 5 -p tcp --dport 3306 -j ACCEPT

[root@localhost rc.d]# service iptables save

[root@localhost rc.d]# service iptables restat
数据库安全配置项
[root@localhost local]# mysql #进入数据库
1、设置root用户密码:
mysql> USE  mysql;

mysql> UPDATE user SET password=PASSWORD('root') WHERE User='root';
Query OK, 3 rows affected (0.00 sec)
Rows matched: 3 Changed: 3 Warnings: 0

mysql> FLUSH PRIVILEGES;
注意:PASSWORD()是MySQL的密码函数,密码是引号中间的字符,不含引号,密码需符合复杂度策略。
2、删除匿名用户:
mysql> DROP user ''@localhost;
mysql> \q;
三、PHP
3.1、php安装的时有两种方式:
(1):php作为apapche的模块形式存在,需要用apxs指定apapche位置,并且用apxs来自动的加载模块;需要结合apapche使用(处理动态请求);
(2):php作为一个独立的服务单独运行,不需要指定其路径;
a)php作为模块的形式的编译参数如下:
./configure --prefix=/usr/local/php --with-apxs2=/usr/local/apache2.4/bin/apxs --with-config-file-path=/usr/local/php/etc --with-mysql=/usr/local/mysql --with-pdo-mysql=/usr/local/mysql --with-mysqli=/usr/local/mysql/bin/mysql_config --with-libxml-dir --with-gd --with-jpeg-dir --with-png-dir --with-freetype-dir --with-iconv-dir --with-zlib-dir --with-bz2 --with-openssl --with-mcrypt --enable-soap --enable-gd-native-ttf --enable-mbstring --enable-sockets --enable-exif
yum install -y libxml2-devel openssl openssl-devel bzip2 bzip2d-devel libjpeg-devel libpng libpng-devel freetype freetype-devel epel-release libmcrypt-devel
b)php作为服务单独运行的编译参数如下:
./configure --prefix=/usr/local/php-fpm --with-config-file-path=/usr/local/php-fpm/etc --enable-fpm --with-fpm-user=php-fpm --with-fpm-group=php-fpm --with-mysql=/usr/local/mysql --with-mysqli=/usr/local/mysql/bin/mysql_config --with-pdo-mysql=/usr/local/mysql --with-mysql-sock=/tmp/mysql.sock --with-libxml-dir --with-gd --with-jpeg-dir --with-png-dir --with-freetype-dir --with-iconv-dir --with-zlib-dir --with-mcrypt --enable-soap --enable-gd-native-ttf --enable-ftp --enable-mbstring --enable-exif --with-pear --with-curl --with-openssl
yum install -y gcc libxml2-devel openssl openssl-devel libcurl-devel libjpeg-devel libpng libpng-devel freetype freetype-devel epel-relese libmcrypt-devel
3.2、编译安装前的准备
3.2.1、安装gcc-c++及依赖包
yum install libxml2 libxml2-devel bzip2 bzip2-devel libcurl libcurl-devel libjpeg-devel libpng-devel freetype-devel openssl-devel
以模块配置
 ./configure --prefix=/usr/local/php \
--with-config-file-path=/etc \
--with-config-file-scan-dir=/etc/php.d \
--with-mysql=/usr/local/mysql \
-with-apxs2=/usr/local/httpd/bin/apxs \
--with-openssl \
--with-mysqli=/usr/local/mysql/bin/mysql_config \
--enable-mbstring \
--with-freetype-dir \
--with-jpeg-dir \
--with-png-dir \
--with-zlib \
--with-libxml-dir=/usr/local \
--enable-xml \
--enable-sockets \
--with-mcrypt \
--with-bz2 \
--enable-maintainer-zts \
--with-pdo-mysql=mysqlnd \
-with-mysqli=mysqlnd \
--with-mysql=mysqlnd
说明:
为了支持apache的worker或event这两个MPM,编译时使用--enable-maintainer-zts选项
如果使用PHP5.3以上版本,为了链接MySQL数据库,可以指定mysqlnd,这样在本机就不需要先安装MySQL或MySQL开发包
mysqlnd从php5.3开始使用,可以编译时绑定到它(而不动和具体的MySQL客户端绑定形成依赖),但从PHP5.4开始它就是默认设置。
#--with-pdo-mysql=mysqlnd --with-mysqli=mysqlnd --with-mysql=mysqlnd
选项简介:
--with-mysql:指定MySQL的位置
--with-openssl:支持openssl功能的
--with-mysqli:这是MySQL的另外一种让php和MySQL交互的接口,这个接口的程序是/usr/local/mysql/bin/mysql_config
--enable-mbstring:用于支持中文或者非一个字节所能表示的字符的那些语言的
--with-freetype-dir:支持freetype-dir功能,freetype-dir是一个实现引用特定字体的,网页上显示不同字体>。
--enable-mcrypt :支持加密解密
注意:如果httpd使用线程模型MPM,需要额外的--enable-maintainer-zts选项;
注意:如果要以fpm方式运行php,需要编译时移除--with-apxs选项,额外添加--enable-fpm选项;
wget http://mirrors.hust.edu.cn/epel/6/x86_64/Packages/l/libmcrypt-devel-2.5.8-9.el6.x86_64.rpm
然后yum -y localinstall /usr/local/src/libmcrypt-2.5.8-9.el6.x86_64.rpm /usr/local/src/libmcrypt-devel-2.5.8-9.el6.x86_64.rpm 即可
以php-fpm运行配置
#./configure --prefix=/usr/local/php --with-bz2 --with-curl --with-openssl --enable-fpm --enable-ftp --enable-sockets --disable-ipv6 --with-gd --with-jpeg-dir=/usr/local --with-png-dir=/usr/local --with-freetype-dir=/usr/local --enable-gd-native-ttf --with-iconv-dir=/usr/local --enable-mbstring --enable-calendar --with-gettext --with-libxml-dir=/usr/local --with-zlib --with-pdo-mysql=mysqlnd --with-mysqli=mysqlnd --with-mysql=mysqlnd --enable-dom --enable-xml --with-libdir=lib64 --enable-bcmath
3.2.2、编译:
[root@lynk php-7.2.8]# make -j $(cat /proc/cpuinfo |grep processor|wc -l)
[root@lynk php-7.2.8]# make install
apache配置文件查看此模块是否被加载或者httpd -M

3.3、将php加入全局环境变量
#echo "export PATH=/usr/local/php/bin:$PATH" > /etc/profile.d/php.sh
重新加载环境变量使之生效
#source /etc/profile.d/php.sh
3.4、为php提供配置文件:
[root@localhost php-5.6.38]# cp php.ini-production /etc/php.in
3.5、编译apache配置文件httpd.conf,以apache支持php
  AddType application/x-httpd-php .php
  AddType application/x-httpd-php-source .phps
3.6、定位至DirectoryIndex index.html
修改成 DirectoryIndex index.php index.html
<IfModule dir_module>
    DirectoryIndex index.php  index.html
</IfModule>
可选项:
③ 不显示目录结构(根据自己情况决定是否显示)
找到“Options Indexes FollowSymLinks”,修改为
Options FollowSymLinks
④ 开启Apache支持伪静态
找到“AllowOverride None”,修改为
AllowOverride All
⑤ 更改Apache默认网站目录
找到 DocumentRoot “/usr/local/apache2/htdocs ” 这一段
把/usr/local/apache2/htdocs 这个目录改为/var/www/html
再找到 <Directory "/usr/local/apache2/htdocs">这个区域
把 /usr/local/apache2/htdocs改成/var/www/html
保存httpd.conf配置
更改文件权限:
chmod -R 755 /var/www/html
————————————————
3.7、重启apahce
3.8、开启端口
[root@localhost php-5.6.38]# iptables -I INPUT -p tcp --dport 9000 -j ACCEPT
[root@localhost php-5.6.38]# service iptables save
iptables:将防火墙规则保存到 /etc/sysconfig/iptables: [确定]
[root@localhost php-5.6.38]# service iptables restart
3.7、提供测试页:
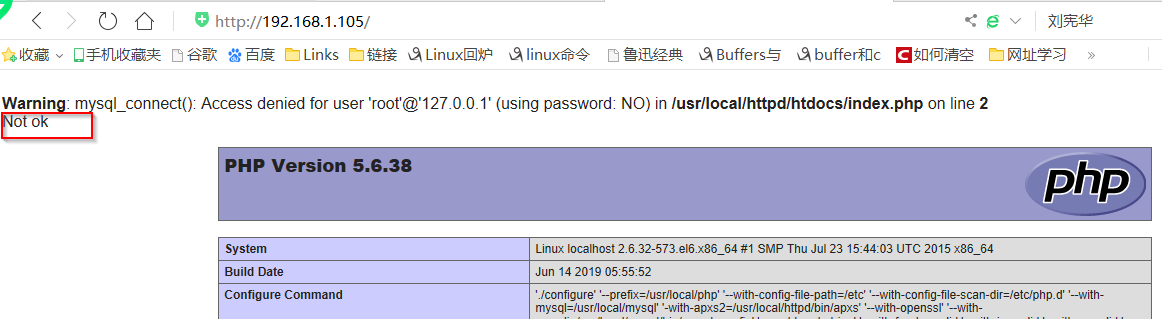
/usr/local/httpd/htdocs
vim index.php
<?php
   $conn=mysql_connect('127.0.0.1','root','');  #此127.0.0.1未被授权换成localhost可以
   if($conn)
        echo "OK";
   else
        echo "Not ok";
   phpinfo();
?>
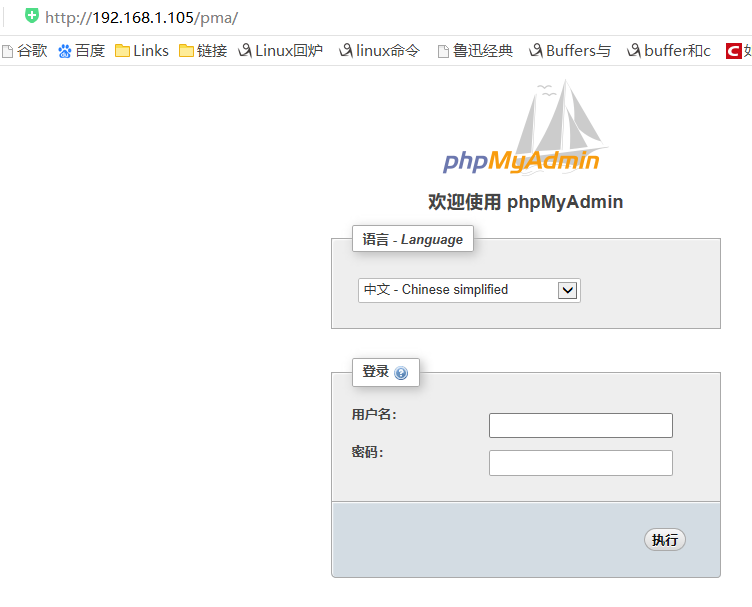
四、phpMyAdmin
#wget https://files.phpmyadmin.net/phpMyAdmin/4.7.9/phpMyAdmin-4.7.9-all-languages.zip
[root@localhost src]# unzip phpMyAdmin-4.7.9-all-languages.zip
[root@localhost src]# mv phpMyAdmin-4.7.9-all-languages /usr/local/httpd/htdocs/pma
[root@localhost pma]# cd /usr/local/httpd/htdocs/pma
[root@localhost pma]# cp config.sample.inc.php config.inc.php
[root@localhost pma]# vim config.inc.php
在此行添加随机数即可


压力测试:
[root@localhost pma]# ab -c 10 -n 100 http://192.168.1.105/pma/index/php
This is ApacheBench, Version 2.3 <$Revision: 1826891 $>
Copyright 1996 Adam Twiss, Zeus Technology Ltd, http://www.zeustech.net/
Licensed to The Apache Software Foundation, http://www.apache.org/


Benchmarking 192.168.1.105 (be patient).....done

Server Software: Apache/2.4.33
Server Hostname: 192.168.1.105
Server Port: 80

Document Path: /pma/index/php
Document Length: 211 bytes

Concurrency Level: 10
Time taken for tests: 0.763 seconds
Complete requests: 100
Failed requests: 0
Non-2xx responses: 100
Total transferred: 40000 bytes
HTML transferred: 21100 bytes
Requests per second: 131.05 [#/sec] (mean)
Time per request: 76.304 [ms] (mean)
Time per request: 7.630 [ms] (mean, across all concurrent requests)
Transfer rate: 51.19 [Kbytes/sec] received


Connection Times (ms)
min mean[+/-sd] median max
Connect: 1 36 51.9 13 243
Processing: 1 29 44.3 12 275
Waiting: 0 18 31.8 9 260
Total: 2 66 82.1 30 339


Percentage of the requests served within a certain time (ms)
50% 30
66% 45
75% 105
80% 113
90% 174
95% 299
98% 308
99% 339
100% 339 (longest request)
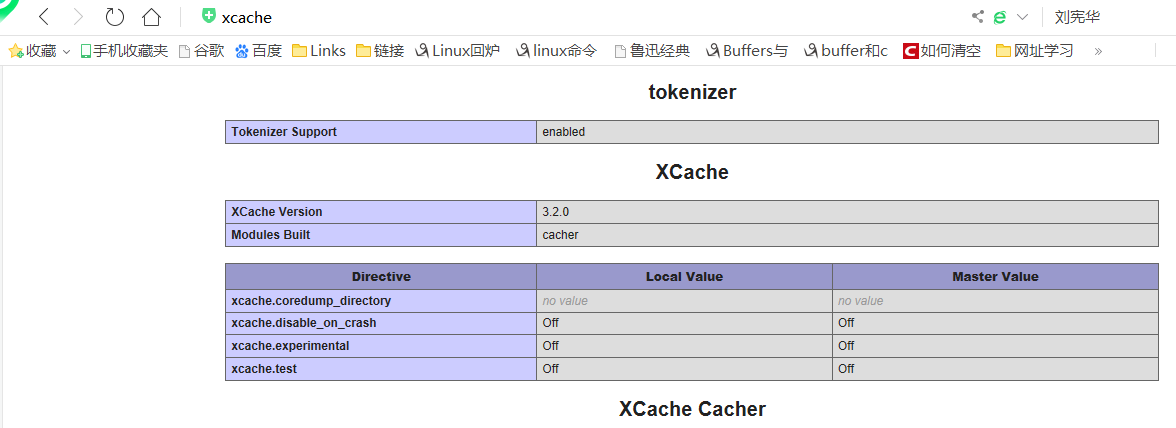
五、xcache--PHP服务缓存加速
安装Xcache缓存加速器
因为我们用的PHP版本为5.6,通过Xcache官网可以了解到需要用到3.20的版本才能支持PHP5.6,可以到官网下载。http://xcache.lighttpd.net/pub/Releases/3.2.0/
[root@localhost src]# wget http://xcache.lighttpd.net/pub/Releases/3.2.0/xcache-3.2.0.tar.gz
[root@localhost src]# tar -zxvf xcache-3.2.0.tar.gz
[root@localhost src]# cd xcache-3.2.0
[root@localhost xcache-3.2.0]# /usr/local/php/bin/phpize #必须一步 否则config 脚本不会出现
Configuring for:
PHP Api Version: 20131106
Zend Module Api No: 20131226
Zend Extension Api No: 220131226
[root@localhost xcache-3.2.0]# ./configure --enable-xcache --with-php-config=/usr/local/php/bin/php-config
[root@localhost xcache-3.2.0]# make
[root@localhost xcache-3.2.0]# make install
Installing shared extensions: /usr/local/php/lib/php/extensions/no-debug-zts-20131226/
[root@localhost xcache-3.2.0]# ll /usr/local/php/lib/php/extensions/no-debug-zts-20131226/
总用量 1132
-rwxr-xr-x. 1 root root 555981 6月 14 06:08 opcache.so
-rwxr-xr-x. 1 root root 598934 6月 14 08:30 xcache.so
安装成功之后会在php目录下生成xcache.so的文件
#配置脚本
[root@localhost xcache-3.2.0]# mkdir /etc/php.d
[root@localhost xcache-3.2.0]# cp xcache.ini /etc/php.d
[root@localhost xcache-3.2.0]# vim /etc/php.d/xcache.ini
将安装xcache后的Installing shared extensions路径写在 zend_extension里
------目的防止找不到xcache.so库文件

[xcache-common] #定义zend扩展
extension = xcache.so        ;加载xcache.so
[xcache.admin]
xcache.admin.enable_auth = On        ;开启认证
xcache.admin.user = "pcm"                                    ;这个自定义
xcache.admin.pass = "62b6d07a02edc7d58cb622def452e81b"        ;这个MD5是后面生成填写进去的
[xcache]  定义xcache的管理

xcache.shm_scheme =        "mmap"    ;设置xcache如何从系统分配共享内存-------实用哪种方式来共享内存   mmap:内存映射
xcache.size  =               256M    ;设置xcache缓存的大小值
xcache.count =                 1   ;设置CPU个数
xcache.slots =                8K
xcache.ttl   =                 86400        ;设定cache对象的生存期TTL,0为永不过期
xcache.gc_interval =           3600
xcache.var_size  =            64M        ;xcache的变量缓存空间大小

xcache.var_count =             1         ;缓存多少个
xcache.var_slots =            8K
xcache.var_ttl   =             0
xcache.var_maxttl   =          0
xcache.var_gc_interval =     300
xcache.var_namespace_mode =    0
xcache.var_namespace =        ""
xcache.readonly_protection = Off
xcache.mmap_path =    "/dev/zero"
xcache.coredump_directory =   ""
xcache.coredump_type =         0
xcache.disable_on_crash =    Off
xcache.experimental =        Off
xcache.cacher =               On
xcache.stat   =               On        ;缓存功能是否启用

xcache.optimizer =           Off        ;xcache 自身的优化器是否启用

[xcache.coverager]
xcache.coverager =           Off
xcache.coverager_autostart =  On
xcache.coveragedump_directory = ""
要让 xcache重新生效,需要重启apache服务
访问:http://localhost 显示如下
https://www.imooc.com/article/30641
https://blog.51cto.com/superpcm/2093866
https://www.imooc.com/article/30953
PHP7 的fpm 方式:https://www.cnblogs.com/lynk/p/10407919.html