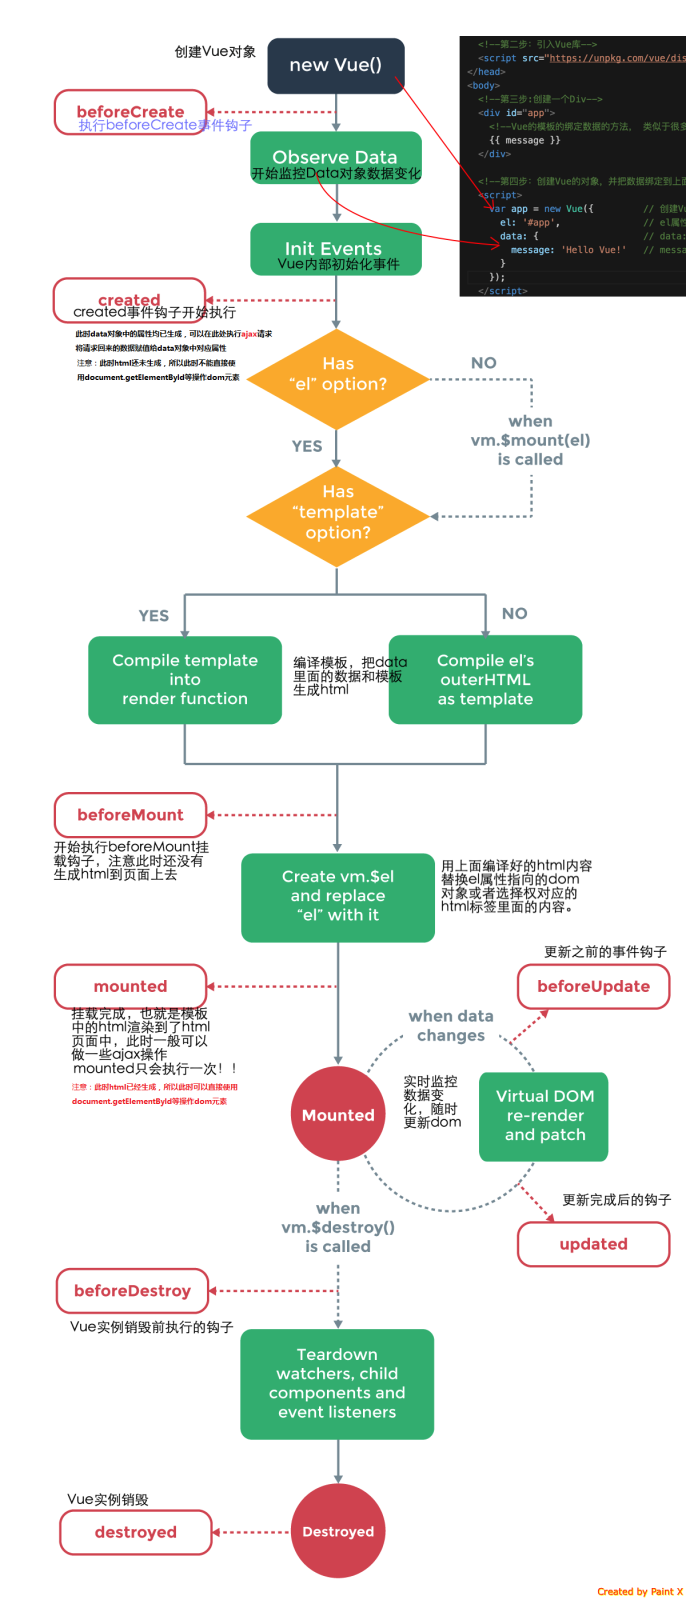
Vue的生命周期:
在理解vue生命周期前要把握它的三个重点: 创建-> 改变 -> 销毁
创建:
1.执行beforeCreate
2.监控data
3.注册事件
4.执行create
5.执行beforeMount
6.执行Mounted
注意:将来执行异步请求时一定要 将请求数据的方法写在beforeCreate事件之外,否则的话将来得到数据以后无法操作data中的属性
改变:
改变data中的数据:
1.先执行beforUpdate
2.重新生成虚拟dom
3.再执行update
扫描二维码关注公众号,回复:
79287 查看本文章

销毁:
1.执行beforeDestroy
2.执行destroy
触发销毁条件: 从一个页面跳转到另一个页面
应用: 清除内存中的这个vue对象
一.创建Vue时执行的钩子函数
 1 <!DOCTYPE html>
 2 <html lang="en">
 3 <head>
 4 <meta charset="UTF-8">
 5 <meta name="viewport" content="width=device-width, initial-scale=1.0">
 6 <meta http-equiv="X-UA-Compatible" content="ie=edge">
 7 <title>Document</title>
 8 <script src="../axios.js"></script>
 9 <script src="../vue2.4.4.js"></script>
10 </head>
11
12 <body>
13 <!-- 定义一个vue的管理区块,(MVVM中的View) -->
14 <div id="app">
15
16 </div>
17
18 </body>
19
20 <script>
21       // 1 将路径的主机名和端口号统一设置
22       axios.defaults.baseURL = "http://157.122.54.189:9093";
23       // 2 将axios加到vue原型对象中
24       Vue.prototype.$http = axios;
25     // 实例化vue对象(MVVM中的View Model)
26     new Vue({
27         // vm控制的区块为id为app的div,此div中的所有vue指令均可以被vm解析
28         el:'#app',
29         data:{
30         // 数据 (MVVM中的Model)
31         name:"小明"
32         },
33         beforeCreate:function() {
34             console.log("01.beforeCreate :"+this.name);
35
36         },
37         created:function() {
38             console.log("02.created :"+this.name);
39                 // 改变this指向
40                 _this = this;
41                 this.$http.get("/api/getprodlist").then(function(result){
42                     var res = result.data;
43                     _this.name = res.message[0].name;
44                 });
45         },
46         beforeMount:function() {
47             console.log("03.beforeMount :"+this.name);
48         },
49         mounted:function() {
50             console.log("04.mounted :"+this.name);
51         }
52     })
53 </script>
54 </html>
二.更新数据时执行的钩子函数
 1 <!DOCTYPE html>
 2 <html lang="en">
 3 <head>
 4 <meta charset="UTF-8">
 5 <meta name="viewport" content="width=device-width, initial-scale=1.0">
 6 <meta http-equiv="X-UA-Compatible" content="ie=edge">
 7 <title>Document</title>
 8 <script src="../axios.js"></script>
 9 <script src="../vue2.4.4.js"></script>
10 </head>
11
12 <body>
13 <!-- 定义一个vue的管理区块,(MVVM中的View) -->
14 <div id="app">
15     {{name}}
16 </div>
17
18 </body>
19
20 <script>
21       // 1 将路径的主机名和端口号统一设置
22       axios.defaults.baseURL = "http://157.122.54.189:9093";
23       // 2 将axios加到vue原型对象中
24       Vue.prototype.$http = axios;
25     // 实例化vue对象(MVVM中的View Model)
26     var vm = new Vue({
27         // vm控制的区块为id为app的div,此div中的所有vue指令均可以被vm解析
28         el:'#app',
29         data:{
30         // 数据 (MVVM中的Model)
31         name:"小明"
32         },
33         beforeCreate:function() {
34             //输出this.name是undifined 因为还没有加载
35             console.log("01.beforeCreate :"+this.name);
36
37         },
38         created:function() {
39             console.log("02.created :"+this.name);
40
41         },
42         beforeMount:function() {
43             console.log("03.beforeMount :"+this.name);
44         },
45         mounted:function() {
46             console.log("04.mounted :"+this.name);
47         },
48         beforeUpdate:function() {
49             console.log("05.beforeUpdate :"+this.name);
50         },
51         updated:function() {
52             console.log("06.updated :"+this.name);
53         }
54     })
55 </script>
56 </html>