转自:https://blog.csdn.net/pengjunlee/article/details/86688858
服务熔断
服务熔断的作用类似于我们家用的保险丝,当某服务出现不可用或响应超时的情况时,为了防止整个系统出现雪崩,暂时停止对该服务的调用。
服务降级
服务降级是从整个系统的负荷情况出发和考虑的,对某些负荷会比较高的情况,为了预防某些功能(业务场景)出现负荷过载或者响应慢的情况,在其内部暂时舍弃对一些非核心的接口和数据的请求,而直接返回一个提前准备好的fallback(退路)错误处理信息。这样,虽然提供的是一个有损的服务,但却保证了整个系统的稳定性和可用性。
熔断VS降级
相同点:
目标一致 都是从可用性和可靠性出发,为了防止系统崩溃;
用户体验类似 最终都让用户体验到的是某些功能暂时不可用;
不同点:
触发原因不同 服务熔断一般是某个服务(下游服务)故障引起,而服务降级一般是从整体负荷考虑;
管理目标的层次不太一样,熔断其实是一个框架级的处理,每个微服务都需要(无层级之分),而降级一般需要对业务有层级之分(比如降级一般是从最外围服务开始);
Hystrix简介
Hystrix:英 [hɪst'rɪks] 美 [hɪst'rɪks] ,翻译过来是“豪猪”的意思。 在分布式环境中,不可避免地会出现某些依赖的服务发生故障的情况。Hystrix是这样的一个库,它通过添加容许时延和容错逻辑来帮助你控制这些分布式服务之间的交互。Hystrix通过隔离服务之间的访问点,阻止跨服务的级联故障,并提供了退路选项,所有这些都可以提高系统的整体弹性。
Hystrix的设计目的:
通过第三方客户端的库来为访问依赖服务时的潜在故障提供保护和控制;
防止在复杂分布式系统中出现级联故障;
快速失败和迅速恢复;
在允许的情况下,提供退路对服务进行优雅降级;
提供近实时的监控、报警和操作控制;
接下来我们将通过对《模拟RPC调用(Feign)》一章中的 message-center 项目进行改造,演示如何使用Hystrix,eureka服务注册中心以及message-service服务提供者无需更改。
使用Hystrix
引入Hystrix依赖
在 pom.xml 文件中引入Hystrix依赖:
<parent>
		<groupId>org.springframework.boot</groupId>
		<artifactId>spring-boot-starter-parent</artifactId>
		<version>2.0.6.RELEASE</version>
	</parent>

	<properties>
		<spring-cloud.version>Finchley.SR2</spring-cloud.version>
	</properties>

	<dependencies>
		<dependency>
			<groupId>org.springframework.boot</groupId>
			<artifactId>spring-boot-starter-web</artifactId>
		</dependency>
		<!-- Eureka-Client 依赖 -->
		<dependency>
			<groupId>org.springframework.cloud</groupId>
			<artifactId>spring-cloud-starter-netflix-eureka-client</artifactId>
		</dependency>
		<!-- Feign 依赖 -->
		<dependency>
			<groupId>org.springframework.cloud</groupId>
			<artifactId>spring-cloud-starter-openfeign</artifactId>
		</dependency>
		<!-- Hystrix 依赖 -->
		<dependency>
			<groupId>org.springframework.cloud</groupId>
			<artifactId>spring-cloud-starter-netflix-hystrix</artifactId>
		</dependency>
	</dependencies>

	<dependencyManagement>
		<dependencies>
			<!-- SpringCloud 版本控制依赖 -->
			<dependency>
				<groupId>org.springframework.cloud</groupId>
				<artifactId>spring-cloud-dependencies</artifactId>
				<version>${spring-cloud.version}</version>
				<type>pom</type>
				<scope>import</scope>
			</dependency>
		</dependencies>
	</dependencyManagement>
修改启动类
在MessageCenterApplication启动类上增加@EnableCircuitBreaker注解:
@SpringBootApplication
@EnableFeignClients
@EnableCircuitBreaker
public class MessageCenterApplication {

	public static void main(String[] args) {
		new SpringApplicationBuilder(MessageCenterApplication.class).web(WebApplicationType.SERVLET).run(args);
	}

}
这里我们在启动类中又增加了@EnableCircuitBreaker注解,用来开启断路器功能。如果你觉得启动类上的注解个数有点多的话,可以使用一个@SpringCloudApplication 注解来代替@SpringBootApplication(或者@EnableEurekaServer)、@EnableDiscoveryClient、@EnableCircuitBreaker这三个注解。
@Target(ElementType.TYPE)
@Retention(RetentionPolicy.RUNTIME)
@Documented
@Inherited
@SpringBootApplication
@EnableDiscoveryClient
@EnableCircuitBreaker
public @interface SpringCloudApplication {
}
修改Controller
接下来,我们为MessageCenterController中的getMsg()接口增加断路器功能,修改部分代码如下:
	@GetMapping("/msg/get")
	@HystrixCommand(fallbackMethod = "getMsgFallback")
	public Object getMsg() {
		String msg = messageService.getMsg();
		return msg;
	}

	public Object getMsgFallback() {
		return "祝您 2019 猪年大吉,'猪'事如意!";
	}
先启动Eureka,再启动一个8771端口的message-service服务,最后启动message-center。待启动完成之后,Eureka注册中心实例注册信息如下:

此时,访问 http://localhost:8781/api/v1/center/msg/get ,返回如下结果表明服务调用成功:

然后,停掉message-service服务,再次请求 http://localhost:8781/api/v1/center/msg/get ,返回结果如下:

可以看出fallback中的信息被直接返回了,表明Hystrix断路器调用成功。
注意:fallback方法的签名需要和原方法保持一致。
	/**
	 * 获取消息详情
	 */
	@GetMapping("/api/v1/msg/detail/{id}")
	@HystrixCommand(fallbackMethod = "getDetailFallback")
	public MessageEntity getDetail(@PathVariable(name = "id") Long id) {
		return messageService.getById(id);
	}

	/**
	 * 获取消息详情退路
	 */
	public MessageEntity getDetailFallback(Long id){
		return null;
	}
Feign结合Hystrix
以MessageService的Feign客户端为例,为其添加Hystrix断路器功能。
修改Feign客户端
通过配置@FeignClient注解的fallback属性来位MessageServiceClient指定一个自定义的fallback处理类(MessageServiceFallback)。
@FeignClient(name = "message-service", fallback = MessageServiceFallback.class)
public interface MessageServiceClient {

	@GetMapping("/api/v1/msg/get")
	public String getMsg();

}
创建Fallback处理类
MessageServiceFallback需要实现MessageServiceClient接口,并且在Spring容器中必须存在一个该类型的有效Bean。在这里,我们使用@Component注解将其注入到Spring容器中。
@Component
public class MessageServiceFallback implements MessageServiceClient {

	@Override
	public String getMsg() {
		System.out.println("调用消息接口失败,对其进行降级处理!");
		return "消息接口繁忙,请稍后重试!";
	}

}
修改配置
在新版本的Springcloud中,Feign默认关闭了对Hystrix的支持,需要在application.yml进行配置:
feign:
  hystrix:
    enabled: true
当message-service服务不可用时,请求 http://localhost:8781/api/v1/center/msg/get,返回结果如下:

查看后台日志,打印如下内容,表明fallback方法被成功调用了:
![]()
监控Hystrix
启用健康监控
Actuator是Springboot提供的用来对应用系统进行自省和监控的功能模块,借助于Actuator开发者可以很方便地对应用系统某些监控指标进行查看、统计等。
若要使用Actuator对Hystrix 流进行监控,除了需在工程POM文件中引入spring-boot-starter-actuator依赖:
		<!-- Actuator 依赖 -->
		<dependency>
			<groupId>org.springframework.boot</groupId>
			<artifactId>spring-boot-starter-actuator</artifactId>
		</dependency>
还需要在application.yml 中添加如下配置:
management:
  endpoints:
    web:
      exposure:
        include: hystrix.stream
启用Hystrix-Dashboard
使用Hystrix一个最大的好处就是它会为我们自动收集每一个HystrixCommand的信息,并利用Hystrix-Dashboard通过一种高效的方式对每一个断路器的健康状态进行展示。
值得注意的是,在使用HystrixCommand对RibbonClient进行包装的时候,你需要确保你配置的Hystrix超时时间要比Ribbon的超时时间长,包括由它们引起的重试时间,举个例子:如果你的Ribbon连接超时时间是1秒,并且Ribbon会连续重试请求3次,那么你的Hystrix连接超时时间需要配置成稍大于3秒。
引入Hystrix-Dashboard依赖
在 pom.xml 文件中引入Hystrix-Dashboard依赖:
		<!-- Hystrix Dashboard 依赖 -->
		<dependency>
			<groupId>org.springframework.cloud</groupId>
			<artifactId>spring-cloud-starter-netflix-hystrix-dashboard</artifactId>
		</dependency>
修改启动类
在MessageCenterApplication启动类上增加@EnableHystrixDashboard注解:
@EnableFeignClients
@SpringCloudApplication
@EnableHystrixDashboard
public class MessageCenterApplication {

	public static void main(String[] args) {
		new SpringApplicationBuilder(MessageCenterApplication.class).web(WebApplicationType.SERVLET).run(args);
	}

}
仪表盘界面
启动应用,访问 http://localhost:8781/hystrix ,打开Hystrix-Dashboard监控首页。
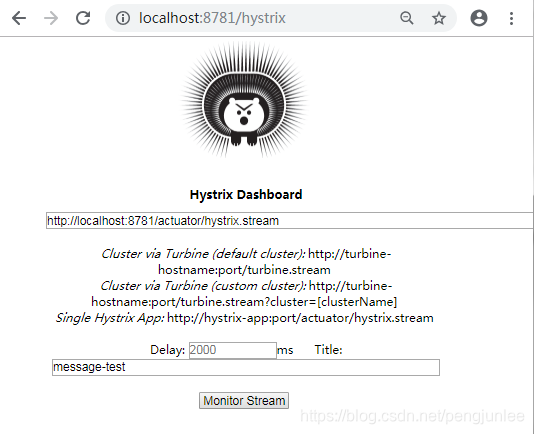
在这里配置好需要监控的Hystrix流地址 http://localhost:8781/actuator/hystrix.stream ,开始监控。
参考文章
https://github.com/netflix/hystrix/wiki
https://github.com/netflix/hystrix
https://cloud.spring.io/spring-cloud-netflix/single/spring-cloud-netflix.html