最近上头安排了帮客户安装svn服务器,用了两种方式安装,yum命令安装,快速简洁容易上手,但是源码安装就比较繁琐,两种方式都试了一下,yum命令基本一个多小时就安装完了,但是源码安装弄了我两天的时间,比较蛋疼,看了网上很多的博文,踩了很多坑,最后也安装成功了,所就分享给有需要的人。
一、环境说明
操作系统:CentoS 7
Subversion版本:1.8.15
二、SVN安装
2.1 Subversion源码下载
下载地址:http://subversion.apache.org/download
选择版本:subversion-1.8.15.tar.gz (注,本文将所有安装过程需要的文件保存在/usr/local/java/svn目录下)
2.2 解压安装Subversion
#cd /usr/local/java/svn
#tar -zxvf subversion-1.8.15.tar.gz
#cd subversion-1.8.15
#./configure --prefix=/usr/local/subversion
2.3 configure: error: no suitable APRUTIL found
configure: WARNING: APR not found
The Apache Portable Runtime (APR) library cannot be found.
Please install APR on this system and configure Subversion
with the appropriate --with-apr option.
You probably need to do something similar with the Apache
Portable Runtime Utility (APRUTIL) library and then configure
Subversion with both the --with-apr and --with-apr-util options.
configure: error: no suitable APR found
搜索后发现缺乏apr和apr-util两个依赖包。
2.4 安装apr与apr-util
(以下的依赖软件包都传到/usr/local/java/svn/dependPackage/下,并且在这个目录下解压)
2.4.1 下载apr与apr-util
下载地址:http://apr.apache.org/
下载版本:apr-1.5.2.tar.gz apr-util-1.6.1.tar.gz
2.4.2 安装apr
#cd /usr/local/java/svn/dependPackage
#tar -zxvf apr-1.5.2.tar.gz
#cd apr-1.5.2
#./configure --prefix=/usr/local/apr
出现这个提示:cannot remove libtoolT’: No such file or directory 解决方案:编辑 configure文件,查找 $RM "$cfgfile" 这个地方,用#注释掉,然后重新编译安装就可以了。 ¨G2G **2.4.3 安装apr-util** ¨G3G **2.5 重新配置subversion(每次重新配置都要回到subversion-1.8.15目录下)** ¨G4G **2.5.1 出现提示:configure: error: Subversion requires SQLite 说明缺乏sqlite依赖包** 解决方案: get the sqlite 3.7.15.1 amalgamation from:http://www.sqlite.org/sqlite-amalgamation-3071501.zipunpack the archive using unzip and rename the resultingdirectory to:/RNA-data/software/S01_utilize/subversion-1.8.11/sqlite-amalgamation 下载sqlite-amalgamation-3071501.zip通过unzip解压到subversion-1.8.15/sqlite-amalgamation目录下 ¨G5G 再次配置subversion **2.5.2 出现提示:configure: error: subversion requires zlib** 解决方案:从http://zlib.net/下载zlib-1.2.8.tar.gz,并安装到/usr/local/zlib目录。 ¨G6G **2.6 重新配置subversion** ¨G7G **三、配置环境变量** 通过修改profile文件设置环境变量 ¨K13K ¨G8G ¨G9G **四、测试安装是否成功** ¨K14K ¨G10G 出现版本信息则安装subversion成功。 **五SVN版本库的建立** A.我选择的目录是 /home/svn/作为SVN版本库的根目录,命令为: ¨K24K B.比如,现在我有一个名为“project”的项目需要用SVN做版本管理,那么我可以在svn根目录下建立一个 /project目录,我最终目的想让项目托管到/project目录下。接下来我需要新建这个目录:/home/svn/project ,命令为: ¨K25K C.然后需要将/project目录设定为版本库,命令如下: ¨K26K D.设定/project目录为版本库后,会发现/project目录下会多出以下文件: 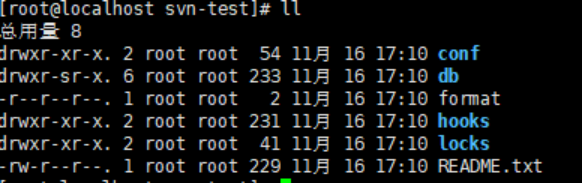 **六、配置svn信息** 输入 ¨K27K conf下有如下文件 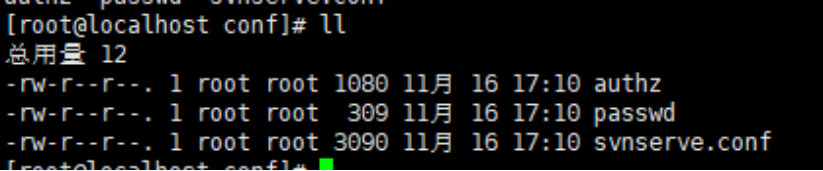 authz:负责账号权限的管理,控制账号是否读写权限 passwd:负责账号和密码的用户名单管理 svnserve.conf:svn服务器配置文件 vim authz`
配置如下
 在这里插入图片描述
[/]代表根目录下所有的资源,如果要限定资源,可以加上子目录即可
xiaotongxue为客户端链接账号 rw表示赋予此账号可读写的权限
vim passwd
 在这里插入图片描述
vi svnserve.conf
 在这里插入图片描述
配置信息解释如下:
匿名访问的权限,可以是read,write,none,默认为read
anon-access=none
使授权用户有写权限
auth-access=write
密码数据库的路径
password-db=passwd
访问控制文件
authz-db=authz
认证命名空间,subversion会在认证提示里显示,并且作为凭证缓存的关键字
realm=/var/svn/svnrepos
开启默认3690端口
firewall-cmd --zone=public --add-port=3690/tcp --permanent
firewall-cmd --reload #重启防火墙
启动svn
svnserve -d -r /var/svn/svnrepos
输入
ps -aux|grep svn
查看,可以发现启动成功
 在这里插入图片描述
客户端访问svn服务器
右键checkout,输入地址:svn://192.168.137.128:3690/svn-test
输入密码
 在这里插入图片描述
确认,连接成功,并在本地生成svn-test版本库,之后将本地项目放到svn-test,commit提交成功,svn已经能正常使用
更多资源和教程请关注公众号:非科班的科班。
如果觉得我写的还可以请给个赞,谢谢大家,你的鼓励是我创作的动力