++==(纯手打,代码可能有错!)==++
服务间通讯
RestTemplate
- 方式一:
直接使用restTemplate,url写死
    RestTemplate restTemplate = new RestTemplate();
String responseStr = restTemplate.getForObject(“http://localhost:8080/msg”,String.class);- 方式二:
利用loadBalancerClient通过应用名获取URL,然后再使用restTemplate
- 先给controller注入loadBalancerClient
    @Autowired
private LoadBalancerClient loadBalancerClient; - 获取URL,再使用restTemplate
    RestTemplate restTemplate = new RestTemplate();
    ServiceInstance serviceInstance = loadBalancerClient.choose(“PRODUCT”);
    String url = String.format(“http://%s:%s”, serviceInstance.getHost, serviceInstance.getPort());
String responseStr = restTemplate.getForObject(url, String.class);- 方式三:
利用@LoadBalanced注解,可在restTemplate里使用应用名字
- 利用@LoadBalanced注解
    @Bean
    @LoadBalanced
    public RestTemplate restTemplate(){
            return new RestTemplate();
    }
String responseStr = restTemplate.getForObject(“http://PRODUCT/msg”, String.class);Feign
- 添加依赖
    <dependency>
        <groupId>org.springframework.cloud</groupId>
        <artifactId>spring-cloud-starter-feign</artifactId>
</dependency>- 在主类中添加注解
@EnableFeignClients - 编写一个service链接其他服务
在controller包同级目录下新建一个client包,在该包下新建ProductClient接口
// product对应的是服务名
@FeignClient(name="product")
public interface ProductClient{
    @GetMapping("/msg")
    String productMsg();
}
然后,在需要调用"/msg"接口的controller中这样使用:
@Autowired
private ProductClient productClient;
或添加其他服务的pom直接访问
统一配置中心
当要修改上线项目的一些配置、文案的时候,为了不用重复发行版本,只做一些小修改,就可以用统一配置中心。
- 问题一:Config是怎么拿到码云上面的配置文件的?
- 创建一个springboot的配置中心服务端应用
- 引入依赖
    <!-- 引入cloud依赖 -->
    <dependencyManagement>
        <dependencies>
            <dependency>
                <groupId>org.springframework.cloud</groupId>
                <artifactId>spring-cloud-dependencies</artifactId>
                <version>Finchley.RELEASE</version>
                <type>pom</type>
                <scope>import</scope>
            </dependency>
        </dependencies>
    </dependencyManagement>
<!-- 引入cloud配置中心服务端依赖 -->
<dependency>
<groupId>org.springframework.cloud</groupId>
<artifactId>spring-cloud-config-server</artifactId>
</dependency>
<!-- 引入Eureka客户端依赖 -->
<dependency>
<groupId>org.springframework.cloud</groupId>
<artifactId>spring-cloud-starter-netflix-eureka-client</artifactId>
</dependency>- 修改配置文件,此处把配置放到了码云上面
spring:
  application:
    name: config-server
  cloud:
      config:
        server:
          git:
            #  配置文件只搜索url目录下的searchPaths
            uri: [email protected]:szliugx/spring_cloud_config.git
            # 指定搜索路径,如果有多个路径则使用,分隔
            searchPaths: infomation/
            # 对于使用git,svn做为后端配置,从远程库获取配置文件,需要存储到本地文件
            basedir: /tmp/spring-cloud-repo
            # 配置中心通过git从远程git库,有时本地的拷贝被污染,这时配置中心无法从远程库更新本地配置,设置force-pull=true,则强制从远程库中更新本地库
            force-pull: true
            #username: username
            #password: password


#服务注册中心端口号
server:
  port: 6130

#服务注册中心实例的主机名、端口
#是否向服务注册中心注册自己
#是否检索服务
#服务注册中心的配置内容,指定服务注册中心的位置
eureka:
  port:
  instance:
    hostname: localhost
  client:
    register-with-eureka: true
    fetch-registry: false
    serviceUrl:
defaultZone: http://${eureka.instance.hostname}:${eureka.port}/eureka/- 启动类上添加注释 @EnableConfigServer 和 @EnableEurekaClient
@SpringBoorApplication
@EnableConfigServer
@EnableEurekaClient
public class ConfigServerApplication {
    public static void main(String[] args){SpringApplication.run(ConfigServerApplication.class,args);}
}
最后,为每个服务添加一个属于自己的配置文件在码云上
注意远程配置的命名,如 user-dev.properties,服务名 -环境.properties/服务名 -环境.yml
/{name}-{profiles}.yml
/{label}/{name}-{profiles}.yml
Name: 服务名
Profiles:环境
Label:分支(branch)
Spring Cloud Bus
配置.YML文件,开放所有的接口;
使用注解:@RefreshScope
异步和消息
例如,用户注册后,需要发短信和加积分。用户信息注册写入数据库后,通知异步消息,通知短信服务和积分服务做事情。
RabbitMQ
- 导入依赖
Spring-boot-starter-amqp; - 修改.YML,配置mq
rabbbitmq:
  host: localhost
  port: 5671
  username: guest
password: guest- 编写代码
接收端:
/**
 * 水果商供应商服务 接收消息
 * @param message
 */
@RabbitListener(bindings = @QueueBinding(
    exchange = @Exchange("myOrder"),
    key = "fruit",
    value = @Queue("fruitOrder")
))
public void processFruit(String message){
    log.info("fruit MqReceiver: {}",message);
}
public class MqReceiver{
// 1.@RabbitListener(queues = "myQueue")
// 2.自动创建队列
@RabbitListener(queuesToDeclare = @Queue("myQueue"))
public void process(String message){
log.info("MqReceiver: {}",message);
}
}发送端:参数有(exchange、routingKey、message)
@Component
public class MqSenderTest extends OrderApplicationTests {
    @Autowired
    private AmqpTemplate amqpTemplate;

    @Test
    public void send(){
        amqpTemplate.converAndSend("myQueue", "now");
    }

    @Test
    public void sendOrder(){
        amqpTemplate.convertAndSend("myOrder", "computer");
    }
}
Spring Cloud Stream
官方定义 Spring Cloud Stream 是一个构建消息驱动微服务的框架
应用程序通过 inputs 或者 outputs 来与 Spring Cloud Stream 中binder 交互,通过我们配置来 binding ,而 Spring Cloud Stream 的 binder 负责与消息中间件交互。所以,我们只需要搞清楚如何与 Spring Cloud Stream 交互就可以方便使用消息驱动的方式。
- 引入依赖:
<dependency>
    <groupId>org.springframework.cloud</groupId>
    <artifactId>spring-cloud-starter-stream-rabbit</artifactId>
</dependency>- 配置文件中配置消息中间件RabbitMQ:
rabbbitmq:
  host: localhost
  port: 5671
  username: guest
password: guest- 使用spring cloud stream发送和接收消息
public interface StreamClient{
   String INPUT = "myMessage";

   @Input(StreamClient.INPUT)
   SubscribableChannel input();

   @Output(StreamClient.INPUT)
   MessageChannel output();

}
消息接收端:
@Component
@EnableBinding(StreamClient.class)
@Slf4j
public class StreamReceiver{

    @StreamListener(StreamClient.INPUT)
    public void process(Object message){
        log.info("StreamReceiver: {}",message);
    }
}
消息发送端:
@RestController
public class SendMessageController{

    @Autowired
    private StreamClient streamClient;

    @GetMapping("/sendMessage")
    public void process(){
        String message = "now" + new Date();
        streamClient.output().send(MessageBuilder.withPayload(message).build());
    }

}
消息分组:
把一个服务放到一个组里面,不管这个服务有多少个实例,只会由一个实例来处理一个消息。
spring:
  application:
    name: order
  cloud:
    config:
    discovery:
      enabled: true
      service-id: CONFIG
    profile: test
  stream:
    bindings:
      # 队列名称
      myMessage:
        # 组名称
        group: order
为了在MQ界面里面看到消息中java对象的具体内容,加一个配置:
spring:
application:
name: order
cloud:
config:
discovery:
enabled: true
service-id: CONFIG
profile: test
stream:
bindings:
# 队列名称
myMessage:
# 组名称
group: order
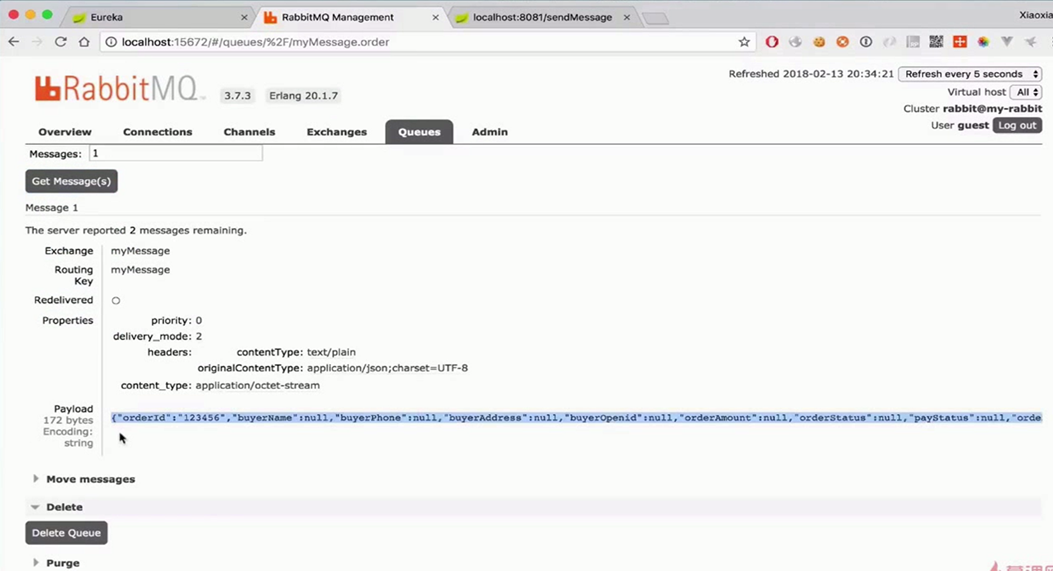
# 设置消息内容类型(可查看java对象属性)
content-type: application/json 效果如下:
处理完消息之后,如果需要回应一下:
- 增加一个消息:
public interface StreamClient {
    String INPUT = "myMessage";
    String INPUT2 = "myMessage2";

    @Input(StreamClient.INPUT)
    SubscribableChannel input();

    @Output(StreamClient.INPUT)
    MessageChannel output();

    @Input(StreamClient.INPUT2)
    SubscribableChannel input2();

    @Output(StreamClient.INPUT2)
    MessageChannel output2();
}- 用@SendTo注解返回信息:
@StreamListener(value = StreamClient.INPUT)
@SendTo(StreamClient.INPUT)
public String process(OrderDTO message){
    log.info("StreamReceiver: {}",message);
    return "received";
}

@StreamListener(value = StreamClient.INPU2T)
public String process2(OrderDTO message){
    log.info("StreamReceiver2: {}",message);
    return "received";
}
异步扣库存分析
订单生成的时候(此时订单状态为等待中),向MQ发送信息,通知商品服务扣除库存,商品服务不论成功还是失败,都要返回结果给订单服务。订单服务订阅了商品服务,根据返回的信息,觉得这个订单是否生成。
***
服务网关
建议使用Nginx和zuul混搭的方式,使用nginx对外暴露一个URL,nginx把请求转发到多个zuul服务上,nginx继续做负载均衡,这样可以做到nginx和zuul的取长补短。
常见的网关方案:
Nginx+Lua
Spring Cloud Zuul
Spring Cloud Zuul
路由+过滤器 = Zuul
Zuul核心是一系列的过滤器
四种标准过滤器类型:
- 前置Pre
- 路由Route
- 后置Post
- 错误Error
要实现路由转发功能要加注解:@EnableZuulProxy
访问路径控制:(自定义、限制访问)
zuul:
  routes:
    # /myProduct/product/list -> /product/product/list
    # product:
    #   path: /myProduct/**
    #   serviceId: product
# 简洁写法
    product: /myProduct/**
# 排除某些路由
ignored-patterns:
- /**/product/listForProductCookie转发(默认是不能传cookie的):
默认限制了cookie、set-cookie、authorization的转发:
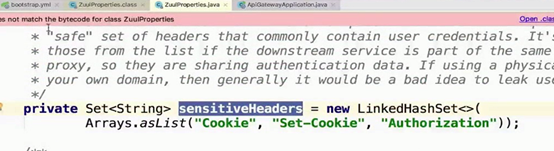
该字段设置为空即可放开:
zuul:
  routes:
    # /myProduct/product/list -> /product/product/list
    product:
      path: /myProduct/**
      serviceId: product
      # 设置为空即可
      sensitiveHeaders:
# 简洁写法
    product: /myProduct/**
# 排除某些路由
ignored-patterns:
  - /**/product/listForProduct
Zuul过滤器:
自定义preFilter:
@Component
public class TokenFilter extends ZuulFilter {
    @Override
    public String filterType() {
        return PRE_TYPE;
    }

    @Override
    public int filterOrder() {
        return PRE_DECORATION_FILTER_ORDER - 1;
    }

    @Override
    public boolean shouldFilter() {
        return true;
    }

    @Override
    public Object run() {
        RequestContext requestContext = RequestContext.getCurrentContext();
        HttpServletRequest request = requestContext.getRequest();

        //这里从url参数里获取, 也可以从cookie, header里获取
        String token = request.getParameter("token");
        if (StringUtils.isEmpty(token)) {
            requestContext.setSendZuulResponse(false);
            requestContext.setResponseStatusCode(HttpStatus.UNAUTHORIZED.value());
        }
        return null;
    }
}
自定义postFilter:
@Component
public class AddResponseHeaderFilter extends ZuulFilter{
    @Override
    public String filterType() {
        return POST_TYPE;
    }

    @Override
    public int filterOrder() {
        return SEND_RESPONSE_FILTER_ORDER - 1;
    }

    @Override
    public boolean shouldFilter() {
        return true;
    }

    @Override
    public Object run() {
        RequestContext requestContext = RequestContext.getCurrentContext();
        HttpServletResponse response = requestContext.getResponse();
        response.setHeader("X-Foo", UUID.randomUUID().toString());
        return null;
    }
}
令牌桶限流(访问拦截):
@Component
public class RateLimitFilter extends ZuulFilter{
    //Google开源工具包Guava提供了限流工具类RateLimiter,该类基于令牌桶算法实现流量限制,使用十分方便,而且十分高效。
    private static final RateLimiter RATE_LIMITER = RateLimiter.create(100);

    @Override
    public String filterType() {
        return PRE_TYPE;
    }

    @Override
    public int filterOrder() {
        return SERVLET_DETECTION_FILTER_ORDER - 1;
    }

    @Override
    public boolean shouldFilter() {
        return true;
    }

    @Override
    public Object run() {
        //如果没有令牌,抛出异常
        if(!RATE_LIMITER.tryAcquire()){
            throw new RateLimitException();
        }
        return null;
    }
}
微信商城中买家端和卖家端登录之后的区别:
买家端登录之后往cookie里写了一个openid=”openid”;
卖家端登录之后,在cookie中存了一个token="redisKey",这个redisKey一般是UUID,redis中存了一个redisKey="openid"
权限拦截:
例子:买家完成订单
public class AuthSellerFilter extends ZuulFilter{

    @Autowired
    private StringRedisTemplate stringRedisTemplate;

    @Override
    public String filterType() {
        return PRE_TYPE;
    }

    @Override
    public int filterOrder() {
        return PRE_DETECTION_FILTER_ORDER - 1;
    }

    @Override
    public boolean shouldFilter() {
        RequestContext requestContext = RequestContext.getCurrentContext();
        HttpServletRequest request = requestContext.getRequest();

        if("/order/order/finish".equals(request.getRequest())){
            return true
        }
        return false;
    }

    @Override
    public Object run() {
        RequestContext requestContext = RequestContext.getCurrentContext();
        HttpServletRequest request = requestContext.getRequest();

        // /order/finish 只能卖家访问(cookie里面有token,并且对应redis中的值)

        Cookie cookie = CookieUtil.get(request,"token");
        if(cookie == null || StringUtils.isEmpty(cookie.getValue()) || StringUtils.isEmpty(stringRedisTemplate.opsForValue().get(String.format(RedisConstant.TOKEN_TEMPLATE, cookie.getValue())))){
            requestContext.setSendZuulResponse(false);
            requestContext.setResponseStatusCode(HttpStatus.UNAUTHORIZED.value());
        }
        return null;
    }
}
网关配置所有服务都可以传递cookie:
zuul:
  # 全部服务忽略敏感头
  sensitive-headers:
  routes:
Zuul跨域:
@Configuration
public class CorsConfig {
    @Bean
    public CorsFilter corsFilter() {
        final UrlBasedCorsConfigurationSource source = new UrlBasedCorsConfigurationSource();
        final CorsConfiguration config = new CorsConfiguration();

        config.setAllowCredentials(true);
        config.setAllowedOrgins(Arrays.asList("*"));
        config.setAllowedHeaders(Arrays.asList("*"));
        config.setAllowedMethods(Arrays.asList("*"));
        config.setMaxAge(300l);

        source.registerCorsConfiguration("/**",config);
        return new CorsFilter(source);
    }
}
链路监控
Spring Cloud Sleuth
Spring Cloud Sleuth是Spring Cloud提供的分布式系统服务链追踪组件。
一个请求可能会经过多个服务才会得到结果,如果在这个过程中出现了异常,就很难去定位问题。所以,必须要实现一个分布式链路跟踪的功能,直观的展示出完整的调用过程。
- 引入依赖
<dependency>
    <groupId>org.springframework.cloud</groupId>
    <artifactId>spring-cloud-starter-sleuth</artifactId>
</dependency>- 加入配置文件
  sleuth:
    sampler:
      # 1表示100%,所有日志都发送到外部程序展示,会消耗带宽等资源,只能在开发中使用
      percentage: 1
Zipkin
官网有安装方法:https://zipkin.io/pages/quickstart
重要概念:
TraceId: 全局跟踪ID,是跟踪的入口点。
SpanId: 下一层请求ID。一个traceId包含1个以上的spanId。
ParentId: 上一层请求跟踪ID,用来将前后的请求串联起来
- 引入依赖:
<dependency>
    <groupId>org.springframework.cloud</groupId>
    <artifactId>spring-cloud-sleuth-zipkin</artifactId>
</dependency>
因为zipkin和sleuth需要一起使用,所以都需要导入依赖:
<!--<dependency>-->
    <!--<groupId>org.springframework.cloud</groupId>-->
    <!--<artifactId>spring-cloud-starter-sleuth</artifactId>-->
<!--</dependency>-->

<!--<dependency>-->
    <!--<groupId>org.springframework.cloud</groupId>-->
    <!--<artifactId>spring-cloud-sleuth-zipkin</artifactId>-->
<!--</dependency>-->

<!-- 包含sleuth和zipkin -->
<dependency>
    <groupId>org.springframework.cloud</groupId>
    <artifactId>spring-cloud-starter-zipkin</artifactId>
</dependency>- 修改配置文件:
  zipkin:
    base-url: http://localhost:9411/
  sleuth:
    sampler:
      percentage: 1