版权声明:本文为博主原创文章,遵循 CC 4.0 BY-SA 版权协议,转载请附上原文出处链接和本声明。
TensorFlow图像数据处理之图像预处理
文章目录
TFRecord输入数据格式
为什么要把数据转化为TFRecord格式
因为在处理现实问题是,图片或者数据往往有很多的格式和属性,这时就引入我们此时的TFRecord的输入数据格式,以方便我们对数据更好的管理和处理。总之将我们已有的数据转换为TFRecord格式有很多的好处,所以我们要去使用这种方法对数据进行处理。
TFRecord样例程序
以下的程序将告诉我们如何讲MNIST输入数据转化为TFRecord的格式,以及如何读取TFRecord格式文件。
import tensorflow as tf
from tensorflow.examples.tutorials.mnist import input_data
import numpy as np


#1.将输入转化成TFRecord格式并保存

# 定义函数转化变量类型。
def _int64_feature(value):
    return tf.train.Feature(int64_list=tf.train.Int64List(value=[value]))

def _bytes_feature(value):
    return tf.train.Feature(bytes_list=tf.train.BytesList(value=[value]))

# 将数据转化为tf.train.Example格式。
def _make_example(pixels, label, image):
    image_raw = image.tostring()
    example = tf.train.Example(features=tf.train.Features(feature={
        'pixels': _int64_feature(pixels),
        'label': _int64_feature(np.argmax(label)),
        'image_raw': _bytes_feature(image_raw)
    }))
    return example

# 读取mnist训练数据。
mnist = input_data.read_data_sets("../../datasets/MNIST_data",dtype=tf.uint8, one_hot=True)
images = mnist.train.images
labels = mnist.train.labels
pixels = images.shape[1]
num_examples = mnist.train.num_examples

# 输出包含训练数据的TFRecord文件。
with tf.python_io.TFRecordWriter("output.tfrecords") as writer:
    for index in range(num_examples):
        example = _make_example(pixels, labels[index], images[index])
        writer.write(example.SerializeToString())
print("TFRecord训练文件已保存。")

# 读取mnist测试数据。
images_test = mnist.test.images
labels_test = mnist.test.labels
pixels_test = images_test.shape[1]
num_examples_test = mnist.test.num_examples

# 输出包含测试数据的TFRecord文件。
with tf.python_io.TFRecordWriter("output_test.tfrecords") as writer:
    for index in range(num_examples_test):
        example = _make_example(
            pixels_test, labels_test[index], images_test[index])
        writer.write(example.SerializeToString())
print("TFRecord测试文件已保存。")


#2.读取TFRecord文件

# 读取文件。
reader = tf.TFRecordReader()
filename_queue = tf.train.string_input_producer(["output.tfrecords"])
_,serialized_example = reader.read(filename_queue)

# 解析读取的样例。
features = tf.parse_single_example(
    serialized_example,
    features={
        'image_raw':tf.FixedLenFeature([],tf.string),
        'pixels':tf.FixedLenFeature([],tf.int64),
        'label':tf.FixedLenFeature([],tf.int64)
    })

images = tf.decode_raw(features['image_raw'],tf.uint8)
labels = tf.cast(features['label'],tf.int32)
pixels = tf.cast(features['pixels'],tf.int32)

sess = tf.Session()

# 启动多线程处理输入数据。
coord = tf.train.Coordinator()
threads = tf.train.start_queue_runners(sess=sess,coord=coord)

for i in range(10):
    image, label, pixel = sess.run([images, labels, pixels])
以上的程序可以将MNIST数据集所有的训练数据储存到一个TFRecord文件中。同样,在数据集较大的情况下,我们也可以将数据写入到多个TFRecord文件中。
图像数据处理
在之前的学习中,我们一直使用的是图像的矩阵。现在我们来引入数据的图像,对图像进行预处理。通过对图像的预处理,可以尽量避免模型受到无关因素的影响。
TensorFlow图像处理函数
输出原始矩阵和原始图像
import matplotlib.pyplot as plt
import tensorflow as tf
import numpy as np
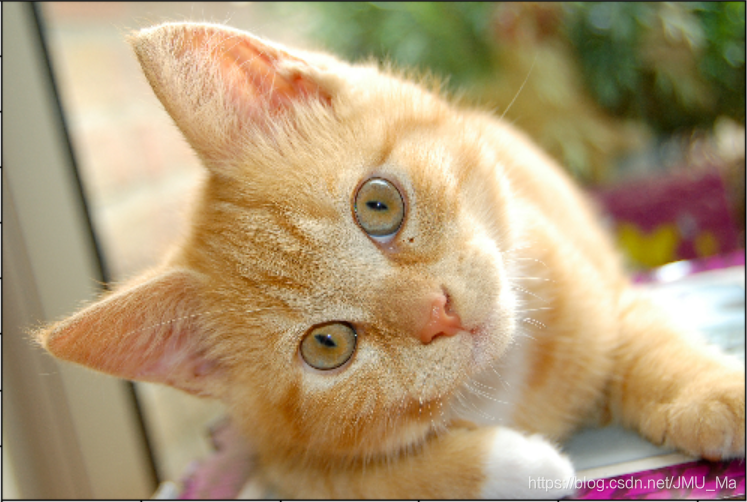
image_raw_data = tf.gfile.FastGFile('cat.jpg','rb').read()
# 输出图像的原始矩阵
with tf.Session() as sess:
img_data = tf.image.decode_jpeg(image_raw_data)
print(img_data.eval())
img_data.set_shape([1797, 2673, 3])
print(img_data.get_shape())
# 输出原始图像
# 此处的plt是matplotlib.pyplot的绘图功能
with tf.Session() as sess:
plt.imshow(img_data.eval())
plt.show()
得到图像的原始矩阵和图像如下:
对图像进行大小调整
import matplotlib.pyplot as plt
import tensorflow as tf
import numpy as np

image_raw_data = tf.gfile.FastGFile('cat.jpg','rb').read()
# 如果直接以0-255范围的整数数据输入resize_images,那么输出将是0-255之间的实数,
# 不利于后续处理。本书建议在调整图片大小前,先将图片转为0-1范围的实数。
with tf.Session() as sess:
	img_data = tf.image.convert_image_dtype(img_data, dtype = tf.float32)
	resized = tf.image.resize_images(img_data, [100, 100], method = 0)
	plt.imshow(resized.eval())
	plt.show()
得到以下的内容:

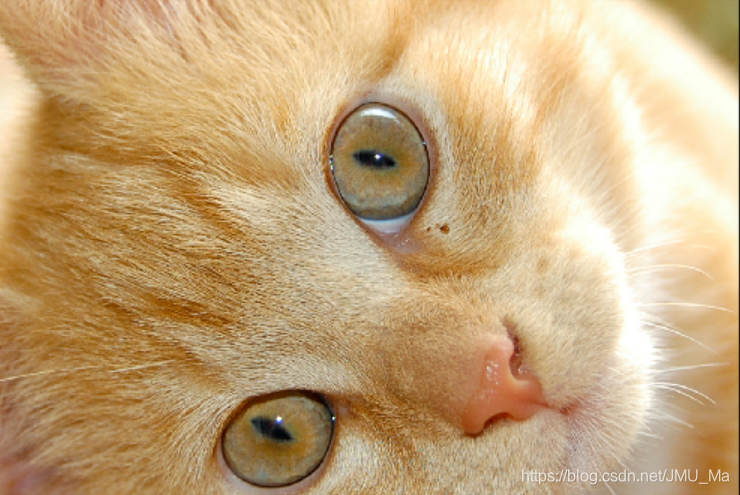
对图像进行按百分比的剪裁
import matplotlib.pyplot as plt
import tensorflow as tf
import numpy as np

image_raw_data = tf.gfile.FastGFile('cat.jpg','rb').read()
# 按照50%进行剪裁
with tf.Session() as sess:
    central_cropped = tf.image.central_crop(img_data, 0.5)
    plt.imshow(central_cropped.eval())
    plt.show()
得到以下的图片:
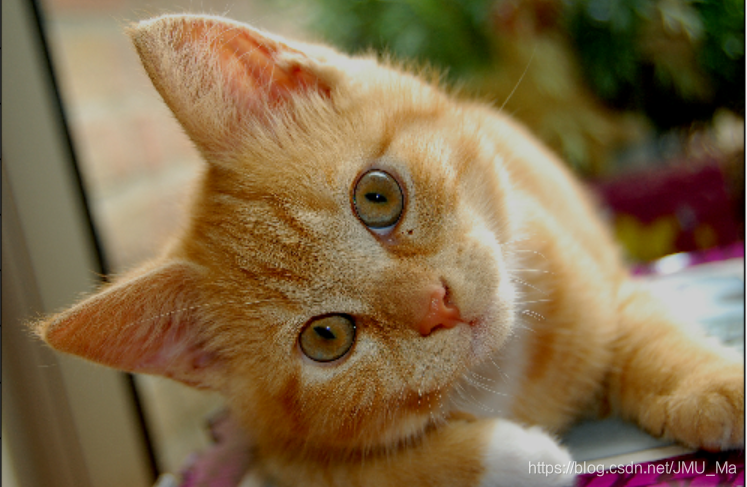
对图片的亮度进行处理
import matplotlib.pyplot as plt
import tensorflow as tf
import numpy as np

image_raw_data = tf.gfile.FastGFile('cat.jpg','rb').read()

with tf.Session() as sess:
	image_float = tf.image.convert_image_dtype(img_data, tf.float32)
    # 在[-max_delta, max_delta)的范围随机调整图片的亮度。
    adjusted = tf.image.random_brightness(image_float, max_delta=0.5)
	plt.imshow(adjusted.eval())
	plt.show()
得到以下的图片:
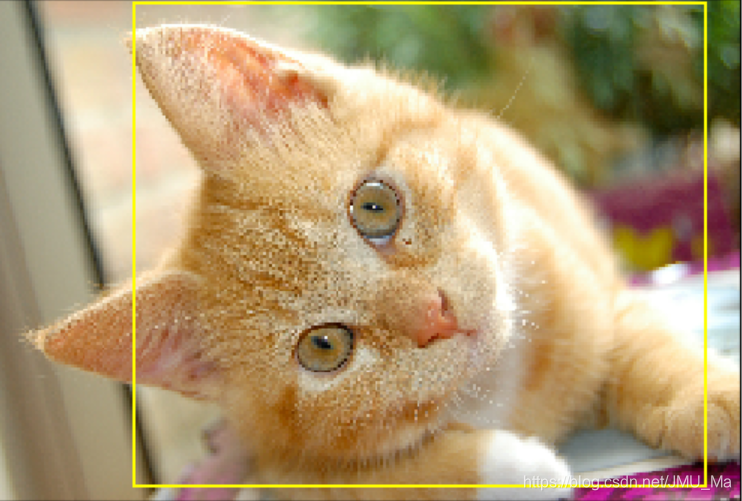
对图像添加标记框
import matplotlib.pyplot as plt
import tensorflow as tf
import numpy as np

image_raw_data = tf.gfile.FastGFile('cat.jpg','rb').read()
with tf.Session() as sess:
    boxes = tf.constant([[[0.05, 0.05, 0.9, 0.7], [0.35, 0.47, 0.5, 0.56]]])

    # sample_distorted_bounding_box要求输入图片必须是实数类型。
    image_float = tf.image.convert_image_dtype(img_data, tf.float32)

    begin, size, bbox_for_draw = tf.image.sample_distorted_bounding_box(
        tf.shape(image_float), bounding_boxes=boxes, min_object_covered=0.4)

    # 截取后的图片
    distorted_image = tf.slice(image_float, begin, size)
    plt.imshow(distorted_image.eval())
    plt.show()

    # 在原图上用标注框画出截取的范围。由于原图的分辨率较大(2673x1797),生成的标注框
    # 在Jupyter Notebook上通常因边框过细而无法分辨,这里为了演示方便先缩小分辨率。
    image_small = tf.image.resize_images(image_float, [180, 267], method=0)
    batchced_img = tf.expand_dims(image_small, 0)
    image_with_box = tf.image.draw_bounding_boxes(batchced_img, bbox_for_draw)
    print(bbox_for_draw.eval())
    plt.imshow(image_with_box[0].eval())
    plt.show()
总结
通过以上的方法能够实现一张训练图像衍生出很多训练样本。通过将训练图像进行预处理,训练得到的神经网络模型可以识别不同大小、方位、色彩等方面的实体。通过这种方法可以弱化图像的颜色、亮度等这些因素对最终分析结果的影响。