所有文章
https://www.cnblogs.com/lay2017/p/11740855.html
正文
上一篇文章中,我们创建了一个ClientHttpRequest的实例。本文将继续阅读ClientHttpRequest的执行逻辑。
再次回顾一下restTemplate核心逻辑的代码
protected <T> T doExecute(URI url, @Nullable HttpMethod method, @Nullable RequestCallback requestCallback,
        @Nullable ResponseExtractor<T> responseExtractor) throws RestClientException {

    ClientHttpResponse response = null;
    try {
        // 生成请求
        ClientHttpRequest request = createRequest(url, method);
        if (requestCallback != null) {
            // 设置header
            requestCallback.doWithRequest(request);
        }
        // 执行请求,获取响应
        response = request.execute();
        // 处理响应
        handleResponse(url, method, response);
        // 获取响应体对象
        return (responseExtractor != null ? responseExtractor.extractData(response) : null);
    }
    catch (IOException ex) {
        // ... 抛出异常
    }
    finally {
        if (response != null) {
            // 关闭响应流
            response.close();
        }
    }
}
ClientHttpRequest的默认实现类是SimpleBufferingClientHttpRequest,我们先看看它的继承关系
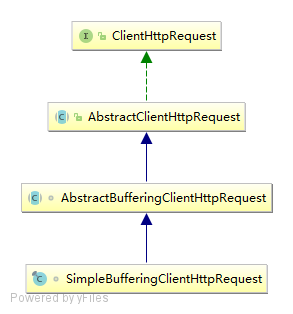
可以看到,ClientHttpRequest直接被AbstractClientHttpRequest继承,所以我们先从AbstractClientHttpRequest实现的execute方法开始
跟进execute方法
@Override
public final ClientHttpResponse execute() throws IOException {
    assertNotExecuted();
    ClientHttpResponse result = executeInternal(this.headers);
    this.executed = true;
    return result;
}
execute方法前置校验executed这个flag,executeInternal执行完后打了个true的标记。所以一个ClientHttpRequest将只能被执行一次。
继续跟进executeInternal方法,executeInternal方法由AbstractBufferingClientHttpRequest实现
@Override
protected ClientHttpResponse executeInternal(HttpHeaders headers) throws IOException {
    byte[] bytes = this.bufferedOutput.toByteArray();
    if (headers.getContentLength() < 0) {
        headers.setContentLength(bytes.length);
    }
    ClientHttpResponse result = executeInternal(headers, bytes);
    this.bufferedOutput = new ByteArrayOutputStream(0);
    return result;
}
核心逻辑在executeInternal(headers, bytes)里,继续跟进它
executeInternal(headers, bytes)由SimpleBufferingClientHttpRequest实现
@Override
protected ClientHttpResponse executeInternal(HttpHeaders headers, byte[] bufferedOutput) throws IOException {
    addHeaders(this.connection, headers);
    // JDK <1.8 doesn't support getOutputStream with HTTP DELETE
    if (getMethod() == HttpMethod.DELETE && bufferedOutput.length == 0) {
        this.connection.setDoOutput(false);
    }
    if (this.connection.getDoOutput() && this.outputStreaming) {
        this.connection.setFixedLengthStreamingMode(bufferedOutput.length);
    }
    this.connection.connect();
    if (this.connection.getDoOutput()) {
        // 写到输出流上
        FileCopyUtils.copy(bufferedOutput, this.connection.getOutputStream());
    }
    else {
        // Immediately trigger the request in a no-output scenario as well
        this.connection.getResponseCode();
    }
    // 响应一个ClientHttpResponse对象
    return new SimpleClientHttpResponse(this.connection);
}
如果开启了输出流,那么FileCopyUtils.copy方法将会把缓冲数据写入到输出流里面。
注意:FileCopyUtils.copy方法在写入完毕后会关闭输出流,所以不需要外部显式关闭。我们看copy方法
public static void copy(byte[] in, OutputStream out) throws IOException {
    Assert.notNull(in, "No input byte array specified");
    Assert.notNull(out, "No OutputStream specified");

    try {
        out.write(in);
    }
    finally {
        try {
            out.close();
        }
        catch (IOException ex) {
        }
    }
}
executerInternal(headers, bytes)方法最后会响应一个SimpleClientHttpResponse实例对象,单纯地包装了Connection对象。
SimpleClientHttpResponse(HttpURLConnection connection) {
    this.connection = connection;
}
显然,后续的处理就是从ClientHttpResponse中读取输入流,然后格式化成一个响应体,最后回收资源。下一篇内容讲述这个
总结
执行ClientHttpRequest逻辑其实就是与服务端创建Connection连接(如果有需要写入数据则写入到输出流),整体还是比较简单的。