在Java中,实现多线程的方式有好几种,现在我主要介绍其中的一种:继承Thread类实现多线程。
首先,我先介绍一下Thread类。
java.lang.Thread是一个线程操作的核心类。新建一个线程最简单的方法就是直接继承Thread类,然后覆写该类中的run()方法。我先举个例子。
class My_Thread extends Thread{//继承于Thread类
    private String message;
    public My_Thread(String message){
        this.message = message;
    }
    @Override
    public void run() {//覆写run()方法
        for(int i = 0;i< 10;i++){
            System.out.println(this.message+i);
        }
    }
}
这个My_Thread类直接继承了Thread类,我们对Thread类的run()方法进行了覆写。在这里我们会想到可以先创建线程类的实例化对象之后直接调用run()方法。但是这种调用和多线程却没有什么关系,只是普通调用罢了。
既然是多线程,我们就应该启动它,然后再执行我们想要的操作。
class My_Thread extends Thread{//继承于Thread类
    private String message;
    public My_Thread(String message){
        this.message = message;
    }
    @Override
    public void run() {
        for(int i = 0;i< 10;i++){
            System.out.println(this.message+":"+i);
        }
    }
}

public class Main{
    public static void main(String[] args){
        Thread New_Thread1 = new My_Thread("新线程1");
        New_Thread1.start();//会直接调用run()方法
    }
}
在这里,Thread.start()会自动调用New_Thread对象的run()方法。虽然同样是调用run()方法,但是,如果我们不启动线程而直接用实例化对象调用run()方法的话,就相当于是主线程(main()方法)调用run()方法,并不是新线程调用。所以达不到多线程的效果。
此外·,还有一点需要说明的是
public class Main{
    public static void main(String[] args){
        Thread New_Thread1 = new My_Thread("新线程1");
        Thread New_Thread2 = new My_Thread("新线程2");
        Thread New_Thread3 = new My_Thread("新线程3");
        New_Thread1.start();
        New_Thread2.start();
        New_Thread3.start();
    }
}
如果在主线程下启动了多个线程的话,那么所有的线程对象就变成了交替执行,这是因为这两个线程是并发的操作,意思就是不断的切换有操作的线程。所以打印出来的结果是交替的。
我们现在来看一下start()方法调用run()方法的过程,这个过程比较复杂。先看一下start()方法的源码
    public synchronized void start() {
        /**
         * This method is not invoked for the main method thread or "system"
         * group threads created/set up by the VM. Any new functionality added
         * to this method in the future may have to also be added to the VM.
         *
         * A zero status value corresponds to state "NEW".
         */
        if (threadStatus != 0)
            throw new IllegalThreadStateException();

        /* Notify the group that this thread is about to be started
         * so that it can be added to the group's list of threads
         * and the group's unstarted count can be decremented. */
        group.add(this);

        boolean started = false;
        try {
            start0();
            started = true;
        } finally {
            try {
                if (!started) {
                    group.threadStartFailed(this);
                }
            } catch (Throwable ignore) {
                /* do nothing. If start0 threw a Throwable then
                  it will be passed up the call stack */
            }
        }
    }

    private native void start0();
首先,在start()方法中有一条语句:
throw new IllegalThreadStateException();
这是一个RunTimeException,之所以会抛出这个异常,是因为线程被重复启动,所以:每个线程只能被启动一次。
其次,在start()方法里还调用了start0()方法,这个方法用native关键字声明且未实现。
private native void start0();
native:调用本地的原生系统函数
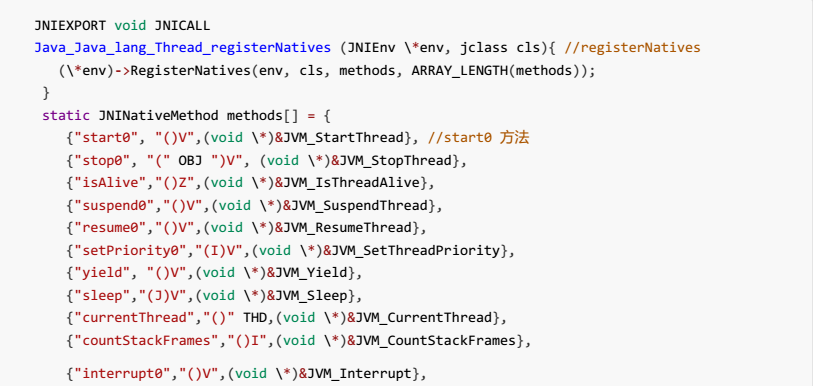
但是在start()方法中调用start0()方法,我们还要获得它的定义,否则光有声明也没什么用。在Thread类中,有一个registerNatives本地方法,这个方法会注册一些本地方法让Thread类使用,可以说操作本地线程的本地方法都是由它注册的。此方法放在一个static块中,在类加载的时候就会调用一次。注册相应的本地方法。
    private static native void registerNatives();
    static {
        registerNatives();
    }
既然registerNative()是一个本地方法,它的定义在一个名为Thread.c的文件中,它定义了各个操作系统需要用到的关于现成的公用数据和操作,Thread.c的部分内容如下
我们会发现线程会调用JVM_StartThread方法,但是,这个方法最终还是要调用run()方法的。
在jvm.cpp中,有以下的代码段:

JVM_ENTRY是一个宏,用来定义JVM_StartThread函数,在函数内创建了真正的本地线程,线程函数是thread_entry
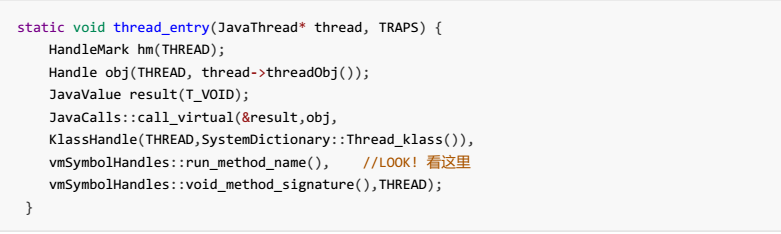
线程函数调用了vmSymbolHandles::run_method_name方法

所以,Java线程创建的调用流程如下图:
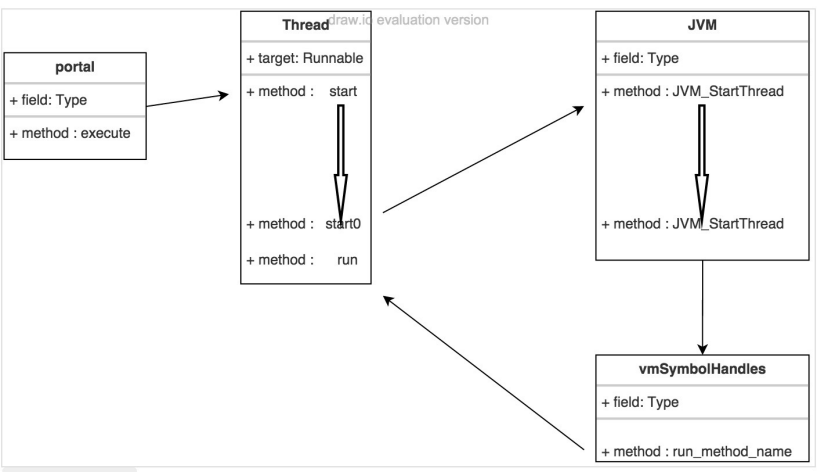
所以,start方法先调用start0本地方法,然后在JVM里调用JVM_StartThread方法,JVM_StartThread里的线程函数thread_entry调用了vmSymbolHandles::run_method_name()方法。run_method_name是在vmSymbols.hpp中用宏来定义的。其中的template(run_method_name,"run");决定了调用方法的名称是"run"。
这就是start方法调用run方法的过程。我现总结到这里,如果有问题我会及时更正。