https://detail.tmall.com/item.htm?id=600904840315&spm=a1z09.2.0.0.31cd2e8d1sb06V&_u=e1qf7bf5aeed
https://pan.baidu.com/s/1_XmY_DZZfsU739t5UdwS1Q
wjfh


/*
 # This sample code is used to test the pH meter Pro V1.0.
*/
#define SensorPin A2            //pH meter Analog output to Arduino Analog Input 2
#define Offset 21.677           //deviation compensate
#define LED 13
#define samplingInterval 20
#define printInterval 800
#define ArrayLenth  40    //times of collection
int pHArray[ArrayLenth];   //Store the average value of the sensor feedback
int pHArrayIndex=0;
void setup(void)
{
  pinMode(LED,OUTPUT);
  Serial.begin(9600);
  Serial.println("pH meter experiment!");    //Test the serial monitor
}
void loop(void)
{
  static unsigned long samplingTime = millis();
  static unsigned long printTime = millis();
  static float pHValue,voltage;
  if(millis()-samplingTime > samplingInterval)
  {
      pHArray[pHArrayIndex++]=analogRead(SensorPin);
      if(pHArrayIndex==ArrayLenth)pHArrayIndex=0;
      voltage = avergearray(pHArray, ArrayLenth)*5.0/1024;
      pHValue = -5.8887*voltage+Offset;
      if(pHValue<=0.0){pHValue=0.0;}
      if(pHValue>14.0){pHValue=14.0;}
      samplingTime=millis();
  }
  if(millis() - printTime > printInterval)   //Every 800 milliseconds, print a numerical, convert the state of the LED indicator
  {
  Serial.print("Voltage:");
  Serial.print(voltage,2);
  Serial.print("    pH value: ");
  Serial.println(pHValue,2);
  digitalWrite(LED,digitalRead(LED)^1);
  printTime=millis();
  }
}
double avergearray(int* arr, int number){
  int i;
  int max,min;
  double avg;
  long amount=0;
  if(number<=0){
    Serial.println("Error number for the array to avraging!/n");
    return 0;
  }
  if(number<5){   //less than 5, calculated directly statistics
    for(i=0;i<number;i++){
      amount+=arr[i];
    }
    avg = amount/number;
    return avg;
  }else{
    if(arr[0]<arr[1]){
      min = arr[0];max=arr[1];
    }
    else{
      min=arr[1];max=arr[0];
    }
    for(i=2;i<number;i++){
      if(arr[i]<min){
        amount+=min;        //arr<min
        min=arr[i];
      }else {
        if(arr[i]>max){
          amount+=max;    //arr>max
          max=arr[i];
        }else{
          amount+=arr[i]; //min<=arr<=max
        }
      }//if
    }//for
    avg = (double)amount/(number-2);
  }//if
  return avg;
}
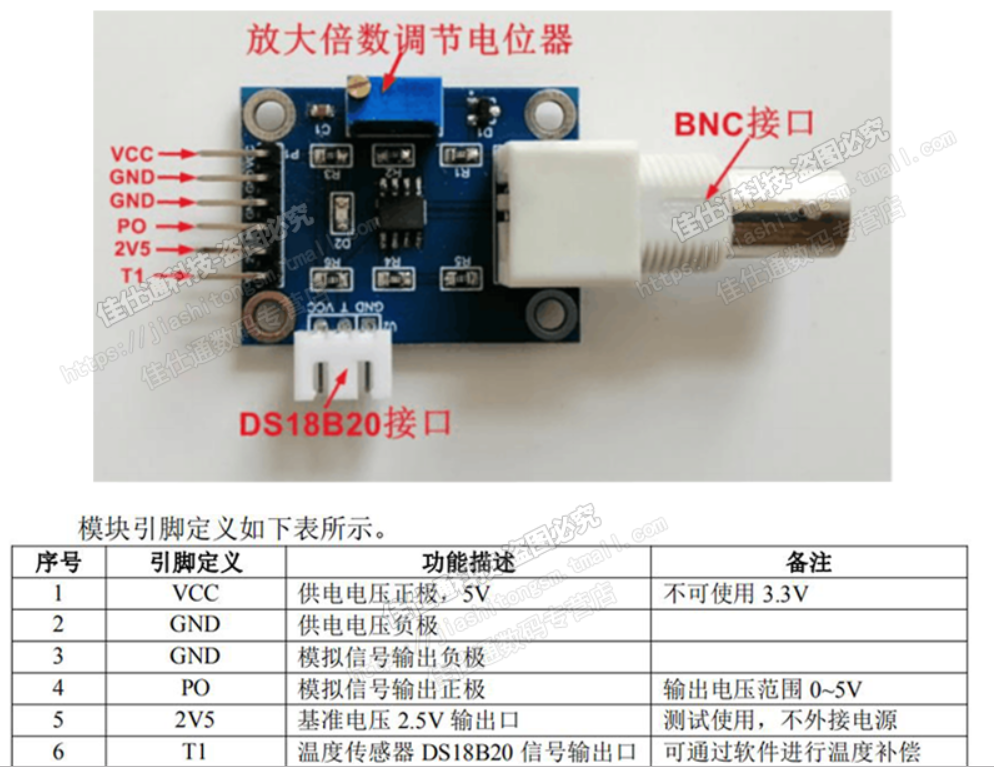
关于温度获取

从电路图看出,T1已经被上拉了一个10k电阻,可以直接用。
只不过从T1拿数据做温度的解析。
T1接到D2口
//注意:此程式只適用於一台Arduino連接一個DS18B20的狀況
#include <OneWire.h>
#include <DallasTemperature.h>

#define DQ_pin 2

OneWire oneWire(DQ_pin);
DallasTemperature sensors(&oneWire);

void setup(void)
{
  Serial.begin(9600);
  sensors.begin();
}

void loop(void)
{
  Serial.print("Temperatures->");
  sensors.requestTemperatures();
  Serial.println(sensors.getTempCByIndex(0));
  delay(2000);
}