本文搭建一个简单的spring工程,了解spring的IoC
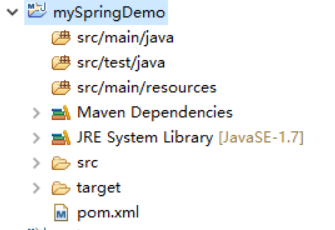
1、通过Eclipse创建一个maven工程,工程名叫mySpringDemo,参考我之前笔记:https://www.cnblogs.com/gllegolas/p/11610341.html,
2、右键工程,new --> others --> source folder,folder name输入:src/main/resources,创建resources文件夹存放配置文件
3、src/main/java目录下创建三个folder, 分别放接口、实现类、controller
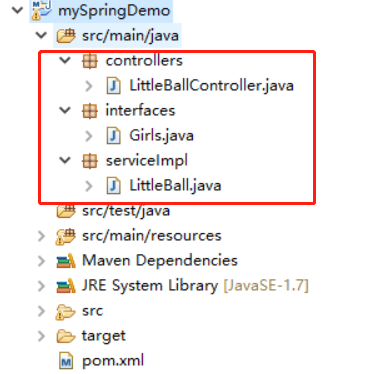
Girls代码:
package interfaces;

public interface Girls {

    public String getGirlsName();
}
LittleBall代码:
package serviceImpl;

import interfaces.Girls;

public class LittleBall implements Girls{

    public String girlsName;

    /**
     * 重写构造函数,输出信息,来确定bean初始化时间
     */
    public LittleBall(){
        System.out.println("Hello, I am little ball! I am very beautiful!");
    }

    public String getGirlsName(){
        return girlsName;
    }
    public void setGirlsName(String girlsName) {
        this.girlsName = girlsName;
    }
}
LittleBallController代码:
package serviceImpl;

import interfaces.Girls;

public class LittleBall implements Girls{

    public String girlsName;

    /**
     * 重写构造函数,输出信息,来确定bean初始化时间
     */
    public LittleBall(){
        System.out.println("Hello, I am little ball! I am very beautiful!");
    }

    public String getGirlsName(){
        return girlsName;
    }
    public void setGirlsName(String girlsName) {
        this.girlsName = girlsName;
    }
}
4、在src/main/resources下创建folder名为springConfig,存放spring的配置文件:

spring-beans.xml代码:
<?xml version="1.0" encoding="UTF-8"?>
<beans xmlns= "http://www.springframework.org/schema/beans"
    xmlns:xsi="http://www.w3.org/2001/XMLSchema-instance"
    xmlns:context="http://www.springframework.org/schema/context"
    xmlns:mvc="http://www.springframework.org/schema/mvc"
    xsi:schemaLocation="http://www.springframework.org/schema/beans
    http://www.springframework.org/schema/beans/spring-beans.xsd
    http://www.springframework.org/schema/context http://www.springframework.org/schema/context/spring-context.xsd
    http://www.springframework.org/schema/mvc http://www.springframework.org/schema/mvc/spring-mvc.xsd ">

    <bean id = "littleBall" class="serviceImpl.LittleBall">
        <property name="girlsName">
            <value>I am little ball!你好,我是小丸子!</value>
        </property>
    </bean>
</beans>
spring-controllers.xml代码:
<?xml version="1.0" encoding="UTF-8"?>
<beans xmlns= "http://www.springframework.org/schema/beans"
    xmlns:xsi="http://www.w3.org/2001/XMLSchema-instance"
    xmlns:context="http://www.springframework.org/schema/context"
    xmlns:mvc="http://www.springframework.org/schema/mvc"
    xsi:schemaLocation="http://www.springframework.org/schema/beans
    http://www.springframework.org/schema/beans/spring-beans.xsd
    http://www.springframework.org/schema/context http://www.springframework.org/schema/context/spring-context.xsd
    http://www.springframework.org/schema/mvc http://www.springframework.org/schema/mvc/spring-mvc.xsd ">

    <!-- 当配置了component-scan,annotation-config可以去掉。 -->
    <!-- 在使用context标签前,必须引入命名空间context="http://www.springframework.org/schema/context",www.springframework.org/schema/context http://www.springframework.org/schema/context/spring-context.xsd -->
    <context:annotation-config />

    <!-- 扫描文件(自动将controller层注入) -->
    <context:component-scan base-package="controllers" />

    <!--解决返回json时候中文乱码-->
    <mvc:annotation-driven>
        <mvc:message-converters>
            <bean class="org.springframework.http.converter.StringHttpMessageConverter">
                <property name="supportedMediaTypes">
                    <list>
                        <value>application/json;charset=UTF-8</value>
                    </list>
                </property>
            </bean>
        </mvc:message-converters>
    </mvc:annotation-driven>
</beans>
5、修改pom.xml文件,引入spring框架
<?xml version="1.0" encoding="UTF-8"?>
<project xmlns="http://maven.apache.org/POM/4.0.0" xmlns:xsi="http://www.w3.org/2001/XMLSchema-instance"
  xsi:schemaLocation="http://maven.apache.org/POM/4.0.0 http://maven.apache.org/xsd/maven-4.0.0.xsd">
  <modelVersion>4.0.0</modelVersion>

  <groupId>com.cmos</groupId>
  <artifactId>mySpringDemo</artifactId>
  <version>0.0.1-SNAPSHOT</version>
  <packaging>war</packaging>

  <name>mySpringDemo Maven Webapp</name>

  <properties>
    <project.build.sourceEncoding>UTF-8</project.build.sourceEncoding>
    <spring.version>4.0.5.RELEASE</spring.version>
  </properties>

  <dependencies>

  <!-- springMvc框架,它依赖于spring的其他jar包,会自动导入spring的core、beans、web等jar包 -->
    <dependency>
        <groupId>org.springframework</groupId>
        <artifactId>spring-webmvc</artifactId>
        <version>${spring.version}</version>
    </dependency>

    <!-- junit测试 -->
    <dependency>
      <groupId>junit</groupId>
      <artifactId>junit</artifactId>
      <version>4.11</version>
      <scope>test</scope>
    </dependency>

    <!-- servlet配置,解决jsp报错 -->
    <dependency>
        <groupId>javax.servlet</groupId>
        <artifactId>servlet-api</artifactId>
        <version>2.5</version>
        <scope>provided</scope>
    </dependency>
  </dependencies>

  <build>
    <finalName>mySpringDemo</finalName><!-- 最终打包名称 -->
  </build>
</project>
6、修改web.xml文件,添加spring初始化配置
<?xml version="1.0" encoding="UTF-8"?>
<web-app xmlns:xsi="http://www.w3.org/2001/XMLSchema-instance"
        xmlns="http://java.sun.com/xml/ns/javaee"
        xsi:schemaLocation="http://java.sun.com/xml/ns/javaee http://java.sun.com/xml/ns/javaee/web-app_3_0.xsd"
        id="WebApp_ID" version="3.0">

    <!-- spring使用listener初始化bean(service和dao层bean) -->
    <!-- 多个xml文件中间用逗号隔开,此项如果不配置,spring默认取WEB-INF:applicationContext.xml -->
    <context-param>
        <param-name>contextConfigLocation</param-name>
        <param-value>classpath:springConfig/spring-beans.xml</param-value>
    </context-param>
    <listener>
          <listener-class>
              org.springframework.web.context.ContextLoaderListener
          </listener-class>
    </listener>

    <!-- spring使用servlet初始化bean(controller层bean) -->
    <servlet>
        <servlet-name>DispatcherServlet</servlet-name>
        <servlet-class>org.springframework.web.servlet.DispatcherServlet</servlet-class>
        <init-param>
            <param-name>contextConfigLocation</param-name>
            <param-value>classpath:springConfig/spring-controllers.xml</param-value>
        </init-param>
        <load-on-startup>1</load-on-startup>
    </servlet>

    <servlet-mapping>
        <servlet-name>DispatcherServlet</servlet-name>
        <url-pattern>/</url-pattern>
    </servlet-mapping>

  <display-name>Archetype Created Web Application</display-name>
</web-app>
7、将项目在tomcat容器中启动,在程序启动时候,控制台会打印初始化LittleBall的日志:

访问项目controller路径:http://localhost:8088/mySpringDemo/littleController/getLittleBallName
