由于网络问题或者安全问题,可能我们的数据无法直接暴露出一个entrypoint 给prometheus采集。 这个时候可能就需要一个pushgateway来作为中间者完成中转工作。 prometheus还是采用pull方式来采集pushgateway的数据,我们的采集端通过push方式把数据push给pushgateway,来完成数据的上报。
pushgateway的安装
[root@node01 src]# wget https://github.com/prometheus/pushgateway/releases/download/v0.10.0/pushgateway-0.10.0.linux-amd64.tar.gz
[root@node01 src]# tar xf pushgateway-0.10.0.linux-amd64.tar.gz
[root@node01 src]# ll
total 8732
drwxr-xr-x. 2 root root       6 Nov  5  2016 debug
drwxr-xr-x. 2 root root       6 Nov  5  2016 kernels
drwxr-xr-x  2 3434 3434      54 Oct 10 19:29 pushgateway-0.10.0.linux-amd64
-rw-r--r--  1 root root 8940709 Oct 10 19:30 pushgateway-0.10.0.linux-amd64.tar.gz
[root@node01 src]# mv pushgateway-0.10.0.linux-amd64 /usr/local/^C
[root@node01 src]# mkdir /usr/local/prometheus
[root@node01 src]# mv pushgateway-0.10.0.linux-amd64 /usr/local/prometheus/
[root@node01 src]# cd  /usr/local/prometheus/
[root@node01 prometheus]# ls
pushgateway-0.10.0.linux-amd64
[root@node01 prometheus]# ln -s pushgateway-0.10.0.linux-amd64/ pushgateway
[root@node01 prometheus]# ll
total 0
lrwxrwxrwx 1 root root 31 Oct 11 04:00 pushgateway -> pushgateway-0.10.0.linux-amd64/
drwxr-xr-x 2 3434 3434 54 Oct 10 19:29 pushgateway-0.10.0.linux-amd64
pushgateway的配置
[root@node01 system]#  cd /usr/lib/systemd/system
[root@node01 system]#  vim pushgateway.service
[root@node01 system]# cat pushgateway.service
[Unit]
Description=prometheus
After=network.target

[Service]
User=prometheus
Group=prometheus
WorkingDirectory=/usr/local/prometheus/pushgateway
ExecStart=/usr/local/prometheus/pushgateway/pushgateway \
                --web.enable-admin-api  \
                --persistence.file="pushfile.txt" \
                --persistence.interval=10m
[Install]
WantedBy=multi-user.target
[root@node01 system]# systemctl enable pushgateway
Created symlink from /etc/systemd/system/multi-user.target.wants/pushgateway.service to /usr/lib/systemd/system/pushgateway.service.
[root@node01 system]# systemctl start pushgateway
[root@node01 system]# systemctl status pushgateway
测试web页面

配置采集push端
添加一个数据,查看结果
[root@node02 ~]# !vim
vim push_memory.sh
#!/bin/bash
# desc push memory info

total_memory=$(free  |awk '/Mem/{print $2}')
used_memory=$(free  |awk '/Mem/{print $3}')

job_name="custom_memory"
instance_name="192.168.100.12"

cat <<EOF | curl --data-binary @- http://192.168.100.11:9091/metrics/job/$job_name/instance/$instance_name
#TYPE custom_memory_total  gauge
custom_memory_total $total_memory
#TYPE custom_memory_used  gauge
custom_memory_used $used_memory
EOF

# 执行导入
bash push_memory.sh
插入数据后效果图

集成prometheus
添加pushgateway的采集
# 修改prometheus.yml 加入如下片段
 - job_name: "custom-memory-pushgateway"
    #honor_labels: true
    static_configs:
    - targets: ["192.168.100.11:9091"]
持续生成数据
上面执行的 push_memory.sh脚本也就是只是插入一次数据, 我们这里使用计划任务来周期push数据到pushgateway中。
[root@node02 ~]# crontab  -e
no crontab for root - using an empty one
1 * * * * /root/push_memory.sh
[root@node02 ~]# chmod a+x push_memory.sh
效果图
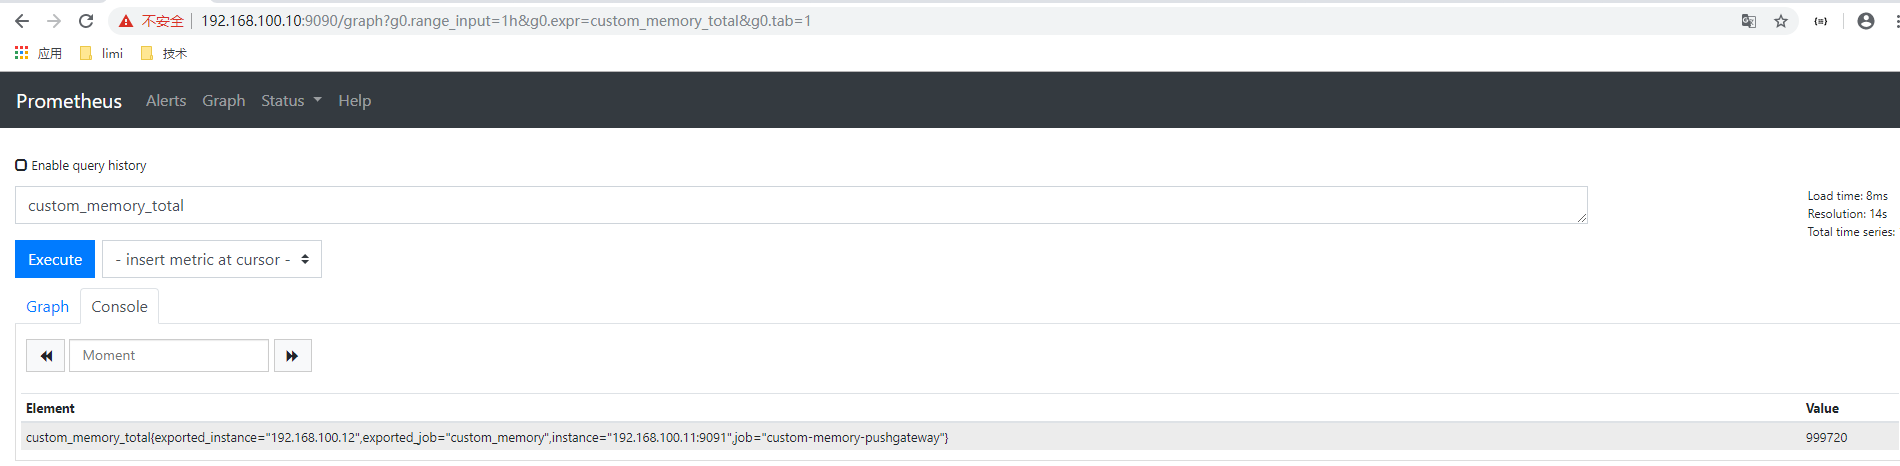
可以发现instance和job标签有点问题, 这是pushgateway填充的, 我们可以加入honor配置使用我们自定义的。
修改配置如下
  - job_name: "custom-memory-pushgateway"
    honor_labels: true
    static_configs:
    - targets: ["192.168.100.11:9091"]
效果图

总结
我们可以通过pushgateway来辅助采集。 此场景中,我们假定的192.168.100.10这个prometheus server服务器是到192.168.100.12网络是不通的, 但是192.168.100.11 这个ip地址是可以和2个ip是通的, 这里就可以在192.168.100.11 这个服务器上面部署pushgateway来作为桥梁, 采集到192.168.100.12的监控数据。
扫描二维码关注公众号,回复:
7451271 查看本文章
