一.百度网盘Cifar获取地址:
链接:https://pan.baidu.com/s/132yQGedau02Bw47fz75bYQ
提取码:bnvd
二.Tensorflow代码实现:
该程序部分分为两个文件,分别是:Cifar10_data.py和CNN_Cifar-10.py文件。其中Cifar10_data.py文件的作用是采用文件队列的方式读取目标文件并对读取完毕的图像文件进行图像增强预处理,CNN_Cifar-10.py文件的作用是构造循环神经网络的整体结构,并进行训练和测试(评估)过程。
下面的代码是Cifar10_data.py程序文件:
 1 #该文件负责读取Cifar-10数据并对其进行数据增强预处理
 2 import os
 3 import tensorflow as tf
 4 num_classes=10
 5
 6 #设定用于训练和评估的样本总数
 7 num_examples_pre_epoch_for_train=50000
 8 num_examples_pre_epoch_for_eval=10000
 9
10 #定义一个空类,用于返回读取的Cifar-10的数据
11 class CIFAR10Record(object):
12     pass
13
14
15 #定义一个读取Cifar-10的函数read_cifar10(),这个函数的目的就是读取目标文件里面的内容
16 def read_cifar10(file_queue):
17     result=CIFAR10Record()
18
19     label_bytes=1                                            #如果是Cifar-100数据集,则此处为2
20     result.height=32
21     result.width=32
22     result.depth=3                                           #因为是RGB三通道,所以深度是3
23
24     image_bytes=result.height * result.width * result.depth  #图片样本总元素数量
25     record_bytes=label_bytes + image_bytes                   #因为每一个样本包含图片和标签,所以最终的元素数量还需要图片样本数量加上一个标签值
26
27     reader=tf.FixedLengthRecordReader(record_bytes=record_bytes)  #使用tf.FixedLengthRecordReader()创建一个文件读取类。该类的目的就是读取文件
28     result.key,value=reader.read(file_queue)                 #使用该类的read()函数从文件队列里面读取文件
29
30     record_bytes=tf.decode_raw(value,tf.uint8)               #读取到文件以后,将读取到的文件内容从字符串形式解析为图相对应的像素数组
31
32     result.label=tf.cast(tf.strided_slice(record_bytes,[0],[label_bytes]),tf.int32)   #因为该数组第一个元素是标签,所以我们使用strided_slice()函数将标签提取出来,并且使用tf.cast()函数将这一个标签转换成int32的数值形式
33
34     depth_major=tf.reshape(tf.strided_slice(record_bytes,[label_bytes],[label_bytes + image_bytes]),
35                            [result.depth,result.height,result.width])  #剩下的元素再分割出来,这些就是图片数据,因为这些数据在数据及立面存储的形式是depth * height * width,我们要把这种格式转换成[depth,height,width]
36
37
38     result.uint8image=tf.transpose(depth_major,[1,2,0])   #我们要将之前分割好的图片数据使用tf.transpose()函数转换成为高度信息、宽度信息、深度信息这样的顺序
39
40     return result                                 #返回值是已经把目标文件里面的信息都读取出来
41
42 def inputs(data_dir,batch_size,distorted):                  #这个文件是读取数据并对数据进行预处理,这个函数就是对数据进行预处理---对图像数据是否进行增强进行判断,并作出相应的操作
43     filenames=[os.path.join(data_dir,"data_batch_%d.bin"%i)for i in range(1,6)]   #拼接地址
44
45     file_queue=tf.train.string_input_producer(filenames)     #根据已经有的文件地址创建一个文件队列
46     read_input=read_cifar10(file_queue)                      #根据已经有的文件队列使用已经定义好的文件读取函数read_cifar10()读取队列中的文件
47
48     reshaped_image=tf.cast(read_input.uint8image,tf.float32)   #将已经转换好的图片数据再次转换为float32的形式
49
50     num_examples_per_epoch=num_examples_pre_epoch_for_train
51
52
53     if distorted != None:                         #如果预处理函数中的distorted参数不为空值,就代表要进行图片增强处理
54         cropped_image=tf.random_crop(reshaped_image,[24,24,3])          #首先将预处理好的图片进行剪切,使用tf.random_crop()函数
55
56         flipped_image=tf.image.random_flip_left_right(cropped_image)    #将剪切好的图片进行左右翻转,使用tf.image.random_flip_left_right()函数
57
58         adjusted_brightness=tf.image.random_brightness(flipped_image,max_delta=0.8)   #将左右翻转好的图片进行随机亮度调整,使用tf.image.random_brightness()函数
59
60         adjusted_contrast=tf.image.random_contrast(adjusted_brightness,lower=0.2,upper=1.8)    #将亮度调整好的图片进行随机对比度调整,使用tf.image.random_contrast()函数
61
62         float_image=tf.image.per_image_standardization(adjusted_contrast)          #进行标准化图片操作,tf.image.per_image_standardization()函数是对每一个像素减去平均值并除以像素方差
63
64         float_image.set_shape([24,24,3])                      #设置图片数据及标签的形状
65         read_input.label.set_shape([1])
66
67         min_queue_examples=int(num_examples_pre_epoch_for_eval * 0.4)
68         print("Filling queue with %d CIFAR images before starting to train.    This will take a few minutes."
69               %min_queue_examples)
70
71         images_train,labels_train=tf.train.shuffle_batch([float_image,read_input.label],batch_size=batch_size,
72                                                          num_threads=16,
73                                                          capacity=min_queue_examples + 3 * batch_size,
74                                                          min_after_dequeue=min_queue_examples,
75                                                          )
76                              #使用tf.train.shuffle_batch()函数随机产生一个batch的image和label
77
78         return images_train,tf.reshape(labels_train,[batch_size])
79
80     else:                               #不对图像数据进行数据增强处理
81         resized_image=tf.image.resize_image_with_crop_or_pad(reshaped_image,24,24)   #在这种情况下,使用函数tf.image.resize_image_with_crop_or_pad()对图片数据进行剪切
82
83         float_image=tf.image.per_image_standardization(resized_image)          #剪切完成以后,直接进行图片标准化操作
84
85         float_image.set_shape([24,24,3])
86         read_input.label.set_shape([1])
87
88         min_queue_examples=int(num_examples_per_epoch * 0.4)
89
90         images_test,labels_test=tf.train.batch([float_image,read_input.label],
91                                               batch_size=batch_size,num_threads=16,
92                                               capacity=min_queue_examples + 3 * batch_size)
93                                  #这里使用batch()函数代替tf.train.shuffle_batch()函数
94         return images_test,tf.reshape(labels_test,[batch_size])
下面的代码是CNN_Cifar-10.py程序文件:
  1 #该文件的目的是构造循环神经网络的整体结构,并进行训练和测试(评估)过程
  2 import tensorflow as tf
  3 import numpy as np
  4 import time
  5 import math
  6 import Cifar10_data
  7
  8 max_steps=4000
  9 batch_size=100
 10 num_examples_for_eval=10000
 11 data_dir="C:/Users/muzi/Desktop/Cifar_data/cifar-10-batches-bin"
 12
 13 #创建一个variable_with_weight_loss()函数,该函数的作用是:
 14 #   1.使用参数w1控制L2 loss的大小
 15 #   2.使用函数tf.nn.l2_loss()计算权重L2 loss
 16 #   3.使用函数tf.multiply()计算权重L2 loss与w1的乘积,并赋值给weights_loss
 17 #   4.使用函数tf.add_to_collection()将最终的结果放在名为losses的集合里面,方便后面计算神经网络的总体loss,
 18 def variable_with_weight_loss(shape,stddev,w1):
 19     var=tf.Variable(tf.truncated_normal(shape,stddev=stddev))
 20     if w1 is not None:
 21         weights_loss=tf.multiply(tf.nn.l2_loss(var),w1,name="weights_loss")
 22         tf.add_to_collection("losses",weights_loss)
 23     return var
 24
 25 #使用上一个文件里面已经定义好的文件序列读取函数读取训练数据文件和测试数据从文件,其中训练数据文件进行数据增强处理,测试数据文件不进行数据增强处理
 26 images_train,labels_train=Cifar10_data.inputs(data_dir=data_dir,batch_size=batch_size,distorted=True)
 27 images_test,labels_test=Cifar10_data.inputs(data_dir=data_dir,batch_size=batch_size,distorted=None)
 28
 29 #创建x和y_两个placeholder,用于在训练或评估时提供输入的数据和对应的标签值。要注意的是,由于以后定义全连接网络的时候用到了batch_size,所以x中,第一个参数不应该是None,而应该是batch_size
 30 x=tf.placeholder(tf.float32,[batch_size,24,24,3])
 31 y_=tf.placeholder(tf.int32,[batch_size])
 32
 33 #创建第一个卷积层
 34 kernel1=variable_with_weight_loss(shape=[5,5,3,64],stddev=5e-2,w1=0.0)
 35 conv1=tf.nn.conv2d(x,kernel1,[1,1,1,1],padding="SAME")
 36 bias1=tf.Variable(tf.constant(0.0,shape=[64]))
 37 relu1=tf.nn.relu(tf.nn.bias_add(conv1,bias1))
 38 pool1=tf.nn.max_pool(relu1,ksize=[1,3,3,1],strides=[1,2,2,1],padding="SAME")
 39
 40 #创建第二个卷积层
 41 kernel2=variable_with_weight_loss(shape=[5,5,64,64],stddev=5e-2,w1=0.0)
 42 conv2=tf.nn.conv2d(pool1,kernel2,[1,1,1,1],padding="SAME")
 43 bias2=tf.Variable(tf.constant(0.1,shape=[64]))
 44 relu2=tf.nn.relu(tf.nn.bias_add(conv2,bias2))
 45 pool2=tf.nn.max_pool(relu2,ksize=[1,3,3,1],strides=[1,2,2,1],padding="SAME")
 46
 47 #因为要进行全连接层的操作,所以这里使用tf.reshape()函数将pool2输出变成一维向量,并使用get_shape()函数获取扁平化之后的长度
 48 reshape=tf.reshape(pool2,[batch_size,-1])    #这里面的-1代表将pool2的三维结构拉直为一维结构
 49 dim=reshape.get_shape()[1].value             #get_shape()[1].value表示获取reshape之后的第二个维度的值
 50
 51 #建立第一个全连接层
 52 weight1=variable_with_weight_loss(shape=[dim,384],stddev=0.04,w1=0.004)
 53 fc_bias1=tf.Variable(tf.constant(0.1,shape=[384]))
 54 fc_1=tf.nn.relu(tf.matmul(reshape,weight1)+fc_bias1)
 55
 56 #建立第二个全连接层
 57 weight2=variable_with_weight_loss(shape=[384,192],stddev=0.04,w1=0.004)
 58 fc_bias2=tf.Variable(tf.constant(0.1,shape=[192]))
 59 local4=tf.nn.relu(tf.matmul(fc_1,weight2)+fc_bias2)
 60
 61 #建立第三个全连接层
 62 weight3=variable_with_weight_loss(shape=[192,10],stddev=1 / 192.0,w1=0.0)
 63 fc_bias3=tf.Variable(tf.constant(0.1,shape=[10]))
 64 result=tf.add(tf.matmul(local4,weight3),fc_bias3)
 65
 66 #计算损失,包括全中参数的正则化损失和交叉熵损失
 67 cross_entropy=tf.nn.sparse_softmax_cross_entropy_with_logits(logits=result,labels=tf.cast(y_,tf.int64))
 68
 69 weights_with_l2_loss=tf.add_n(tf.get_collection("losses"))
 70 loss=tf.reduce_mean(cross_entropy)+weights_with_l2_loss
 71
 72 train_op=tf.train.AdamOptimizer(1e-3).minimize(loss)
 73
 74 #函数tf.nn.in_top_k()用来计算输出结果中top k的准确率,函数默认的k值是1,即top 1的准确率,也就是输出分类准确率最高时的数值
 75 top_k_op=tf.nn.in_top_k(result,y_,1)
 76
 77 init_op=tf.global_variables_initializer()
 78 with tf.Session() as sess:
 79     sess.run(init_op)
 80     tf.train.start_queue_runners()      #启动线程操作,这是因为之前数据增强的时候使用train.shuffle_batch()函数的时候通过参数num_threads()配置了16个线程用于组织batch的操作
 81
 82 #每隔100step会计算并展示当前的loss、每秒钟能训练的样本数量、以及训练一个batch数据所花费的时间
 83     for step in range (max_steps):
 84         start_time=time.time()
 85         image_batch,label_batch=sess.run([images_train,labels_train])
 86         _,loss_value=sess.run([train_op,loss],feed_dict={x:image_batch,y_:label_batch})
 87         duration=time.time() - start_time
 88
 89         if step % 100 == 0:
 90             examples_per_sec=batch_size / duration
 91             sec_per_batch=float(duration)
 92             print("step %d,loss=%.2f(%.1f examples/sec;%.3f sec/batch)"%(step,loss_value,examples_per_sec,sec_per_batch))
 93
 94 #计算最终的正确率
 95     num_batch=int(math.ceil(num_examples_for_eval/batch_size))  #math.ceil()函数用于求整
 96     true_count=0
 97     total_sample_count=num_batch * batch_size
 98
 99     #在一个for循环里面统计所有预测正确的样例个数
100     for j in range(num_batch):
101         image_batch,label_batch=sess.run([images_test,labels_test])
102         predictions=sess.run([top_k_op],feed_dict={x:image_batch,y_:label_batch})
103         true_count += np.sum(predictions)
104
105     #打印正确率信息
106     print("accuracy = %.3f%%"%((true_count/total_sample_count) * 100))
最终执行完成以后,执行的结果如下(使用CPU进行训练):
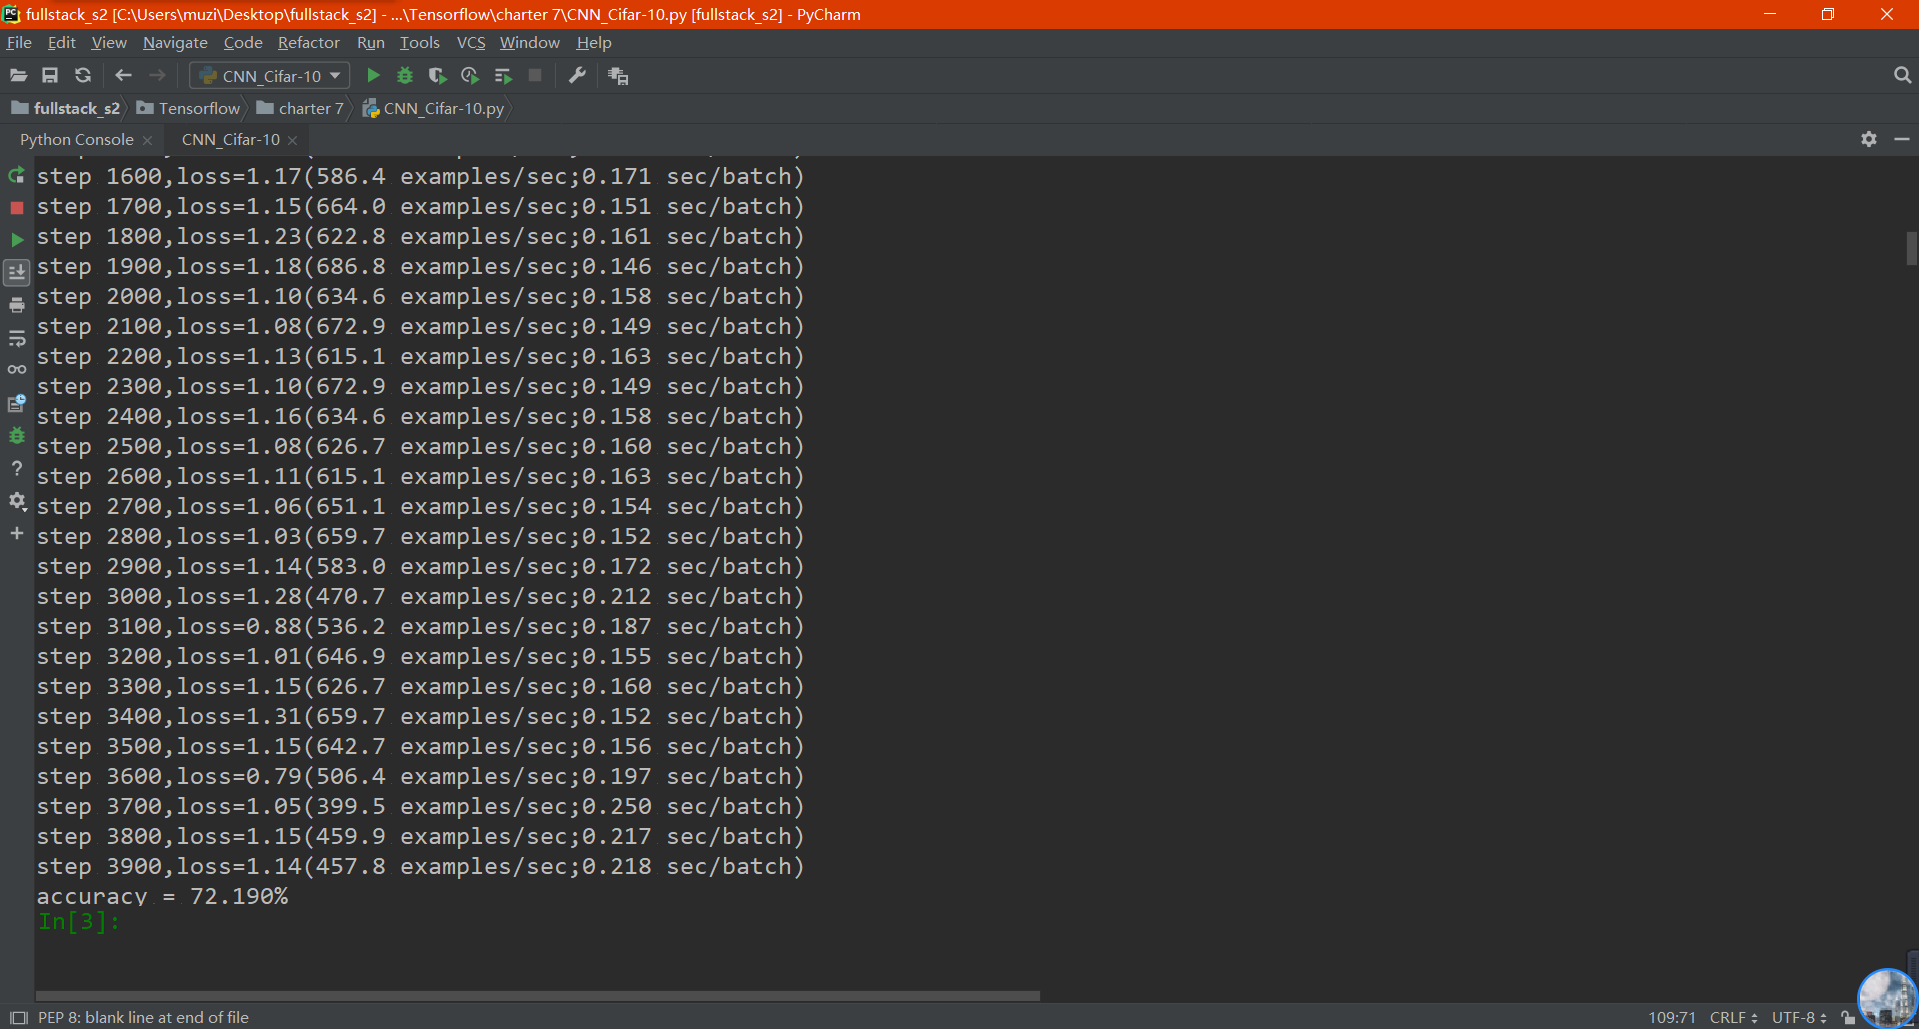
可以看到,最后的正确率在72.190%