前面几节,通过配置xml文件,可以实现Spring 控制反转的依赖注入。不过,如果一个类中,存在很多属性、依赖不止一个目标,此时这种基于xml配置的方式就显得非常繁琐。幸好,Spirng提供了几种技巧,可以帮助我们减少xml的配置数量
- 自动装配(autowiring)有助于减少甚至消除配置<property>元素和<constructor-arg>元素,让spring自动识别如何装配Bean的依赖关系
- 自动检测(autodiscovery)比自动装配更进了一步,让Spring能够自动识别哪些类需要被配置成Spring Bean,从而减少对<bean>元素的使用
一、自动装配Bean属性
1、四中类型的自动装配
- byName——把与Bean的属性具有相同名字(或者ID)的其他Bean自动装配到Bean的对应属性中。如果没有跟属性的名字相匹配的Bean,则该属性不进行装配。
- byType——把与Bean的属性具有相同类型的其他Bean自动装配到Bean自动装配到Bean的对应属性中。如果没有跟属性的类型相匹配的Bean,则该属性不被装配。
- constructor——把与Bean的构造器入参具有相同类型的其他Bean自动装配到Bean构造器的对应入参中。
- autodetect——首先尝试使用constructor进行自动装配。如果失败,再尝试使用byType进行自动装配。
这里,我们只演示第一个byName:
第一步:创建持久层UserDao
1 package com.justnow.dao;
2
3 import com.justnow.domain.User;
4
5 public class UserDao {
6     public void findAll(User user){
7         System.out.println(user);
8     }
9 }
第二步:创建业务层的实现类UserServiceImpl,通过 set方法实现依赖注入。
 1 package com.justnow.service.impl;
 2
 3 import com.justnow.dao.UserDao;
 4 import com.justnow.domain.User;
 5 import com.justnow.service.IUserService;
 6
 7 public class UserServiceImpl implements IUserService {
 8     private UserDao userDao;
 9     private String otherProperty;
10
11     //必须有属性的set方法,否则不能实现依赖注入
12     public void setUserDao(UserDao userDao) {
13         this.userDao = userDao;
14     }
15
16     public void setOtherProperty(String otherProperty) {
17         this.otherProperty = otherProperty;
18     }
19
20     public void findAll(User user) {
21         userDao.findAll(user);
22         System.out.println(otherProperty);
23     }
24 }
第三步:编写Spring框架的配置文件
在bean标签中设置autowire的属性为byName:如果在该配置文件中出现一个Bean的id是userDao(userDao为userServiceImpl的属性名字),就可以实现自动装配
 1 <?xml version="1.0" encoding="UTF-8"?>
 2 <beans xmlns="http://www.springframework.org/schema/beans"
 3        xmlns:xsi="http://www.w3.org/2001/XMLSchema-instance"
 4        xsi:schemaLocation="http://www.springframework.org/schema/beans
 5                            http://www.springframework.org/schema/beans/spring-beans.xsd">
 6         <bean id="userService" class="com.justnow.service.impl.UserServiceImpl" autowire="byName">
 7             <property name="otherProperty" value="利用property标签注入的值"/>
 8         </bean>
 9
10         <bean id="userDao" class="com.justnow.dao.UserDao"/>
11 </beans>
第四步:测试
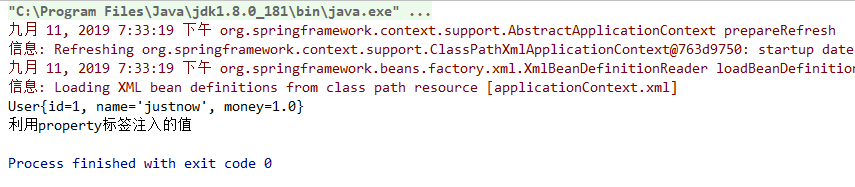
 1     @Test
 2     public void test(){
 3         ClassPathXmlApplicationContext context = new ClassPathXmlApplicationContext("applicationContext.xml");
 4         IUserService userService = (IUserService) context.getBean("userService");
 5         User user = new User();
 6         user.setId(1);
 7         user.setName("justnow");
 8         user.setMoney(1.0f);
 9         userService.findAll(user);
10     }
结果:
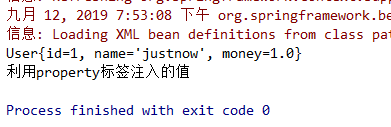
修改userDao这个bean的id值为userDao2,如下:
 1 <?xml version="1.0" encoding="UTF-8"?>
 2 <beans xmlns="http://www.springframework.org/schema/beans"
 3        xmlns:xsi="http://www.w3.org/2001/XMLSchema-instance"
 4        xsi:schemaLocation="http://www.springframework.org/schema/beans
 5                            http://www.springframework.org/schema/beans/spring-beans.xsd">
 6         <bean id="userService" class="com.justnow.service.impl.UserServiceImpl" autowire="byName">
 7             <property name="otherProperty" value="利用property标签注入的值"/>
 8         </bean>
 9
10 <!--
11         <bean id="userDao" class="com.justnow.dao.UserDao"/>
12 -->
13         <bean id="userDao2" class="com.justnow.dao.UserDao"/>
14 </beans>
看一下测试结果:

在以后的开发中,基本上不怎么用这四种方式实现自动装配,而使用注解装配!所以,后面三个就不再演示了。
https://github.com/justn0w/javawebdemo/tree/master/spring/Spring_Demo3
c6e5dccfcacb13c42db41a2ed7b1145ddef700b7
2、使用注解实现自动装配
使用注解自动装配 Bean的属性,可以不再编写繁琐的xml文件,从而将注意力转向项目的业务逻辑。在将来的开发中,注解发挥着中流砥柱的作用!
Spring容器默认禁用注解装配。所以,在使用基于注解的自动装配前,我们需要在Spring配置文件中启用它。最简单的启用方式是使用Spring的context命名空间配置中的<context:annotation-config>元素,如下所示:
<?xml version="1.0" encoding="UTF-8"?>
<beans xmlns="http://www.springframework.org/schema/beans"
       xmlns:xsi="http://www.w3.org/2001/XMLSchema-instance"
       xmlns:context="http://www.springframework.org/schema/context"
       xsi:schemaLocation="http://www.springframework.org/schema/beans
                           http://www.springframework.org/schema/beans/spring-beans.xsd
                           http://www.springframework.org/schema/context
                           http://www.springframework.org/schema/context/spring-context.xsd">
       <context:annotation-config />
红底白字是新加入的命名规则。
(1)使用@Autowired
场景一:在set方法上使用
第一步:修改UserServiceImpl实现类,在setUserDao这个方法上添加注解
 1 public class UserServiceImpl implements IUserService {
 2     private UserDao userDao;
 3     private String otherProperty;
 4     //必须有属性的set方法,否则不能实现依赖注入
 5     @Autowired
 6     public void setUserDao(UserDao userDao) {
 7         this.userDao = userDao;
 8     }
 9     public void setOtherProperty(String otherProperty) {
10         this.otherProperty = otherProperty;
11     }
12
13     public void findAll(User user) {
14         userDao.findAll(user);
15         System.out.println(otherProperty);
16     }
17 }
第二步:修改配置文件,如下:
 1 <?xml version="1.0" encoding="UTF-8"?>
 2 <beans xmlns="http://www.springframework.org/schema/beans"
 3        xmlns:xsi="http://www.w3.org/2001/XMLSchema-instance"
 4        xmlns:context="http://www.springframework.org/schema/context"
 5        xsi:schemaLocation="http://www.springframework.org/schema/beans
 6                            http://www.springframework.org/schema/beans/spring-beans.xsd
 7                            http://www.springframework.org/schema/context
 8                            http://www.springframework.org/schema/context/spring-context.xsd">
 9         <context:annotation-config />
10         <bean id="userService" class="com.justnow.service.impl.UserServiceImpl">
11             <property name="otherProperty" value="利用property标签注入的值"/>
12         </bean>
13
14         <bean id="userDao10" class="com.justnow.dao.UserDao" />
15 </beans>
第三步:测试
 1     @Test
 2     public void test(){
 3         ClassPathXmlApplicationContext context = new ClassPathXmlApplicationContext("applicationContext.xml");
 4         IUserService userService = (IUserService) context.getBean("userService");
 5         User user = new User();
 6         user.setId(1);
 7         user.setName("justnow");
 8         user.setMoney(1.0f);
 9         userService.findAll(user);
10     }
结果:
该结果,与按名字实现自动装配的结果一致!
场景二:标注在需要自动装配Bean引用的任意方法
比如说,下面的方法:
@Autowired
pubilc void differentWay(UserDao userdao){
   this.userdao=userdao;
}
该方法并不是set方法,但是通过注解实现自动装配userDao这个Bean
场景三:标注在构造函数
如下:
1     @Autowired
2     public UserServiceImpl(UserDao userDao){
3         this.userDao = userDao;
4     }
场景四:直接标注属性,并删除setter方法
在我们的开发过程中,利用这种方法实现自动装配,使用的非常频繁。
第一步:修改UserServiceImpl实现类,在私有属性上添加注解,并删除setter方法
 1 public class UserServiceImpl implements IUserService {
 2     @Autowired
 3     private UserDao userDao;
 4
 5     private String otherProperty;
 6
 7     public void setOtherProperty(String otherProperty) {
 8         this.otherProperty = otherProperty;
 9     }
10
11     public void findAll(User user) {
12         userDao.findAll(user);
13         System.out.println(otherProperty);
14     }
15 }
测试下:

@Autowired不会受限于private关键字。即使属性是私有的实例变量,它仍然可以被自动装配!
自动装配,只是帮助我们不再编写<property>和<constructor-arg>元素,我们仍需要使用<bean>元素显示定义Bean。
二、自动检测Bean
这是Spring的另一种技巧,<context:component-scan>元素除了完成<context:annotation-config>一样的工作外,还允许Spring自动检测Bean和定义Bean。也就说,不再使用<bean>元素,Spring应用中的大多数Bean都能够实现定义和装配。
使用方法如下:
<context:component-scan
base-package="com.justnow">
</context:component-scan>
<context:component-scan>元素会扫描指定的包及其所有自曝,并查找出能够自动注册为Spring Bean的类。base-package属性标识了<context:component-scan>元素所扫描的包。
那么,<context:component-scan>又是如何知道哪些类需要注册为Spring Bean呢?
2.1 使用注解,为自动检测标注Bean
(1) @Component
作用:把资源让spring管理。相当于在xml中配置一个bean
属性:value:指定了bean的id。如果不指定value属性,默认bean的id是当前类的类名(首字母小写)。
(2) @Controller @Service @Repository
这三个注解都是针对第一个的衍生注解,他们的作用级属性都是一模一样。不过提供了更加明确的语义化。
@Controller:一般用于表现层的注解。即SpringMVC中
@Service:一般用于业务层的注解。
@Repository:一般用于持久层的注解。
(3) @Autowired
这个注解相当于使用第一节中的autodetect类型的自动装配。首先尝试使用constructor进行自动装配。如果失败,再尝试使用byType进行自动装配。
当使用该注解注入属性时,setter方法可以省略!
2.2 过滤组件扫描
如果出现接下来的需求,我们使用<context:component-scan>扫描了com.justnow,但是对于com.justnow.controller中的包,我们不希望被扫描到,此时,就需要使用<context:include-filter>和<context:exclude-filter>子元素来调整扫描的行为。
(1) <context:include-filter>
该元素还包括以下属性:type和expression,使用方式如下
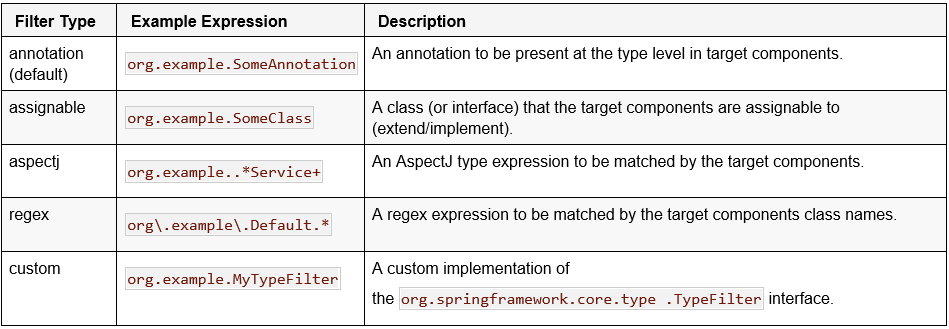
type和expression的
第一种搭配:过滤器扫描使用指定注解所标注的那些类。通过expression属性指定要扫描的注解
第二种搭配:过滤器扫描派生与(实现或者继承)expression属性所指定类型的那些类。
第三种搭配:过滤器扫描与expression属性所指定的AspectJ表达式所匹配的那些类。
第四种搭配:过滤器扫描类的名称与expression属性所指定的正则表达式所匹配的那些类。
第五种搭配:使用自定义的org.springframework.core.type.TypeFilter实现类,该类由expression属性指定。
举个例子:
1     <context:component-scan base-package="com.justnow">
2         <context:include-filter type="assignable" expression="com.justnow.service.IUserService"/>
3     </context:component-scan>
只扫描,在com.justnow包下实现com.justnow.service.IUSerService接口的类。
(2) <context:exclude-filter>,为哪些类不需要注册为Spring Bean。
如:
    <!--1、 配置 spring 创建容器时要扫描的包  -->
    <context:component-scan base-package="com.justnow">
        <!--制定扫包规则,不扫描@Controller 注解的 JAVA 类,其他的还是要扫描 -->
        <context:exclude-filter type="annotation" expression="org.springframework.stereotype.Controller" />
    </context:component-scan>
即不扫描@Controller注解的java类,但是其他的还要扫描。
参考:
https://docs.spring.io/spring/docs/4.3.25.RELEASE/spring-framework-reference/htmlsingle/
三、总结
1、最小化Spring XML配置是通过自动装配和自动检测实现的。前者让我们不再依赖<property>和<constructor-org>元素,而后者可以解放为每个类创建Bean这个繁琐的过程。
2、还有一种基于Java的Spring的配置没有总结,这种方法当然也非常实用。