Spring除了支持Schema方式配置AOP,还支持注解方式:使用@AspectJ风格的切面声明。导入需要的包:aspectjweaver.jar、aopalliance-1.0.jar
一、基本使用方法
1.1、启用对@AspectJ的支持
Spring默认不支持@AspectJ风格的切面声明,为了支持需要使用如下配置:
<!-- 启动@AspectJ支持 -->
<!-- proxy-target-class默认"false",更改为"ture"使用CGLib动态代理 -->
<aop:aspectj-autoproxy proxy-target-class="false"/>
这样Spring就能发现@AspectJ风格的切面并且将切面应用到目标对象。
1.2、 声明切面
@AspectJ风格的声明切面非常简单,使用@Aspect注解进行声明:
 @Aspect
public class AdivceMethod {
然后将该切面在配置文件中声明为Bean后,Spring就能自动识别并进行AOP方面的配置:
<bean id="aspect" class="……AdivceMethod"/>
或者直接使用元注解的方法:
@Component
@Aspect
public class AdivceMethod {
1.3、 声明切入点
@AspectJ风格的命名切入点使用org.aspectj.lang.annotation包下的@Pointcut+方法(方法必须是返回void类型)实现。
@Pointcut(value="切入点表达式", argNames = "参数名列表")
public void pointcutName(……) {} - value:指定切入点表达式;
- argNames:指定命名切入点方法参数列表参数名字,可以有多个用“,”分隔,这些参数将传递给通知方法同名的参数,同时比如切入点表达式“args(param)”将匹配参数类型为命名切入点方法同名参数指定的参数类型。
- pointcutName:切入点名字,可以使用该名字进行引用该切入点表达式。
定义了一个切入点,名字为“beforePointcut”,该切入点将匹配目标方法的第一个参数类型为通知方法实现中参数名为“param”的参数类型。
二、声明通知
@AspectJ风格的声明通知也支持5种通知类型:
2.1、前置通知:使用org.aspectj.lang.annotation 包下的@Before注解声明;
@Before(value = "切入点表达式或命名切入点", argNames = "参数列表参数名") - value:指定切入点表达式或命名切入点;
- argNames:与Schema方式配置中的同义。
接下来示例一下吧:
1、定义接口和实现,在此我们就使用Schema风格时的定义;
2、定义切面:
3、定义切入点:
4、定义通知:
2.2、后置返回通知:使用org.aspectj.lang.annotation 包下的@AfterReturning注解声明;
    @AfterReturning(
    value="切入点表达式或命名切入点",
    pointcut="切入点表达式或命名切入点",
    argNames="参数列表参数名",
    returning="返回值对应参数名")
- value:指定切入点表达式或命名切入点;
- pointcut:同样是指定切入点表达式或命名切入点,如果指定了将覆盖value属性指定的,pointcut具有高优先级;
- argNames:与Schema方式配置中的同义;
- returning:与Schema方式配置中的同义。
2.3、后置异常通知:使用org.aspectj.lang.annotation 包下的@AfterThrowing注解声明;
@AfterThrowing (
value="切入点表达式或命名切入点",
pointcut="切入点表达式或命名切入点",
argNames="参数列表参数名",
throwing="异常对应参数名") - value:指定切入点表达式或命名切入点;
- pointcut:同样是指定切入点表达式或命名切入点,如果指定了将覆盖value属性指定的,pointcut具有高优先级;
- argNames:与Schema方式配置中的同义;
- throwing:与Schema方式配置中的同义。
其中测试代码与Schema方式几乎一样,在此就不演示了,如果需要请参考AopTest.java中的testAnnotationAfterThrowingAdvice测试方法。
2.4、后置最终通知:使用org.aspectj.lang.annotation 包下的@After注解声明;
    @After (
    value="切入点表达式或命名切入点",
    argNames="参数列表参数名")
- value:指定切入点表达式或命名切入点;
- argNames:与Schema方式配置中的同义;
2.5、环绕通知:使用org.aspectj.lang.annotation 包下的@Around注解声明;
    @Around (
    value="切入点表达式或命名切入点",
    argNames="参数列表参数名")
- value:指定切入点表达式或命名切入点;
- argNames:与Schema方式配置中的同义;
2.6 引入:@AspectJ风格的引入声明在切面中使用org.aspectj.lang.annotation包下的@DeclareParents声明:
    @DeclareParents(
    value=" AspectJ语法类型表达式",
    defaultImpl=引入接口的默认实现类)
    private Interface interface;
- value:匹配需要引入接口的目标对象的AspectJ语法类型表达式;与Schema方式中的types-matching属性同义;
- private Interface interface:指定需要引入的接口;
- defaultImpl:指定引入接口的默认实现类,没有与Schema方式中的delegate-ref属性同义的定义方式;
三、使用范例
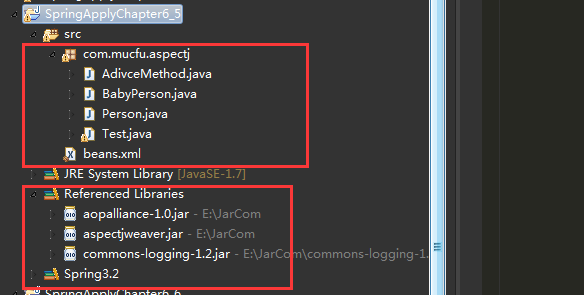
整个工程目录如下:
记得导入包:aopalliance-1.0.jar+aspectjweaver.jar+commons-logging-1.2.jar+spring
1、首先新建一个人的接口类:
package com.mucfu.aspectj;
/**
*功能  人的接口类
*/
public interface Person {
    public void eatBreakfast();
    public void eatLunch();
    public void eatSupper();
    public String drink(String name);


}
2、来个baby的实现类:
package com.mucfu.aspectj;

import org.springframework.stereotype.Component;

/**
*功能  人的实现类
*/
@Component
public class BabyPerson implements Person{

    @Override
    public void eatBreakfast() {
        System.out.println("小Baby正在吃早餐");
    }

    @Override
    public void eatLunch() {
        System.out.println("小Baby正在吃午餐");
    }

    @Override
    public void eatSupper() {
        System.out.println("小Baby正在吃晚餐");
    }

    @Override
    public String drink(String name) {
        return "小Baby在喝:"+name;
    }

}
3、然后后就是对Bayby吃饭的函数进行各种增强
package com.mucfu.aspectj;

import org.aspectj.lang.ProceedingJoinPoint;
import org.aspectj.lang.annotation.After;
import org.aspectj.lang.annotation.AfterReturning;
import org.aspectj.lang.annotation.Around;
import org.aspectj.lang.annotation.Aspect;
import org.aspectj.lang.annotation.Before;
import org.springframework.stereotype.Component;

@Component
@Aspect
public class AdivceMethod {

    @Before("execution(* com.mucfu.aspectj.BabyPerson.*(..))")
    // 匹配BabyPerson类所有的方法,注意*和com之间有个空格
    public void beforeEat() {
        System.out
                .println("-------------------这里是前置增强,吃饭之前先洗小手!--------------------");
    }

    @After("execution(* eatLunch(..))")
    // 匹配该工程下所有的eatLunch方法
    public void afterEat() {
        System.out
                .println("-------------------这里是后置增强,午饭吃完要睡午觉!--------------------");
    }

    @Around("execution(* com.mucfu.aspectj.BabyPerson.eatSupper())")
    // 匹配该工程下BabyPerson的eatLunch方法
    public Object aroundEat(ProceedingJoinPoint pjp) throws Throwable {
        System.out
                .println("-------------------这里是环绕增强,吃晚饭前先玩一玩!-------------------");
        Object retVal = pjp.proceed();
        System.out
                .println("-------------------这里是环绕增强,晚饭吃完后要得睡觉了!-------------------");
        return retVal;
    }
    @AfterReturning(returning="rvt",pointcut="execution(* com.mucfu.aspectj.BabyPerson.drink(..))")
    public void log(Object rvt) {
        System.out
        .println("-------------------这里是AfterReturning增强-------------------");
        System.out.println("获取小Baby正在喝的饮料"+rvt);
        System.out.println("记录每天喝的饮料容量");

    }

}
4、新建一个beans.xml,内容如下:
<?xml version="1.0" encoding="UTF-8"?>
<beans xmlns="http://www.springframework.org/schema/beans"
    xmlns:xsi="http://www.w3.org/2001/XMLSchema-instance" xmlns:context="http://www.springframework.org/schema/context"
    xmlns:aop="http://www.springframework.org/schema/aop"
    xsi:schemaLocation="
           http://www.springframework.org/schema/beans
           http://www.springframework.org/schema/beans/spring-beans-3.0.xsd
           http://www.springframework.org/schema/aop
           http://www.springframework.org/schema/aop/spring-aop-3.0.xsd
           http://www.springframework.org/schema/context
           http://www.springframework.org/schema/context/spring-context-3.0.xsd">

    <!-- 指定自动搜索bean组件、自动搜索切面类 -->
        <context:component-scan base-package="com.mucfu"/>
    <!-- 启动@AspectJ支持 -->
    <!-- proxy-target-class默认"false",更改为"ture"使用CGLib动态代理 -->
    <aop:aspectj-autoproxy proxy-target-class="false"/>


</beans>
5、最后来测试
package com.mucfu.aspectj;

import org.springframework.context.ApplicationContext;
import org.springframework.context.support.ClassPathXmlApplicationContext;

public class Test {

    public static void main(String[] args) {
         ApplicationContext context = new ClassPathXmlApplicationContext("beans.xml");
        Person person=(Person)context.getBean("babyPerson");
        person.eatBreakfast();
        System.out.println("===================================================");
        person.eatLunch();
        System.out.println("===================================================");
        person.eatSupper();
        System.out.println("===================================================");
        person.drink("可乐");
        System.out.println("===================================================");


    }

}
输出结果:

