版权声明:本文为博主原创文章,遵循 CC 4.0 BY-SA 版权协议,转载请附上原文出处链接和本声明。
看到淘宝首页顶部是一个向上凹进去的背景(如下左图),有点好奇是如何实现的,今日闲来无事,便琢磨个实现的方法。
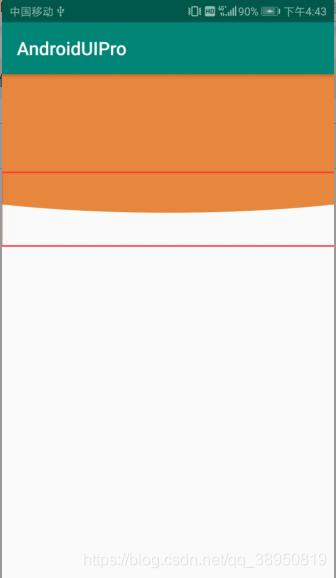
琢磨的过程中,想到的就是用layer-list来实现,此外又实现了一个顶部向下凸的背景(如下右图),在这里记录下实现的过程。

一、实现顶部向上凹的背景
1、自定义drawable文件,arc_bg_up.xml
<layer-list xmlns:android="http://schemas.android.com/apk/res/android">

    <item android:top="0dp"
        android:right="-250dp"
        android:left="-250dp">

        <shape android:shape="oval">

            <solid android:color="#FFFFFF"/>
        </shape>

    </item>

    <item android:top="50dp">
        <shape android:shape="rectangle">
            <solid android:color="#FFFFFF"/>
        </shape>
    </item>
</layer-list>
2、布局文件
<LinearLayout xmlns:android="http://schemas.android.com/apk/res/android"
    xmlns:app="http://schemas.android.com/apk/res-auto"
    xmlns:tools="http://schemas.android.com/tools"
    android:layout_width="match_parent"
    android:layout_height="match_parent"
    android:orientation="vertical"
    tools:context=".ArcActivity">

    <LinearLayout
        android:layout_width="match_parent"
        android:layout_height="150dp">

        <ImageView
            android:layout_width="match_parent"
            android:layout_height="match_parent"
            android:src="@drawable/love"
            android:scaleType="fitXY"/>
    </LinearLayout>

    <LinearLayout
        android:layout_marginTop="-20dp"
        android:layout_width="match_parent"
        android:layout_height="match_parent"
        android:background="@drawable/arc_bg_up">
    </LinearLayout>

</LinearLayout>
二、实现顶部向下凸的背景
1、自定义drawable文件,arc_bg_down.xml
<?xml version="1.0" encoding="utf-8"?>
<layer-list xmlns:tools="http://schemas.android.com/tools"
    xmlns:android="http://schemas.android.com/apk/res/android">

    <item android:height="50dp"
        tools:ignore="UnusedAttribute">

        <shape android:shape="rectangle">
            <solid android:color="#e7873e"/>

        </shape>
    </item>

    <item android:top="0dp"
        android:right="-200dp"
        android:left="-200dp">
        <shape android:shape="oval">
            <solid android:color="#e7873e"/>
        </shape>
    </item>

</layer-list>
2、布局文件
<?xml version="1.0" encoding="utf-8"?>
<LinearLayout xmlns:android="http://schemas.android.com/apk/res/android"
    xmlns:app="http://schemas.android.com/apk/res-auto"
    xmlns:tools="http://schemas.android.com/tools"
    android:layout_width="match_parent"
    android:layout_height="match_parent"
    android:orientation="vertical"
    tools:context=".ArcActivity">

    <LinearLayout
        android:layout_width="match_parent"
        android:layout_height="150dp"
        android:background="@drawable/arc_bg_down">
    </LinearLayout>

</LinearLayout>
好啦,两种顶部弧形背景的样式到这里就简单实现啦。