Before we start use it, you'd better import it to an empty project, following the ReadMe to learn this framework step by step.
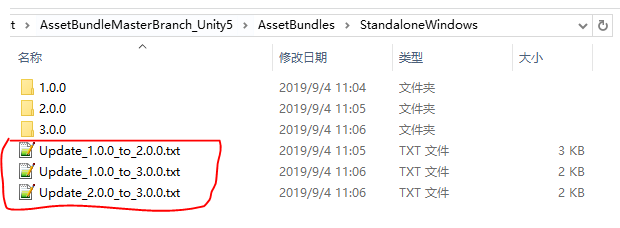
Let's see the folder structure :

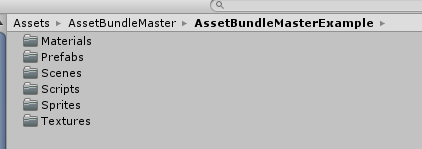
It has 4 folders in the AssetBundleMaster folder:
[AssetBundleMasterExample] is Demo for leaning basical APIs, It include load assets, load scenes, and how to do unload.
[AssetBundleMasterExample2] is Demo for testing how Built-In Shader multi compiled and how AssetBundleMaster to optimize it.
[Editor] is editor scripts.
[Plugins] is runtime scripts, asset load is basic logic for a project, so we put it in Plugins.
Let's try to run API Demo scenes in Editor Mode, open AssetBundleMaster Window first :

window shows :
We need to set only 2 variables can make it run in Editor, developer friendly, ignor other options now :
1. Editor Asset LoadMode : load mode in Editor, select AssetDataBase_Editor, it means load asset directly.
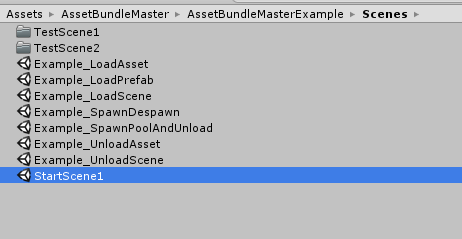
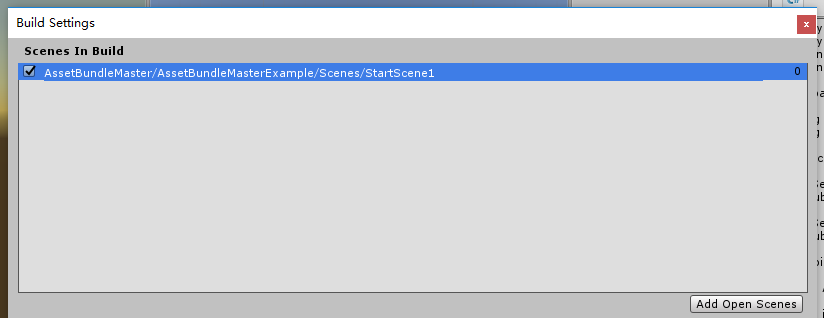
2. Build Root : It is the root folder for loading assets, click [Change Build Root...] to change the folder, set to AssetBundleMasterExample so that we can run API Demo scenes. The entry scene is StartScene1, you can find it in AssetBundleMasterExample/Scenes folder:

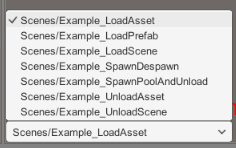
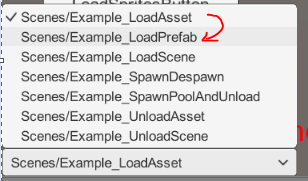
Run StartScene1, the bottom-left shows a dropdown for selecting demo scenes :
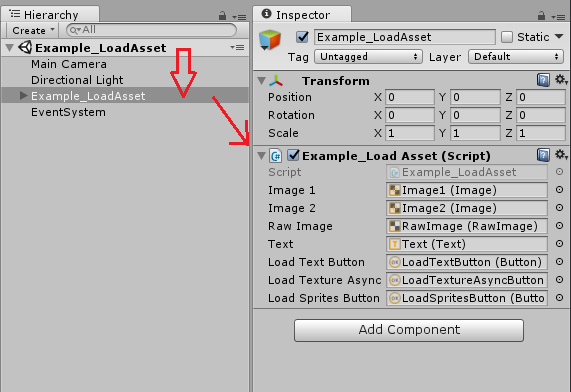
These are all the API demo scenes, select any scene, you can see the hierarchy that a GameObject has the same name with the scene, and the same named script attached on it, check it.
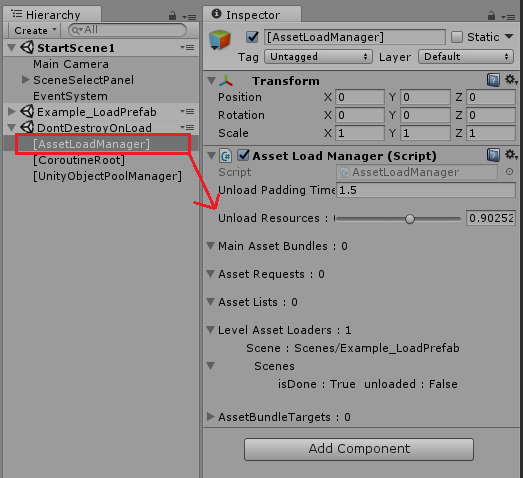
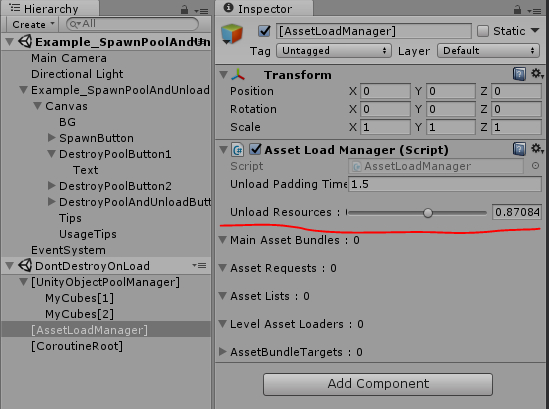
We must explain how the scene load proccess working, when we select any scene it will unload all assets loaded before, so that any asset will be loaded in the new scene will be new loaded, this is convenient for testing asset load and unload, you can open Profiler window to check all the time. The unload proccess has a padding time such as you changed the scene, it will trigger unload. You can see Hierarchy select [AssetLoadManager] GameObject and the inspector will shows it :
Change the scene, then you can see [AssetLoadManager] Inspector has a count down Slider:
If you use Profiler : Memory > Detailed > Take Sample to check assets in memory, check after the unload proccess done.
Let's see every demo scene and how to use APIs, we set the Build Root path, so all the asset load paths are relative path from it, the assets in this folder are called main assets that commonly are the assets should be load by your script, like Scenes, and assets not in this folder called referenced assets like Meshes will not be load by your code, so you don't need to put all assets into the Build Root. keep this in mind.
PS : when using AssetDataBase_Editor mode, it has no asynchronous loading, all asset loading will be sync load because we use AssetDataBase.LoadAssetAtPath as Editor load function.
You can check what kinds of assets we have in the AssetBundleMasterExample folder.
After all the setting was done for Editor load, not so much things to learn, if you want it work for your project, only to set Build Root to your asset folder.
Now you can see AssetBundleMaster generated a file in your Resources Folder, this is the basic setting of AssetBundleMaster, you just upload it for other teammates can use it :

Let's start learn how to use API by Demo scenes. How to create AssetBundle written at the end.
一. Example_LoadAsset (Script : Example_LoadAsset.cs)
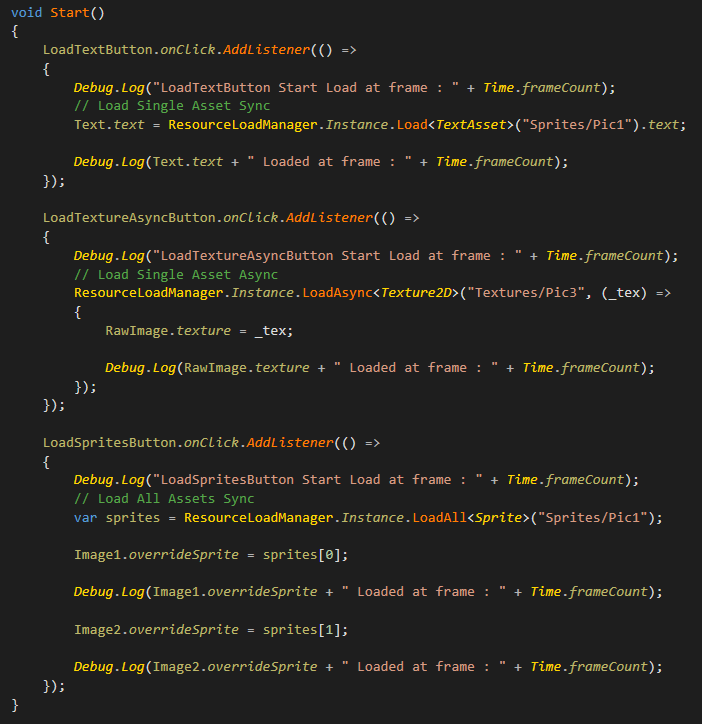
This Demo shows how to load common assets, loading with ResourceLoadManager .
API (namespace AssetBundleMaster.ResourceLoad):
ResourceLoadManager.Instance.Load<T>(string loadPath)
ResourceLoadManager.Instance.LoadAsync<T>(string loadPath, System.Action<T> loaded)
ResourceLoadManager.Instance.LoadAll<T>(string loadPath)
It load assets in Sprite and Texture folder, the path "Sprites/Pic1" is kind of special, let's see :
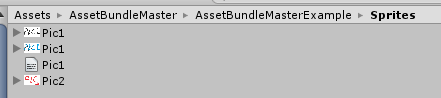

It contains 3 assets have the same asset name Pic1.jpg / Pic1.png / Pic1.txt, in this situation our asset load API use no ext name path to load assets, so these 3 assets have the same load path, the API can load asset by limit its type, for example ResourceLoadManager.Instance.Load<TextAsset>("Sprites/Pic1").text; loaded the first TextAsset in the path, and ResourceLoadManager.Instance.LoadAll<Sprite>("Sprites/Pic1"); load all Sprites from this path, if you change "Sprites/Pic1" to "Sprites" that targeting the folder, it will also load asset, the logic is the same as UnityEngine.Resources load API. This feather solved the case when in Android load from StreamingAssets that has no way to load assets from target folder.
Tips for AssetBunlde load mode : if you are requesting asset async, and the assetbundle is still loading, if a sync requst happened, the Console will pop an error message, but the function still work. see below :

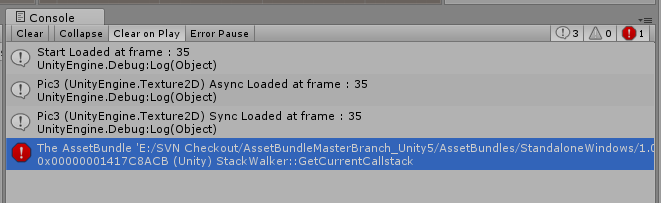
This is because Unity has no provide any API for stop a AssetBundle async load, and load sync while async is loading will pop error, the AssetBundleMaster Low-Level API handles it to ensure all call backs and returns was work correctly. you don't need to worry about it.
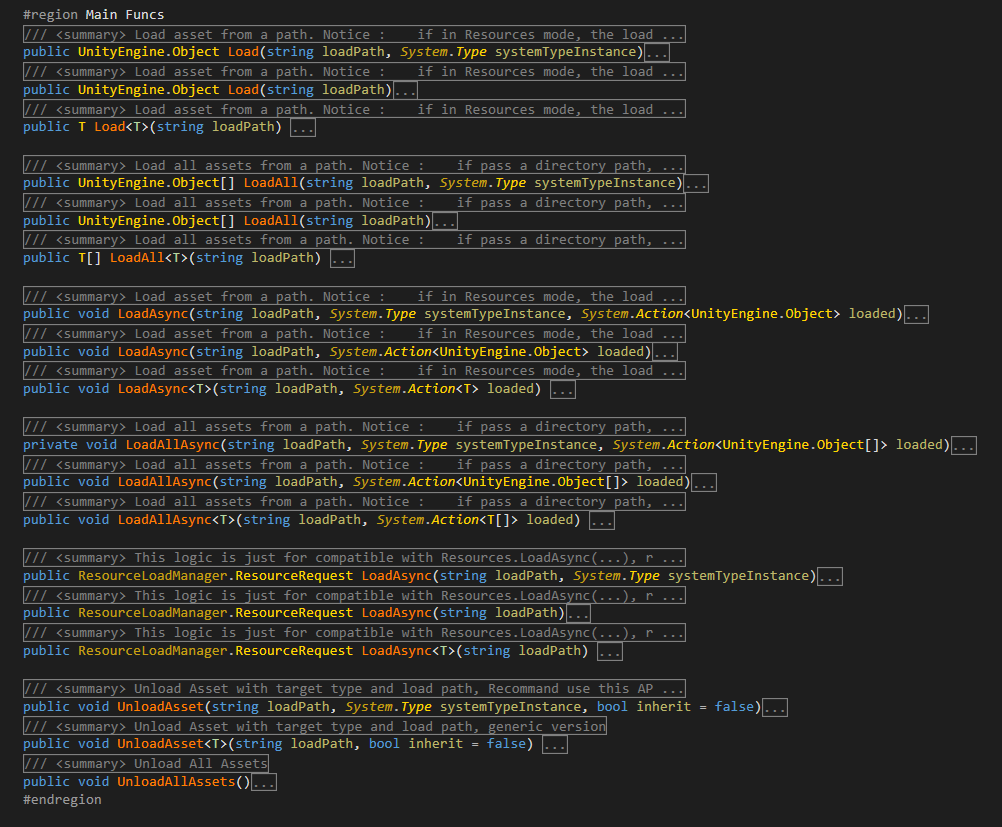
Other APIs can be check in ResourceLoadManager.cs, include Generic and Non-Generic version, convenient for users using lua script.
二. Example_LoadPrefab (脚本Example_LoadPrefab.cs)
此Demo演示怎样读取和实例化GameObject对象, 使用的是对象池. 由 PrefabLoadManager 进行控制.
读取API (命名空间 AssetBundleMaster.ResourceLoad):
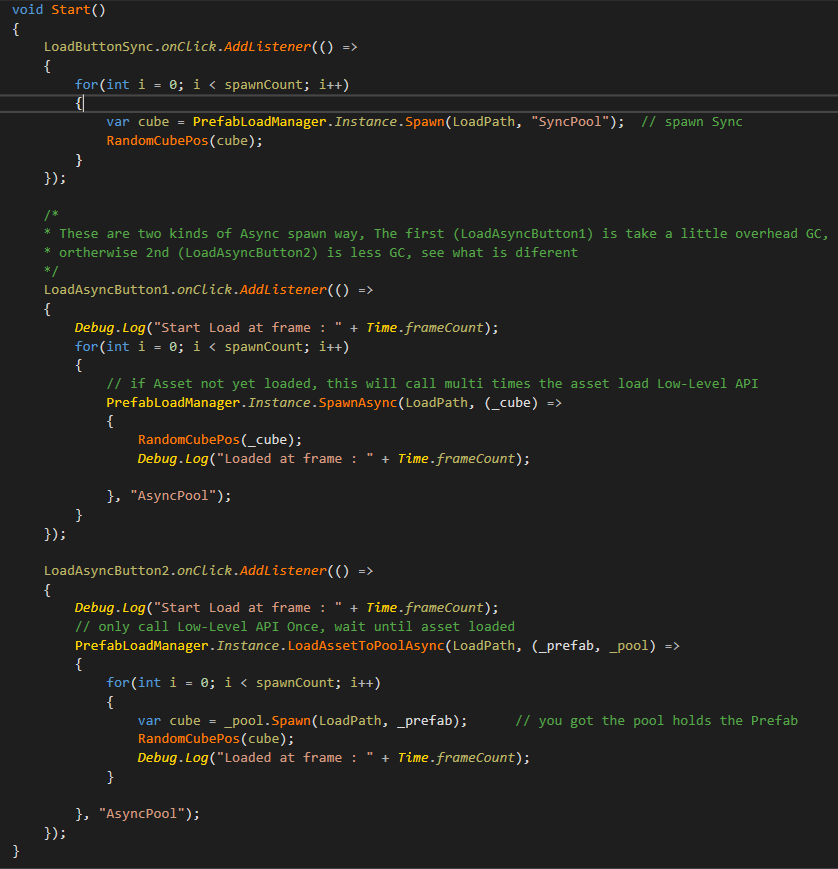
PrefabLoadManager.Instance.Spawn(string loadPath, string poolName = null, bool active = true)
Spawn是直接实例化GameObject.
PrefabLoadManager.Instance.SpawnAsync(string loadPath, System.Action<GameObject> loaded = null, string poolName = null, bool active = true)
SpawnAsync是异步读取资源后实例化GameObject.
PrefabLoadManager.Instance.LoadAssetToPoolAsync(string loadPath, System.Action<GameObject, GameObjectPool> loaded = null, string poolName = null)
LoadAssetToPoolAsync是将资源读取到对应的对象池.
其它接口请查看PrefabLoadManager.cs, 其Prefab资源的加载也是通过ResourceLoadManager 进行的. 我们强烈建议所有需要实例化的GameObject通过PrefabLoadManager 这个类进行加载以及实例化(UI, 特效, 武器等等), 这样用户不仅获得了对象池的控制, 也获得了资源的自动控制.
三. Example_LoadScene (脚本 Example_LoadScene.cs)
此Demo演示怎样读取场景以及读取场景的一些特点, 注意所有被加载的场景, 都不需要添加到Build Settings里面, 在开发时可以减少这方面的工作, 在发布时如没有特殊需求不要添加任何场景, 请用户注意:
当前编辑器运行不需要添加任何场景, 跟资源一样直接使用相对路径加载.
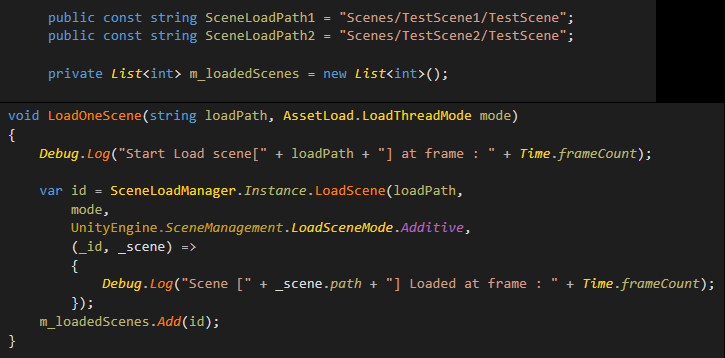
读取场景使用的API (命名空间 AssetBundleMaster.ResourceLoad):
SceneLoadManager.Instance.LoadScene(string sceneLoadPath,
AssetBundleMaster.AssetLoad.LoadThreadMode loadMode = AssetBundleMaster.AssetLoad.LoadThreadMode.Asynchronous,
UnityEngine.SceneManagement.LoadSceneMode loadSceneMode = LoadSceneMode.Single,
System.Action<int, Scene> loaded = null )
它与资源一样通过相对路径来进行读取的, 可以选择同步异步以及加载模式, Unity在读取场景时无论是同步或是异步, 都需要等待场景读取完成的回调 UnityEngine.SceneManagement.SceneManager.sceneLoaded 的触发, 所以无论同步异步, 都建议用户通过 loaded 参数进行回调. 此函数的返回是一个哈希码, 它代表的就是此场景的ID, 用户可以通过这个ID对场景进行控制, 详见Demo七 Example_UnloadScene.
四. Example_SpawnDespawn (脚本 Example_SpawnDespawn.cs)
此Demo演示受对象池控制的GameObject的实例化和归还到对象池的操作.
主要API (命名空间 AssetBundleMaster.ResourceLoad):
PrefabLoadManager.Instance.Spawn(string loadPath, string poolName = null, bool active = true);
PrefabLoadManager.Instance.Despawn(GameObject go, string poolName = null);
我们自动加载并实例化Prefab的时候可以设定对象池的名称, 并且指定对象的active, 在我们归还到对象池的时候, 也需要归还到对应名称的池中去. 归还到池中的GameObject, active会被自动设置为false, 如果用户有特殊的需求, 可以自行修改相关代码在 AssetBundleMaster.ObjectPool.GameObjectPool类中的Despawn函数.
五. Example_SpawnPoolAndUnload (脚本 Example_SpawnPoolAndUnload.cs)
此Demo演示了怎样销毁对象池内的资源, 以及自动资源控制是怎样工作的.
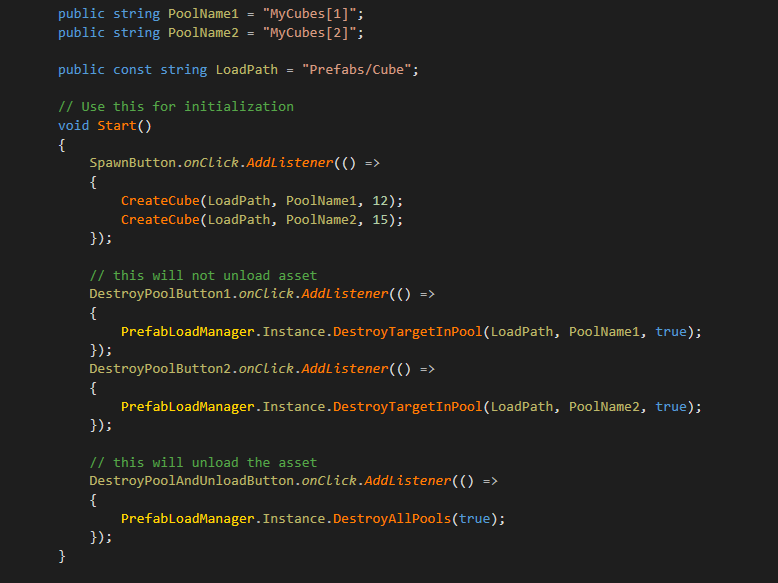
主要API (命名空间 AssetBundleMaster.ResourceLoad):
PrefabLoadManager.Instance.DestroyTargetInPool(string loadPath, string poolName = null, bool tryUnloadAsset = true);
此API的功能是清除目标对象池中的目标资源, 资源标记是通过读取路径进行标记的, 如果tryUnloadAsset 那么PrefabLoadManager 会对引用资源进行检查, 如果没有在使用的资源的话, 会进行资源清除.
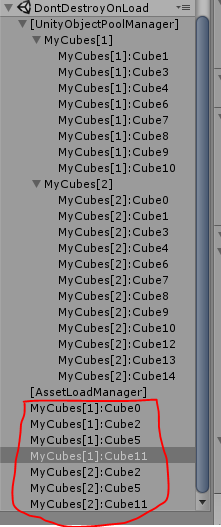
操作: 点击Spawn Cubes按钮之后, 场景中实例化了两个对象池, 并且每个对象池创建了一些Cube, 看Hierarchy面板中显示的, 有些Cube的主节点被故意修改了, 这里是告诉用户对象池与实例化对象的关联性与节点无关, 即使对象不在对象池节点下, 仍然是被对象池控制的.
点击DestroyCubesInPool:MyCubes[1] 按钮, 此时将MyCubes[1]对象池中的Cubes删除了, 可以看到对象池还在, 可是实例化的对象被删除了.
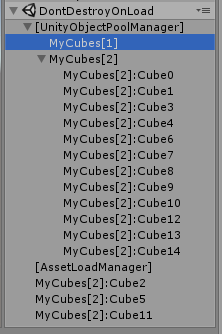
因为Cube的资源仍然被MyCubes[2]引用, 此时不触发任何删除资源的操作, 再点击DestroyCubesInPool:MyCubes[2]按钮, 此时所有实例化对象都被销毁了, 查看AssetLoadManager 的检视面板, 可以看到资源删除倒计时:
所以PrefabLoadManager 对GameObject的资源能够实现自动清除控制.
六. Example_UnloadAsset (脚本 Example_UnloadAsset.cs)
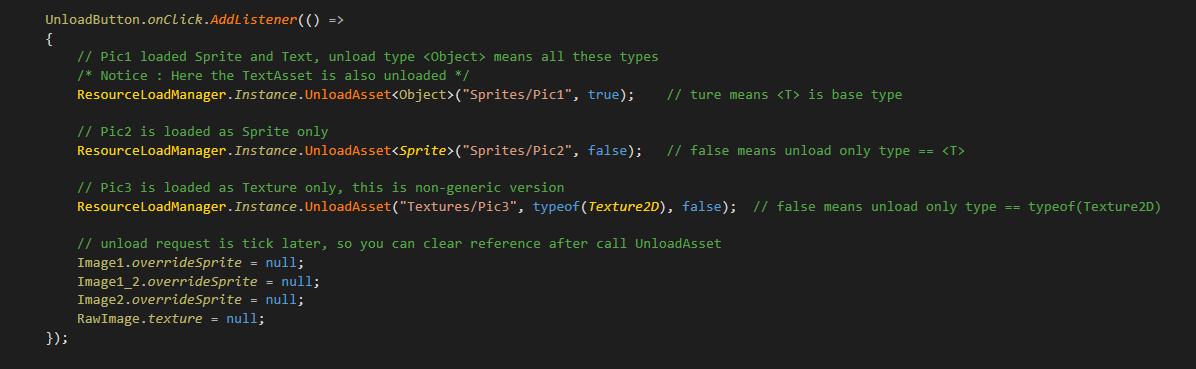
此Demo演示一般资源的卸载过程. 加载过程与Demo1Example_LoadAsset 没有太大差别, 在这里不再进行描述, 下图为卸载资源的API:
主要API (命名空间 AssetBundleMaster.ResourceLoad):
ResourceLoadManager.Instance.UnloadAsset(string loadPath, System.Type systemTypeInstance, bool inherit = false);
ResourceLoadManager.Instance.UnloadAsset<T>(string loadPath, bool inherit = false);
卸载资源的逻辑跟 UnityEngine.Resources.UnloadAsset 不同, 我们传入的参数不是资源对象, 而是资源的读取路径以及资源的类型. 比如读取资源的时候对同一个资源读取的类型可能不同, 比如图片可以读成Sprite或是Texture2D或是Object等, 那么释放的时候也需要所有加载出来的类型都被卸载才能触发资源卸载逻辑. 而卸载的类型也是可以继承的, 比如上图中 ResourceLoadManager.Instance.UnloadAsset<Object>("Sprites/Pic1", true); 意思是卸载所有"Sprites/Pic1"路径读取出来的继承于Object类型的资源, 而 ResourceLoadManager.Instance.UnloadAsset<Sprite>("Sprites/Pic2", false); 是只删除"Sprites/Pic2"读取出来的Sprite类型的资源, 这样的功能就等于是对 UnityEngine.Resources.UnloadAsset 的限定和扩大化, 实际使用上来说要比它更准确.
此API的主要逻辑就是通过资源的读取路径以及读取类型来唯一确定需要卸载的资源对象, 然后在底层的逻辑中减少对该资源的引用计数, 如果资源的引用计数为零的话, 就会触发资源卸载的过程, 在上图中我们将引用到图片的对象都置空了, 这样在后面的资源卸载中就能正确被卸载了. 而如果用户并没有将引用资源的对象置空, 卸载过程也会正常运行, 只不过运行之后也不会将资源卸载, 因为资源卸载是基于 Resources.UnloadUnusedAssets();调用的, 有强引用的资源将不会被卸载. 而在中间层ResourceLoadManager 中, 该资源是被弱引用对象引用的, 也就是说在这种情况下弱引用对象也是能一直存在的, 那么在下一次用户请求加载这些没有被释放的资源的时候, 返回的就是这个资源, 而不会触发资源加载的逻辑, 这就是保证资源在内存中不会重复的核心逻辑.
因此, 如果你的项目为中小型项目, Resources.UnloadUnusedAssets(); 不会对运行时造成性能影响的话, 那么开发团队的成员都不需要对资源的控制进行额外的工作了, 只要在需要时加载, 不用时卸载即可, 因为资源不会因为错误的请求而在内存中重复, 所有人对资源的交叉控制都是非耦合的.
如果是大型项目的话, 一般有两种方式可以修改此工程来支撑你的项目:
1. 你可以移除Resources.UnloadUnusedAssets(); 逻辑, 并修改AssetBundle的卸载逻辑 : AssetBundleMaster.AssetLoad.AssetBundleTarget.Unload 函数中的卸载逻辑 AssetBundle.Unload(false); 为 AssetBundle.Unload(true); 即可成为定点清除逻辑. 这样就跟强制清除资源无异, 就需要开发团队中每个人都对资源的控制非常了解才行.
2. 添加一个资源卸载的请求中间层, 而资源卸载的触发只在某些时候才进行, 比如转换场景等.
PS : 目前在中小型项目上, 并没有发现Resources.UnloadUnusedAssets(); 对运行时造成太大的影响.
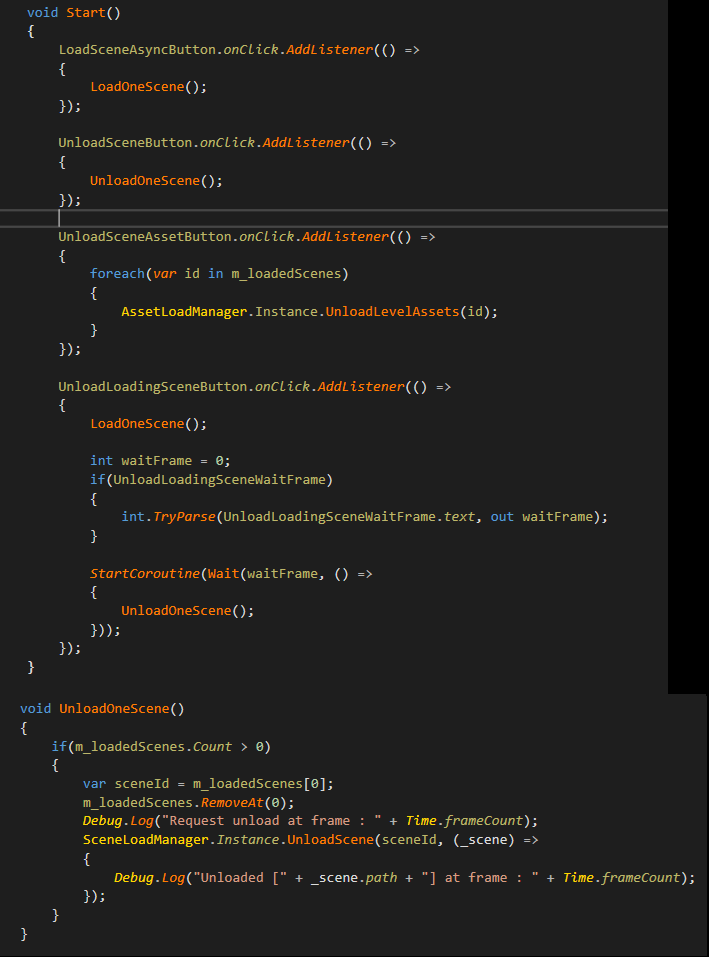
七. Example_UnloadScene (脚本 Example_UnloadScene.cs)
此Demo演示卸载场景的一些特性, 因为场景有同步和异步加载过程, 并且场景加载完成都是通过SceneManager.sceneLoaded 回调触发的, 所以场景的卸载过程有些复杂:
主要API (命名空间 AssetBundleMaster.ResourceLoad, AssetBundleMaster.AssetLoad):
AssetLoadManager.Instance.UnloadLevelAssets(int hashCode);
这是Low-Level API 提供的清除场景资源的API, 在AssetBundle模式下只能清除一些AssetBundle的序列化数据, 不建议使用, 在其它模式下没有什么意义, 只有在序列化数据占据大量内存导致内存问题的情况下再使用, 然而这会增加资源在内存中被重复加载的风险.
SceneLoadManager.Instance.UnloadScene(int id, System.Action<Scene> unloaded = null);
场景读取API ( SceneLoadManager.Instance.LoadScene ) 返回的是一个HashCode, 它指代的就是被加载出来的场景, 所以卸载场景的API参数也是该HashCode, 用来卸载指定场景. 并且资源的卸载也是根据场景的引用自动发生的, 卸载场景都应该使用这个API. 因为读取场景有很多异步过程, 所以卸载流程如下图(如果非AssetBundle模式则没有AssetBundle加载步骤):
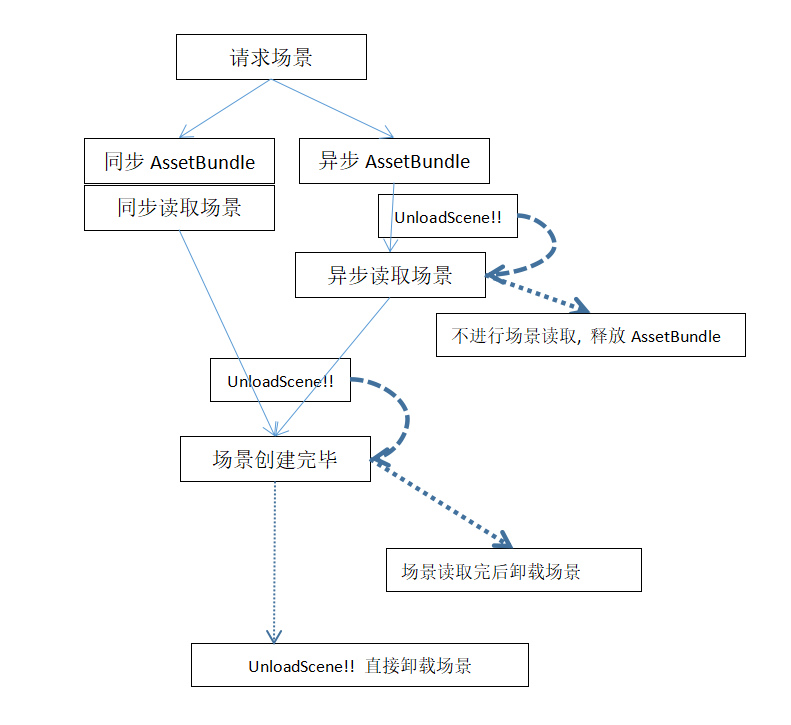
场景读取可能的异步过程有
1. 异步读取AssetBundle
2. 异步读取场景
3. 等待异步回调, 不管同步加载还是异步加载场景, 都需要等待这个回调
所以UnloadScene函数内对其中的各个步骤都进行了封装, 即使在各个异步过程还在执行中进行场景卸载, 也能保证场景能够正确被卸载.
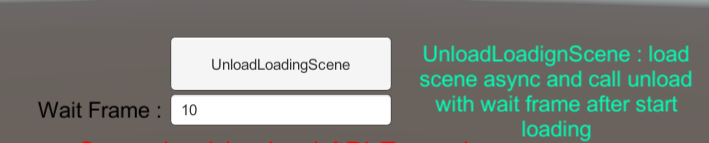
这个测试功能就是对卸载的测试, 它在开始异步加载场景后经过Wait Frame 10帧之后执行场景卸载, 把这个修改为1, 2, 3...等数值可以看到在异步过程中卸载场景也是正确的.
以上就是全部的资源加载, 实例化, 场景读取以及卸载逻辑, 我们如果运行在AssetDataBase_Editor模式下, 有些功能可能无法测试, 比如资源异步加载和资源重复的问题, 接下来就进行资源打包创建AssetBundle, 并在编辑器下加载AssetBundle测试, 之后再进行发布测试.
--------------------------------------- Build AssetBundles -----------------------------------------
还是先打开编辑器界面
我们的读取模式有5种, 而发布后的支持的模式有3种
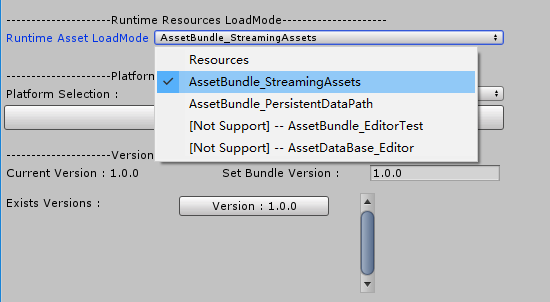
1. Resoueces 模式 : 这个是使用Resources文件夹下的资源的模式, 没有太多意义, 只是作为保留模式
2. AssetBundle_StreamingAssets 模式 : 从StreamingAssets路径下读取AssetBundle.
3. AssetBundle_PersistentDataPath 模式 : 作为可更新资源模式, 在读取资源时会先检查PersistentDataPath下是否有资源, 没有的话会到StreamingAssets路径下读取资源.
4. AssetBundle_EditorTest 模式: 打包的AssetBundle会被放到临时路径下, 这个就是从临时路径读取AssetBundle.
5. AssetDataBase_Editor 模式 : 不需要打包直接进行编辑器下资源加载, 这个是开发者模式.
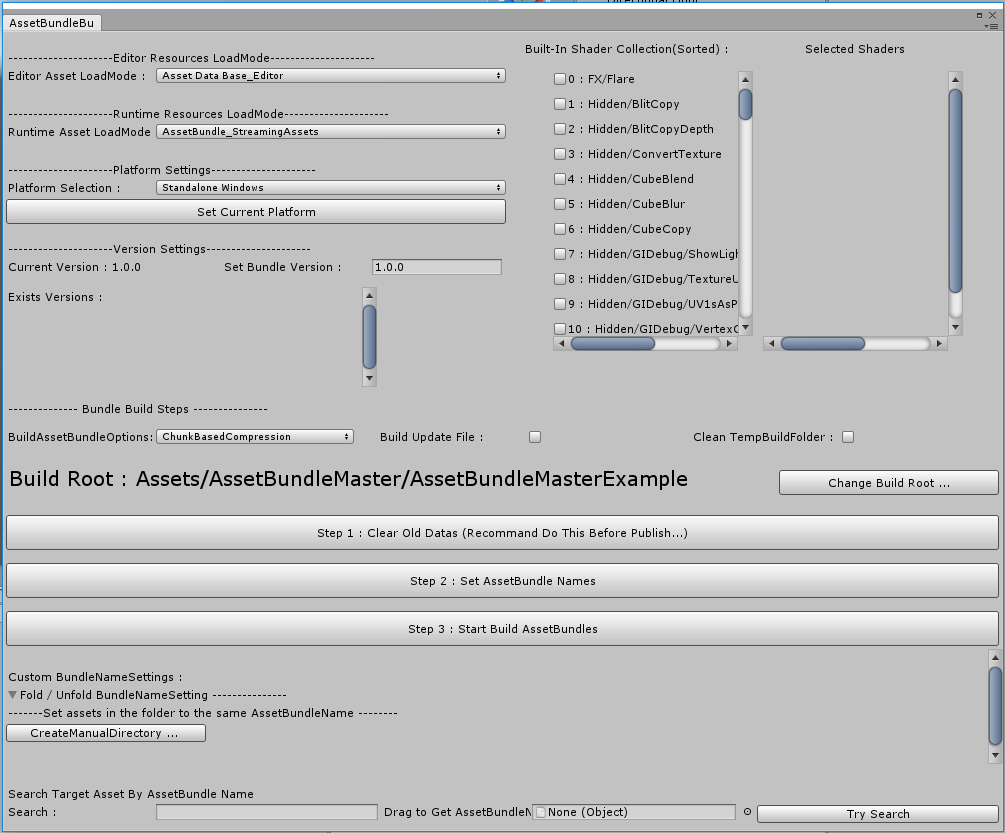
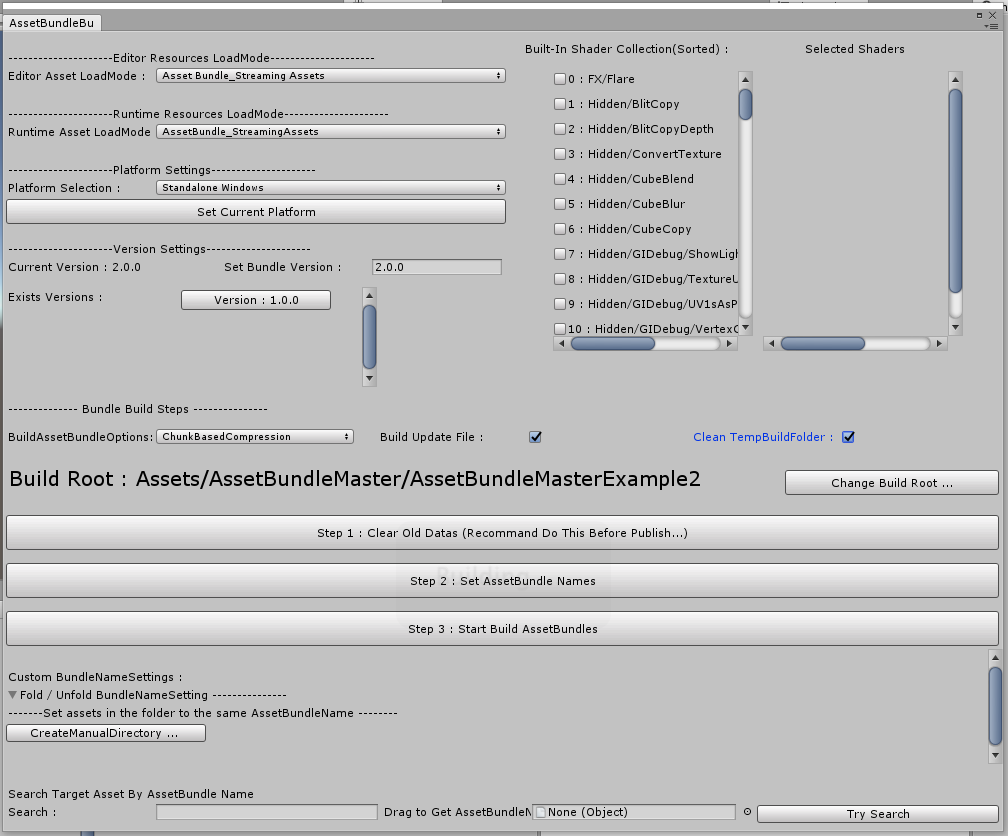
接下来我们把面板上的所有设置看一遍:
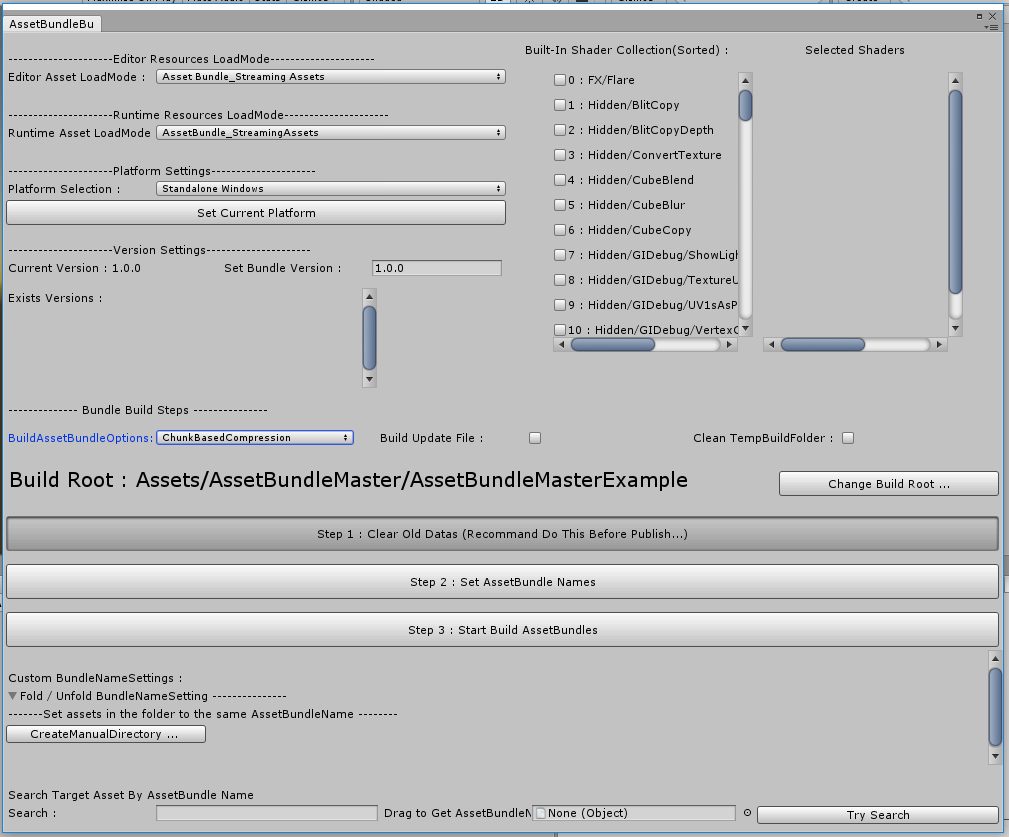
1. Editor Asset LoadMode (EnumPop) : 编辑器下加载资源方式
2. Runtime Asset LoadMode (EnumPop) : 发布后的资源加载方式
3. Platform Selection (EnumPop) : AssetBundle的目标平台, 点击 [Set Current Platform] 即可设置为你当前的平台
4. Set Bundle Version (Text) : 可以设置不同版本的AssetBundle
5. BuildAssetBundleOptions (EnumFlagPop) : 打包设置
6. Build Update File (CheckBox) : 自动创建版本Patch文件, Patch是AssetBundleMaster.AssetLoad.LocalVersion.UpdateInfo 的Josn序列化.
7. Clean TempBuildFolder (CheckBox) : 当同一个版本进行多次打包时, 临时文件夹可能含有多余文件, 清除冗余文件.
8. Built-In Shader Collection (Scroll View CheckBox) : 对使用相同內建shader的材质进行整合, 减少重复编译.
9. Build Root (Label, Button) : 资源文件夹根目录, 所有此文件夹下的资源可以被读取.
10. Step1 Clear Old Datas (Button) : 清除已经被设置的AssetBundleName. 可以减少冗余资源被打包.
11. Step 2 Set AssetBundle Names (Button) : 自动设置包名, 其中包含了资源的自动处理, 处理过程参看附录.
12. Step 3 Start Build AssetBundles (Button) : 开始打包.
13. Custom BundleNameSettings (Scroll View) : 可以添加一些文件夹, 使文件夹下的所有文件设置为统一包名, 作为一些特殊扩展.
14. Search Target Asset By AssetBundle Name : 通过AssetBundleName来查找资源并自动选择, Debug用.
以上就是所有设置项. 我们先把编辑器和发布的加载选项都选为AssetBundle_StreamingAssets, 这个是最简单的发布方式. 然后点击
Step1...
Step2...
Step3...
这三步就会自动设置和打包AssetBundle了. 每一步都有提示操作.
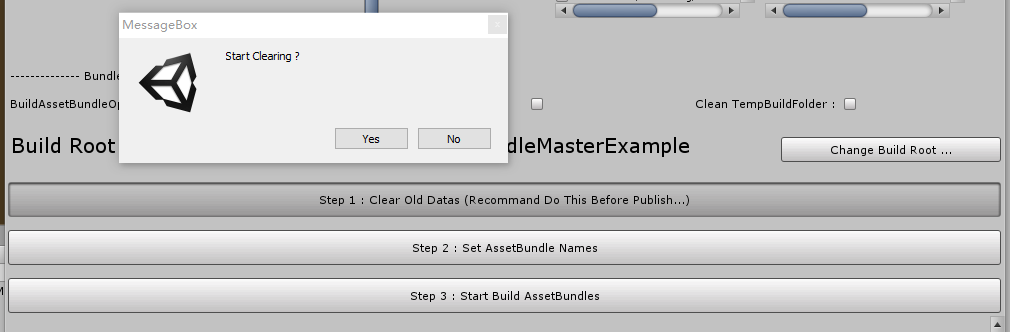
Step1
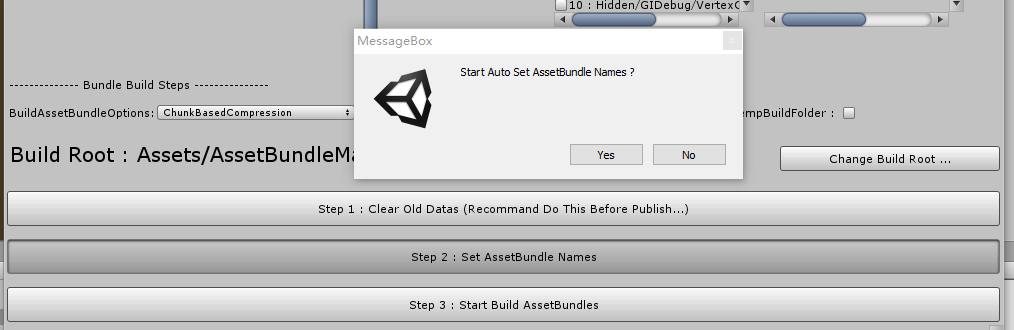
Step2
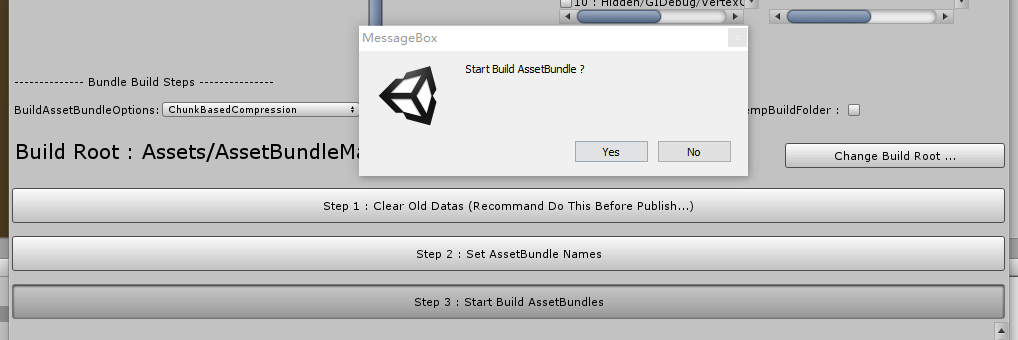
Step3
当创建完成后会询问是否从临时文件夹复制AssetBundle到StreamingAssets文件夹下, 选择Yes即可.
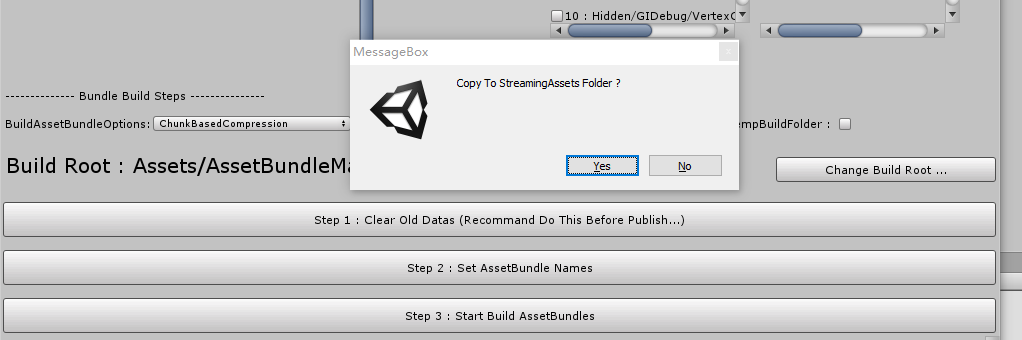
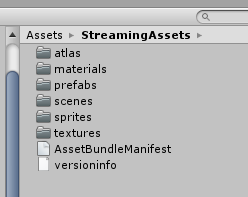
可以看到StreamingAssets下面有打包好的文件:
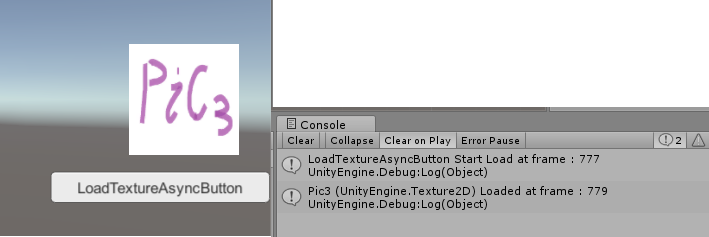
这样就打包好了, 如果在编辑器下运行, 只需要再打开 StartScene1 场景即可, 重复上面的API测试步骤, 可以看到异步读取打印的Log信息确实是异步的了.
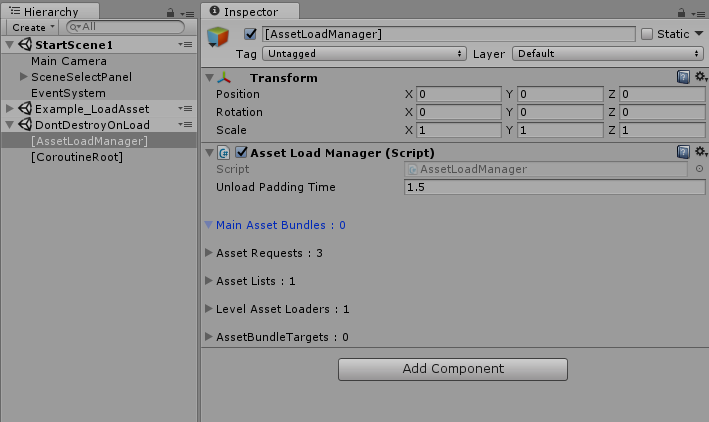
我们在AssetDataBase_Editor模式和AssetBundle_StreamingAssets模式下读取资源的内容也不一样了, 对比一下检视面板[AssetLoadManager] :
AssetDataBase_Editor 没有AssetBundle相关资源

AssetBundle_StreamingAssets模式下读取了AssetBundle
这样就完成了打包和在编辑器下读取AssetBundle的流程了, 如果要发布到目标平台, 那么在打包面板的Platform Selection 选项中选择目标平台打包即可, 接下来是最重要的一点, 场景与Build Settings :
在发布时, AssetBundle模式是不需要把场景加到Build Settings中的, 因为如果场景在Build Root文件夹中, 场景会被打包成AssetBundle, 而加入到Build Settings中的场景也会被自动打包到Resouces里面, 这样场景就会被打包两次, 浪费时间和空间. 比如我们当前的工程, 如果想发布的话, 我们怎样让程序启动之后自动加载初始场景StartScene1呢?
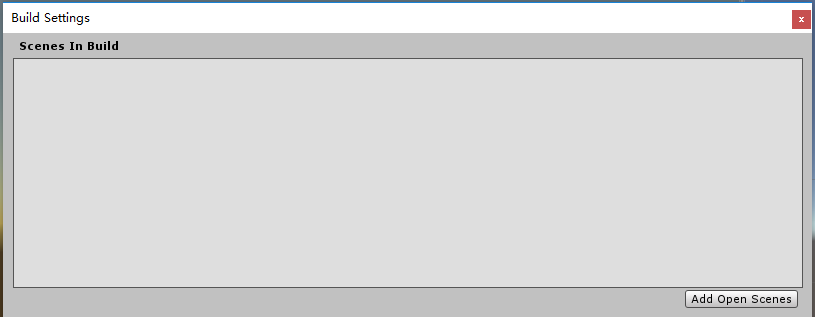
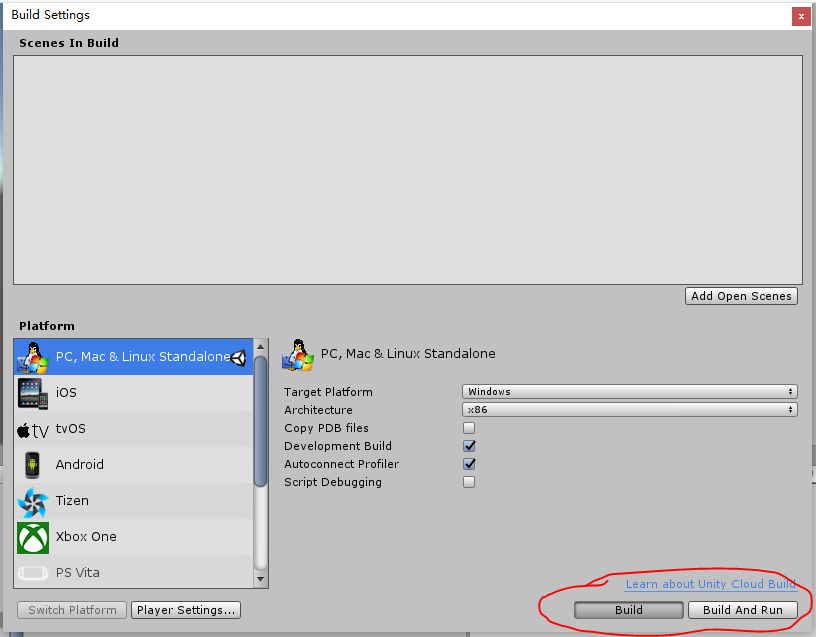
第一种方法是把StartScene1加到Build Settins中, 因为StartScene1很小很简单, 被两次打包也不会产生什么影响:
或者清空Scenes In Build使用初始化调用属性来读取初始场景(可以写在任何代码中), 这种方式更好, 因为规避了二次打包的风险 :

这段代码请自行添加到任意脚本中.
以上就是所有API以及AssetBundle创建和发布的流程了.
现在开始说明打包功能 8. Built-In Shader Collection 的作用, 我们直接修改Build Root读取AssetBundleMasterExample2 :
只简单修改了一下版本, 打包2.0.0版本, 因为我们之前Build了1.0.0版本, 所以Exists Versions里面显示出了1.0.0版本, 这里我们试一试Update文件创建, 勾选它, 修改Build Root为AssetBundleMasterExample2, 我们看看这个资源文件夹下的文件:

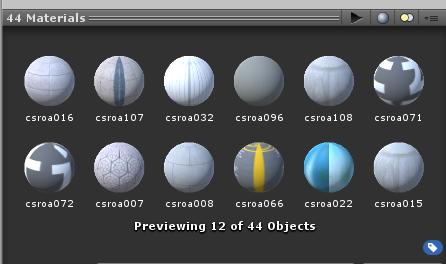
Example_ShaderCollection场景中有一些建筑, 使用了大量标准材质(Standard Shader):
这个场景引用了很多标准材质, 会造成一些性能问题. 我们现在要加载的初始场景为StartScene2(它自动读取Example_ShaderCollection场景), 把刚才的初始场景代码改一改:
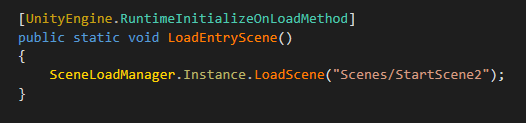
PS : 基于Demo场景一致化的考虑, 我们在两个Example中都使用入口场景 StartScene1 / StartScene2, 没有什么特殊深意, "Scenes/StartScene2"改为"Scenes/Example_ShaderCollection"也是一样的.
再次执行Step1, Step2, Step3, 这次在执行Step3时出现了新的提示信息:
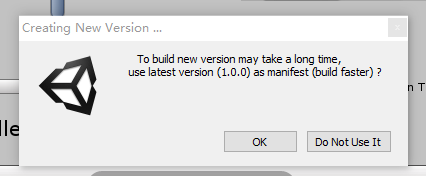
这是因为我们已经有1.0.0版本的AssetBundle包了, 如果我们是增量打包, 复制1.0.0的文件到2.0.0版本文件夹下, 再开始打包会比重新打包快很多, 不过2.0.0的资源跟1.0.0的资源有差别, 所以功能 7. Clean TempBuildFolder (CheckBox) 的功能就体现出来了, 它能清除打包完后不属于这个版本的文件. 等到打包结束, 就开始Build一个app来查看这个场景的特点吧, 因为2.0.0版本没有选择任何Shader Collection, 所以是一个未优化的版本.

任务管理器 运行内存219.7MB
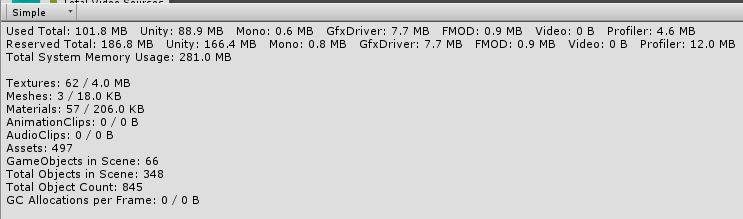
Profiler
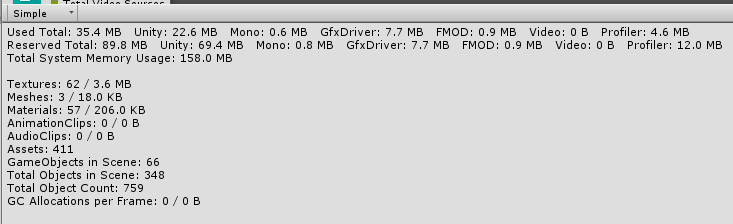
Profiler : ShaderLab 62.9MB 编译占用了很大内存

Profiler : Standard Shader在每个建筑上都进行了编译.
问题出在Standard Shader上, 我们使用Shader Collection的方式再打一个3.0.0的版本看看, 这次把Shader Collection中的Standard选上, 因为Shader的变更不会造成引用资源的变更, 所以我们把BuildAssetBundleOption的选项加上ForeRebuildAssetBundle, 否则会造成材质丢失 :
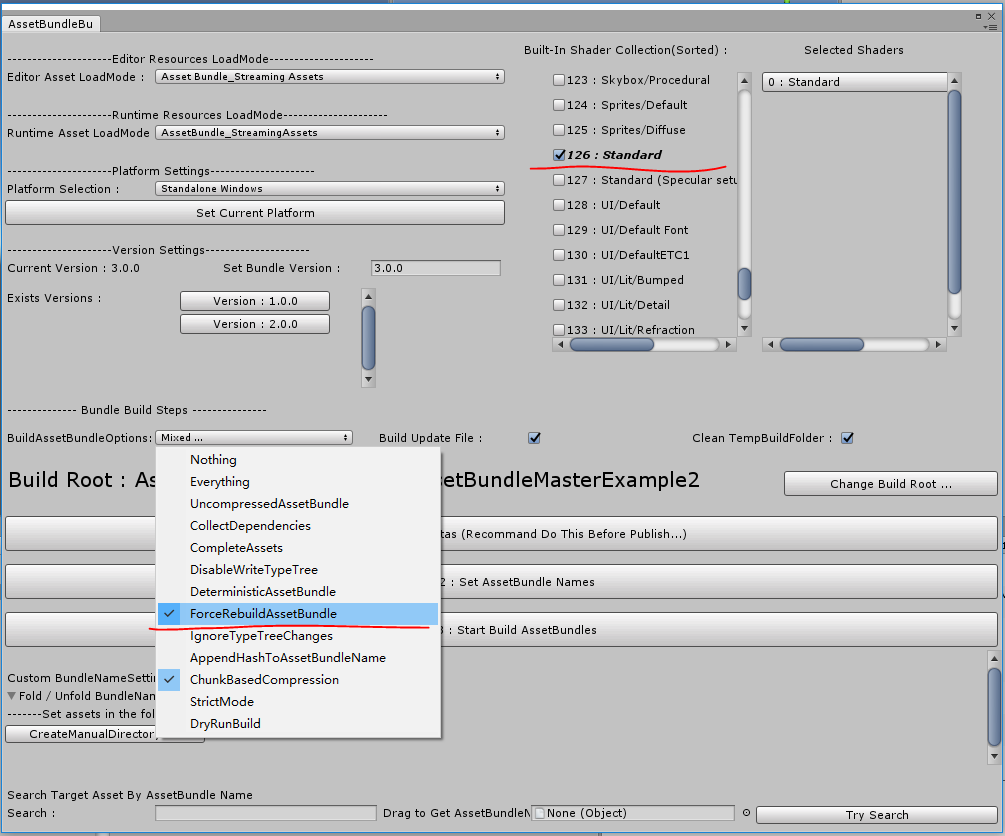
PS : 默认BuildAssetBundleOption选项ChunkBasedCompression是为了测试时更快速的打包, 用户可以自己进行修改. 编辑器下的配置文件在下图的文件夹内, 你可以上传至SVN等同步给其他人:

同样重新执行Step1, Step2, Step3...然后Build出来运行查看:

任务管理器 运行内存 81.6MB VS 219.7MB
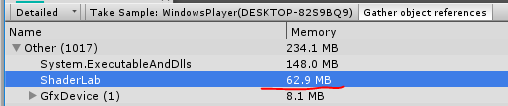
Profiler
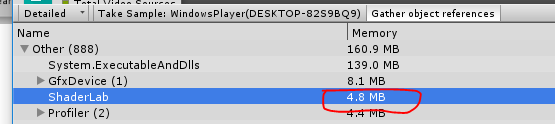
Profiler : ShaderLab 4.8M VS 62.9MB
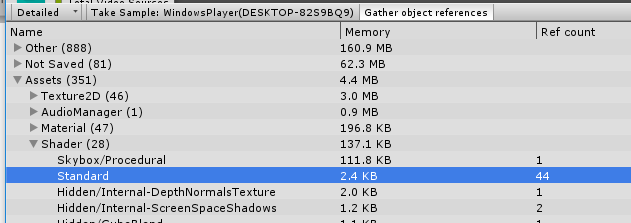
Profiler : Standard Shader 只编译了一次, 复用了44次.
你可以看到这两个版本巨大的差别, 它的差别不仅在内存上, 在启动时间上也有性能差别. 这是由于內建Shader的引用造成的多次编译, 所以我们在这里提供了针对內建Shader的整合功能.
回头看一下AssetBundle打包的临时文件夹:
它创建了版本间的Patch文件, 可以作为更新列表使用, 它是AssetBundleMaster.AssetLoad.LocalVersion.UpdateInfo的序列化:

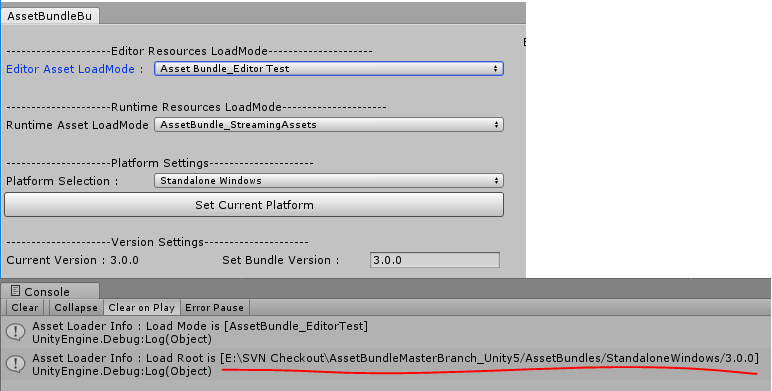
因此如果使用 AssetBundle_EditorTest 模式进行编辑器下资源读取的话, 可以很方便地在已经打包好的各个版本间切换. 读取的平台和版本就是编辑器面板中的当前设定:
工具栏其余功能:
1. 从临时文件夹复制AssetBundle到StreamingAssets文件夹 :

一般在打包完成后会出现提示框提示用户是否要复制到StreamingAssets文件夹, 这个是手动复制.
2. 清除AssetBundleMaster产生的数据 :

它会清除一些编辑器产生的序列化文件. 没有这些文件AssetBundleMaster将无法运行.
以上就是AssetBundleMaster的全部说明, 它就像介绍说的, 是一个自动打包以及资源读取的整合解决方案, 提供了开发者很友好的开发流程, 并实现了大部分的资源自动管理逻辑, 甚至提供了一些资源自动处理方案以及对资源更新的友好支持. 还是那句话: 我们建议在任何情况下都不应该人为地手动去设置AssetBundle分包, 或不设置任由其自动分包, 即使你基于游戏更新或其它方面的考虑, 大部分情况下都与引擎特性不符.
附录
资源自动处理, 编辑器代码在AssetBundleBuildWindow.cs 文件中, 其中资源处理有几个部分:
1. SpriteAtlas, 在Unity5中无法自己创建SpriteAtlas, 在Unity2017之后可以创建, 代码在AssetBundleBuildWindow::1759行 CreateSpriteAtlasAssets 函数内, 通过把所有相同Packing Tag的Sprite资源设置到同一个AssetBundle包内, 规避了SpriteAtlas可能被重复打包的问题. 这里使用了Packing Tag作为分包的依据, 可是在Unity2019中检视面板没有显示Packing Tag 不过它仍然存在于序列化数据之中, AssetBundleMaster提供了一个重载的检视面板, 添加了Packing Tag设置, 编辑器代码为TextureImporterCustomEditor.cs:
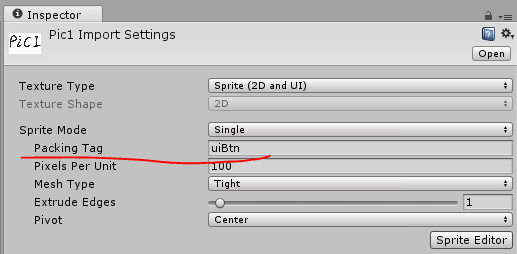
Unity5
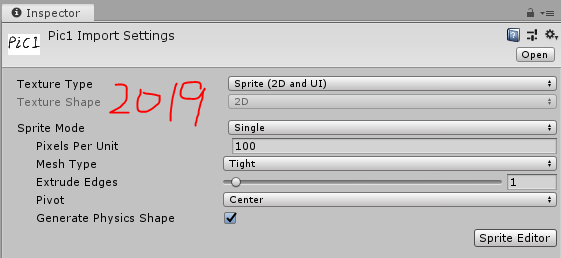
Unity2019
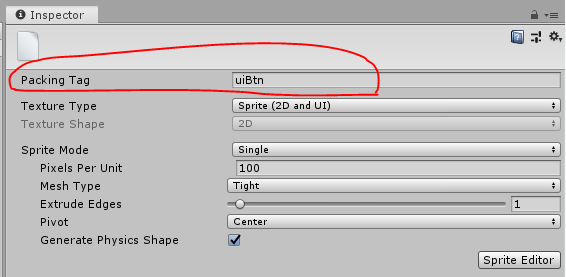
AssetBundleMaster重载了Unity2019检视面板
注意图集如果因为一些原因导致Include in Build的信息丢失(比如资源更新等), ResourceLoadManager通过对UnityEngine.U2D.SpriteAtlasManager.atlasRequested 添加了回调, 对这种情况作了补偿操作, 最大限度保证读取的正确性, 用户如果碰到此问题请到这里进行调试(Unity2017以及之后的版本才有).

SpriteAtlas中的设定(Unity2017以及之后的版本).
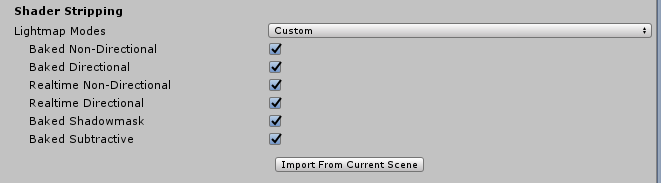
2. EditorConfigSettings, 自动调整一些编辑器下的设置, 用户可以根据自己的工程修改此处代码. 代码在AssetBundleBuildWindow::1676行 EditorConfigSettings 函数内, 它首先修改了UnityEditor.EditorSettings.spritePackerMode以方便创建SpriteAtlas, 并修改了GraphicsSettings的相关变量, 通过此修改能解决打包后场景中物体LightMap信息被错误剥离的错误. 见图:
3. TerrainData, 它使用的贴图需要设置isReadable属性, 如果不设置在编辑器下不会报错, 直到打包运行之后才会报错. 将自动把被引用到的贴图设置isReadable.
4. Shader Collection, 因为內建Shader会因为打包引用造成多次编译, 整合材质可以减少重复编译.