概述
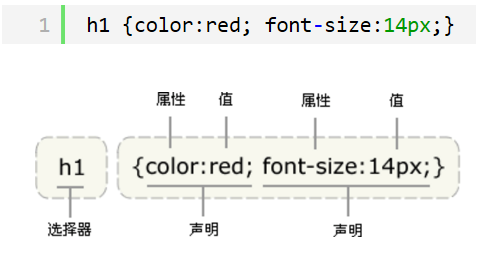
CSS是英文Cascading Style Sheets的缩写,称为层叠样式表,用于对页面进行美化。CSS规则由两个主要的部分构成:选择器,以及一条或多条声明,语法:style = 'key1:value1;key2:value2;' 如下图:
存在方式有三种:元素内联、页面嵌入和外部引入
1 <p style="background-color: aqua">
2         test
3     </p>
在页面中嵌入 < style type="text/css"> </style > #在头部指定CSS样式
 1 <!DOCTYPE html>
 2 <html lang="en">
 3 <head>
 4     <meta charset="UTF-8">
 5     <title>Test CSS</title>
 6     <!--在头部指定好CSS样式然后,在标签里使用class="样式名应用"-->
 7     <style>
 8         .css_test {
 9             background-color: darkorchid;
10         }
11     </style>
12 </head>
13 <body>
14 <div>
15     <p class="css_test">
16         <!--这里应用指定好的CSS样式名即可-->
17         test
18     </p>
19 </div>
20 </body>
21 </html>


 1 <!DOCTYPE html>
 2 <html lang="en">
 3 <head>
 4     <meta charset="UTF-8">
 5     <title>Test CSS</title>
 6     <style>
 7         /*"#"这个调用CSS样式的方法*/
 8         #name {
 9             background-color: blue;
10         }
11     </style>
12 </head>
13 <body>
14 <div>
15     <p id="name">
16         <!--这里不需要指定,只要id=name的就会自动应用头部指定的CSS样式-->
17         test
18     </p>
19     <p id="name">
20         TEST
21     </p>
22 </div>
23 </body>
24 </html>
 1 <!DOCTYPE html>
 2 <html lang="en">
 3 <head>
 4     <meta charset="UTF-8">
 5     <title>Test CSS</title>
 6     <style>
 7         /*为段落p标签统一设置格式*/
 8         p {
 9             background-color: green;
10             width: 100px;
11             height: 100px;
12         }
13     </style>
14 </head>
15 <body>
16 <div>
17     <!--应用段落p标签的格式-->
18     <p>
19         test
20     </p>
21     <p>
22         TEST
23     </p>
24 </div>
25 </body>
26 </html>
引入外部css文件
1 .pg-body {
2     background-color: #337ab7;
3     height: 20px;
4     width: 10%;
5 }
 1 <!DOCTYPE html>
 2 <html lang="en">
 3 <head>
 4     <meta charset="UTF-8">
 5     <title>Test CSS</title>
 6     <!--通过link导入,href指定样式文件-->
 7     <link rel="stylesheet" href="test.css">
 8 </head>
 9 <body>
10 <div>
11     <!--这里直接应用指定好的CSS样式名即可-->
12     <p class=pg-body>
13         test
14     </p>
15 </div>
16 </body>
17 </html>
注意嵌套规则
-
块级元素可以包含内联元素或某些块级元素,但内联元素不能包含块级元素,它只能包含其它内联元素。
-
有几个特殊的块级元素只能包含内联元素,不能包含块级元素。如h1,h2,h3,h4,h5,h6,p,dt
-
li内可以包含div
-
块级元素与块级元素并列、内联元素与内联元素并列。
CSS选择器
基本选择器

“选择器”指明了{}中的“样式”的作用对象,也就是“样式”作用于网页中的哪些元素
1.通用元素选择器 *: 所有的标签都变色
2.标签选择器:匹配所有使用p标签的样式 p{color:red}
3.id选择器:匹配指定的标签 #p2{color:red}
4.class类选择器:谁指定class谁的变色,可选多个 .c1{color:red} 或者 div.c1{color:red}
 1 <!DOCTYPE html>
 2 <html lang="en">
 3 <head>
 4     <meta charset="UTF-8">
 5     <title>CSS</title>
 6 </head>
 7 <style>
 8     /*标签选择器*/
 9     /*所有标签是div的都变了*/
10     div {
11         font-family: 微软雅黑;
12     }
13
14     /*id选择器*/
15     /*给id='c2'的设置样式,id一般不常用。因为id是不能重复的。*/
16     #c2 {
17         background-color: purple;
18         font-size: larger;
19     }
20
21     /*calss类选择器*/
22     .cls {
23         color: gold;
24     }
25
26     /*通用元素选择器*/
27     * {
28         background-color: aquamarine;
29         color: red;
30     }
31 </style>
32 <body>
33 <div id="c1">
34     <div id="c2">
35         <p>hello</p>
36         <div class="cls">哇啊</div>
37     </div>
38     <p>hi</p>
39 </div>
40 <span>啦啦啦</span>
41
42 <div class="a1">
43     <p class="a2">你好啊</p>
44     <h5>我是h5标签</h5>
45 </div>
46 <a class="cls">
47     class test a
48 </a>
49 <p>HI</p>
50 <span class="cls">
51     class test span
52 </span>
53 </body>
54 </html>
关联选择器
 1 <!DOCTYPE html>
 2 <html lang="en">
 3 <head>
 4     <meta charset="UTF-8">
 5     <title>关联选择器</title>
 6     <style>
 7         /*关联选择器:为应用了container下面的子元素下应用了l类选择器下面的应用了p类选择器设置样式*/
 8         .container .l .p {
 9             background-color: blue;
10         }
11     </style>
12 </head>
13 <body>
14 <!--下面的div应用了container类选择器,那么它下面的所有的li标签将应用上面设置的样式-->
15 <div class="container">
16     <div class="l">
17         test
18         <div>
19             <ul>
20                 <!--这里需要注意,它们只要是有包含关系就行,不一定非得挨着-->
21                 <li class="p">
22                     hello
23                 </li>
24             </ul>
25         </div>
26     </div>
27 </div>
28 </body>
29 </html>
组合选择器
1 #c1, .c2, div {
2             background-color: pink;
3         }
属性选择器
 1 <!DOCTYPE html>
 2 <html lang="en">
 3 <head>
 4     <meta charset="UTF-8">
 5     <title>属性选择器</title>
 6     <style>
 7         /*input和[之间不能有空格]*/
 8         .con input[type="text"][name="second"] {
 9             border: 3px solid red;
10         }
11     </style>
12 </head>
13 <body>
14 <div class="con">
15     <input type="text"/>
16     <input type="text" name="second"/>
17     <input type="password"/>
18     <input type="file"/>
19     <input type="checkbox"/>
20     <input type="button"/>
21     <input type="reset"/>
22 </div>
23 </body>
24 </html>
优先级:标签上style优先,按照编写顺序,就近原则
CSS常用属性
height, 高度 百分比width, 宽度 像素,百分比
text-align:ceter, 水平方向居中
line-height,垂直方向根据标签高度
color, 字体颜色
font-size, 字体大小
font-weight, 字体加粗
padding,内边距
margin 0 auto,居中
background背景
background-color 背景颜色
background-image 背景图片
background-repeat 背景重复
border边框
border:有3个参数:线的粗细、线的样式(实线、点、虚线等)、线的颜色
Display
display: none; 让标签消失display: inline; 行内标签
display: block; 块级标签
display: inline-block; 具有inline,默认自己有多少占多少;也具有block,可以设置高度,宽度,padding margin
行内标签:无法设置高度,宽度,padding margin
块级标签:设置高度,宽度,padding margin
常见的块级标签有 div、form、table、p、pre、h1~h5、dl、ol、ul 等
常见的行内标签有span、a、strong、em、label、input、select、textarea、img、br等
cursor 鼠标停放所显示的效果
值:pointer || help || wait || move || crosshair
 1 <!DOCTYPE html>
 2 <html lang="en">
 3 <head>
 4     <meta charset="UTF-8">
 5     <title>CSS常用属性</title>
 6 </head>
 7 <body style="margin:0 auto">
 8 <div style="background-color: red">
 9     Hello
10 </div>
11 <div style="background-image: url(favicon.ico);height: 80px;background-repeat: no-repeat">
12     <!--<div style="background-image: url(favicon.ico);height: 80px;background-repeat: repeat-x">-->
13     <!--<div style="background-image: url(favicon.ico);height: 80px;background-repeat: repeat-y">-->
14 </div>
15
16 <!--第一种:线的粗细为1像素,实线、红色-->
17 <div style="border:1px solid red;height:10px"></div>
18 <!--第二种:线的粗细为1像素,点、蓝色-->
19 <div style="border:1px dotted blue;height:10px"></div>
20 <!--第三种:线的粗细为1像素、虚线、紫色-->
21 <div style="border:1px dashed purple;height:10px"></div>
22
23 <!--display 为none将隐藏标签-->
24 <div style="display:inline-block;">inline-block</div>
25 <!--display 为inline会将块级别标签调为行内标签-->
26 <div style="background-color:red;display:inline">inline</div>
27 <!--display 为block会将行内标签调为块级别标签-->
28 <a style="background-color:red;display:block">block</a>
29
30 <!--cursor鼠标停放所显示的效果-->
31 <div style="cursor:pointer">显示小手(pointer)</div>
32 <div style="cursor:help">显示问号(help)</div>
33 <div style="cursor:wait">显示滚圈(wait)</div>
34 <div style="cursor:move">显示移动(move)</div>
35 <div style="cursor:crosshair">显示定位(crosshair)</div>
36 </body>
37 </html>
float 浮动
基本浮动规则
block元素通常被现实为独立的一块,独占一行,多个block元素会各自新起一行,默认block元素宽度自动填满其父元素宽度。block元素可以设置width、height、margin、padding属性;
inline元素不会独占一行,多个相邻的行内元素会排列在同一行里,直到一行排列不下,才会新换一行,其宽度随元素的内容而变化。inline元素设置width、height属性无效
clear语法:clear:none | left | right | both
1.clear:left 清除的是左边的浮动
2.clear:both :保证左右两边都没有浮动
排序的时候是一个标签一个标签的排
如果上一个是浮动的,就紧贴个上一个
如果上一个不是浮动的,就和上一个保持垂直不变
 1 <!DOCTYPE html>
 2 <html lang="en">
 3 <head>
 4     <meta charset="UTF-8">
 5     <title>float</title>
 6     <style>
 7         * {
 8             margin: 0;
 9             padding: 0;
10         }
11
12         .box1 {
13             width: 200px;
14             height: 80px;
15             background-color: wheat;
16             float: left;
17         }
18
19         .box2 {
20             width: 200px;
21             height: 30px;
22             background-color: rebeccapurple;
23             float: left;
24         }
25
26         .box3 {
27             width: 100px;
28             height: 50px;
29             background-color: rosybrown;
30             float: left;
31         }
32
33         .content {
34             width: 100%;
35             height: 200px;
36             background-color: royalblue;
37         }
38
39         /*.clearfix:after {*/
40         /*content: "";*/
41         /*display: block;*/
42         /*clear: both;*/
43         /*!*清楚浮动的功能(可以做到一个自动切换的功能)*!*/
44         /*}*/
45     </style>
46 </head>
47 <body>
48 <!--<div class="clearfix">-->
49 <div class="box1"></div>
50 <div class="box2"></div>
51 <div class="box3"></div>
52 <!--</div>-->
53
54 <div style="clear: both;">
55     <div class="content">
56         Content
57     </div>
58 </div>
59 </body>
60 </html>
overflow样式
 1 <!DOCTYPE html>
 2 <html lang="en">
 3 <head>
 4     <meta charset="UTF-8">
 5     <title>样式</title>
 6 </head>
 7 <body>
 8 <!--<div style="overflow:auto;height:100px;background-color:green;">-->
 9     <!--“overflow:auto”div块级标签内有个滚动条,“overflow:hidden”超出div区域的将会自动隐藏-->
10 <div style="overflow:hidden;height:100px;background-color:green;">
11     test <br/>
12     test <br/>
13     test <br/>
14     test <br/>
15     test <br/>
16     test <br/>
17     test <br/>
18     test <br/>
19     test <br/>
20     test <br/>
21     test <br/>
22 </div>
23 </body>
24 </html>
position定位
position的四种属性1.static:默认位置
2.fixed:完全脱离文档流,固定定位(以可视窗口为参照物)
3.relative:相对定位(参照的是自己本身的位置),没有脱离文档流,没有顶上去,会保持自己的位置不动。可以使用top,left 进行定位
4.absolute:绝对定位:脱离了文档流(参照的是按已定位的父级标签定位,如果找不到会按body的去找)
注意:将定位标签设置为absolute,将他的父级标签设置为定位标签 (relative)
 1 <!DOCTYPE html>
 2 <html lang="en">
 3 <head>
 4     <meta charset="UTF-8">
 5     <title>position</title>
 6     <style>
 7         .father {
 8             position: relative;
 9         }
10
11         * {
12             margin: 0;
13         }
14
15         .box1, .box2, .box3 {
16             width: 200px;
17             height: 200px;
18         }
19
20         .box1 {
21             background-color: blueviolet;
22             position: relative;
23
24         }
25
26         .box2 {
27             background-color: darksalmon;
28             position: absolute;
29             left: 200px;
30             /*right: 200px;*/
31             top: 200px;
32         }
33
34         .box3 {
35             background-color: lime;
36             /*position: absolute;*/
37             /*position: relative;*/
38         }
39
40         .returntop {
41             width: 100px;
42             height: 40px;
43             background-color: gray;
44             color: white;
45             text-align: center;
46             line-height: 40px;
47             position: fixed;
48             bottom: 50px;
49             right: 20px;
50         }
51     </style>
52 </head>
53 <body>
54 <div class="box1"></div>
55 <div class="father">
56     <div class="box2"></div>
57 </div>
58 <div class="box3"></div>
59 <div class="returntop">返回顶部>></div>
60 </body>
61 </html>
opacity透明度
 1 <!DOCTYPE html>
 2 <html lang="en">
 3 <head>
 4     <meta charset="UTF-8">
 5     <title>透明度</title>
 6 </head>
 7 <body>
 8 <div style="background-color:blue;height:100px;padding-top:30px">
 9     <!--这里设置内部的div的透明度-->
10     <div style="opacity: 0.3;background-color:pink;height:30px;margin-left: 30px;margin-right:30px;">
11     </div>
12 </div>
13 </body>
14 </html>
CSS布局页面实例
 1 <!DOCTYPE html>
 2 <html lang="en">
 3 <head>
 4     <meta charset="UTF-8">
 5     <title>CSS布局</title>
 6     <style>
 7         .pg-hander {
 8             height: 48px;
 9             background-color: cornflowerblue;
10
11         }
12
13         .pg-body .pg-left {
14             /*往左飘*/
15             position: absolute;
16             top: 50px;
17             left: 0px;
18             bottom: 0px;
19             width: 200px;
20             overflow: auto;
21             background-color: #dddddd;
22         }
23
24         .pg-body .pg-right {
25             position: absolute;
26             top: 50px;
27             bottom: 0px;
28             /*这里离左边是200像素,因为上面设置的宽为200px*/
29             left: 200px;
30             right: 0px;
31             overflow: auto;
32             background-color: lightblue;
33         }
34     </style>
35 </head>
36 <body style="margin:0 auto">
37 <!--定义把整个窗体分为2大部分上,下
38
39 <!--上部分-->
40 <div class="pg-hander">
41 </div>
42
43 <!--下部分-->
44 <div class="pg-body">
45     <!--左部分-->
46     <div class="pg-left">
47         <a>菜单选项</a>
48     </div>
49     <!--右部分-->
50     <div class="pg-right">
51         <div style="height:1000px">
52             对应内容
53         </div>
54     </div>
55 </div>
56 </body>
57 </html>
参考:
http://www.cnblogs.com/alex3714
http://www.cnblogs.com/wupeiqi
internet&python books
PS:如侵权,联我删。