
作者 | 阿里云智能事业群技术专家 牛秋霖(冬岛) > **导读**:通过前面的一系列文章你已经知道如何基于 kubectl 来操作 Knative 的各种资源。但是如果想要在项目中集成 Knative 仅仅使用 kubectl 这种命令的方式是不够的,还需要在代码中基于 Knative Serving SDK 进行集成开发。本篇文章中,阿里云智能事业群技术专家冬岛将从 Knative Serving SDK 入手,介绍如何基于 Knative SDK 进行 serverless 开发。 []()
## [](https://yuque.antfin-inc.com/knative/aipafv/ytyzz2#2dc1354b)Golang Context 在正式开始介绍 Knative Serving SDK 之前,我们先简单介绍一下 Golang Context 的机理。因为在 Knative Serving 中 client、Informer 的初始化和信息传递完全是基于 Golang Context 实现的。 Golang 是从 1.7 版本开始引入的 Context ,Golang 的 Context 可以很好的简化多个 goroutine 之间以及请求域间的数据传递、取消信号和截至时间等相关操作。Context 主要有两个作用: 1. 传输必要的数据; 1. 进行协调控制,比如终止 goroutein、设置超时时间等。
### Context 定义 Context 本身是一个接口。 ``` type Context interface { Deadline() (deadline time.Time, ok bool) Done() <-chan struct{} Err() error Value(key interface{}) interface{} } ``` 这个接口中定义了四个方法,下面分别介绍: - Deadline 方法是获取设置的截止时间的意思,到了这个时间点,Context 会自动发起取消请求; - Done 方法返回一个只读的 chan,如果该方法返回的 chan 可以读取,则意味着 parent Context 已经发起了取消请求, 此时应该做清理操作,然后退出 goroutine 并释放资源; - Err 方法返回取消的错误原因; - Value 方法获取该 Context 上绑定的值,是一个键值对。所以要通过一个 Key 才可以获取对应的值,这个值是线程安全的。 关于 Context 主要记住一点:可以通过 Value 传递数据,Value 是一个键值对结构。更多详细的介绍可以参见下面这些文章: - [Concurrency Patterns in Go](https://www.oreilly.com/library/view/concurrency-in-go/9781491941294/ch04.html) - [How to correctly use context.Context in Go 1.7](https://medium.com/@cep21/how-to-correctly-use-context-context-in-go-1-7-8f2c0fafdf39) - [Using context cancellation in Go](https://www.sohamkamani.com/blog/golang/2018-06-17-golang-using-context-cancellation/) - [Go Context](https://ekocaman.com/go-context-c44d681da2e8) []()
## [](https://yuque.antfin-inc.com/knative/aipafv/ytyzz2#65bba541)Knative Serving client 源码浅析 在 Context 的这些特性中,Knative Serving 中重度依赖的是 Value 功能。以 Service 的 Informer 初始化为例进行说明,[这里可以看到源码](https://github.com/knative/serving/blob/v0.8.0/pkg/client/injection/informers/serving/v1alpha1/service/service.go#L31)。 Informer “构造函数”是在 init 函数中自动注册到 injection.Default 中的。当 Informer “构造函数”被调用之后会自动把生成的 Informer 注入到 Context 中 `context.WithValue(ctx, Key{}, inf), inf.Informer()`。 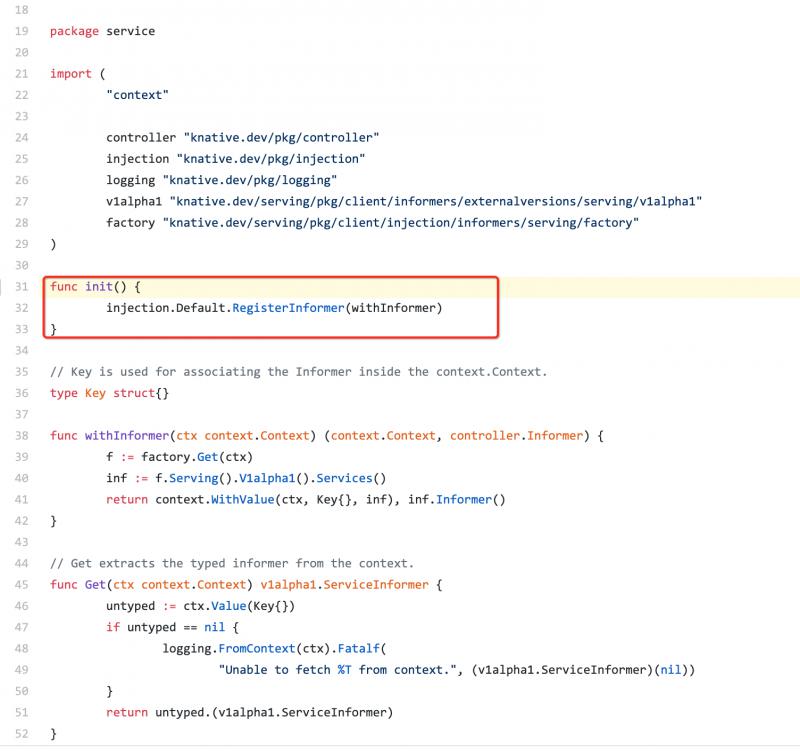 从上图中可以看到:Informer 初始化的时候需要调用 factory,而 factory 本身是从 Context 中获取的。下面我们再看看 factory 是怎么初始化的。[factory 的初始化](https://github.com/knative/serving/blob/v0.8.0/pkg/client/injection/informers/serving/factory/servingfactory.go#L31)。 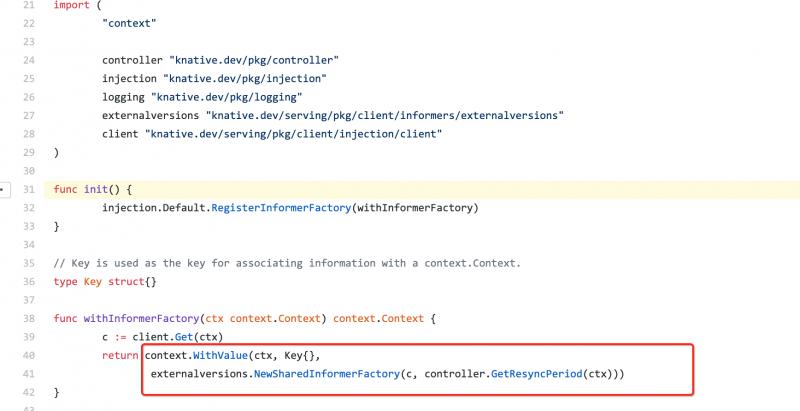 上图可以发现,factory 也是把“构造函数”注册到 injection.Default 中,并会将生成的 SharedInformerFactory 注入到 Context 中。而且 factory 中使用的 client (链接 kube-apiserver 使用的对象)也是从 Context 获取到的。 可以说 Knative Serving SDK 初始化的过程是面向 Context 编程的。关键对象是自动注入到 Context,在使用的时候从 Context 中取出。 顺带提一点,Knative Serving 的日志对象也是在 Context 保存的,当需要打印日志的时候先通过 `logger := logging.FromContext(ctx)` 从 Context 中拿到 logger,然后就可以使用了。这样做的好处是可以通过管理 logger 对象,比如做 trace 功能。 如下所示是基于 logger 打印出来的日志,可以看到对于同一个请求的处理是可以通过 traceID 进行追踪的。下面这段日志都是对 `577f8de5-cec9-4c17-84f7-f08d39f40127` 这个 trace 的处理。 ``` {"level":"info","ts":"2019-08-28T20:24:39.871+0800","caller":"controller/service.go:67","msg":"Reconcile: default/helloworld-go","knative.dev/traceid":"be5ec711-6ca3-493c-80ed-dddfa21fd576","knative.dev/key":"default/helloworld-go"} {"level":"info","ts":"2019-08-28T20:24:39.871+0800","caller":"controller/controller.go:339","msg":"Reconcile succeeded. Time taken: 487.347µs.","knative.dev/traceid":"90653eda-644b-4b1e-8bdb-4a1a7a7ff0d8","knative.dev/key":"eci-test/helloworld-go"} {"level":"info","ts":"2019-08-28T20:24:39.871+0800","caller":"controller/service.go:106","msg":"service: default/helloworld-go route: default/helloworld-go ","knative.dev/traceid":"be5ec711-6ca3-493c-80ed-dddfa21fd576","knative.dev/key":"default/helloworld-go"} {"level":"info","ts":"2019-08-28T20:24:39.872+0800","caller":"controller/service.go:67","msg":"Reconcile: eci-test/helloworld-go","knative.dev/traceid":"22f6c77d-8365-4773-bd78-e011ccb2fa3d","knative.dev/key":"eci-test/helloworld-go"} {"level":"info","ts":"2019-08-28T20:24:39.872+0800","caller":"controller/service.go:116","msg":"service: default/helloworld-go revisions: 1 ","knative.dev/traceid":"be5ec711-6ca3-493c-80ed-dddfa21fd576","knative.dev/key":"default/helloworld-go"} {"level":"info","ts":"2019-08-28T20:24:39.872+0800","caller":"controller/service.go:118","msg":"service: default/helloworld-go revision: default/helloworld-go-cgt65 ","knative.dev/traceid":"be5ec711-6ca3-493c-80ed-dddfa21fd576","knative.dev/key":"default/helloworld-go"} {"level":"info","ts":"2019-08-28T20:24:39.872+0800","caller":"controller/controller.go:339","msg":"Reconcile succeeded. Time taken: 416.527µs.","knative.dev/traceid":"be5ec711-6ca3-493c-80ed-dddfa21fd576","knative.dev/key":"default/helloworld-go"} {"level":"info","ts":"2019-08-28T20:24:39.872+0800","caller":"controller/service.go:106","msg ``` []()
## [](https://yuque.antfin-inc.com/knative/aipafv/ytyzz2#72f57261)使用 Knative Serving SDK 介绍完 Knative Serving client 的初始化过程,下面我们看一下应该如何在代码中用 Knative Serving SDK 进行编码。 示例参见:[https://github.com/knative-sample/serving-controller/blob/v0.1/cmd/app/app.go](https://github.com/knative-sample/serving-controller/blob/v0.1/cmd/app/app.go) 这个示例中首先使用配置初始化 `*zap.SugaredLogger` 对象,然后基于 `ctx := signals.NewContext()` 生成一个 Context。`signals.NewContext()` 作用是监听 SIGINT 信号,也就是处理 CTRL+c 指令。这里用到了 Context 接口的 Done 函数机制。
### 构造 Informer 接着使用 `ctx, informers := injection.Default.SetupInformers(ctx, cfg)` 构造出所有的 informer,然后调用下面这段代码执行注入,把 informer 注入到 Context 中。 ``` // Start all of the informers and wait for them to sync. logger.Info("Starting informers.") if err := controller.StartInformers(ctx.Done(), informers...); err != nil { logger.Fatalw("Failed to start informers", err) } ``` 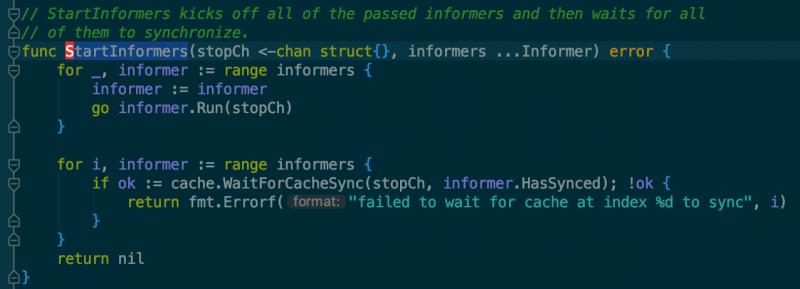
### 从 Context 中获取 Informer 实例代码: [https://github.com/knative-sample/serving-controller/blob/v0.1/pkg/controller/controller.go](https://github.com/knative-sample/serving-controller/blob/v0.1/pkg/controller/controller.go) 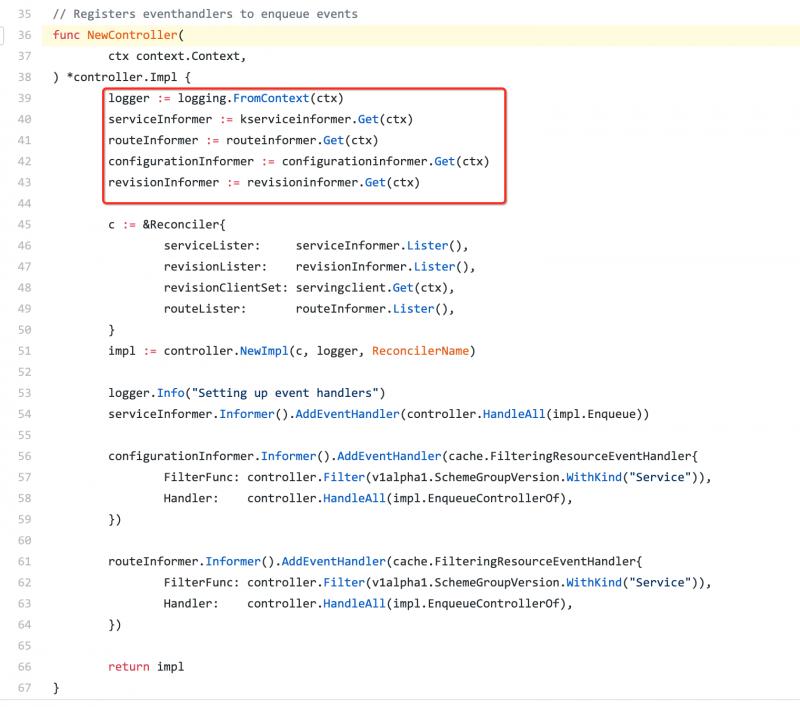 如上所示,所有的 informer 都是从 Context 中获取的。 最后 Controller 初始化一个 Reconciler 接口,接口的定义如下, 里面只有一个 Reconcile 函数。这个使用方式和 `sigs.k8s.io/controller-runtime` 使用的逻辑是一样的。如果你之前写过 Operator 之类的功能,对这个操作应该不会陌生。 ``` // Reconciler is the interface that controller implementations are expected // to implement, so that the shared controller.Impl can drive work through it. type Reconciler interface { Reconcile(ctx context.Context, key string) error } ```
### 在 Reconcile 中调用 Knative API 代码示例: [https://github.com/knative-sample/serving-controller/blob/v0.1/pkg/controller/service.go](https://github.com/knative-sample/serving-controller/blob/v0.1/pkg/controller/service.go) 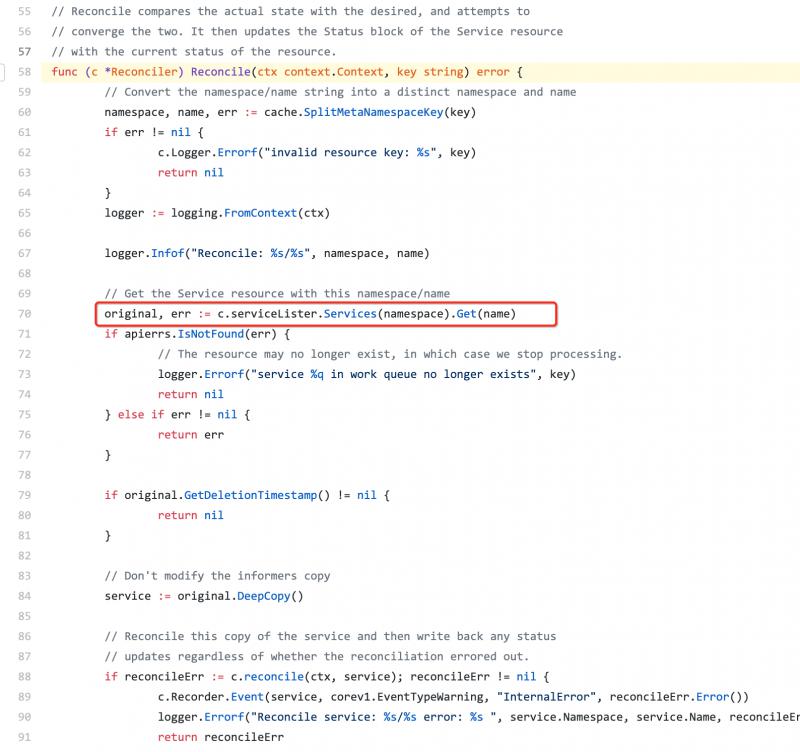 现在就可以在 Reconcile 中通过 `c.serviceLister.Services(namespace).Get(name)` 这种方式直接操作 Seving 资源了。 至此,我们已经把基于 Knative Seving 开发 Serverless 应用的关键脉梳理了一遍。更详细的代码示例请参见:[https://github.com/knative-sample/serving-controller](https://github.com/knative-sample/serving-controller) ,这里面有完整可以运行的代码。
[]()
## [](https://yuque.antfin-inc.com/knative/aipafv/ytyzz2#5db9fd7c)小结 本文从 Knative Serving client 的初始化过程开始展开,介绍了 Knative informer 的设计以及使用方法。通过本文你可以了解到: - Knative Serving client 的设计思路 - 如何基于 Knative Serving SDK 进行二次开发 - 通过 Knative Serving 学习到如何面向 Context 编程 - Knative Serving 集成开发示例: [https://github.com/knative-sample/serving-controller](https://github.com/knative-sample/serving-controller)
## 欢迎加入 Knative 交流群 
##
## 扫描下方二维码添加小助手,拉你进群! 
Knative Serving 进阶: Knative Serving SDK 开发实践
猜你喜欢
转载自www.cnblogs.com/alisystemsoftware/p/11434441.html
今日推荐
周排行