序言
笔者前段时间在使用自研框架NF( 传送门 )开发一个自动模板生成工具之后,想将他发布到Linux下,之前一直使用IDE直接run as运行,在遇到发布的时候考虑过发布为war或者jar,在一番抉择之后最终选择了jar(原因是NF自带服务容器,而war为tomcat而生,所以jar更适合NF),所以特意研究了一番如何将普通项目打包成jar发布。
不出意外,最终我成功了,在兴奋之余,希望能够将自己实现的过程及遇到的坑记录下来,让看到有此需求的同学们少走一些弯路!
一、何为Jar
JAR 文件格式以流行的 ZIP 文件格式为基础。与 ZIP 文件不同的是,JAR 文件不仅用于压缩和发布,而且还用于部署和封装库、组件和插件程序,并可被像编译器和 JVM 这样的工具直接使用。在 JAR 中包含特殊的文件,如 manifests 和部署描述符,用来指示工具如何处理特定的 JAR。
更多详情通过 传送门 查阅。
二、发布服务的几种方案
在web开发完成之后,我们往往想要发布服务到外网服务器中,而外网服务器大多是都是Linux系统,这时我们不能已常规方式直接在IDE中运行,需要特定几种形式去发布。
我们最初最常用的方式就是打包成.war 的格式发布到Tomcat的服务容器中,这之后Tomcat会帮助我们解压war包,并加载classes 文件夹下的.class 到内存中,加载完毕之后,我们的服务就可以在服务器中正常运行,但是.war 通常只适合配合Tomcat容器,对于其他服务容器,尤其是自研服务容器来讲,适用性非常差,而Spring Boot 率先打破了常规。
Spring Boot采用jar的方式发布,也就是说,我们可以使用Spring Boot提供的maven插件,通过mvn package 指令将服务打包成jar的形式发布,这就意味着服务中涉及的所有资源(class文件、依赖jar包、静态资源文件)都将会打包在一个jar包之内,在启动这个层次来讲就异常的简单了,只需要通过java -jar xxxx.jar 的方式就可以正常启动服务,这对于我们在自己的服务器中去启动服务来说非常的方便,而Spring Boot是怎么做到这一点的呢?
我们来看一下Spring Boot的pom.xml 依赖插件 spring-boot-maven-plugin ,全配置如下
<plugin>
    <groupId>org.springframework.boot</groupId>
    <artifactId>spring-boot-maven-plugin</artifactId>
    <configuration>
        <mainClass>${start-class}</mainClass>
    </configuration>
</plugin>我们通过之前对Jar包的了解已经得知,一个可执行jar的必要因素就是需要一个主函数入口,在上述配置中,我们可以看到很明确的主函数配置<mainClass>${start-class}</mainClass>, 而占位符${start-class} 的值就是我们平常开发中用来启动Spring Boot的主函数入口所在类,继续深入spring-boot-maven-plugin 中,我们会看到这个插件内部依赖了更多maven自带的原生插件
- maven-failsafe-plugin
- maven-jar-plugin
- maven-surefire-plugin
- maven-war-plugin
- maven-resources-plugin
- maven-shade-plugin
另外少部分插件如下
- exec-maven-plugin
- git-commit-id-plugin
- spring-boot-maven-plugin 自依赖,为了支持自己的插件
从以上插件列表分析,spring-boot-maven-plugin 中包含了很多maven原生插件,支持jar 和 war 的格式发布,我们只站在打包可执行jar的角度来分析以上插件的作用,可以这样理解
-
maven-jar-plugin
设定
manifest中的Main-Class参数 -
maven-shade-plugin
用于把多个jar包,打成1个jar包
-
maven-resources-plugin
处理将项目资源(
src/main/和src/test)复制到输出目录的操作 -
maven-surefire-plugin 和 maven-failsafe-plugin
执行测试用例
依赖插件的同时,spring-boot-maven-plugin 中还使用<resources> 标签来重新定义jar包内部结构。
以上信息是否满足将我们的服务打包成可执行jar呢?我们分析一下,如果达到我们想要的效果,我们需要
- 自动配置主函数入口
- 静态资源打包
- 依赖打包
对比上述插件,我们需要的功能都有,那么我们是否可以使用上方的插件及标签自己写个打包插件试试呢? 当然!这里就不带着大家亲自尝试了,因为下面我要讲另一种Spring Boot没有用到的maven插件进行打包!
三、maven-assembly-plugin 插件打包Jar
maven-assembly-plugin 是一个超灵活maven项目打包工具,提供默认配置和自定义配置,同时提供Main-Class 的配置、静态文件Copy及依赖打包的功能,这里是官方对于这款插件的介绍
The Assembly Plugin for Maven is primarily intended to allow users to aggregate the project output along with its dependencies, modules, site documentation, and other files into a single distributable archive.
Your project can build distribution “assemblies” easily, using one of the convenient, prefabricated assembly descriptors. These descriptors handle many common operations, such as packaging a project’s artifact along with generated documentation into a single zip archive. Alternatively, your project can provide its own descriptor and assume a much higher level of control over how dependencies, modules, file-sets, and individual files are packaged in the assembly.
大概意思就是
Maven的组装插件主要是允许用户将项目输出与它的依赖项、模块、站点文档和其他文件一起集成到一个可分发的归档文件中。您的项目可以使用一种方便的预制组装描述符轻松地构建分布“程序集”。这些描述符处理许多常见的操作,例如将项目的工件连同生成的文档打包到一个zip归档文件中。或者,您的项目可以提供自己的描述符,并对依赖项、模块、文件集和各个文件如何在程序集中打包具有更高的控制级别。
通俗一点,你可以自定义你的项目打包格式,maven-assembly-plugin 更像是多个打包插件的集成,并提供多种打包的文件格式,使用方面也很方便,最简单的一个使用如下
<plugin>
       <artifactId> maven-assembly-plugin </artifactId>
       <configuration>
            <descriptorRefs>
                 <descriptorRef>jar-with-dependencies</descriptorRef>
            </descriptorRefs>
            <archive>
                 <manifest>
                      <mainClass>${main-class}</mainClass>
                 </manifest>
            </archive>
       </configuration>
       <executions>
            <execution>
                 <id>make-assembly</id>
                 <phase>package</phase>
                 <goals>
                      <goal>single</goal>
                 </goals>
            </execution>
       </executions>
</plugin>descriptorRefs标签内部可以配置使用官方定制好的打包方式,其中如下可选配置
- bin
- jar-with-dependencies
- src
- project
不过官方定制好的有很大的局限性,我们可以将上述改成如下配置,来自定义打包方式
<plugin>
    <artifactId>maven-assembly-plugin</artifactId>
    <configuration>
        <archive>
            <manifest>
                <mainClass>${main-class}</mainClass>
            </manifest>
        </archive>
        <descriptors>
            <descriptor>src/main/resource/assembly-fat.xml</descriptor>
        </descriptors>
    </configuration>
    <executions>
         <execution>
               <id>make-assembly</id>
               <phase>package</phase>
               <goals>
                    <goal>single</goal>
               </goals>
          </execution>
     </executions>
</plugin>可以看出,上述配置去掉了<descriptorRefs>标签,增加了<descriptors>配置,并且子标签中还指向了src/main/resource/assembly-fat.xml 这个配置文件,如果你的思路跟着这篇文章走,一定可以猜得到,这个配置文件就是我们自定义打包方式的入口!它的格式如下
<assembly xmlns="http://maven.apache.org/ASSEMBLY/2.0.0"
    xmlns:xsi="http://www.w3.org/2001/XMLSchema-instance"
    xsi:schemaLocation="http://maven.apache.org/ASSEMBLY/2.0.0 http://maven.apache.org/xsd/assembly-2.0.0.xsd">
  <id>distribution</id>

  <formats>
    <format>jar</format>
  </formats>

  <dependencySets>
        <dependencySet>
            <outputDirectory>/</outputDirectory>
            <useProjectArtifact>true</useProjectArtifact>
            <unpack>true</unpack>
            <scope>runtime</scope>
        </dependencySet>
    </dependencySets>

  <includeBaseDirectory>false</includeBaseDirectory>

  <fileSets>
    <fileSet>
      <directory>${basedir}</directory>
      <includes>
        <include>*.txt</include>
      </includes>
      <excludes>
        <exclude>README.txt</exclude>
        <exclude>NOTICE.txt</exclude>
      </excludes>
    </fileSet>
  </fileSets>

  <files>
    <file>
      <source>README.txt</source>
      <outputDirectory>/</outputDirectory>
      <filtered>true</filtered>
    </file>
    <file>
      <source>NOTICE.txt</source>
      <outputDirectory>/</outputDirectory>
      <filtered>true</filtered>
    </file>
  </files>
</assembly>
下面是标签的相关介绍
<id>生成文件的后缀,如果有,文件名将会是${artifactId}-${id}.jar<formats>生成文件的格式,可以同时生成多个格式的目标文件dependencySets依赖jar的打包方式includeBaseDirectory是否将项目目录引入进来,如果是True的话,生成的目标文件打开之后将会是项目主目录,我们打包的资源将会被放于这个主目录中(推荐Fasle,因为Main-Class路径通常直接是类路径)<fileSets>引入静态资源的配置(目录级)files引入静态资源的配置(文件级)
以上是最常用的几种标签,更多的配置大家可以查阅官网 传送门
配置完成之后可以通过mvn assembly:assembly或者mvn package指令打包。
介绍完毕,下面会拉取笔者自己用NF框架开发的模板工具来为大家演示一下maven-assembly-plugin在实战中的使用!
四、Jar方式发布服务实战
首先是项目结构
Project
│  LICENSE
│  pom.xml                              =》pom文件
│  README.md
├─src
│  └─main
│      ├─java                           =》源码目录
│      └─resource                       =》配置文件目录
└─web =》UI静态资源从结构中可以看出,我们需要手动配置的打包资源是src/main/resource和web这两个目录,所以我们需要所有配置,将上述两个目录随着我们的.class文件一起打包进jar中,首先在原pom.xml保持不变的基础上插入maven-assembly-plugin 插件
<plugin>
    <artifactId>maven-assembly-plugin</artifactId>
    <configuration>
        <source>1.8</source>
        <target>1.8</target>
        <archive>
            <manifest>
                <mainClass>org.nico.ct.CtApplication</mainClass>
            </manifest>
        </archive>
        <descriptors>
            <descriptor>src/main/resource/assembly-fat.xml</descriptor>
        </descriptors>
    </configuration>
    <executions>
        <execution>
             <id>make-assembly</id>
             <phase>package</phase>
             <goals>
                  <goal>single</goal>
             </goals>
        </execution>
   </executions>
</plugin>接下来编辑src/main/resource/assembly-fat.xml文件配置打包
<assembly
    xmlns="http://maven.apache.org/plugins/maven-assembly-plugin/assembly/1.1.3"
    xmlns:xsi="http://www.w3.org/2001/XMLSchema-instance"
    xsi:schemaLocation="http://maven.apache.org/plugins/maven-assembly-plugin/assembly/1.1.3 http://maven.apache.org/xsd/assembly-1.1.3.xsd">
    <id>RELEASE</id>

    <formats>
        <format>jar</format>
    </formats>

    <dependencySets>
        <dependencySet>
            <outputDirectory>/</outputDirectory>
            <useProjectArtifact>true</useProjectArtifact>
            <unpack>true</unpack>
            <scope>runtime</scope>
        </dependencySet>
    </dependencySets>

    <includeBaseDirectory>false</includeBaseDirectory>

    <fileSets>
        <fileSet>
            <directory>src/main/resource</directory>
            <outputDirectory>/</outputDirectory>
            <includes>
                <include>/**</include>
            </includes>
        </fileSet>
        <fileSet>
            <directory>web</directory>
            <outputDirectory>/web</outputDirectory>
            <includes>
                <include>/**</include>
            </includes>
        </fileSet>
    </fileSets>


    <files>
        <file>
            <source>README.md</source>
            <outputDirectory>/</outputDirectory>
        </file>
    </files>

</assembly>然后运行mvn assembly:assembly,等待maven构建成功
...
[INFO] META-INF/ already added, skipping
[INFO] META-INF/MANIFEST.MF already added, skipping
[INFO] org/ already added, skipping
[INFO] org/nico/ already added, skipping
[INFO] META-INF/maven/ already added, skipping
[INFO] ------------------------------------------------------------------------
[INFO] BUILD SUCCESS
[INFO] ------------------------------------------------------------------------
[INFO] Total time: 7.627 s
[INFO] Finished at: 2018-06-30T15:39:47+08:00
[INFO] Final Memory: 24M/269M
[INFO] ------------------------------------------------------------------------看到BUILD SUCCESS之后,你会发现项目target目录中会有两个jar
- CoffeeTime-0.0.1-SNAPSHOT.jar
- CoffeeTime-0.0.1-SNAPSHOT-RELEASE.jar
文件名请忽略,后缀带RELEASE的jar就是maven-assembly-plugin插件生成的jar,解压看下目录
│  assembly-fat.xml
│  cat-mysql-nico.xml
│  cat-mysql.xml
│  cat-redis-nico.xml
│  cat-redis.xml
│  cat.xml
│  logno.properties
│  module-info.class
│  README.md
├─com
│  ├─mchange
│  │
│  └─mysql
├─images
├─META-INF
│  ├─maven
│  │
│  └─services
├─net
│  └─sf
├─org
│  ├─apache
│  │
│  ├─gjt
│  │
│  ├─nico
│  ├─objectweb
│  └─slf4j
│
├─redis
│  └─clients
│
└─web
    ├─images
    ├─page
    ├─plugins
    ├─script
    ├─style
    ├─video
└─videojs路径没问题,我们试下能不能运行,切到jar包所在的目录,执行jar -jar CoffeeTime-0.0.1-SNAPSHOT-RELEASE.jar运行之 ![]()
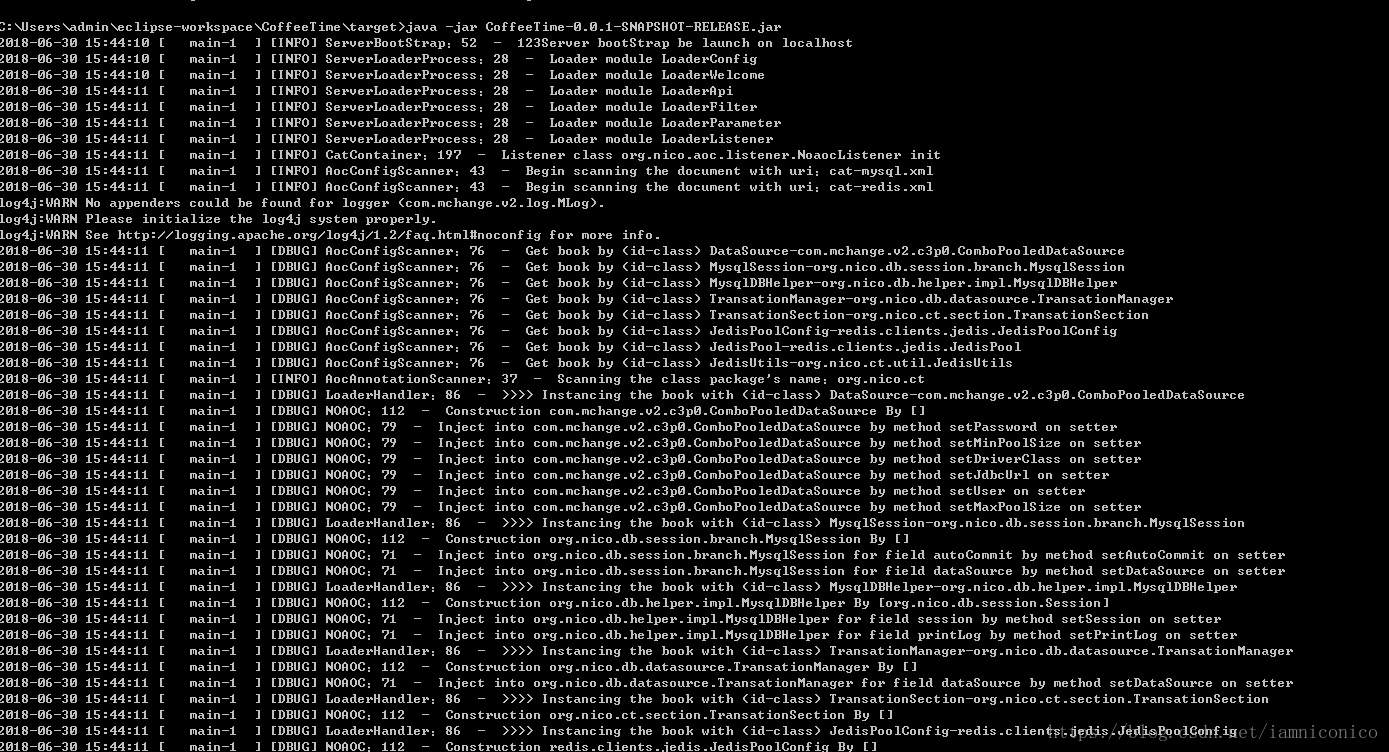
SUCCESS !