一、前言
上一篇我们搭建了一个简单的Spring项目,并简单的使用了 组件注册。这一篇中,我们来详细的讲解组件注入。
二、组件注入
1. @ComponentScan
在上一篇中,我们使用了@Configuration和@Bean实现了组件注入。但是如果需要注入的组件很多的情况下,每个组件都需要通过一个@Bean注解进行注入,这样就会很麻烦。所以Spring提供了@ComponentScan注解。
@ComponentScan可以指定需要扫描的包,在这些包下,@Component注解标注的组件都会注入到Spring容器中。
注意,@Controller、@Service、@Repository这些注解包含@Component注解的功能。
@Controller
public class PersonController {
}
@Service
public class PersonService {
}
@Repository
public class PersonDao {
}
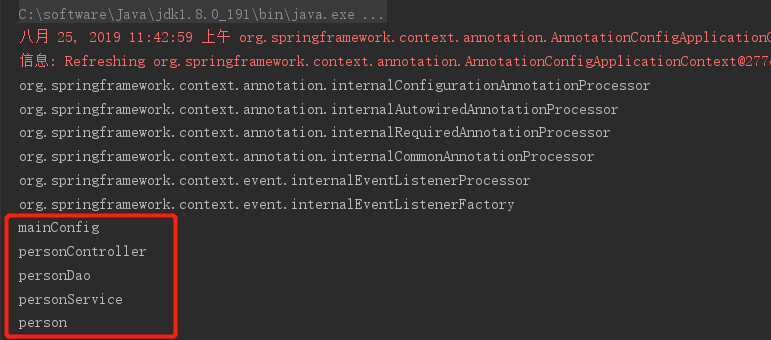
@ComponentScan(basePackages = "indi.zqc")
@Configuration
public class MainConfig {

    @Bean(name = "person")
    public Person person() {
        return new Person("张三", 13);
    }

}
public class MainConfigTest {

    @Test
    public void test() {
        ApplicationContext applicationContext = new AnnotationConfigApplicationContext(MainConfig.class);
        // 获取容器中的所有Bean描述
        String[] beanDefinitionNames = applicationContext.getBeanDefinitionNames();
        for (String name : beanDefinitionNames) {
            System.out.println(name);
        }
    }
}
2. 自定义TypeFilter
在使用@ComponentScan注解时,会将扫描包下所有@Component标注的组件都注入到Spring容器中。但有时候我们不需要注入某个或某些组件,可能你会想把@Component注解去掉就好了。但有这么个场景,如果你想注入的包是第三方的包,这时你就不能修改第三方包中的代码。@ComponentScan注解有一个excludeFilters属性可以排除组件。如下图中,将PersonController排除在外。
@ComponentScan(basePackages = "indi.zqc",
        excludeFilters = {
                @ComponentScan.Filter(type = FilterType.ASSIGNABLE_TYPE, classes = PersonController.class)
        })
@Configuration
public class MainConfig {

    @Bean(name = "person")
    public Person person() {
        return new Person("张三", 13);
    }

}

@ComponentScan.Filter的类型有多种
- FilterType.ANNOTATION 通过注解匹配,配合参数classes指定注解类型
- FilterType.ASSIGNABLE_TYPE 通过类匹配,配合参数classes指定类类型
- FilterType.ASPECTJ 通过AspectJ类型的表达式匹配,配合参数pattern指定表达式
- FilterType.REGEX 通过正则表达式匹配类名,配合参数pattern指定表达式
- FilterType.CUSTOM 通过自定义,配合参数classes指定类,自定义类需要实现接口org.springframework.core.type.filter.TypeFilter
可以通过属性excludeFilters将指定的组件排除在外,当然也可以通过includeFilters导入指定的组件。
注意我们先通过userDefaultFilters=false关闭了@CompenentScan默认的功能。然后通过属性includeFilters导入了指定的组件。
@ComponentScan(basePackages = "indi.zqc",
        includeFilters = {
                @ComponentScan.Filter(type = FilterType.ASSIGNABLE_TYPE, classes = PersonController.class)
        },
        useDefaultFilters = false)
@Configuration
public class MainConfig {

    @Bean(name = "person")
    public Person person() {
        return new Person("张三", 13);
    }

}
