一、概述
对于接口的测试,可以使用客户端版本的postman,也可以直接在chrome浏览器上安装postman插件。客户端版本的postman
功能比较强大,但是对于需要登录后才能测试的接口,在测试时需要单独设置如sessionid这样的验证参数;对于插件版的postman,
在测试时只需要访问网址后,就可以直接设置请求参数,不需要在设置sessionid这样的参数。
1. 请求体数据类型:
(1)form-data(post)
既可以上传键值对,也可以上传文件(multipart/form-data)。当上传的字段是文件时,会有Content-Type来说明文件类型;
content-disposition用来说明字段的一些信息;在springmvc中可以使用MultipartHttpServletRequest接收通过api根据"name"
获取不同的键值,也可以通过MulTipartFile数组接收多个文件;
(2)x-www-form-urlencoded(post)
会将表单内的数据转换为键值对,比如,name=java&age = 23。后端采用@RequestParam来接收参数。@RequestParam用来
处理Content-Type: 为 application/x-www-form-urlencoded编码的内容,提交方式GET、POST, @RequestParam可以处理get 方式
中queryString的值,也可以处理post方式中 body data的值,@RequestParam 底层是通过request.getParameter方式获得参数的。
前端请求传Json对象则后端使用@RequestParam(后端不加则为默认此方式)。
(3)raw(post)
可以上传任意格式的文本,可以上传text、json、xml、html等;@RequestBody接受的是一个json对象的字符串,而不是Json对象,
在请求时往往都是Json对象,用JSON.stringify(data)的方式就能将对象变成json字符串。前端请求传Json对象的字符串则后端使用@RequestBody。
(4)binary(post)
只可以上传二进制数据,通常用来上传文件,由于没有键值,所以,一次只能上传一个文件(相当于Content-Type:application/octet-stream);
2. 注解@RequestParam与@RequestBody的区别
(1)@RequestParam
注解@RequestParam接收的参数是来自requestHeader中,即请求头。通常用于GET请求,像POST、DELETE等其它类型的请求也可以使用。
使用示例:
请求url:
http://xxx:8080/getByNameAndType?name=王菲&type=1

@RequestParam有三个配置参数:
required 表示是否必须,默认为 true,必须;
defaultValue 可设置请求参数的默认值;
value 为接收url的参数名(相当于key值);

@RequestMapper(value="getByNameAndType", method=RequestMethod.GET)
public List<User> getByNameAndType(@RequestParam(value="name", required=true, defaultValue="刘亦菲")String name,
@RequestParam(value="type", required=true, defaultValue="1")String type){......}

@RequestParam用来处理 Content-Type 为 application/x-www-form-urlencoded 编码的内容,Content-Type默认为该属性。
@RequestParam也可用于其它类型的请求,例如:POST、DELETE等请求。比如向表中插入单条数据,Controller 层的写法如下图所示:

@RequestMapper(value="save", method=RequestMethod.POST)
public void save(User user){......}
(2)@RequestBody
注解@RequestBody接收的参数是来自requestBody中,即请求体。一般用于处理非Content-Type: application/x-www-form-urlencoded
编码格式的数据,比如:application/json、application/xml等类型的数据。通常用于接收POST、DELETE等类型的请求数据,GET类型也可以适用。
就application/json类型的数据而言,使用注解@RequestBody可以将body里面所有的json数据传到后端,后端再进行解析。
@RequestMapper(value="save", method=RequestMethod.POST)
public void save(@RequestBody User user){......}
由于@RequestBody可用来处理 Content-Type 为 application/json 编码的内容,所以在postman中,选择body的类型为
row -> JSON(application/json),这样在 Headers 中也会自动变为 Content-Type : application/json 编码格式。
body 里面的 json 语句的 key 值要与后端实体类的属性一一对应。
注意:前端使用$.ajax的话,一定要指定 contentType: "application/json;charset=utf-8;",默认为 application/x-www-form-urlencoded。
二、使用方法
我这里使用的是chrome插件的形式:
1. get
后端代码:
@GetMapping("get")
public ResponseVO get(Integer id){
    return ResponseVO.success(roleService.getById(id));
}

2. post
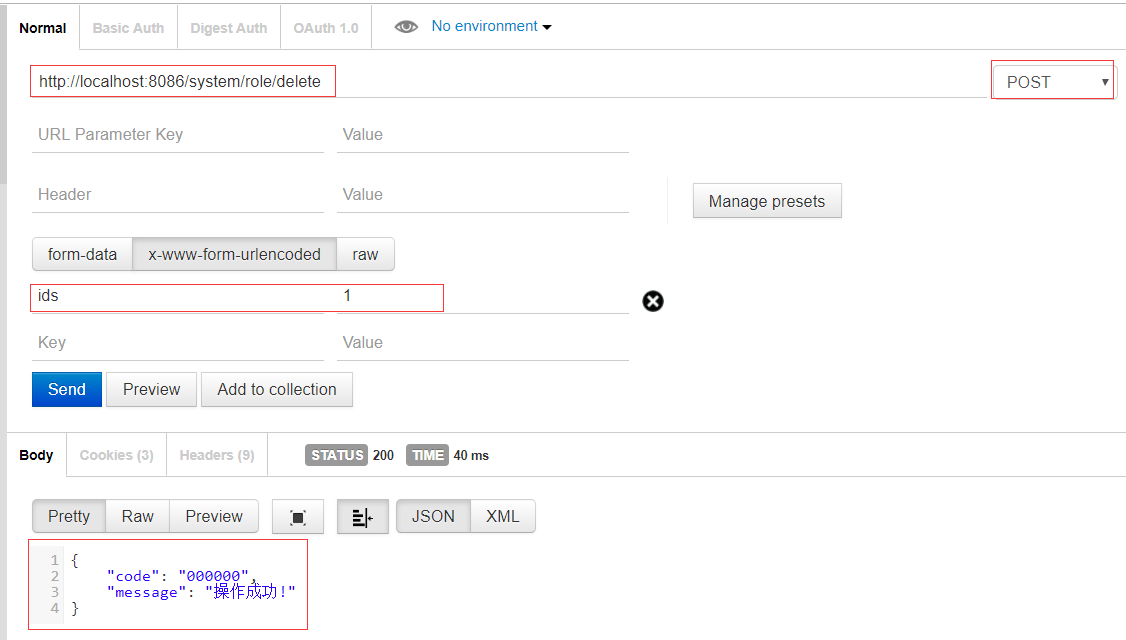
(1)@RequestParam:前端需要传json对象
当后端采用数组接收时,前端测试时可以分别设置多对key-value,eg:
ids:1 ids:2 ids:3
@PostMapping("delete")
public ResponseVO delete(@RequestParam("ids") Integer[] ids){
    roleService.delete(ids);
    return ResponseVO.success();
}
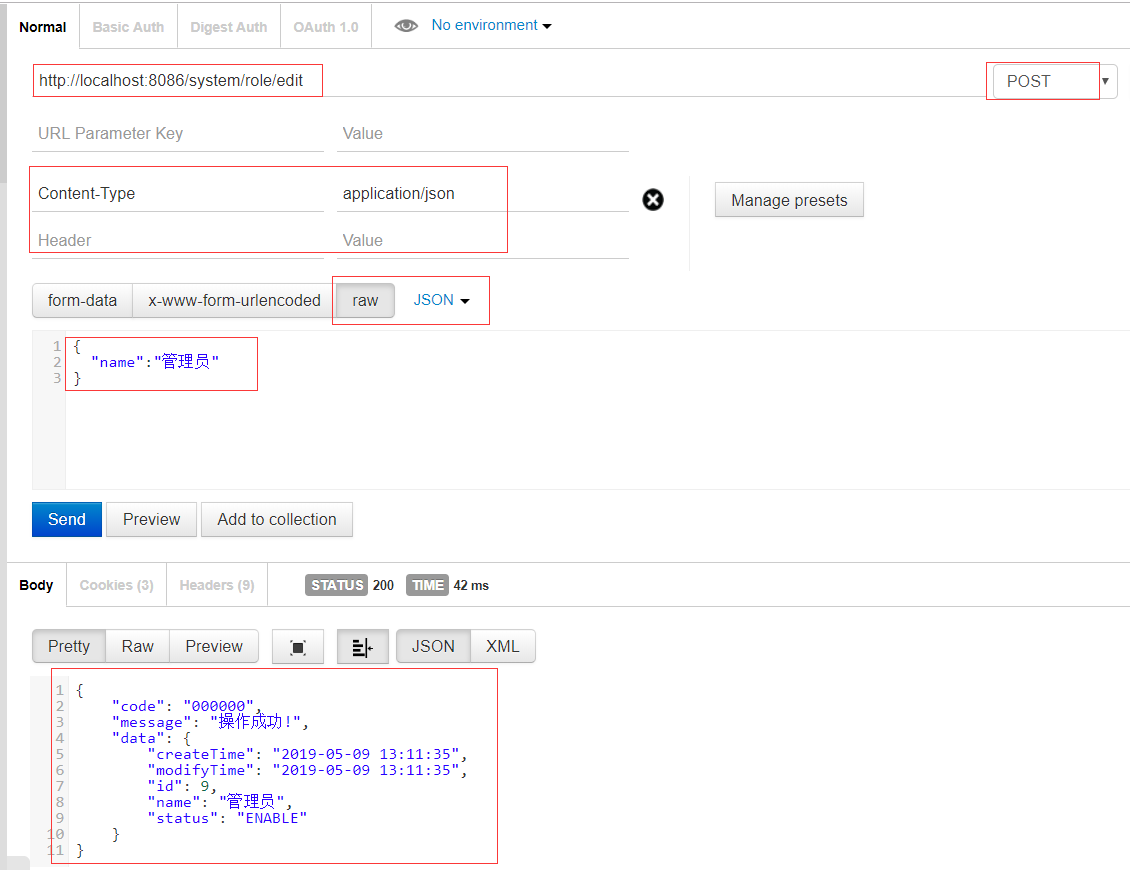
(2)@RequestBody:后端接收的json字符串
@PostMapping("edit")
public ResponseVO edit(@RequestBody RolePo rolePo){
    return ResponseVO.success(roleService.save(rolePo));
}
参考文档: