一. 房间服务器搭建
1.1 安装依赖程序
apt-get install git unzip lrzsz nodejs npm automake autoconf libtool nodejs-legacy python-webtest golang –y1.2 安装jdk8
1.2.1 下载jdk8
从http://www.oracle.com/technetwork/java/javase/downloads/jdk8-downloads-2133151.html下载对应的版本到/usr/lib/jvm目录,然后解压到当前目录:
tar zxf jdk-8u151-linux-x64.tar.gz1.2.2 设置环境变量
编辑/etc/source文件,在文件尾添加如下内容(因为jdk版本不同,文件夹名称可能会有差别):
export JAVA_HOME=/usr/lib/jvm/jdk1.8.0_151
export PATH=$JAVA_HOME/bin:$PATH
export CLASSPATH=.:$JAVA_HOME/lib/dt.jar:$JAVA_HOME/lib/tools.jar执行source /etc/profile命令让设置生效。
1.3 apprtc获取和安装
1.3.1 获取apprtc源码
cd ~
git clone https://github.com/webrtc/apprtc.git
1.3.2 安装apprtc
cd apprtc
npm -g install grunt-cli
npm install
grunt build --force
1.3.3 修改源码
使用ifconfig命令查看本机IP信息:

我使用的阿里云的云服器,服务器在NAT之后,所以172.18.163.203是内网IP,从云服务器的管理页可以看到外网IP,如120.79.164.111。如果使用的是阿里云等服务器还需要在安全策略中设置将所有进/出端口都映射到172.18.163.203。
下面以外网IP 120.79.164.111为例,根据实际外网IP进行对应修改。
● 修改apprtc/out/app_engine/constants.py
设置ICE服务器的IP端口、信令服务器(collider)的IP端口,修改之后的constants.py文件完整内容如下:
# Copyright 2015 Google Inc. All Rights Reserved.

"""AppRTC Constants.

This module contains the constants used in AppRTC Python modules.
"""
import os

# Deprecated domains which we should to redirect to REDIRECT_URL.
REDIRECT_DOMAINS =  [
  'apprtc.appspot.com', 'apprtc.webrtc.org', 'www.appr.tc'
]
# URL which we should redirect to if matching in REDIRECT_DOMAINS.
REDIRECT_URL = 'https://appr.tc'

ROOM_MEMCACHE_EXPIRATION_SEC = 60 * 60 * 24
MEMCACHE_RETRY_LIMIT = 100

LOOPBACK_CLIENT_ID = 'LOOPBACK_CLIENT_ID'

# Turn/Stun server override. This allows AppRTC to connect to turn servers
# directly rather than retrieving them from an ICE server provider.
ICE_SERVER_OVERRIDE = None
# Enable by uncomment below and comment out above, then specify turn and stun
# ICE_SERVER_OVERRIDE  = [
#   {
#     "urls": [
#       "turn:hostname/IpToTurnServer:19305?transport=udp",
#       "turn:hostname/IpToTurnServer:19305?transport=tcp"
#     ],
#     "username": "TurnServerUsername",
#     "credential": "TurnServerCredentials"
#   },
#   {
#     "urls": [
#       "stun:hostname/IpToStunServer:19302"
#     ]
#   }
# ]

ICE_SERVER_BASE_URL = 'http://120.79.164.111:3033'
ICE_SERVER_URL_TEMPLATE = '%s/v1alpha/iceconfig?key=%s'
ICE_SERVER_API_KEY = os.environ.get('ICE_SERVER_API_KEY')

# Dictionary keys in the collider instance info constant.
WSS_INSTANCE_HOST_KEY = 'host_port_pair'
WSS_INSTANCE_NAME_KEY = 'vm_name'
WSS_INSTANCE_ZONE_KEY = 'zone'
WSS_INSTANCES = [{
    WSS_INSTANCE_HOST_KEY: '120.79.164.111:8089',
    WSS_INSTANCE_NAME_KEY: 'wsserver-std',
    WSS_INSTANCE_ZONE_KEY: 'us-central1-a'
}, {
    WSS_INSTANCE_HOST_KEY: '120.79.164.111:8089',
    WSS_INSTANCE_NAME_KEY: 'wsserver-std-2',
    WSS_INSTANCE_ZONE_KEY: 'us-central1-f'
}]

WSS_HOST_PORT_PAIRS = [ins[WSS_INSTANCE_HOST_KEY] for ins in WSS_INSTANCES]

# memcache key for the active collider host.
WSS_HOST_ACTIVE_HOST_KEY = 'wss_host_active_host'

# Dictionary keys in the collider probing result.
WSS_HOST_IS_UP_KEY = 'is_up'
WSS_HOST_STATUS_CODE_KEY = 'status_code'
WSS_HOST_ERROR_MESSAGE_KEY = 'error_message'

RESPONSE_ERROR = 'ERROR'
RESPONSE_ROOM_FULL = 'FULL'
RESPONSE_UNKNOWN_ROOM = 'UNKNOWN_ROOM'
RESPONSE_UNKNOWN_CLIENT = 'UNKNOWN_CLIENT'
RESPONSE_DUPLICATE_CLIENT = 'DUPLICATE_CLIENT'
RESPONSE_SUCCESS = 'SUCCESS'
RESPONSE_INVALID_REQUEST = 'INVALID_REQUEST'

IS_DEV_SERVER = os.environ.get('APPLICATION_ID', '').startswith('dev')

BIGQUERY_URL = 'https://www.googleapis.com/auth/bigquery'

# Dataset used in production.
BIGQUERY_DATASET_PROD = 'prod'

# Dataset used when running locally.
BIGQUERY_DATASET_LOCAL = 'dev'

# BigQuery table within the dataset.
BIGQUERY_TABLE = 'analytics'
● 修改apprtc/out/app_engine/apprtc.py
将
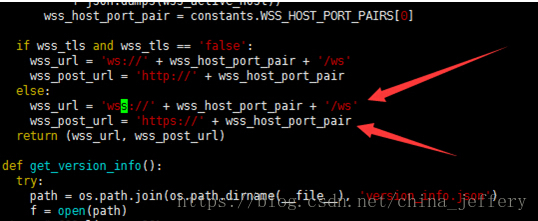
修改为
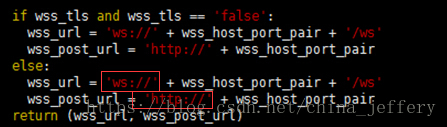
(大约位于146行左右)
● 修改apprtc/out/app_engine/index_template.html
设置TURN服务器信息,在javascript脚本中添加servers变量:
var servers=[{
        credential:"helloword",
        username:"helloword",
        urls:[
        "turn:120.79.164.111:3478?transport=udp",
        "turn:120.79.164.111:3478?transport=tcp"
        ]
}];并将peerConnectionConfig: {{ pc_config | safe }}修改为使用该server变量;
peerConnectionConfig: { "rtcpMuxPolicy":"require","iceServers":servers,"bundlePolicy":"max-bundle"},iceServerRequestUrl: '{{ ice_server_url }}',
//      peerConnectionConfig: {{ pc_config | safe }},
1.4 获取google_appengine
从下载google_appengine_1.9.38.tar,并使用tar命令解压:
cd ~
unzip  google_appengine_1.9.38.tar
1.5 启动房间服务器
cd ~
./google_appengine/dev_appserver.py --host 172.18.163.203 ./apprtc/out/app_engine --skip_sdk_update_check172.18.163.203为内网IP。