一、概述
在Spring AOP 中:
- AnnotationAwareAspectJAutoProxyCreator是基于Bean中的AspectJ 注解来实现自动代理,在Bean创建的过程中完成对切入点的增强。
- Spring AOP 的其他实现方式可以查看 【Spring】 AOP Base
对于 Spring AOP 使用注解的方式中,我们配置开启AOP注解
- 可以用XML的方式:
<!-- 自动生成代理  底层就是AnnotationAwareAspectJAutoProxyCreator -->
<aop:aspectj-autoproxy />
- 或者用注解的方式 在配置类上标注
@EnableAspectJAutoProxy 注解
import org.springframework.context.annotation.Bean;
import org.springframework.context.annotation.Configuration;
import org.springframework.context.annotation.EnableAspectJAutoProxy;

@EnableAspectJAutoProxy
@Configuration
public class MainConfigOfAOP {
    //业务逻辑类加入容器中
    @Bean
    public UserDao userDao(){
        return new UserDao();
    }
    //切面类加入到容器中
    @Bean
    public MyAspect myAspect(){
        return new MyAspect();
    }
}
- 无论是XML 还是
@EnableAspectJAutoProxy底层实现都是AnnotationAwareAspectJAutoProxyCreator
二、@EnableAspectJAutoProxy 注解分析
此注解的源码:
@Target(ElementType.TYPE)
@Retention(RetentionPolicy.RUNTIME)
@Documented
@Import(AspectJAutoProxyRegistrar.class)
public @interface EnableAspectJAutoProxy {
    ...
}
点击此注解发现 有一个@Import注解,此注解是将其中的类直接导入到Spring 容器中,再看AspectJAutoProxyRegistrar 这个类,这个类是一个注册器,我们可以通过此类手动注册bean到容器中,Spring 源码中将AnnotationAwareAspectJAutoProxyCreator通过Regist注册到了Spring容器当中关于@Import的一些总结查阅【Spring】 IOC Base 中初始化Bean方式的部分
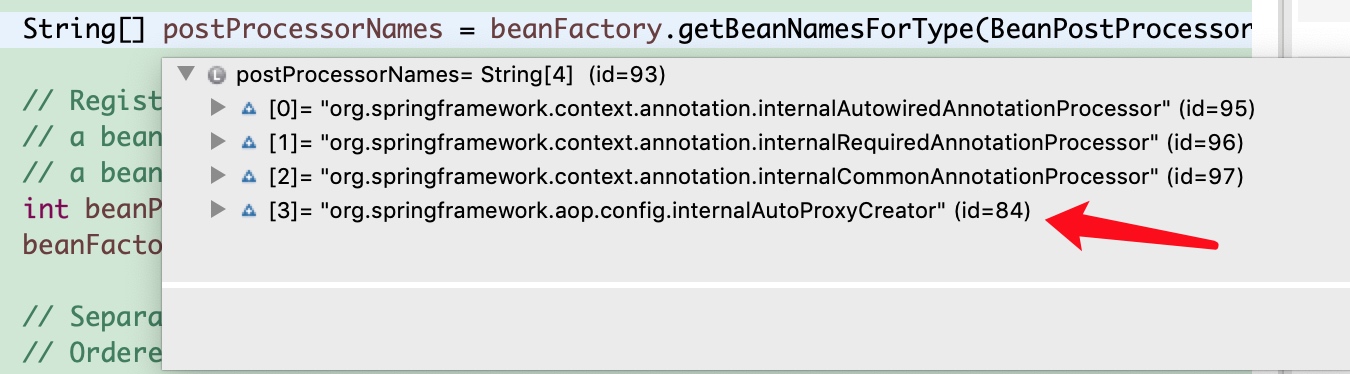
在AspectJAutoProxyRegistrar类中,可以分析出internalAutoProxyCreator 就是AnnotationAwareAspectJAutoProxyCreator
三、分析AnnotationAwareAspectJAutoProxyCreator
接下来分析一下这个关键的类:
首先看AnnotationAwareAspectJAutoProxyCreator 的继承体系
- AnnotationAwareAspectJAutoProxyCreator
- -->AspectJAwareAdvisorAutoProxyCreator
- -->AbstractAdvisorAutoProxyCreator
- -->AbstractAutoProxyCreator
- implements SmartInstantiationAwareBeanPostProcessor, BeanFactoryAware
- -->AbstractAutoProxyCreator
- -->AbstractAdvisorAutoProxyCreator
- -->AspectJAwareAdvisorAutoProxyCreator
可以分析出此类 实现了 BeanPostProcessor 和 BeanFactoryAware 接口,所以说此类具有后置处理器的特性和Aware接口的特点
我们就可以从两方面来分析这个类的机制:
- 关注后置处理器(在bean初始化完成前后做事情)、
- 自动装配BeanFactory
四、执行流程
下面分析一下执行的流程:
1. registerBeanPostProcessors()
在容器中注册AnnotationAwareAspectJAutoProxyCreator
第一步: 传入配置类,创建ioc容器
第二步: 注册配置类,调用 refresh() 刷新容器
第三步: registerBeanPostProcessors(beanFactory),注册bean的后置处理器来方便拦截bean的创建,步骤如下:
(第一步): 先获取ioc容器已经定义了的需要创建对象的所有BeanPostProcessor
(第二步): 给容器中加别的BeanPostProcessor
(第三步): 优先注册实现了PriorityOrdered接口的BeanPostProcessor;
(第四步): 再给容器中注册实现了Ordered接口的BeanPostProcessor;
(第五步): 注册没实现优先级接口的BeanPostProcessor;
这个方法的源码如下:
public static void registerBeanPostProcessors(
ConfigurableListableBeanFactory beanFactory, AbstractApplicationContext applicationContext) {
//获取ioc容器已经定义了的需要创建对象的所有后置处理器
String[] postProcessorNames = beanFactory.getBeanNamesForType(BeanPostProcessor.class, true, false);
// Register BeanPostProcessorChecker that logs an info message when
// a bean is created during BeanPostProcessor instantiation, i.e. when
// a bean is not eligible for getting processed by all BeanPostProcessors.
int beanProcessorTargetCount = beanFactory.getBeanPostProcessorCount() + 1 + postProcessorNames.length;
beanFactory.addBeanPostProcessor(new BeanPostProcessorChecker(beanFactory, beanProcessorTargetCount));
// Separate between BeanPostProcessors that implement PriorityOrdered,
// Ordered, and the rest.
//对后置处理进行分类
List<BeanPostProcessor> priorityOrderedPostProcessors = new ArrayList<BeanPostProcessor>();
List<BeanPostProcessor> internalPostProcessors = new ArrayList<BeanPostProcessor>();
List<String> orderedPostProcessorNames = new ArrayList<String>();
List<String> nonOrderedPostProcessorNames = new ArrayList<String>();
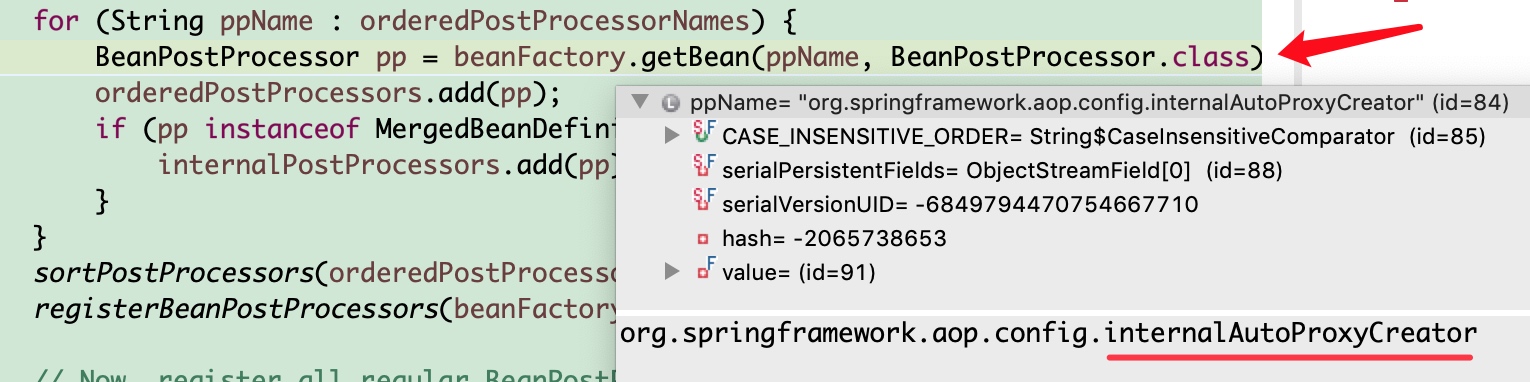
for (String ppName : postProcessorNames) {
if (beanFactory.isTypeMatch(ppName, PriorityOrdered.class)) {
BeanPostProcessor pp = beanFactory.getBean(ppName, BeanPostProcessor.class);
priorityOrderedPostProcessors.add(pp);
if (pp instanceof MergedBeanDefinitionPostProcessor) {
internalPostProcessors.add(pp);
}
}
else if (beanFactory.isTypeMatch(ppName, Ordered.class)) {
orderedPostProcessorNames.add(ppName);
}
else {
nonOrderedPostProcessorNames.add(ppName);
}
}
//首先注册实现了PriorityOrdered 接口的后置处理器
// First, register the BeanPostProcessors that implement PriorityOrdered.
sortPostProcessors(priorityOrderedPostProcessors, beanFactory);
registerBeanPostProcessors(beanFactory, priorityOrderedPostProcessors);
//然后注册实现了Ordered接口的后置处理器
// Next, register the BeanPostProcessors that implement Ordered.
List<BeanPostProcessor> orderedPostProcessors = new ArrayList<BeanPostProcessor>();
for (String ppName : orderedPostProcessorNames) {
BeanPostProcessor pp = beanFactory.getBean(ppName, BeanPostProcessor.class);
orderedPostProcessors.add(pp);
if (pp instanceof MergedBeanDefinitionPostProcessor) {
internalPostProcessors.add(pp);
}
}
sortPostProcessors(orderedPostProcessors, beanFactory);
registerBeanPostProcessors(beanFactory, orderedPostProcessors);
//注册常规的(即没有实现优先级接口)的后置处理器
// Now, register all regular BeanPostProcessors.
List<BeanPostProcessor> nonOrderedPostProcessors = new ArrayList<BeanPostProcessor>();
for (String ppName : nonOrderedPostProcessorNames) {
BeanPostProcessor pp = beanFactory.getBean(ppName, BeanPostProcessor.class);
nonOrderedPostProcessors.add(pp);
if (pp instanceof MergedBeanDefinitionPostProcessor) {
internalPostProcessors.add(pp);
}
}
registerBeanPostProcessors(beanFactory, nonOrderedPostProcessors);
// Finally, re-register all internal BeanPostProcessors.
sortPostProcessors(internalPostProcessors, beanFactory);
registerBeanPostProcessors(beanFactory, internalPostProcessors);
// Re-register post-processor for detecting inner beans as ApplicationListeners,
// moving it to the end of the processor chain (for picking up proxies etc).
beanFactory.addBeanPostProcessor(new ApplicationListenerDetector(applicationContext));
}
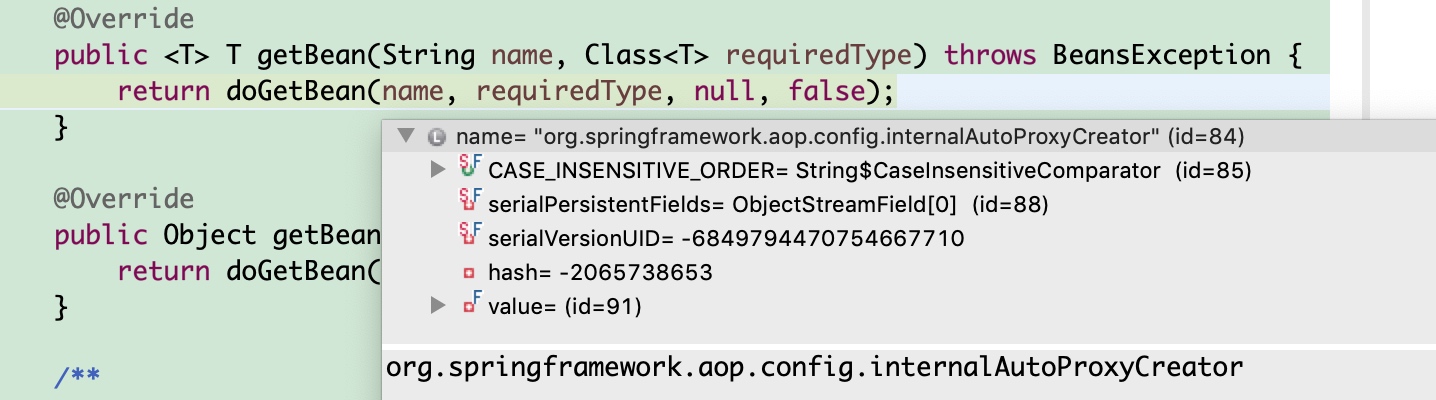
internalAutoProxyCreator【AnnotationAwareAspectJAutoProxyCreator】 是实现了Ordered接口的后置处理器,注册的过程,实际上就是创建BeanPostProcessor对象,保存在容器中,方法的调用流程
getBean()--> doGetBean()--> getSingleton()-->最终走到了createBean()方法,
在createBean方法中调用了doCreateBean方法,此方法的执行流程为:
- 创建Bean的实例:
- populateBean;给bean的各种属性赋值
- initializeBean:初始化bean;在此方法中:
- invokeAwareMethods():处理Aware接口的方法回调
- applyBeanPostProcessorsBeforeInitialization():应用后置处理器的postProcessBeforeInitialization()
- invokeInitMethods();执行自定义的初始化方法
- applyBeanPostProcessorsAfterInitialization();执行后置处理器的postProcessAfterInitialization();
- BeanPostProcessor(AnnotationAwareAspectJAutoProxyCreator)创建成功; aspectJAdvisorsBuilder
(第六步): 把BeanPostProcessor注册到BeanFactory中;beanFactory.addBeanPostProcessor(postProcessor);
以上是创建和注册AnnotationAwareAspectJAutoProxyCreator的过程
2. finishBeanFactoryInitialization()
第四步: 执行finishBeanFactoryInitialization():完成BeanFactory初始化工作,创建剩下的单实例bean。
(第一步): 遍历获取容器中所有的Bean,依次创建对象getBean(beanName);
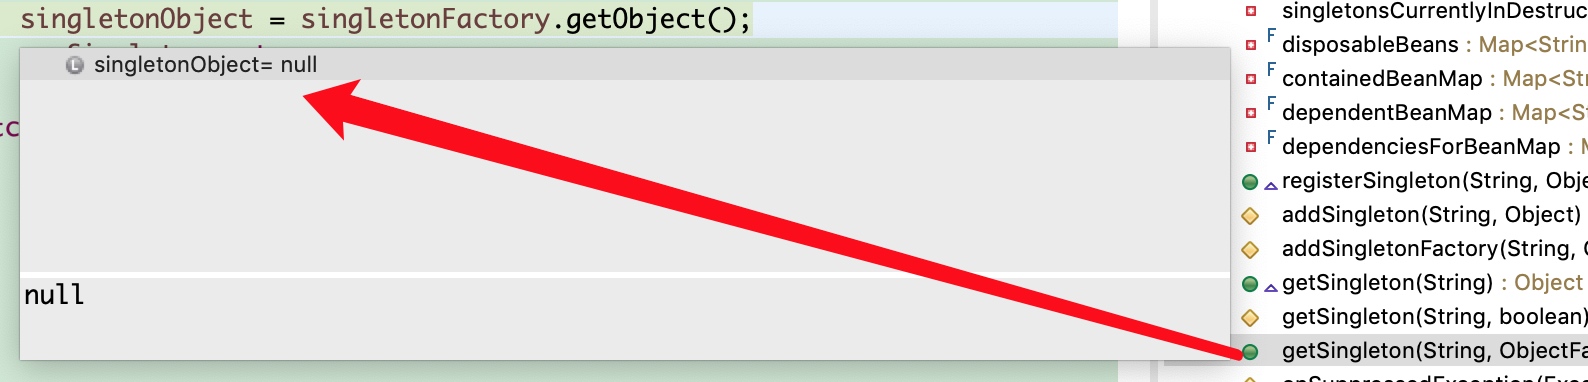
getBean->doGetBean()->getSingleton()->
(第二步): 创建bean
下面是doGetBean方法的部分源码:
protected <T> T doGetBean(
final String name, final Class<T> requiredType, final Object[] args, boolean typeCheckOnly)
throws BeansException {
final String beanName = transformedBeanName(name);
Object bean;
//这里先尝试获取单实例bean
// Eagerly check singleton cache for manually registered singletons.
Object sharedInstance = getSingleton(beanName);
if (sharedInstance != null && args == null) {
....
}else {
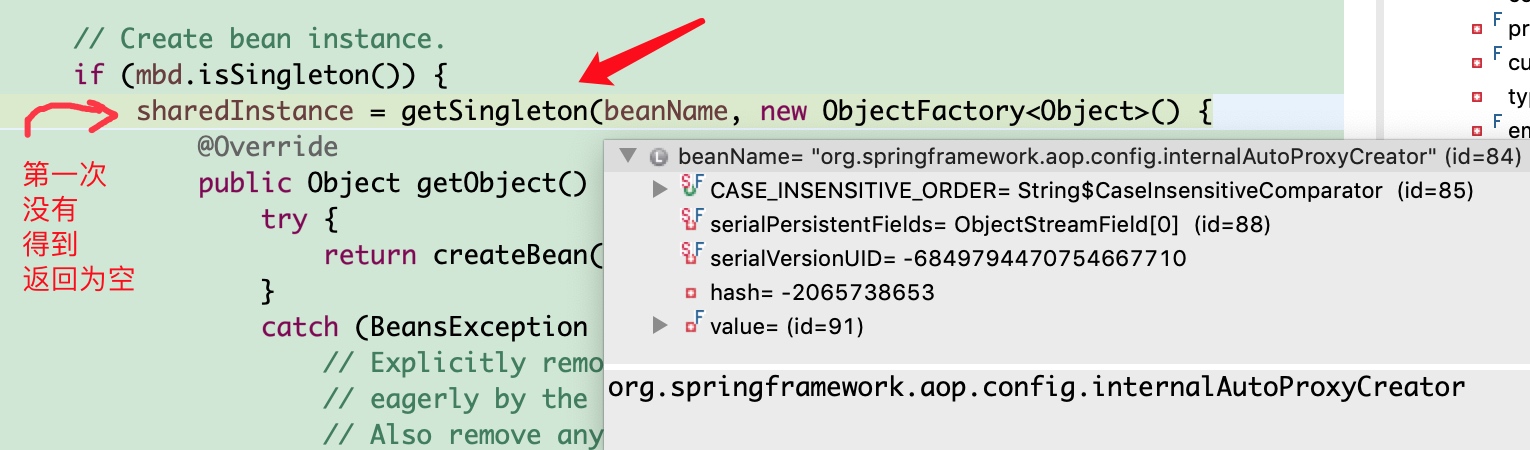
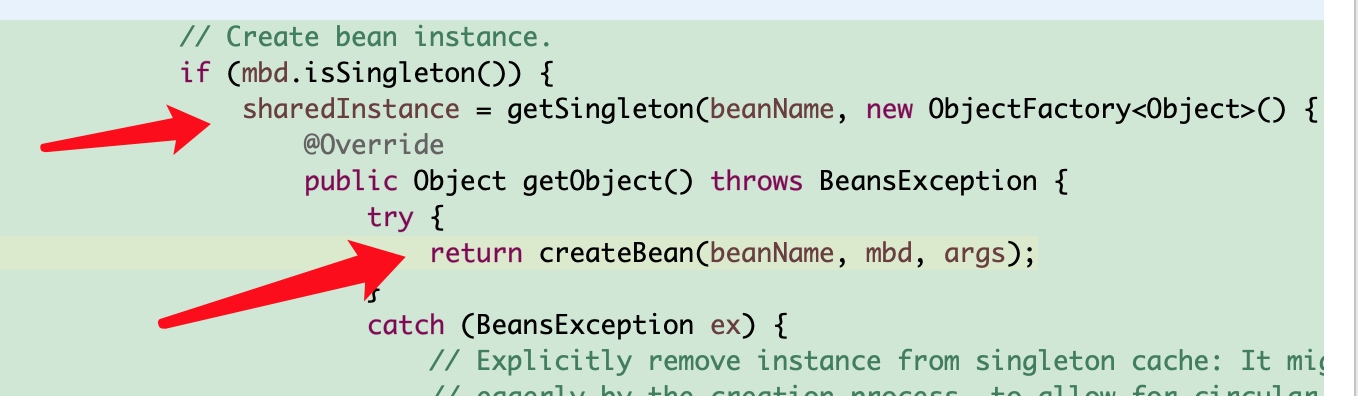
// Create bean instance.
if (mbd.isSingleton()) {
sharedInstance = getSingleton(beanName, new ObjectFactory<Object>() {
@Override
public Object getObject() throws BeansException {
try {
//这里创建Bean实例
return createBean(beanName, mbd, args);
}
...
}
...
return (T) bean;
}
- 先从缓存中获取当前bean,如果能获取到,说明bean是之前被创建过的,直接使用,否则再创建;只要创建好的Bean都会被缓存起来
- createBean(),创建bean,下面是createBean方法的流程分析:
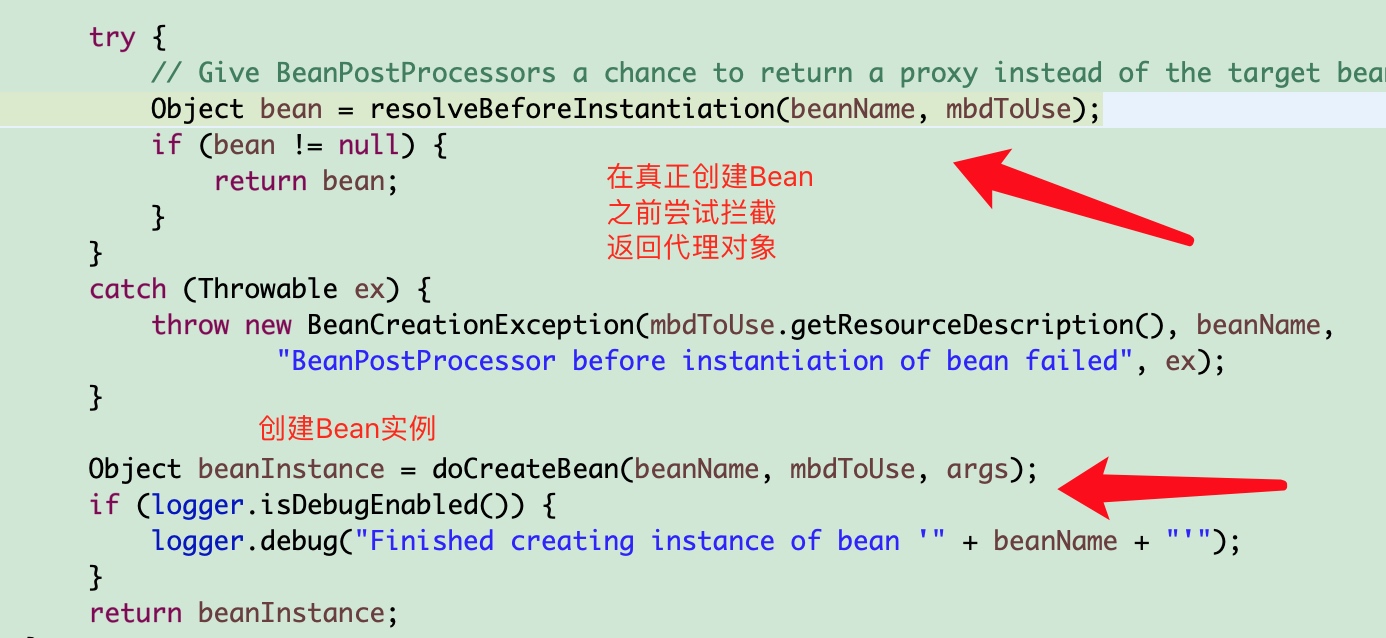
1.
resolveBeforeInstantiation(beanName, mbdToUse):希望后置处理器在此能返回一个代理对象;如果能返回代理对象就使用,如果不能就继续- 后置处理器先尝试返回对象;
- bean = applyBeanPostProcessorsBeforeInstantiation():拿到所有后置处理器,如果是 InstantiationAwareBeanPostProcessor; 就执行postProcessBeforeInstantiation
if (bean != null) {
bean = applyBeanPostProcessorsAfterInitialization(bean, beanName);

}
protected Object applyBeanPostProcessorsBeforeInstantiation(Class<?> beanClass, String beanName) { for (BeanPostProcessor bp : getBeanPostProcessors()) {
if (bp instanceof InstantiationAwareBeanPostProcessor) {
//如果是这个类型的处理器,就执行其postProcessBeforeInstantiation() 方法
InstantiationAwareBeanPostProcessor ibp = (InstantiationAwareBeanPostProcessor) bp;
Object result = ibp.postProcessBeforeInstantiation(beanClass, beanName);
if (result != null) {
return result;
}
}
}
return null;
}- AnnotationAwareAspectJAutoProxyCreator会在任何bean创建之前先尝试返回bean的实例
- BeanPostProcessor是在Bean对象创建完成初始化前后调用的
- InstantiationAwareBeanPostProcessor是在创建Bean实例之前先尝试用后置处理器返回对象的
2.doCreateBean(beanName, mbdToUse, args):真正的去创建一个bean实例,此方法的流程在上面已经介绍 (第三.(五)步中图片下面)
3. InstantiationAwareBeanPostProcessor后置处理器的执行逻辑
经过上面的分析可以知道,在所有bean创建之前会有一个拦截:由于 AnnotationAwareAspectJAutoProxyCreator 是一个InstantiationAwareBeanPostProcessor 类型的后置处理器,它会调用postProcessBeforeInstantiation()方法
(一):每一个bean创建之前,调用postProcessBeforeInstantiation();
关注 业务逻辑类和切面类的创建
源码如下:
    public Object postProcessBeforeInstantiation(Class<?> beanClass, String beanName) throws BeansException {
        Object cacheKey = getCacheKey(beanClass, beanName);

//1.判断当前bean是否在advisedBeans中(保存了所有需要增强bean)
        if (beanName == null || !this.targetSourcedBeans.contains(beanName)) {
            if (this.advisedBeans.containsKey(cacheKey)) {
                return null;
            }

//2.判断当前bean是否是基础类型的Advice、Pointcut、Advisor、AopInfrastructureBean,或者是否是切面(@Aspect)
//3.是否需要跳过
//获取候选的增强器(切面里面的通知方法)
//【List<Advisor> candidateAdvisors】每一个封装的通知方法的
//增强器是 InstantiationModelAwarePointcutAdvisor类型;
//判断每一个增强器是否是 AspectJPointcutAdvisor 类型的,
//如果是,返回true;如果不是调用父类的【shouldSkip()-->永远返回false】
            if (isInfrastructureClass(beanClass) || shouldSkip(beanClass, beanName)) {
                this.advisedBeans.put(cacheKey, Boolean.FALSE);
                return null;
            }
        }

        // Create proxy here if we have a custom TargetSource.
        // Suppresses unnecessary default instantiation of the target bean:
        // The TargetSource will handle target instances in a custom fashion.
        if (beanName != null) {
            TargetSource targetSource = getCustomTargetSource(beanClass, beanName);
            if (targetSource != null) {
                this.targetSourcedBeans.add(beanName);
                Object[] specificInterceptors = getAdvicesAndAdvisorsForBean(beanClass, beanName, targetSource);
                Object proxy = createProxy(beanClass, beanName, specificInterceptors, targetSource);
                this.proxyTypes.put(cacheKey, proxy.getClass());
                return proxy;
            }
        }

        return null;
    }
(二):创建完业务类对象之后调用执行postProcessAfterInitialization;
源码如下:
public Object postProcessAfterInitialization(Object bean, String beanName) throws BeansException {
        if (bean != null) {
            Object cacheKey = getCacheKey(bean.getClass(), beanName);
            if (!this.earlyProxyReferences.contains(cacheKey)) {
                return wrapIfNecessary(bean, beanName, cacheKey);
            }
        }
        return bean;
    }
protected Object wrapIfNecessary(Object bean, String beanName, Object cacheKey) {
        if (beanName != null && this.targetSourcedBeans.contains(beanName)) {
            return bean;
        }
        if (Boolean.FALSE.equals(this.advisedBeans.get(cacheKey))) {
            return bean;
        }
        if (isInfrastructureClass(bean.getClass()) || shouldSkip(bean.getClass(), beanName)) {
            this.advisedBeans.put(cacheKey, Boolean.FALSE);
            return bean;
        }

        // Create proxy if we have advice.
/*1.获取当前bean的所有增强器(通知方法) getAdvicesAndAdvisorsForBean() 内部流程:
*  1.1找到候选的所有的增强器(找哪些通知方法是需要切入当前bean方法的)
*  1.2获取到能在bean使用的增强器。
*  1.3给增强器排序
*/
        Object[] specificInterceptors = getAdvicesAndAdvisorsForBean(bean.getClass(), beanName, null);
        if (specificInterceptors != DO_NOT_PROXY) {
//2.保存当前bean在advisedBeans中;
            this.advisedBeans.put(cacheKey, Boolean.TRUE);

/*3. 如果当前bean需要增强,创建当前bean的代理对象;
 *  1)、获取所有增强器(通知方法)
 *  2)、保存到proxyFactory
 *  3)、创建代理对象:Spring自动决定
 *      JdkDynamicAopProxy(config);jdk动态代理;
 *      ObjenesisCglibAopProxy(config);cglib的动态代理;
 *  4)、给容器中返回当前组件增强了的代理对象;
 *  5)、以后容器中获取到的就是这个组件的代理对象,执行目标方法的时候,代理对象就会执行通知方法的流程;
*/
            Object proxy = createProxy(
                    bean.getClass(), beanName, specificInterceptors, new SingletonTargetSource(bean));
            this.proxyTypes.put(cacheKey, proxy.getClass());
            return proxy;
        }

        this.advisedBeans.put(cacheKey, Boolean.FALSE);
        return bean;
    }
4. 目标方法执行
经过上面的流程后,容器中获取到的就是这个组件的代理对象,执行目标方法的时候,代理对象就会执行通知方法的流程。
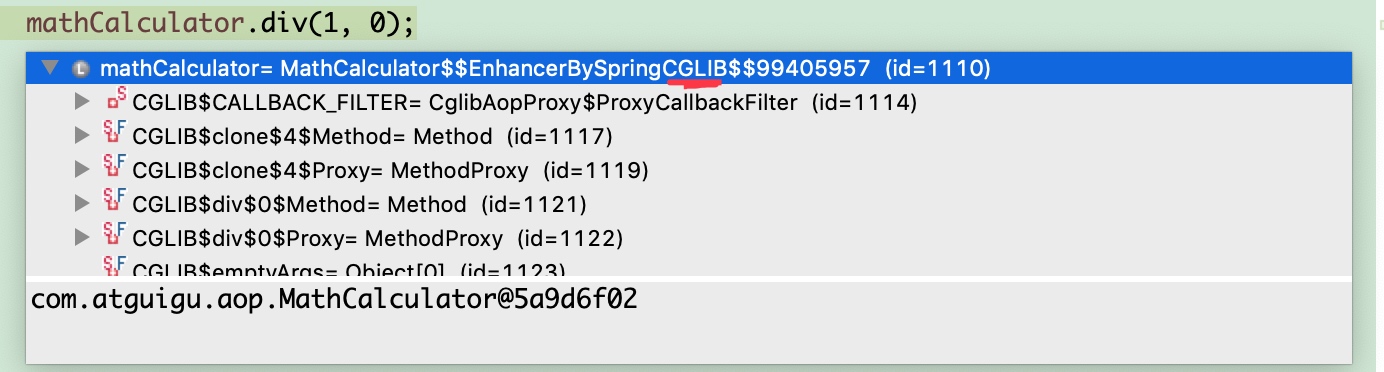
通过Debug的几次进入进出之后,可以进入到CglibAopProxy.intercept()方法,此方法用于拦截目标方法的执行
源码如下:
public Object intercept(Object proxy, Method method, Object[] args, MethodProxy methodProxy) throws Throwable {
Object oldProxy = null;
boolean setProxyContext = false;
Class<?> targetClass = null;
Object target = null;
try {
if (this.advised.exposeProxy) {
// Make invocation available if necessary.
oldProxy = AopContext.setCurrentProxy(proxy);
setProxyContext = true;
}
// May be null. Get as late as possible to minimize the time we
// "own" the target, in case it comes from a pool...
target = getTarget();
if (target != null) {
targetClass = target.getClass();
}
/*
* 1. 根据ProxyFactory对象获取将要执行的目标方法拦截器链;
* 方法源码见下面
* 1.1 List<Object> interceptorList保存所有拦截器 5
* 一个默认的ExposeInvocationInterceptor 和 4个增强器;
* 1.2 遍历所有的增强器,将其转为Interceptor;
* registry.getInterceptors(advisor);
* 1.2.1 将增强器转为List<MethodInterceptor>;
* 1.2.2 如果是MethodInterceptor,直接加入到集合中
* 1.2.3 如果不是,使用AdvisorAdapter将增强器转为MethodInterceptor;
* 转换完成返回MethodInterceptor数组;
*/
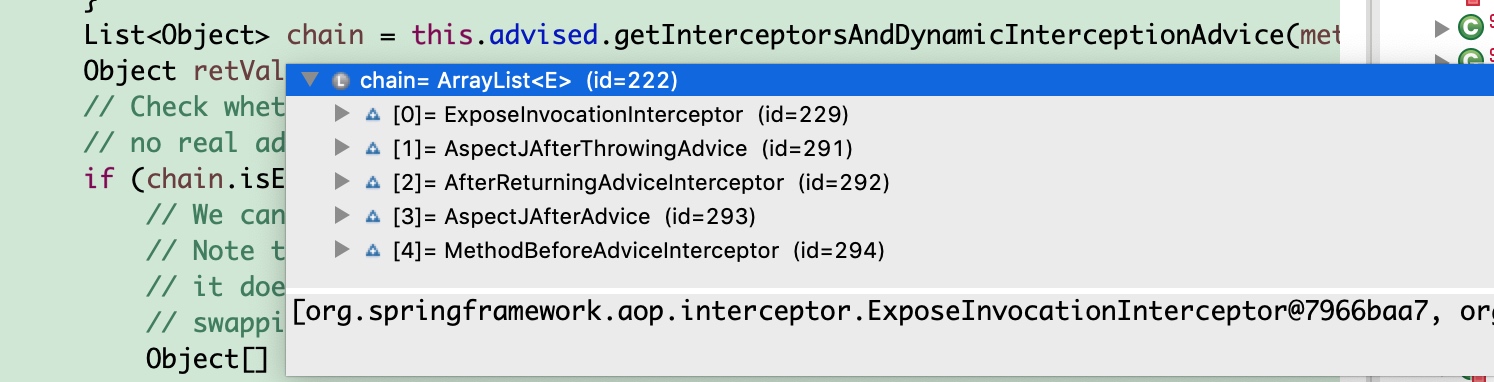
List<Object> chain = this.advised.getInterceptorsAndDynamicInterceptionAdvice(method, targetClass);
Object retVal;
// Check whether we only have one InvokerInterceptor: that is,
// no real advice, but just reflective invocation of the target.
if (chain.isEmpty() && Modifier.isPublic(method.getModifiers())) {
/*
* 2.如果没有拦截器链,直接执行目标方法;
* 拦截器链(每一个通知方法又被包装为方法拦截器,利用MethodInterceptor机制)
*/
// We can skip creating a MethodInvocation: just invoke the target directly.
// Note that the final invoker must be an InvokerInterceptor, so we know
// it does nothing but a reflective operation on the target, and no hot
// swapping or fancy proxying.
Object[] argsToUse = AopProxyUtils.adaptArgumentsIfNecessary(method, args);
retVal = methodProxy.invoke(target, argsToUse);
}
else {
/*
* 3. 如果有拦截器链,把需要执行的目标对象,目标方法,
* 拦截器链等信息传入,创建一个 CglibMethodInvocation 对象,
* 并调用Object retVal = mi.proceed();
*/
// We need to create a method invocation...
retVal = new CglibMethodInvocation(proxy, target, method, args, targetClass, chain, methodProxy).proceed();
}
retVal = processReturnType(proxy, target, method, retVal);
return retVal;
}
finally {
if (target != null) {
releaseTarget(target);
}
if (setProxyContext) {
// Restore old proxy.
AopContext.setCurrentProxy(oldProxy);
}
}
}
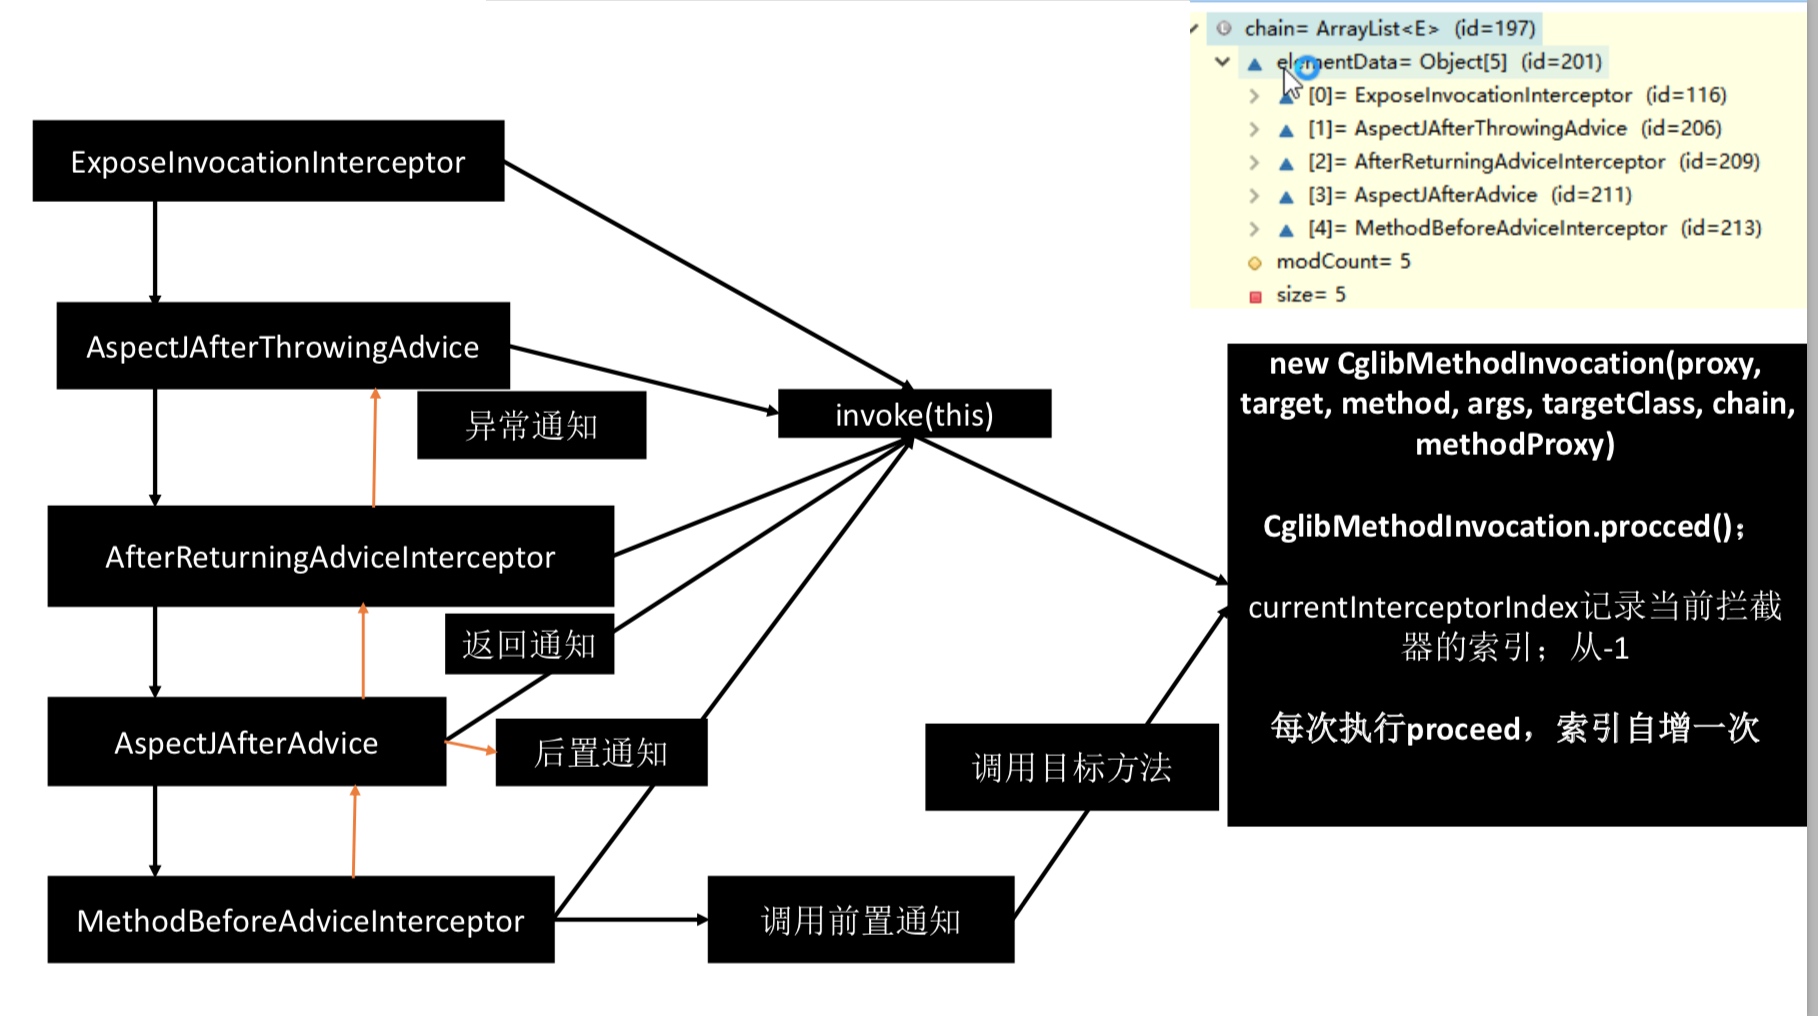
第一部分,得到拦截器链
上面源码 1 中调用的方法
public List<Object> getInterceptorsAndDynamicInterceptionAdvice(Method method, Class<?> targetClass) {
    MethodCacheKey cacheKey = new MethodCacheKey(method);
    List<Object> cached = this.methodCache.get(cacheKey);
    if (cached == null) {
        cached = this.advisorChainFactory.getInterceptorsAndDynamicInterceptionAdvice(
                this, method, targetClass);
        this.methodCache.put(cacheKey, cached);
    }
    return cached;
}
上面方法中调用了如下方法:
public List<Object> getInterceptorsAndDynamicInterceptionAdvice(
            Advised config, Method method, Class<?> targetClass) {

        // This is somewhat tricky... We have to process introductions first,
        // but we need to preserve order in the ultimate list.

/**
* 1.1 List<Object> interceptorList保存所有拦截器 5
*   一个默认的ExposeInvocationInterceptor 和 4个增强器;
*/
        List<Object> interceptorList = new ArrayList<Object>(config.getAdvisors().length);
        Class<?> actualClass = (targetClass != null ? targetClass : method.getDeclaringClass());
        boolean hasIntroductions = hasMatchingIntroductions(config, actualClass);
        AdvisorAdapterRegistry registry = GlobalAdvisorAdapterRegistry.getInstance();


    for (Advisor advisor : config.getAdvisors()) {
            if (advisor instanceof PointcutAdvisor) {
                // Add it conditionally.
                PointcutAdvisor pointcutAdvisor = (PointcutAdvisor) advisor;
                if (config.isPreFiltered() || pointcutAdvisor.getPointcut().getClassFilter().matches(actualClass)) {


/*
1.2 遍历所有的增强器,将其转为Interceptor;
*/
                    MethodInterceptor[] interceptors = registry.getInterceptors(advisor);
                    MethodMatcher mm = pointcutAdvisor.getPointcut().getMethodMatcher();
                    if (MethodMatchers.matches(mm, method, actualClass, hasIntroductions)) {
                        if (mm.isRuntime()) {
                            // Creating a new object instance in the getInterceptors() method
                            // isn't a problem as we normally cache created chains.
                            for (MethodInterceptor interceptor : interceptors) {
                                interceptorList.add(new InterceptorAndDynamicMethodMatcher(interceptor, mm));
                            }
                        }
                        else {
                            interceptorList.addAll(Arrays.asList(interceptors));
                        }
                    }
                }
            }
            else if (advisor instanceof IntroductionAdvisor) {
                IntroductionAdvisor ia = (IntroductionAdvisor) advisor;
                if (config.isPreFiltered() || ia.getClassFilter().matches(actualClass)) {
                    Interceptor[] interceptors = registry.getInterceptors(advisor);
                    interceptorList.addAll(Arrays.asList(interceptors));
                }
            }
            else {
                Interceptor[] interceptors = registry.getInterceptors(advisor);
                interceptorList.addAll(Arrays.asList(interceptors));
            }
        }

        return interceptorList;
    }
上面方法又调用了如下方法:
@Override
    public MethodInterceptor[] getInterceptors(Advisor advisor) throws UnknownAdviceTypeException {
        List<MethodInterceptor> interceptors = new ArrayList<MethodInterceptor>(3);
        Advice advice = advisor.getAdvice();
/*
* 1.2.1 将增强器转为List<MethodInterceptor>;
* 1.2.2 如果是MethodInterceptor,直接加入到集合中,如果不是,使用AdvisorAdapter将增强器转为MethodInterceptor;
* 1.2.3转换完成返回MethodInterceptor数组;
*/
        if (advice instanceof MethodInterceptor) {
            interceptors.add((MethodInterceptor) advice);
        }
        for (AdvisorAdapter adapter : this.adapters) {
            if (adapter.supportsAdvice(advice)) {
                interceptors.add(adapter.getInterceptor(advisor));
            }
        }
        if (interceptors.isEmpty()) {
            throw new UnknownAdviceTypeException(advisor.getAdvice());
        }
        return interceptors.toArray(new MethodInterceptor[interceptors.size()]);
    }
经过上面中的 1 我们得到了拦截器链(每一个通知方法又被包装为方法拦截器,利用MethodInterceptor机制)
第二部分,拦截器链的触发过程
上面源码 3 中调用的方法
public Object proceed() throws Throwable {
        //  We start with an index of -1 and increment early.
        if (this.currentInterceptorIndex == this.interceptorsAndDynamicMethodMatchers.size() - 1) {
            return invokeJoinpoint();
        }

        Object interceptorOrInterceptionAdvice =
                this.interceptorsAndDynamicMethodMatchers.get(++this.currentInterceptorIndex);
        if (interceptorOrInterceptionAdvice instanceof InterceptorAndDynamicMethodMatcher) {
            // Evaluate dynamic method matcher here: static part will already have
            // been evaluated and found to match.
            InterceptorAndDynamicMethodMatcher dm =
                    (InterceptorAndDynamicMethodMatcher) interceptorOrInterceptionAdvice;
            if (dm.methodMatcher.matches(this.method, this.targetClass, this.arguments)) {
                return dm.interceptor.invoke(this);
            }
            else {
                // Dynamic matching failed.
                // Skip this interceptor and invoke the next in the chain.
                return proceed();
            }
        }
        else {
            // It's an interceptor, so we just invoke it: The pointcut will have
            // been evaluated statically before this object was constructed.
            return ((MethodInterceptor) interceptorOrInterceptionAdvice).invoke(this);
        }
    }
- 如果没有拦截器执行执行目标方法,或者拦截器的索引和拦截器数组-1大小一样(指定到了最后一个拦截器)执行目标方法;
- 链式获取每一个拦截器,拦截器执行invoke方法,每一个拦截器等待下一个拦截器执行完成返回以后再来执行;
- 拦截器链的机制,保证通知方法与目标方法的执行顺序;
总结
- @EnableAspectJAutoProxy 开启AOP功能
- @EnableAspectJAutoProxy 会给容器中注册一个组件 AnnotationAwareAspectJAutoProxyCreator
- AnnotationAwareAspectJAutoProxyCreator是一个后置处理器;
- 容器的创建流程:
- registerBeanPostProcessors():注册后置处理器;创建AnnotationAwareAspectJAutoProxyCreator对象
- finishBeanFactoryInitialization():初始化剩下的单实例bean
- 创建业务逻辑组件和切面组件;
- AnnotationAwareAspectJAutoProxyCreator拦截组件的创建过程;
- 组件创建完之后,判断组件是否需要增强,如果需要增强:将切面的通知方法包装成增强器(Advisor);给业务逻辑组件创建一个代理对象(cglib);
- 执行目标方法:代理对象执行目标方法
- CglibAopProxy.intercept();
- 得到目标方法的拦截器链(增强器包装成拦截器MethodInterceptor)
- 利用拦截器的链式机制,依次进入每一个拦截器进行执行;
- 效果:
- 正常执行:前置通知-》目标方法-》后置通知-》返回通知
- 出现异常:前置通知-》目标方法-》后置通知-》异常通知
- CglibAopProxy.intercept();