Title:最近做完了项目,review代码的同时,就想写一篇详细的小程序开发经历,记录自己的项目从0到1的过程
Desc : 小程序从0到1,从小白到完成项目,你需要这样做:
step1: 基础知识准备
知识储备: html5, CSS3, js(ES6), 组件化思维
wepy飞机票: https://tencent.github.io/wepy/document.html#/
Vue飞机票: https://cn.vuejs.org/
js-阮一峰飞机票: http://javascript.ruanyifeng.com/
js-git-廖雪峰飞机票: https://www.liaoxuefeng.com/
小程序飞机票: https://developers.weixin.qq.com/doc/
前端框架太多了,多到每个公司使用的技术栈都可能和你掌握的不一样,但是别怕,万变不离其宗,走到天涯海角也是 html5, CSS3,js ,组件化这四部分构成,之所以框架很多,是因为每个公司的业务需求不一致。Vue、react、angular三大框架,其中又衍生了根据这三种框架来的小框架,这里主要讲Vue,微信小程序开发可以使用官方提供的原生wxml、wxss、wxs,嗯,和html,css, js对比一下,换了个名称而已(自带狗头滑稽),也可以使用Vue思想的框架wepy,wepy完全继承了Vue的写法,只要熟悉Vue,wepy上手很快的。
step2:梳理项目
前端项目,移动端为主,主要涉及三个方面:UI、前端逻辑、数据三部分,UI产品经理会给你设计流程稿,美工会给你需要的样式素材 、后端会给你返回数据。我们只需要搭出页面,运用数据,以前jquery时代,要操作DOM树来改变页面的显示,DOM如下图:
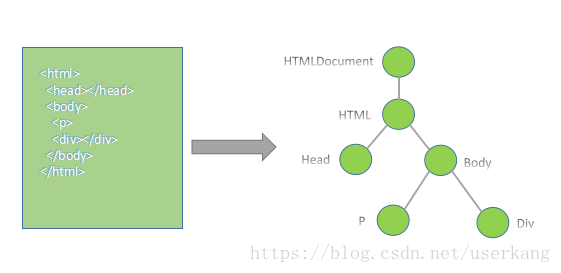
说白了,DOM树就是HTML标签的关系!!写HTML的时候,标签之间总要嵌套吧,最外层是<html>,一个页面的其他标签都在<html>中包裹着,对吧?有包裹着的关系,也有并列关系,基于这两种关系,换成专业术语,就是父子、兄弟关系,用树结构描述出来就是DOM的树结构,简称DOM树,在DOM树里面,我们可以通过标签(HTML元素)的class类名或者 ID 找到这个标签,
/**
*获取标签
*/
let div1 = document.getElementById('idName')    //原生
let div2 = $('idName')                          //jquery
function $(id) {                                //jq的$选择器简易源码原理
  return document.getElementById('id')
}
//获取到目标之后,可以对目标做操作,包括但不限于改变目标的文字内容、背景颜色、插入子元素、插入子模板,隐藏、显示、添加点击事件或其他事件等等,
之所以用树结构来描述,就是因为这样一目了然,关系很明确。而且还可以通过一个标签,找到他的子元素,父元素、兄弟元素、祖宗元素,进而对它们进行操作,例如:
let getFirstChild = document.getElementById("test").children[0];
let p = document.getElementById("test").parentNode;
let brother5 = document.getElementById("test").nextSibling;
以上是原生和jq的操作DOM树模式,这种方式现在已经不常用,但需要了解一下,现在常用的框架,几乎都是组件式开发,数据驱动、已经不操作DOM树了!!!!!
进入数据驱动模式::
开发一个项目,产品会上说明开发需求,在把pr(设计需求文件)发给前后端和美工,三方开发开发,也就是说前端在没和后端对接口之前,都需要使用模拟数据,那么,一个普通项目可能会包含什么?事件、内容填充、页面跳转。就这三部分!!!
事件: wepy和Vue中,绑定事件用 v-on 简写 @tap = ‘eventName’ 原生和jq中用 onclick=eventName()" 大同小异
内容填充: 即用后端返回来的数据,把他们放到页面中去,

js代码如下:
 // 获取名片信息
    getCardInfo( user_id ) {
        const that = this
        circleApi.getCardInfo({
            data: {
                user_id,
                card_is_mine: -1            //默认-1 ====》圈内
            },
            getToken: true
        }).then( res => {
            log('获取我的名片信息', res)
            let data = res.data
            that.cardInfo = data
            that.$apply()
        })
    }
html标签代码:(这个view是在<template>当中的)
<view class="myCardContent">
                <view class="redHeader"></view>
                <view class="contentBox">

                    <image class="headImgCard" src="{{cardInfo.avatar}}" mode="aspectFill"></image>
                    <view class="professionInfo">{{cardInfo.career}}</view>
                    <view class="userId">ID: {{cardInfo.user_id}}</view>

                    <!-- 用户信息展示栏 -->
                    <view class="cardInfoBox">
                        <view class="item">性别:  <sapn class="attribute"> {{cardInfo.gender}}</sapn></view>
                        <view class="item itemRight">年龄:  <sapn class="attribute"> {{cardInfo.age}}年</sapn></view>
                        <view class="item">居住地:  <sapn class="attribute"> {{cardInfo.place_of_residence}}</sapn></view>
                        <view class="item itemRight">学历:  <sapn class="attribute"> {{cardInfo.education}}</sapn></view>
                        <view class="item">身高:  <sapn class="attribute"> {{cardInfo.height}}cm</sapn></view>
                        <view class="item itemRight">年薪:  <sapn class="attribute"> {{cardInfo.annual_salary}}</sapn></view>
                        <view class="item">住房:  <sapn class="attribute"> {{cardInfo.house}}</sapn></view>
                        <view class="item itemRight">车辆:  <sapn class="attribute"> {{cardInfo.car}}</sapn></view>
                    </view>

                    <!-- 用户信息简介 -->

                    <view class="tipChildIntroduce">孩子介绍
                        <view class="orangeLine"></view>
                    </view>
                    <view class="childIntrodCont">{{cardInfo.child_introduction}}</view>

                    <!-- 用户择偶条件 -->

                    <view class="tipChildIntroduce">择偶条件
                        <view class="orangeLine"></view>
                    </view>
                    <view class="childIntrodCont">{{cardInfo.spouse_description}}</view>

                    <!-- 用户生活照 -->
                    <view class="tipChildIntroduce">生活照
                        <view class="orangeLine"></view>
                    </view>
                    <view class="lifeImgBox {{isMinePage ? 'marginBottom' : ''}}">
                        <repeat for="{{cardInfo.photos}}" item="item">
                            <image src="{{item}}" class="lifeImg" @tap="liveImg" data-index="{{index}}" mode="aspectFill"></image>
                        </repeat>
                    </view>
                </view>
            </view>
数据操作的精髓 ↑
而如果在jq中,你拿到数据之后,还要把数据一条条插进DOM中,看下代码:
// 获取名片信息  === jq版
    getCardInfo( user_id ) {
        const that = this
        circleApi.getCardInfo({
            data: {
                user_id,
                card_is_mine: -1            //默认-1 ====》圈内
            },
            getToken: true
        }).then( res => {
            log('获取我的名片信息', res)
            let data = res.data
           let sexDom = $('sexClassName').innerText = res.gender;
       let ageDom = $('sexClassName').innerText = res.age;
       ***
        有多少条数据需要插入,就得操作DOM多少次!!!!!吓人不
        })
    }
数据填充二: 数据模板插入。就是后端给你返回了10条商品数据,你得把这10个商品全部展示出来对吧,看例子:

如上图,后端返回了我们圈子的列表,圈子分为四种,career_circles、local_circles、my_circles、group_circles四种,每一个是数组,这里以my_circles为例,数组里面有6条商品信息,需要展现出来,看上图左可以发现,每个圈子的模板都是一样的,一张图片加两行文字说明。模板在此时就发挥了作用,
// 获取圈子列表
    getCircleList(city_id, card_is_mine) {
        const that = this;
        circleApi.getCircleList({
            data: {
                city: 2,                  //city_id
            },
            getToken: true
        }).then( res => {
            log('获取圈子列表01', res)
            let data = res.data;
            that.careerCirclr = data.career_circles;
            if( that.careerCirclr.length === 0 ) {
                this.prefTipCtrl = false
            }
            that.localCirclr = data.local_circles;
            if( that.localCirclr.length === 0 ) {
                that.localTipCtrl = false
            }
            that.myCircle = (data.group_circles).concat(data.my_circles) ;
            if( that.myCircle.length != 0) {
                that.showMyCircle = true;
            }
            that.$apply();
        })
    }
<block wx:if="{{showMyCircle}}">
        <view class="subiect">我的相亲圈</view>
        <view class="circleBigBox">
            <repeat for="{{myCircle}}" key="index" item="item">
                <CircleItemNew @circleDescClick.user = "circleDescClick"
                                :circleImg.sync = "item.image"
                                :circleName.sync = "item.circle_name"
                                :circleDesc.sync = "item.short_desc"
                >
                </CircleItemNew>
            </repeat>
        </view>
        </block>
以上代码中直接遍历数据 myCircle ,Vue中有 v-for ,微信原生有 wx:for= wepy中采用 <repeat for>,虽然写法有差异,但思想都是遍历数据就可以了,不需要操作DOM
组件CircleItemNew:(因为其他的三种圈子也是这个模板,所以抽出来作为模板写)
<template>

    <view class="circleItemBox" data-circleId="{{circleId}}" data-circlestate ="{{circleState}}" data-circlegroupId="{{circleGroupId}}" @tap="goCircleIntroduce">
        <image class="circleImgNew" mode="aspectFill" src="{{circleImg}}"></image>
        <view class="circleName">{{circleName}}</view>
        <view class="circleDesc">{{circleDesc}}</view>
    </view>

</template>
以上模块若用jq中操作DOM实现,代码如下:
 // 获取圈子列表
    getCircleList(city_id, card_is_mine) {
        const that = this;
        circleApi.getCircleList({
            data: {
                city: 2,                  //city_id
            },
            getToken: true
        }).then( res => {
            log('获取圈子列表01', res)
            let data = res.data;
            that.careerCirclr = data.career_circles;
            if( that.careerCirclr.length === 0 ) {
                this.prefTipCtrl = false
            }
            that.localCirclr = data.local_circles;
            if( that.localCirclr.length === 0 ) {
                that.localTipCtrl = false
            }
            that.myCircle = (data.group_circles).concat(data.my_circles) ;
$(parentNode).empty() //首先你得把放这个6个圈子的父元素清空,要不下次进来就12个圈子了,在下次进来18个,
        $.each(that.myCircle, function(item, index) {        //遍历数组
          let circleDiv = '<img src='+ item.image +'></img>         //每次遍历都生成一个HTML模板,再把该模板插入父元素中
                    <div>'+ item.circle_name +'</div>
                    <div>'+ item.short_desc +'</div>
                    '
          $(parentNode).append(circleDiv)
        })

            that.$apply();
        })
    }