专职DBA-基于MHA高可用搭建MySQL读写分离架构-Atlas


1.Atlas介绍
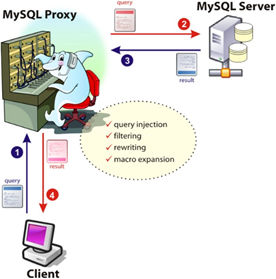
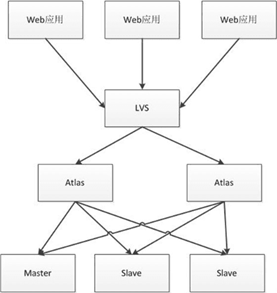
Atlas是由Qihoo360,Web平台部基础架构团队开发维护的一个基于MySQL协议的数据中间层项目。
它是在mysql-proxy-0.8.2版本的基础上,对其进行了优化,增加了一些新的功能特性。
360内部使用Atlas运行的mysql业务,每天承载的读写请求数达几十亿条。
下载地址:https://github.com/Qihoo360/Atlas/releases
注意:
1.Atlas只能安装运行在64位的系统上。
2.版本
CentOS-5.x安装Atlas-xx.el5.x86_64.rpm
CentOS-6.x安装Atlas-xx.el6.x86_64.rpm
3.后端mysql版本应大于5.1,建议使用mysql-5.6以上。


2.安装配置
[root@db04 ~]# wget https://github.com/Qihoo360/Atlas/releases/download/2.2.1/Atlas-2.2.1.el6.x86_64.rpm
[root@db04 ~]# wget https://github.com/Qihoo360/Atlas/releases/download/sharding-1.0.1/Atlas-sharding_1.0.1-el6.x86_64.rpm


[root@db04 ~]# ps -ef | grep masterha
root      8560  6706  0 19:40 pts/0    00:00:00 perl /usr/bin/masterha_manager --global_conf=/etc/masterha/masterha_default.conf --conf=/etc/masterha/app1.conf
root      8647  6706  0 19:42 pts/0    00:00:00 grep --color=auto masterha


[root@db04 ~]# masterha_check_status --conf=/etc/masterha/app1.conf
app1 (pid:8560) is running(0:PING_OK), master:10.0.0.11


[root@db04 ~]# masterha_check_repl --global_conf=/etc/masterha/masterha_default.conf --conf=/etc/masterha/app1.conf
Fri Jul 26 19:43:16 2019 - [info] Reading default configuration from /etc/masterha/masterha_default.conf..
Fri Jul 26 19:43:16 2019 - [info] Reading application default configuration from /etc/masterha/app1.conf..
Fri Jul 26 19:43:16 2019 - [info] Reading server configuration from /etc/masterha/app1.conf..
Fri Jul 26 19:43:16 2019 - [info] MHA::MasterMonitor version 0.58.
Fri Jul 26 19:43:18 2019 - [info] GTID failover mode = 1
Fri Jul 26 19:43:18 2019 - [info] Dead Servers:
Fri Jul 26 19:43:18 2019 - [info] Alive Servers:
Fri Jul 26 19:43:18 2019 - [info]   10.0.0.11(10.0.0.11:3306)
Fri Jul 26 19:43:18 2019 - [info]   10.0.0.12(10.0.0.12:3306)
Fri Jul 26 19:43:18 2019 - [info]   10.0.0.13(10.0.0.13:3306)
Fri Jul 26 19:43:18 2019 - [info] Alive Slaves:
Fri Jul 26 19:43:18 2019 - [info]   10.0.0.12(10.0.0.12:3306)  Version=5.7.26-log (oldest major version between slaves) log-bin:enabled
Fri Jul 26 19:43:18 2019 - [info]     GTID ON
Fri Jul 26 19:43:18 2019 - [info]     Replicating from 10.0.0.11(10.0.0.11:3306)
Fri Jul 26 19:43:18 2019 - [info]     Primary candidate for the new Master (candidate_master is set)
Fri Jul 26 19:43:18 2019 - [info]   10.0.0.13(10.0.0.13:3306)  Version=5.7.26-log (oldest major version between slaves) log-bin:enabled
Fri Jul 26 19:43:18 2019 - [info]     GTID ON
Fri Jul 26 19:43:18 2019 - [info]     Replicating from 10.0.0.11(10.0.0.11:3306)
Fri Jul 26 19:43:18 2019 - [info]     Primary candidate for the new Master (candidate_master is set)
Fri Jul 26 19:43:18 2019 - [info] Current Alive Master: 10.0.0.11(10.0.0.11:3306)
Fri Jul 26 19:43:18 2019 - [info] Checking slave configurations..
Fri Jul 26 19:43:18 2019 - [info]  read_only=1 is not set on slave 10.0.0.12(10.0.0.12:3306).
Fri Jul 26 19:43:18 2019 - [info]  read_only=1 is not set on slave 10.0.0.13(10.0.0.13:3306).
Fri Jul 26 19:43:18 2019 - [info] Checking replication filtering settings..
Fri Jul 26 19:43:18 2019 - [info]  binlog_do_db= , binlog_ignore_db=
Fri Jul 26 19:43:18 2019 - [info]  Replication filtering check ok.
Fri Jul 26 19:43:18 2019 - [info] GTID (with auto-pos) is supported. Skipping all SSH and Node package checking.
Fri Jul 26 19:43:18 2019 - [info] Checking SSH publickey authentication settings on the current master..
Fri Jul 26 19:43:18 2019 - [info] HealthCheck: SSH to 10.0.0.11 is reachable.
Fri Jul 26 19:43:18 2019 - [info]
10.0.0.11(10.0.0.11:3306) (current master)
 +--10.0.0.12(10.0.0.12:3306)
 +--10.0.0.13(10.0.0.13:3306)

Fri Jul 26 19:43:18 2019 - [info] Checking replication health on 10.0.0.12..
Fri Jul 26 19:43:18 2019 - [info]  ok.
Fri Jul 26 19:43:18 2019 - [info] Checking replication health on 10.0.0.13..
Fri Jul 26 19:43:18 2019 - [info]  ok.
Fri Jul 26 19:43:18 2019 - [info] Checking master_ip_failover_script status:
Fri Jul 26 19:43:18 2019 - [info]   /etc/masterha/master_ip_failover --command=status --ssh_user=root --orig_master_host=10.0.0.11 --orig_master_ip=10.0.0.11 --orig_master_port=3306
Fri Jul 26 19:43:18 2019 - [info]  OK.
Fri Jul 26 19:43:18 2019 - [warning] shutdown_script is not defined.
Fri Jul 26 19:43:18 2019 - [info] Got exit code 0 (Not master dead).

MySQL Replication Health is OK.


[root@db01 ~]# ip addr show bond0
6: bond0: <BROADCAST,MULTICAST,MASTER,UP,LOWER_UP> mtu 1500 qdisc noqueue state UP group default qlen 1000
    link/ether 00:0c:29:a1:4c:f7 brd ff:ff:ff:ff:ff:ff
    inet 10.0.0.11/24 brd 10.0.0.255 scope global bond0
       valid_lft forever preferred_lft forever
    inet 10.0.0.15/32 scope global bond0
       valid_lft forever preferred_lft forever
    inet6 fe80::20c:29ff:fea1:4cf7/64 scope link
       valid_lft forever preferred_lft forever


[root@db04 ~]# rpm -ivh Atlas-2.2.1.el6.x86_64.rpm
Preparing...                          ################################# [100%]
Updating / installing...
   1:Atlas-2.2.1-1                    ################################# [100%]


[root@db04 ~]# cd /usr/local/mysql-proxy/conf/
[root@db04 /usr/local/mysql-proxy/conf]# ls -l
total 4
-rw-r--r-- 1 root root 2810 Dec 17  2014 test.cnf
[root@db04 /usr/local/mysql-proxy/conf]# mv test.cnf test.cnf.bak


看一下默认配置文件
[root@db04 /usr/local/mysql-proxy/conf]# cat test.cnf.bak
[mysql-proxy]

#带#号的为非必需的配置项目

#管理接口的用户名
admin-username = user

#管理接口的密码
admin-password = pwd

#Atlas后端连接的MySQL主库的IP和端口,可设置多项,用逗号分隔
proxy-backend-addresses = 127.0.0.1:3306

#Atlas后端连接的MySQL从库的IP和端口,@后面的数字代表权重,用来作负载均衡,若省略则默认为1,可设置多项,用逗号分隔
#proxy-read-only-backend-addresses = 127.0.0.1:3305@1

#用户名与其对应的加密过的MySQL密码,密码使用PREFIX/bin目录下的加密程序encrypt加密,下行的user1和user2为示例,将其替换为你的MySQL的用户名和加密密码!
pwds = user1:+jKsgB3YAG8=, user2:GS+tr4TPgqc=

#设置Atlas的运行方式,设为true时为守护进程方式,设为false时为前台方式,一般开发调试时设为false,线上运行时设为true,true后面不能有空格。
daemon = true

#设置Atlas的运行方式,设为true时Atlas会启动两个进程,一个为monitor,一个为worker,monitor在worker意外退出后会自动将其重启,设为false时只有worker,没有monitor,一般开发调试时设为false,线上运行时设为true,true后面不能有空格。
keepalive = true

#工作线程数,对Atlas的性能有很大影响,可根据情况适当设置
event-threads = 8

#日志级别,分为message、warning、critical、error、debug五个级别
log-level = message

#日志存放的路径
log-path = /usr/local/mysql-proxy/log

#SQL日志的开关,可设置为OFF、ON、REALTIME,OFF代表不记录SQL日志,ON代表记录SQL日志,REALTIME代表记录SQL日志且实时写入磁盘,默认为OFF
#sql-log = OFF

#慢日志输出设置。当设置了该参数时,则日志只输出执行时间超过sql-log-slow(单位:ms)的日志记录。不设置该参数则输出全部日志。
#sql-log-slow = 10

#实例名称,用于同一台机器上多个Atlas实例间的区分
#instance = test

#Atlas监听的工作接口IP和端口
proxy-address = 0.0.0.0:1234

#Atlas监听的管理接口IP和端口
admin-address = 0.0.0.0:2345

#分表设置,此例中person为库名,mt为表名,id为分表字段,3为子表数量,可设置多项,以逗号分隔,若不分表则不需要设置该项
#tables = person.mt.id.3

#默认字符集,设置该项后客户端不再需要执行SET NAMES语句
#charset = utf8

#允许连接Atlas的客户端的IP,可以是精确IP,也可以是IP段,以逗号分隔,若不设置该项则允许所有IP连接,否则只允许列表中的IP连接
#client-ips = 127.0.0.1, 192.168.1

#Atlas前面挂接的LVS的物理网卡的IP(注意不是虚IP),若有LVS且设置了client-ips则此项必须设置,否则可以不设置
#lvs-ips = 192.168.1.1


制作加密密码
因为我的repl账户和mha账户密码都是123
[root@db04 ~]# /usr/local/mysql-proxy/bin/encrypt 123
3yb5jEku5h4=


[root@db04 /usr/local/mysql-proxy/conf]# vim test.cnf
[mysql-proxy]
admin-username = user
admin-password = pwd
proxy-backend-addresses = 10.0.0.15:3306
proxy-read-only-backend-addresses = 10.0.0.12:3306,10.0.0.13:3306
pwds = repl:3yb5jEku5h4=,mha:3yb5jEku5h4=
daemon = true
keepalive = true
event-threads = 8
log-level = message
log-path = /usr/local/mysql-proxy/log
sql-log=ON
proxy-address = 0.0.0.0:33060
admin-address = 0.0.0.0:2345
charset=utf8


[root@db04 ~]# /usr/local/mysql-proxy/bin/mysql-proxyd test start
OK: MySQL-Proxy of test is started


[root@db04 ~]# ps -ef | grep proxy
root      9246     1  0 19:58 ?        00:00:00 /usr/local/mysql-proxy/bin/mysql-proxy --defaults-file=/usr/local/mysql-proxy/conf/test.cnf
root      9247  9246  0 19:58 ?        00:00:00 /usr/local/mysql-proxy/bin/mysql-proxy --defaults-file=/usr/local/mysql-proxy/conf/test.cnf
root      9271  6706  0 19:58 pts/0    00:00:00 grep --color=auto proxy


[root@db04 ~]# ss -tunlp | grep proxy
tcp    LISTEN     0      128       *:2345                  *:*                   users:(("mysql-proxy",pid=9247,fd=9))
tcp    LISTEN     0      128       *:33060                 *:*                   users:(("mysql-proxy",pid=9247,fd=10))

[root@db04 ~]# netstat -tunlp | grep proxy
tcp        0      0 0.0.0.0:2345            0.0.0.0:*               LISTEN      9247/mysql-proxy
tcp        0      0 0.0.0.0:33060           0.0.0.0:*               LISTEN      9247/mysql-proxy


3.Atlas功能测试
Microsoft Windows [版本 6.1.7601]
版权所有 (c) 2009 Microsoft Corporation。保留所有权利。

C:\Users\zhouwanchun>mysql -umha -p -h 10.0.0.14 -P33060
Enter password: ***
Welcome to the MySQL monitor.  Commands end with ; or \g.
Your MySQL connection id is 1
Server version: 5.0.81-log MySQL Community Server (GPL)

Copyright (c) 2000, 2017, Oracle and/or its affiliates. All rights reserved.

Oracle is a registered trademark of Oracle Corporation and/or its
affiliates. Other names may be trademarks of their respective
owners.

Type 'help;' or '\h' for help. Type '\c' to clear the current input statement.

mysql>


(1).测试读操作
mysql> select @@server_id;
+-------------+
| @@server_id |
+-------------+
|      123306 |
+-------------+
1 row in set (0.01 sec)

mysql> select @@server_id;
+-------------+
| @@server_id |
+-------------+
|      133306 |
+-------------+
1 row in set (0.00 sec)

mysql> select @@server_id;
+-------------+
| @@server_id |
+-------------+
|      123306 |
+-------------+
1 row in set (0.00 sec)

mysql> select @@server_id;
+-------------+
| @@server_id |
+-------------+
|      133306 |
+-------------+
1 row in set (0.00 sec)


(2).测试写操作
mysql> begin;select @@server_id;commit;
Query OK, 0 rows affected (0.01 sec)

+-------------+
| @@server_id |
+-------------+
|      113306 |
+-------------+
1 row in set (0.00 sec)

Query OK, 0 rows affected (0.00 sec)

mysql> exit;
Bye

C:\Users\zhouwanchun>


4.生产用户要求
开发人员申请一个应用:
用户:app(insert,update,select)
密码:123
要通过10.0.0.% 网段登录

(1).在主库中创建用户app
[root@db01 ~]# mysql -S /data/mysql/3306/mysql.sock -p
Enter password:

db01 [(none)]> create user 'app'@'10.0.0.%' identified by '123';
Query OK, 0 rows affected (0.01 sec)

db01 [(none)]> grant insert,update,select on *.* to 'app'@'10.0.0.%';
Query OK, 0 rows affected (0.01 sec)

db01 [(none)]> show grants for 'app'@'10.0.0.%';
+---------------------------------------------------------+
| Grants for app@10.0.0.%                                 |
+---------------------------------------------------------+
| GRANT SELECT, INSERT, UPDATE ON *.* TO 'app'@'10.0.0.%' |
+---------------------------------------------------------+
1 row in set (0.00 sec)


(2).在Atlas中添加生产用户
[root@db04 ~]# /usr/local/mysql-proxy/bin/encrypt 123
3yb5jEku5h4=

[root@db04 ~]# cd /usr/local/mysql-proxy/conf/
[root@db04 /usr/local/mysql-proxy/conf]# vim test.cnf
pwds = repl:3yb5jEku5h4=,mha:3yb5jEku5h4=,app:3yb5jEku5h4=

[root@db04 ~]# /usr/local/mysql-proxy/bin/mysql-proxyd test restart
OK: MySQL-Proxy of test is stopped
OK: MySQL-Proxy of test is started


Microsoft Windows [版本 6.1.7601]
版权所有 (c) 2009 Microsoft Corporation。保留所有权利。

C:\Users\zhouwanchun>mysql -uapp -p -h 10.0.0.14 -P33060
Enter password: ***
Welcome to the MySQL monitor.  Commands end with ; or \g.
Your MySQL connection id is 1
Server version: 5.0.81-log MySQL Community Server (GPL)

Copyright (c) 2000, 2017, Oracle and/or its affiliates. All rights reserved.

Oracle is a registered trademark of Oracle Corporation and/or its
affiliates. Other names may be trademarks of their respective
owners.

Type 'help;' or '\h' for help. Type '\c' to clear the current input statement.

mysql> exit;
Bye


5.Atlas基本管理
连接管理接口
基于密钥连接服务器db04
# ssh root@10.0.0.14

[root@db04 ~]# mysql -uuser -ppwd -h 127.0.0.1 -P2345
mysql: [Warning] Using a password on the command line interface can be insecure.
Welcome to the MySQL monitor.  Commands end with ; or \g.
Your MySQL connection id is 1
Server version: 5.0.99-agent-admin

Copyright (c) 2000, 2019, Oracle and/or its affiliates. All rights reserved.

Oracle is a registered trademark of Oracle Corporation and/or its
affiliates. Other names may be trademarks of their respective
owners.

Type 'help;' or '\h' for help. Type '\c' to clear the current input statement.

db04 [(none)]>


打印帮助
db04 [(none)]> select * from help;
+----------------------------+---------------------------------------------------------+
| command                    | description                                             |
+----------------------------+---------------------------------------------------------+
| SELECT * FROM help         | shows this help                                         |
| SELECT * FROM backends     | lists the backends and their state                      |
| SET OFFLINE $backend_id    | offline backend server, $backend_id is backend_ndx's id |
| SET ONLINE $backend_id     | online backend server, ...                              |
| ADD MASTER $backend        | example: "add master 127.0.0.1:3306", ...               |
| ADD SLAVE $backend         | example: "add slave 127.0.0.1:3306", ...                |
| REMOVE BACKEND $backend_id | example: "remove backend 1", ...                        |
| SELECT * FROM clients      | lists the clients                                       |
| ADD CLIENT $client         | example: "add client 192.168.1.2", ...                  |
| REMOVE CLIENT $client      | example: "remove client 192.168.1.2", ...               |
| SELECT * FROM pwds         | lists the pwds                                          |
| ADD PWD $pwd               | example: "add pwd user:raw_password", ...               |
| ADD ENPWD $pwd             | example: "add enpwd user:encrypted_password", ...       |
| REMOVE PWD $pwd            | example: "remove pwd user", ...                         |
| SAVE CONFIG                | save the backends to config file                        |
| SELECT VERSION             | display the version of Atlas                            |
+----------------------------+---------------------------------------------------------+
16 rows in set (0.00 sec)


查询后端所有节点信息
db04 [(none)]> select * from backends;
+-------------+----------------+-------+------+
| backend_ndx | address        | state | type |
+-------------+----------------+-------+------+
|           1 | 10.0.0.15:3306 | up    | rw   |
|           2 | 10.0.0.12:3306 | up    | ro   |
|           3 | 10.0.0.13:3306 | up    | ro   |
+-------------+----------------+-------+------+
3 rows in set (0.00 sec)


动态删除节点
db04 [(none)]> remove backend 3;
Empty set (0.00 sec)

保存配置到配置文件
db04 [(none)]> save config;
Empty set (0.01 sec)

db04 [(none)]> select * from backends;
+-------------+----------------+-------+------+
| backend_ndx | address        | state | type |
+-------------+----------------+-------+------+
|           1 | 10.0.0.15:3306 | up    | rw   |
|           2 | 10.0.0.12:3306 | up    | ro   |
+-------------+----------------+-------+------+
2 rows in set (0.00 sec)

[root@db04 ~]# cd /usr/local/mysql-proxy/conf/
[root@db04 /usr/local/mysql-proxy/conf]# grep "addresses" test.cnf
proxy-backend-addresses=10.0.0.15:3306
proxy-read-only-backend-addresses=10.0.0.12:3306


动态添加节点
db04 [(none)]> add slave 10.0.0.13:3306;
Empty set (0.00 sec)

db04 [(none)]> save config;
Empty set (0.00 sec)

db04 [(none)]> select * from backends;
+-------------+----------------+-------+------+
| backend_ndx | address        | state | type |
+-------------+----------------+-------+------+
|           1 | 10.0.0.15:3306 | up    | rw   |
|           2 | 10.0.0.12:3306 | up    | ro   |
|           3 | 10.0.0.13:3306 | up    | ro   |
+-------------+----------------+-------+------+
3 rows in set (0.00 sec)

[root@db04 /usr/local/mysql-proxy/conf]# grep "addresses" test.cnf
proxy-backend-addresses=10.0.0.15:3306
proxy-read-only-backend-addresses=10.0.0.12:3306,10.0.0.13:3306


6.自动分表
使用Atlas的分表功能时,首先需要在配置文件test.cnf设置tables参数。
tables参数设置格式:数据库名.表名.分表字段.子表数量
比如:
你的数据库名叫china,表名叫city,分表字段叫id,总共分为2张表。
那么就写为china.city.id.2
如果还有其他的分表,以逗号分隔即可。


7.关于读写分离建议
MySQL-Router ---》MySQL官方
ProxySQL -------》Percona
Maxscale -------》MariaDB