快速开始spring boot应用
官方向导搭建boot应用
- 地址:http://start.spring.io/
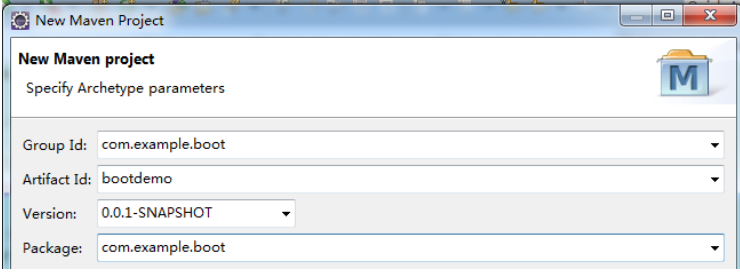
- 设置项目属性:


3.解压,拷贝到工作空间,导入maven项目
4.写Controller: HelloController.java

5.启动Spring Boot入口类:DemoApplication
普通maven工程搭建boot应用
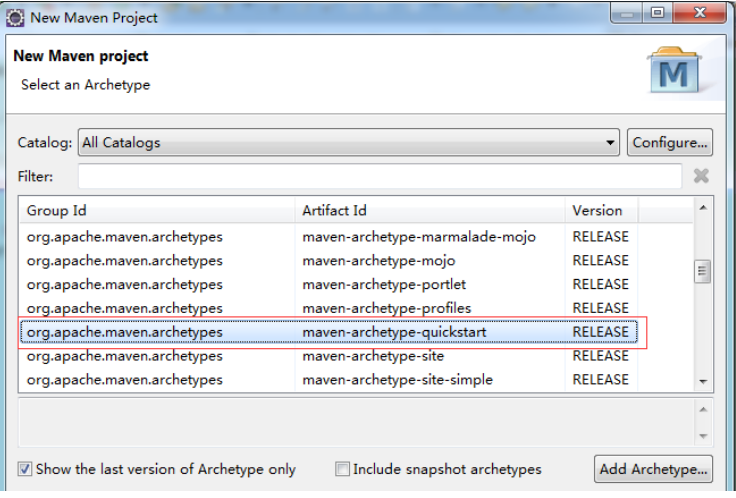
1.新建一个普通的maven工程,选择quickstart
【注意:Spring boot是web工程,但是我们这里只需要建立quickstart即可,因为spring boot内嵌了servlert容器】
2.查看官方文档:https://projects.spring.io/spring-boot/ 点击quick start
选择版本【1.5.10.RELEASE】,建议:生产环境中选择稳定的版本
拷贝依赖的父pom到自己的工程pom文件中:
<parent>
<groupId>org.springframework.boot</groupId>
<artifactId>spring-boot-starter-parent</artifactId>
<version>1.5.10.RELEASE</version>
</parent>
<dependencies>
<dependency>
<groupId>org.springframework.boot</groupId>
<artifactId>spring-boot-starter-web</artifactId>
</dependency>
</dependencies>
5.从上面的第一个boot项目的pom中拷贝项目构建的内容到当前工程中(以下内容为每个maven项目都必须要的):
<properties>
<project.build.sourceEncoding>UTF-8</project.build.sourceEncoding>
<project.reporting.outputEncoding>UTF-8</project.reporting.outputEncoding>
<java.version>1.8</java.version>
</properties>
<build>
<plugins>
<plugin>
<groupId>org.springframework.boot</groupId>
<artifactId>spring-boot-maven-plugin</artifactId>
</plugin>
</plugins>
</build>
6.如果项目出现红叉,选择项目 -- 》右键 --》Maven--》Update Project
7.拷贝文档中的事例代码SampleController.java到工程中
8.Run as --> Java Application启动SampleController.java
9.浏览器输入:http://localhost:8080/ 即可
当然,除了以上两种方式搭建boot工程,也可以通过其它工具快速生成,例如idea , sts,spring boot cli等
这些工具集成了spring boot特性 ,可以一键生成springboot工程骨架
Starter POM
统一父POM管理
建立boot-parent工程
好,首先我们建立一个 boot-parent的maven工程:
然后修改pom.xml
- packaging改为为pom格式:
<packaging>pom</packaging>
加入dependencyManagement, 同时去掉version, 直接使用父pom中的版本即可
删除无用的源文件,只保留pom.xml
修改pom.xml,加入如下内容,从上面获取即可:
那么我们要成为一个springboot项目,必须要引入他的父pom对不对:
于是加入他的父pom:
<dependency>
<groupId>org.springframework.boot</groupId>
<artifactId>spring-boot-parent</artifactId>
<version>1.5.10.RELEASE</version>
</dependency>
建立boot-base工程:
建立boot-base工程,实现之前的helloworld功能:
- 在boot-parent工程上面,建立maven module模块工程
把之前的SampleController.java复制过来,但是会报错,这时候,加入如下内容:
<dependency>
<groupId>org.springframework.boot</groupId>
<artifactId>spring-boot-starter-web</artifactId>
</dependency>
- 如果报错,如下:
- 需要修改父pom.xml中内容,boot-parent中的pom.xml,加入如下内容:
- 启动SampleController,然后访问:http://localhost:8080/
spring boot一个很重要的特点:解决了所有依赖的版本问题
spring boot 测试
- 添加测试支持依赖:spring-boot-starter-test
<dependency>
<groupId>org.springframework.boot</groupId>
<artifactId>spring-boot-starter-test</artifactId>
<scope>test</scope>
</dependency>
注意:加入这个依赖之后,junit包就可以不用了,因为test的starter中包含了junit
备注:怎么找到所有的starter:
这里面ctrl +f 搜索:starter,就可以看到spring boot中的所有starter
- 在测试包中建立测试程序类,测试SampleController
编写测试类:
so easy
spring boot 启动注解分析
1.@EnableAutoConfiguration:开启自动配置功能
@ComponentScan(basePackages={"com.example.boot"}) 包扫描
2.@SpringBootApplication配置详解:
他是一个组合注解,他内部主要包含三个子注解:@SpringBootConfiguration、@EnableAutoConfiguration、@ComponentScan
@SpringBootConfiguration:他继承@Configuration,说明这是一个配置类,什么是配置类呢?就相当于我们以前写的xml配置,例如我们我们的bean标签,用来实例化一个bean。那么在这个配置类中就是实现以前我们xml配置的功能
@EnableAutoConfiguration:开启自动配置功能,他会扫描带有@Configuration的类,然后初始化这些配置类中的信息并且加入到应用上下文中去,同时完成一些基本的初始化工作
@ComponentScan:组件包扫描,也就是我现在需要扫描哪些包下面的注解,可自动发现和装配一些bean。默认扫描当前启动类所在包下面的类和下面的所有子包
spring boot 热加载/部署
1.加入springloaded
<dependency>
<groupId>org.springframework</groupId>
<artifactId>springloaded</artifactId>
</dependency>
2.加入spring-boot-devtools
<dependency>
<groupId>org.springframework.boot</groupId>
<artifactId>spring-boot-devtools</artifactId>
</dependency>
3.启动程序,访问浏览器出现第一个结果,然后修改控制器输出内容,再次刷新看到新的结果
同时在控制台可以看待这样一句话:
o.s.b.d.a.OptionalLiveReloadServer : LiveReload server is running on port 35729
项目打包部署
1.修改boot-parent中pom.xml文件,增加如下内容(当然也可以把下面的内容复制到子模块中也是可以的)
<build>
<plugins>
<plugin><!-- 项目的打包发布 -->
<groupId>org.springframework.boot</groupId>
<artifactId>spring-boot-maven-plugin</artifactId>
<configuration>
<mainClass>com.example.boot.SpringBootMain</mainClass>
</configuration>
<executions>
<execution>
<goals>
<goal>repackage</goal>
</goals>
</execution>
</executions>
</plugin>
</plugins>
</build>
2.执行maven install
3.在target目录下面,可以看到打包的jar文件
4.执行java -jar xx.jar
例如:
D:\tools\javaSE1.8\jdk1.8\bin>java.exe -jar D:\01_dev_env\repos\com\example\boot\boot-base\0.0.1-SNAPSHOT\boot-base-0.0.1-SNAPSHOT.jar
【注意:执行jar的jdk版本需要与jar打包编译的版本一致。如果配置了环境变量,直接使用java命令打包即可】
这就是微架构,一个程序打包之后轻轻松松在如任何地方一执行就完成了。
Spring Boot属性配置文件详解
修改端口
application.properties:
server.port=8888
另外,也可以直接在运行jar包的时候修改
java -jar xx.jar --server.port=8888
自定义属性及获取
1.application.properties中[文件改成UTF-8]:
teacher.id=1
teacher.name=zhangsan
2.@Value("${属性名}")获取对应的属性值
@Controller
public class SampleController {
@Value("${teacher.name}")
private String teacherName;
@RequestMapping("/")
@ResponseBody
public String home() {
return "Hello World!" + this.teacherName;
}
}
参数引用
application.properties
teacher.id=1
teacher.name=zhangsan
teacher.info=Teacher ${teacher.name}'s number is ${teacher.id}
随机内容生成
# 随机字符串
random.string=${random.value}
# 随机int
random.number=${random.int}
# 随机long
random.long=${random.long}
# 1-20的随机数
random.b=${random.int[1,20]}
多环境配置
我们在开发应用时,通常一个项目会被部署到不同的环境中,比如:开发、测试、生产等。其中每个环境的数据库地址、服务器端口等等配置都会不同,对于多环境的配置,大部分构建工具或是框架解决的基本思路是一致的,通过配置多份不同环境的配置文件,再通过打包命令指定需要打包的内容之后进行区分打包,Spring Boot也提供了支持
在Spring Boot中多环境配置文件名需要满足application-{profile}.properties的格式,其中{profile}对应你的环境标识,比如:
l application-dev.properties:开发环境
l application-test.properties:测试环境
l application-prod.properties:生产环境
至于哪个具体的配置文件会被加载,需要在application.properties文件中通过spring.profiles.active属性来设置,其值对应{profile}值。
比如:spring.profiles.active=dev就会加载application-dev.properties配置文件中的内容
案例:
在dev, test, prod这三个文件均都设置不同的server.port端口属性,如:dev环境设置为8081,test环境设置为8082,prod环境设置为8083
application.properties中设置spring.profiles.active=dev,就是说默认以dev环境设置
总结:
1.application.properties中配置通用内容,并设置spring.profiles.active=dev,以开发环境为默认配置
2.application-{profile}.properties中配置各个环境不同的内容
Spring boot 集成模板引擎实现web应用
静态资源访问
静态资源:js, css, html, 图片,音视频等
静态资源路径:是指系统可以直接访问的路径,且路径下的所有文件均可被用户直接读取。
Spring Boot默认提供静态资源目录位置需置于classpath下,目录名需符合如下规则:
/static
/public
/resources
/META-INF/resources
案例:在classpath下面创建static目录,并且加入一个图片a.png
加入之后,然后不需要重启直接访问:http://localhost:8081/a.png
修改默认的静态资源目录:spring.resources.static-locations
模板引擎
Spring Boot强烈建议使用模板引擎渲染html页面,避免使用JSP,若一定要使用JSP将无法实现Spring Boot的多种特性。
老师在这里讲两种模板引擎的集成:Thymeleaf(spring boot推荐), FreeMarker
【师傅领进门,修行靠个人,哈哈】
Thymeleaf
Spring boot默认的模板配置路径为:src/main/resources/templates。当然也可以修改这个路径
集成Thymeleaf步骤:
1.修改pom.xml, 增加如下依赖:
<dependency>
<groupId>org.springframework.boot</groupId>
<artifactId>spring-boot-starter-thymeleaf</artifactId>
</dependency>
2.编写Controller
@Controller
public class SampleController {
@RequestMapping("/testThymeleaf")
public String testThymeleaf(ModelMap map) {
// 设置属性
map.addAttribute("name", "zhangsan");
// testThymeleaf:为模板文件的名称
// 对应src/main/resources/templates/testThymeleaf.html
return "testThymeleaf";
}
}
3.在src/main/resources/下面建立templates/testThymeleaf.html
<!DOCTYPE html>
<html>
<head lang="en">
<meta charset="UTF-8" />
<title>testThymeleaf</title>
</head>
<body>
<h1 th:text="${name}">ABC</h1>
</body>
</html>
4.运行spring boot,浏览器输入:http://localhost:8081/testThymeleaf
Thymeleaf的默认参数配置(供参考):
# Enable MVC Thymeleaf view resolution.
spring.thymeleaf.enabled=true
# Enable template caching.
spring.thymeleaf.cache=true
# Check that the templates location exists.
spring.thymeleaf.check-template-location=true
# Content-Type value.
spring.thymeleaf.content-type=text/html
# Template encoding.
spring.thymeleaf.encoding=UTF-8
# Comma-separated list of view names that should be excluded from resolution.
spring.thymeleaf.excluded-view-names=
# Template mode to be applied to templates. See also StandardTemplateModeHandlers.
spring.thymeleaf.mode=HTML5
# Prefix that gets prepended to view names when building a URL.
spring.thymeleaf.prefix=classpath:/templates/
# Suffix that gets appended to view names when building a URL.
spring.thymeleaf.suffix=.html
# Order of the template resolver in the chain.
spring.thymeleaf.template-resolver-order=
# Comma-separated list of view names that can be resolved.
spring.thymeleaf.view-names=
FreeMarker
1.修改pom.xml,增加依赖
<!-- 集成freemarker -->
<dependency>
<groupId>org.springframework.boot</groupId>
<artifactId>spring-boot-starter-freemarker</artifactId>
</dependency>
2.写Controller
@RequestMapping("/testFreemarker")
public String testFreemarker(Map<String,String> map) {
map.put("name", "张三");
return "hello"; //默认为src/main/resources/templates/hello.flt
}
3.hello.flt,目录为:src\main\resources\templates
<html>
<body>
hello, ${name}
</body>
</html>
3运行spring boot main,浏览器输入如下地址:
http://localhost:8081/testFreemarker
集成Swagger2构建RESTful API文档
[Swagger2提供以下能力]:
1.随项目自动生成强大RESTful API文档,减少工作量
2.API文档与代码整合在一起,便于同步更新API说明
3.页面测试功能来调试每个RESTful API
[集成Swagger2步骤]:
1.修改pom.xml, 添加Swagger2依赖
<dependency>
<groupId>io.springfox</groupId>
<artifactId>springfox-swagger2</artifactId>
<version>2.2.2</version>
</dependency>
<dependency>
<groupId>io.springfox</groupId>
<artifactId>springfox-swagger-ui</artifactId>
<version>2.2.2</version>
</dependency>
2.创建Swagger2配置类
在spring boot启动类所在包或子包中创建Swagger配置类SwaggerConfig.java,如下:
SwaggerConfig.java内容如下:
@Configuration
@EnableSwagger2
public class SwaggerConfig {
@Bean
public Docket createRestApi() {
return new Docket(DocumentationType.SWAGGER_2)
.apiInfo(apiInfo())
.select()
.apis(RequestHandlerSelectors.basePackage("com.example.boot"))// 指定扫描包下面的注解
.paths(PathSelectors.any())
.build();
}
// 创建api的基本信息
private ApiInfo apiInfo() {
return new ApiInfoBuilder()
.title("集成Swagger2构建RESTful APIs")
.description("集成Swagger2构建RESTful APIs")
.termsOfServiceUrl("https://www.baidu.com")
.contact("zhangsan")
.version("1.0.0")
.build();
}
}
3.创建Controller: SwaggerController.java
@RestController
@RequestMapping(value="/swagger")
public class SwaggerController {
@ApiOperation(value="获取用户信息", notes="根据id来获取用户详细信息")
@ApiImplicitParam(name="id", value="用户ID", required=true, dataType="String")
@RequestMapping(value="/{id}", method=RequestMethod.GET)
public Map<String,String> getInfo(@PathVariable String id) {
Map<String ,String> map = new HashMap<String, String>();
map.put("name", "张三");
map.put("age", "34");
return map;
}
}
4.启动Spring boot,访问Swagger UI界面:http://localhost:8081/swagger-ui.html
5.测试API:
集成Swagger2源码成功!
统一异常处理
创建全局异常处理类:通过使用@ControllerAdvice定义统一的异常处理类,@ExceptionHandler用来定义针对的异常类型
1.增加异常类:
@ControllerAdvice
class GlobalExceptionHandler {
@ExceptionHandler(value = Exception.class)
public ModelAndView defaultErrorHandler(HttpServletRequest req, Exception e)
throws Exception {
ModelAndView mav = new ModelAndView();
mav.addObject("msg", "异常咯...");
mav.setViewName("error");
return mav;
}
}
2.增加Controller方法,抛出异常:
@RequestMapping("/exception")
public String hello() throws Exception {
throw new Exception("发生错误");
}
3.src/main/resources/templates增加error.html:
<!DOCTYPE html>
<html>
<head lang="en">
<meta charset="UTF-8" />
<title>统一异常处理</title>
</head>
<body>
<h1>Error</h1>
<div th:text="${msg}"></div>
</body>
</html>
集成Mybatis
集成步骤:
1.修改pom.xml,增加依赖
<dependency>
<groupId>org.mybatis.spring.boot</groupId>
<artifactId>mybatis-spring-boot-starter</artifactId>
<version>1.1.1</version><!-- 版本号必须需要 -->
</dependency>
<dependency>
<groupId>mysql</groupId>
<artifactId>mysql-connector-java</artifactId>
</dependency>
2.mysql的连接配置
application.properties:
spring.datasource.url=jdbc:mysql://localhost:3306/spring
spring.datasource.username=root
spring.datasource.password=root
spring.datasource.driver-class-name=com.mysql.jdbc.Driver
3.创建表t_user
CREATE TABLE `t_user` (
`id` int(11) NOT NULL AUTO_INCREMENT,
`name` varchar(40) DEFAULT NULL,
`age` int(11) DEFAULT NULL,
`address` varchar(100) DEFAULT NULL,
`phone` varchar(40) DEFAULT NULL,
PRIMARY KEY (`id`)
) ENGINE=InnoDB AUTO_INCREMENT=1 DEFAULT CHARSET=utf8;
4.创建User.java文件
包名为:com.example.boot.bean
public class User {
private Integer id;
private String name;
private Integer age;
private String address;
private String phone;
// getter,setter省略
}
5.创建UserMapper.java接口文件
包名为:com.example.boot.mybatis
@Mapper
public interface UserMapper {
/**根据id查询用户*/
@Select("SELECT * FROM T_USER WHERE ID = #{id}")
User findById(@Param("id") String id);
/**新增用户*/
@Insert("INSERT INTO T_USER(NAME, AGE, ADDRESS, PHONE) VALUES(#{name}, #{age}, #{address}, #{phone})")
int insert(@Param("name") String name, @Param("age") Integer age,@Param("address") String address,@Param("phone") String phone);
}
6.测试
@RunWith(SpringJUnit4ClassRunner.class)
@SpringBootTest(classes = SpringBootMain.class)
public class MybatisTest {
@Autowired
private UserMapper userMapper;
@Test
public void testInsert() throws Exception {
int num = userMapper.insert("zhangsan", 20,"长沙","13100000000");
TestCase.assertEquals(num,1);
}
@Test
public void testFindById() throws Exception {
User u = userMapper.findById(14);
TestCase.assertNotNull(u);
System.out.println(u.getName());
}
}
注意:测试完毕之后,记得把这个测试类注释掉,不然后面构建整个项目的时候会执行test case,导致编译不成功
集成redis
集成Redis集成步骤:
1.修改pom.xml,增加依赖
<dependency>
<groupId>org.springframework.boot</groupId>
<artifactId>spring-boot-starter-data-redis</artifactId>
</dependency>
注意:旧版本spring boot中集成的redis starter为:spring-boot-starter-redis
2.redis连接配置
# REDIS (RedisProperties)
# Redis数据库索引(默认为0)
spring.redis.database=0
# Redis服务器地址
spring.redis.host=127.0.0.1
# Redis服务器连接端口
spring.redis.port=6379
# Redis服务器连接密码(默认为空)
spring.redis.password=
# 连接池最大连接数(使用负值表示没有限制)
spring.redis.pool.max-active=8
# 连接池最大阻塞等待时间(使用负值表示没有限制)
spring.redis.pool.max-wait=-1
# 连接池中的最大空闲连接
spring.redis.pool.max-idle=8
# 连接池中的最小空闲连接
spring.redis.pool.min-idle=0
# 连接超时时间(毫秒)
spring.redis.timeout=0
注意:spring.redis.database的配置通常使用0即可,Redis在配置的时候可以设置数据库数量,默认为16,可以理解为数据库的schema
3.启动redis
windows:
redis-server redis.windows.conf
4.测试
@RunWith(SpringJUnit4ClassRunner.class)
@SpringBootTest(classes = SpringBootMain.class)
public class SpringRedisTest {
@Autowired
private RedisTemplate<String,String> redisTemplate;
@Test
public void testRedis() throws Exception {
ValueOperations<String, String> ops = redisTemplate.opsForValue();
ops.set("name", "zhangsan");
String value = ops.get("name");
System.out.println(value);
TestCase.assertEquals("zhangsan", value);
}
}
注意:redis中存储对象,需要我们自己实现RedisSerializer<T>接口来对传入对象进行序列化和反序列化
集成RabbitMQ
RabbitMQ是以AMQP协议实现的一种消息中间件产品,
AMQP是Advanced Message Queuing Protocol的简称,它是一个面向消息中间件的开放式标准应用层协议。AMQP中定义了以下标准特性:
消息方向
消息队列
消息路由(包括:点到点模式和发布-订阅模式)
可靠性
安全性
关于AMQP 、RabbitMQ的详细内容不再这里过多介绍,本次课主要讲怎么与Spring boot集成
1.安装RabbitMQ[windows]
Erlang/OTP 20.3下载地址:
http://erlang.org/download/otp_win64_20.3.exe
Erlang/OTP其它版本下载地址:http://www.erlang.org/downloads
RabbitMQ Server 3.7.4下载地址:
https://dl.bintray.com/rabbitmq/all/rabbitmq-server/3.7.4/rabbitmq-server-3.7.4.exe
RabbitMQ其它版本下载地址:https://www.rabbitmq.com/download.html
关于Linux平台怎么安装,同学们自行百度即可
2.启动RabbitMQ Server
RabbitMQ Server安装之后,会自动注册为windows服务,并以默认配置启动起来
所以需要启动的话,直接通过服务的方式启动即可。
3.RabbitMQ管理页面
1.开启Web管理插件
进入rabbitmq安装目录的sbin目录,在此打开dos命令窗口,执行以下命令
rabbitmq-plugins enable rabbitmq_management
出现如下提示,说明web管理插件安装成功
然后重新启动RabbitMQ 服务,打开浏览器并访问:http://localhost:15672/,并使用默认用户guest登录,密码也为guest,即可进入管理界面
4.Spring Boot整合
1.修改pom.xml,增加依赖支持
<dependency>
<groupId>org.springframework.boot</groupId>
<artifactId>spring-boot-starter-amqp</artifactId>
</dependency>
2.新增管理用户并设置权限
1.Add a user
username:springboot
password:123456
2.切换到springboot用户登陆,在All users中,点击Name为springboot, 进入权限设置页面
3.在权限设置页面,进入Permissions页面,点击“Set permission"
3.rabbit mq连接配置
## rabbitmq config
spring.rabbitmq.host=localhost
spring.rabbitmq.port=5672
spring.rabbitmq.username=springboot
spring.rabbitmq.password=123456
4.创建Rabbit配置类
配置类主要用来配置队列、交换器、路由等高级信息
import org.springframework.amqp.core.Queue;
import org.springframework.context.annotation.Bean;
import org.springframework.context.annotation.Configuration;
@Configuration
public class RabbitConfig {
@Bean
public Queue firstQueue() {
// 创建一个队列,名称为:first
return new Queue("first");
}
}
5.创建消息产生者类
@Component
public class Sender {
@Autowired
private AmqpTemplate rabbitTemplate;
public void send() {
rabbitTemplate.convertAndSend("first", "test rabbitmq message !!!");
}
}
说明:通过注入AmqpTemplate接口的实例来实现消息的发送,AmqpTemplate接口定义了一套针对AMQP协议的基础操作
6.创建消息消费者
@Component
@RabbitListener(queues = "first")
public class Receiver {
@RabbitHandler
public void process(String msg) {
System.out.println("receive msg : " + msg);
}
}
说明:
@RabbitListener注解:定义该类需要监听的队列
@RabbitHandler注解:指定对消息的处理
6.创建测试类
@RunWith(SpringJUnit4ClassRunner.class)
@SpringBootTest(classes = SpringBootMain.class)
public class RabbitmqTest {
@Autowired
private Sender sender;
@Test
public void testRabbitmq() throws Exception {
sender.send();
}
}
7.启动主程序:SpringBootMain
控制台如果出现以下信息,则说明rabbitmq连接成功
Created new connection: rabbitConnectionFactory#29102d45:0/SimpleConnection@1dcfb5ba [delegate=amqp://[email protected]:5672/, localPort= 55088]
8.运行Junit测试类
控制台输出:
receive msg : test rabbitmq message !!!
集成Rabbit MQ完毕!
Spring boot 日志
Java 有很多日志系统,例如,Java Util Logging, Log4J, Log4J2, Logback 等。Spring Boot 也提供了不同的选项,比如日志框架可以用 logback 或 log4j ,log4j2等。
默认的日志框架 logback
springboot自带log日志功能 使用的是slf4j(Simple Logging Facade For Java),它是一个针对于各类Java日志框架的统一Facade抽象
日志实现默认使用的logback
Logback是log4j框架的作者开发的新一代日志框架,它效率更高、能够适应诸多的运行环境,同时天然支持SLF4J。这是默认支持logback的原因
例如,在spring-boot-starter 依赖中,添加了 spring-boot-starter-logging依赖
<dependency>
<groupId>org.springframework.boot</groupId>
<artifactId>spring-boot-starter-logging</artifactId>
</dependency>
那么, Spring Boot 应用将自动使用 logback 作为应用日志框架, Spring Boot 启动的时候,由 org.springframework.boot.logging.Logging.LoggingApplicationListener 根据情况初始化并使用。
值得注意的是,默认情况下,Spring Boot 使用 logback 作为应用日志框架。因为 spring-boot-starter 其中包含了 spring-boot-starter-logging,该依赖就是 使用Spring Boot 默认的日志框架 logback
【程序中使用】:
import org.slf4j.Logger;
import org.slf4j.LoggerFactory;
private final Logger logger = LoggerFactory.getLogger(SampleController.class);
日志级别
默认情况下,Spring Boot 配置的是INFO 日志级别,也就是会输出INFO级别以上的日志( ERROR, WARN, INFO )。如果需要 Debug 级别的日志。在 src/main/resources/application.properties 中配置。
debug=true
此外,配置 logging.level.* 来具体输出哪些包的日志级别。
例如
logging.level.root=INFO
logging.level.org.springframework.web=DEBUG
logging.level.com.example.boot.controller=DEBUG
日志文件
默认情况下, Spring Boot 日志只会输出到控制台,并不会写入到日志文件,因此,对于正式环境的应用,我们需要通过在 application.properites 文件中配置 logging.file 文件名称和 logging.path 文件路径,将日志输出到日志文件中。
logging.path = /var/tmp
logging.file = xxx.log
logging.level.root = info
如果只配置 logging.path,在 /var/tmp文件夹生成一个日志文件为 spring.log。如果只配置 logging.file,会在项目的当前路径下生成一个 xxx.log 日志文件。
值得注意的是,日志文件会在 10MB 大小的时候被截断,产生新的日志文件。
常用的日志框架 log4j
如果,我们希望使用 log4j 或者 log4j2,我们可以采用类似的方式将它们对应的依赖模块加到 Maven 依赖中。
集成log4j2
在spring-boot-dependencies POMs中搜索spring-boot-starter-log4j2
发现Spring boot父Pom中自己提供了这个依赖,于是我们加入如下jar依赖:
<!-- log4j2 -->
<dependency>
<groupId>org.springframework.boot</groupId>
<artifactId>spring-boot-starter</artifactId>
<exclusions>
<exclusion>
<groupId>org.springframework.boot</groupId>
<artifactId>spring-boot-starter-logging</artifactId>
</exclusion>
</exclusions>
</dependency>
<dependency>
<groupId>org.springframework.boot</groupId>
<artifactId>spring-boot-starter-log4j2</artifactId>
</dependency>
日志使用跟上面logback一样。
集成log4j
在spring-boot-dependencies POMs中搜索spring-boot-starter-log4j
发现Spring boot的父Poms中自己并没有提供了这个依赖, 我们在http://mvnrepository.com
中央仓库中查找spring-boot-starter-log4j
1.加入pom依赖
<!-- log4j start -->
<dependency>
<groupId>org.springframework.boot</groupId>
<artifactId>spring-boot-starter</artifactId>
<exclusions>
<exclusion>
<groupId>org.springframework.boot</groupId>
<artifactId>spring-boot-starter-logging</artifactId>
</exclusion>
</exclusions>
</dependency>
<dependency>
<groupId>org.springframework.boot</groupId>
<artifactId>spring-boot-starter-log4j</artifactId>
<version>1.3.8.RELEASE</version>
</dependency>
<!-- log4j end -->
classpath下增加log4j.properties
log4j.rootCategory=INFO, stdout, file, errorfile
log4j.category.com.example.boot=INFO, myFile
log4j.logger.error=errorfile
# 控制台输出
log4j.appender.stdout=org.apache.log4j.ConsoleAppender
log4j.appender.stdout.layout=org.apache.log4j.PatternLayout
log4j.appender.stdout.layout.ConversionPattern=%d{yyyy-MM-dd HH:mm:ss,SSS} %5p %c{1}:%L - %m%n
# root日志输出
log4j.appender.file=org.apache.log4j.DailyRollingFileAppender
log4j.appender.file.file=logs/all.log
log4j.appender.file.DatePattern='.'yyyy-MM-dd
log4j.appender.file.layout=org.apache.log4j.PatternLayout
log4j.appender.file.layout.ConversionPattern=%d{yyyy-MM-dd HH:mm:ss,SSS} %5p %c{1}:%L - %m%n
# error日志输出
log4j.appender.errorfile=org.apache.log4j.DailyRollingFileAppender
log4j.appender.errorfile.file=logs/error.log
log4j.appender.errorfile.DatePattern='.'yyyy-MM-dd
log4j.appender.errorfile.Threshold = ERROR
log4j.appender.errorfile.layout=org.apache.log4j.PatternLayout
log4j.appender.errorfile.layout.ConversionPattern=%d{yyyy-MM-dd HH:mm:ss,SSS} %5p %c{1}:%L - %m%n
# com.example.boot下的日志输出
log4j.appender.myFile=org.apache.log4j.DailyRollingFileAppender
log4j.appender.myFile.file=logs/my.log
log4j.appender.myFile.DatePattern='.'yyyy-MM-dd
log4j.appender.myFile.layout=org.apache.log4j.PatternLayout
log4j.appender.myFile.layout.ConversionPattern=%d{yyyy-MM-dd HH:mm:ss,SSS} %5p %c{1}:%L ---- %m%n
3.代码中使用log4j
import org.apache.log4j.Logger;
private final Logger logger = Logger.getLogger(xxx.class);
自定义视图映射
在项目开发过程中,经常会涉及页面跳转问题,而且这个页面跳转没有任何业务逻辑过程,只是单纯的路由过程 ( 例如:点击一个按钮跳转到一个页面 )
正常的写法是这样的:
@RequestMapping("/testmvc")
public String view(){
return "abc";
}
现在只需要这样统一写,此类必须在启动类所在包或者子包中:
@Configuration
public class WebMvcConfig extends WebMvcConfigurerAdapter{
@Override
public void addViewControllers(ViewControllerRegistry registry) {
registry.addViewController("/testmvc").setViewName("/abc");
}
}
页面:abc.flt 或者 abc.html
<html>
<body>
hello
</body>
</html>
访问http://localhost:8081/testmvc 即可访问到这个abc.flt文件
自定义Starter
在我们学习SpringBoot时都已经了解到starter是SpringBoot的核心组成部分,SpringBoot为我们提供了尽可能完善的封装,提供了一系列的自动化配置的starter插件,我们在使用spring-boot-starter-web时只需要在pom.xml配置文件内添加依赖就可以了,我们之前传统方式则是需要添加很多相关SpringMVC配置文件。而spring-boot-starter-web为我们提供了几乎所有的默认配置,很好的降低了使用框架时的复杂度。
因此在使用xx.starter时你就不用考虑该怎么配置,即便是有一些必要的配置在application.properties配置文件内对应配置就可以了,那好,为什么我在application.properties配置对应属性后xx.starter就可以获取到并作出处理呢?下面我们带着这个疑问来编写我们自定义的starter让我们深入了解SpringBoot
创建自己的starter项目
创建普通maven项目,修改pom.xml,增加自动配置依赖
<dependency>
<groupId>org.springframework.boot</groupId>
<artifactId>spring-boot-autoconfigure</artifactId>
<version>1.5.10.RELEASE</version>
</dependency>
我们这个starter并不做其他复杂逻辑的编写,所以这里的依赖只是添加了spring-boot-autoconfigure,实战开发时可以添加任意依赖到项目中。
配置映射参数实体
starter是如何读取application.properties或者application.yml配置文件内需要的配置参数的呢?那么接下来我们就看看如何可以获取自定义的配置信息。
SpringBoot在处理这种事情上早就已经考虑到了,所以提供了一个注解@ConfigurationProperties,该注解可以完成将application.properties配置文件内的有规则的配置参数映射到实体内的field内,不过需要提供setter方法,自定义配置参数实体代码如下所示:
@ConfigurationProperties(prefix = "hello")
public class HelloProperties{
private String msg = "test";
public String getMsg() {
return msg;
}
public void setMsg(String msg) {
this.msg = msg;
}
}
在上面代码中,@ConfigurationProperties注解内我们使用到了属性preffix,该属性配置了读取参数的前缀,根据上面的实体属性对应配置文件内的配置则是hello.msg,当然我们提供了默认值,配置文件内不进行配置时则是使用默认值
编写自定义业务
我们为自定义starter提供一个Service,并且提供一个名为sayHello的方法用于返回我们配置的msg内容。代码如下所示:
public class HelloService{
private String msg;
public String sayHello(){
return msg;
}
public void setMsg(String msg) {
this.msg = msg;
}
}
我们Service内的代码比较简单,根据属性参数进行返回格式化后的字符串。
接下来我们开始编写自动配置,这一块是starter的核心部分,配置该部分后在启动项目时才会自动加载配置,当然其中有很多细节性质的配置
实现自动化配置
自动化配置其实只是提供实体bean的验证以及初始化,我们先来看看代码:
@Configuration//开启配置
@EnableConfigurationProperties(HelloProperties.class)//开启使用映射实体对象
@ConditionalOnClass(HelloService.class)//存在HelloService时初始化该配置类
@ConditionalOnProperty//存在对应配置信息时初始化该配置类
(
prefix = "hello",//存在配置前缀hello
value = "enabled",//开启
matchIfMissing = true//缺失检查
)
public class HelloAutoConfiguration{
//application.properties配置文件映射前缀实体对象
@Autowired
private HelloProperties helloProperties;
/**
* 根据条件判断不存在HelloService时初始化新bean到SpringIoc
* @return
*/
@Bean//创建HelloService实体bean
@ConditionalOnMissingBean(HelloService.class)//缺失HelloService实体bean时,初始化HelloService并添加到SpringIoc
public HelloService helloService(){
System.out.println(">>>The HelloService Not Found,Execute Create New Bean.");
HelloService helloService = new HelloService();
helloService.setMsg(helloProperties.getMsg());//设置消息内容
return helloService;
}
}
自动化配置代码中有很多我们之前没有用到的注解配置,我们从上开始讲解
@Configuration:这个配置就不用多做解释了,我们一直在使用
@EnableConfigurationProperties:这是一个开启使用配置参数的注解,value值就是我们配置实体参数映射的ClassType,将配置实体作为配置来源。
SpringBoot内置条件注解
有关@ConditionalOnXxx相关的注解这里要系统的说下,因为这个是我们配置的关键,根据名称我们可以理解为具有Xxx条件,当然它实际的意义也是如此,条件注解是一个系列,下面我们详细做出解释
@ConditionalOnBean:当SpringIoc容器内存在指定Bean的条件
@ConditionalOnClass:当SpringIoc容器内存在指定Class的条件
@ConditionalOnExpression:基于SpEL表达式作为判断条件
@ConditionalOnJava:基于JVM版本作为判断条件
@ConditionalOnJndi:在JNDI存在时查找指定的位置
@ConditionalOnMissingBean:当SpringIoc容器内不存在指定Bean的条件
@ConditionalOnMissingClass:当SpringIoc容器内不存在指定Class的条件
@ConditionalOnNotWebApplication:当前项目不是Web项目的条件
@ConditionalOnProperty:指定的属性是否有指定的值
@ConditionalOnResource:类路径是否有指定的值
@ConditionalOnSingleCandidate:当指定Bean在SpringIoc容器内只有一个,或者虽然有多个但是指定首选的Bean
@ConditionalOnWebApplication:当前项目是Web项目的条件
以上注解都是元注解@Conditional演变而来的,根据不用的条件对应创建以上的具体条件注解。
到目前为止我们还没有完成自动化配置starter,我们需要了解SpringBoot运作原理后才可以完成后续编码。
Starter自动化运作原理
在注解@SpringBootApplication上存在一个开启自动化配置的注解@EnableAutoConfiguration来完成自动化配置,注解源码如下所示:
@AutoConfigurationPackage
@Import({EnableAutoConfigurationImportSelector.class})
public @interface EnableAutoConfiguration {
String ENABLED_OVERRIDE_PROPERTY = "spring.boot.enableautoconfiguration";
Class<?>[] exclude() default {};
String[] excludeName() default {};
}
在@EnableAutoConfiguration注解内使用到了@import注解来完成导入配置的功能,而EnableAutoConfigurationImportSelector内部则是使用了SpringFactoriesLoader.loadFactoryNames方法进行扫描具有META-INF/spring.factories文件的jar包。我们可以先来看下spring-boot-autoconfigure包内的spring.factories文件内容,如下所示:
可以看到配置的结构形式是Key=>Value形式,多个Value时使用,隔开,那我们在自定义starter内也可以使用这种形式来完成,我们的目的是为了完成自动化配置,所以我们这里Key则是需要使用org.springframework.boot.autoconfigure.EnableAutoConfiguration
自定义spring.factories
我们在src/main/resource目录下创建META-INF目录,并在目录内添加文件spring.factories,具体内容如下所示:
#配置自定义Starter的自动化配置
org.springframework.boot.autoconfigure.EnableAutoConfiguration=com.example.HelloAutoConfiguration
都目前为止我们的自定义starter已经配置完成,下面我们需要新建一个SpringBoot项目来测试我们的自动化配置是否已经生效。
创建SpringBoot测试项目
创建spring boot项目,在pom文件中增加自定义的starter依赖
<dependency>
<groupId>com.example</groupId>
<artifactId>spring-boot-starter-hello</artifactId>
<version>0.0.1-SNAPSHOT</version>
</dependency>
controller引入自定义starter中的service调用业务:
运行测试
在运行项目之前,我们打开application.properties配置文件开启debug模式,查看自动化配置的输出日志,配置内容如下所示:
#显示debug日志信息
debug=true
接下来我们启动项目,在控制台查找是否存在我们的HelloAutoConfiguration日志输出
在控制台可以看到我们的自定义starter的自动化配置已经生效了,并且根据@ConditionalOnMissingBean(HelloService.class)做出了条件注入HelloService实体bean到SpringIoc容器内
我们的配置生效了,到目前为止我相信大家已经明白了我们application.properties配置文件为什么可以作为统一配置入口,为什么配置后可以被对应starter所使用