写在最前,后面测试会用到HDFS2,所以本次环境搭建是在Hadoop2.6.1,三节点的基础上完成的。
(关于搭建Hadoop环境,可参考:https://www.cnblogs.com/SysoCjs/p/10835793.html)
说明:
集群环境:
Master 192.168.112.10
Slave1 192.168.112.11
Slave2 192.168.112.12
#master,表示在master节点上操作;
#master,#slave1,#slave2,表示在三个节点上都要操作;
一、准备工作
下载软件包,到flume官网下载tgz压缩包,并解压:
#Master
cd /usr/local/src/
wget http://mirror.bit.edu.cn/apache/flume/1.6.0/apache-flume-1.6.0-bin.tar.gz

tar zxvf apache-flume-1.6.0-bin.tar.gz
二、配置文件、测试
cd ./conf/
# NetCat测试
vim flume-netcat.conf
输入内容:
# Name the components on this agent
agent.sources = r1
agent.sinks = k1
agent.channels = c1

# Describe/configuration the source
agent.sources.r1.type = netcat
agent.sources.r1.bind = 192.168.112.10
agent.sources.r1.port = 44444

# Describe the sink
agent.sinks.k1.type = logger

# Use a channel which buffers events in memory
agent.channels.c1.type = memory
agent.channels.c1.capacity = 1000
agent.channels.c1.transactionCapacity = 100

# Bind the source and sink to the channel
agent.sources.r1.channels = c1
agent.sinks.k1.channel = c1
验证:
开启动一个master窗口,作为#Server
bin/flume-ng agent --conf conf --conf-file conf/flume-netcat.conf --name=agent -Dflume.root.logger=INFO,console
再开启一个master窗口,作为#client
telnet master 44444


# Exec测试
vim flume-exec.conf
输入内容:
# Name the components on this agent
agent.sources = r1
agent.sinks = k1
agent.channels = c1

# Describe/configuration the source
agent.sources.r1.type = exec
agent.sources.r1.command = tail -f /usr/local/src/apache-flume-1.6.0-bin/data/hadoop/flume/test.txt

# Describe the sink
agent.sinks.k1.type = logger

# Use a channel which buffers events in memory
agent.channels.c1.type = memory
agent.channels.c1.capacity = 1000
agent.channels.c1.transactionCapacity = 100

# Bind the source and sink to the channel
agent.sources.r1.channels = c1
agent.sinks.k1.channel = c1
# Server
./bin/flume-ng agent --conf conf --conf-file conf/flume-exec.conf --name=agent -Dflume.root.logger=INFO,console
# Client
while true;do echo `date` >> /usr/local/src/apache-flume-1.6.0-bin/data/hadoop/flume/test.txt ; sleep 1; done
![]()

# Avro测试
vim flume-avro.conf
输入内容:
# Define a memory channel called c1 on agent
agent.channels.c1.type = memory

# Define an avro source alled r1 on agent and  tell it
agent.sources.r1.channels = c1
agent.sources.r1.type = avro
agent.sources.r1.bind = 192.168.112.10
agent.sources.r1.port = 44444

# Describe/configuration the source
agent.sinks.k1.type = hdfs
agent.sinks.k1.channel = c1
agent.sinks.k1.hdfs.path = hdfs://master:9000/flume_data_pool
agent.sinks.k1.hdfs.filePrefix = events-
agent.sinks.k1.hdfs.fileType = DataStream
agent.sinks.k1.hdfs.writeFormat = Text
agent.sinks.k1.hdfs.rollSize = 0
agent.sinks.k1.hdfs.rollCount= 600000
agent.sinks.k1.hdfs.rollInterval = 600

agent.channels = c1
agent.sources = r1
agent.sinks = k1
# Server
./bin/flume-ng agent --conf conf --conf-file conf/flume-avro.conf --name=agent -Dflume.root.logger=DEBUG,console
# client
./bin/flume-ng avro-client --conf conf -H master -p 44444 -F /home/badou/flume_test/monitor_source/3.txt -Dflume.root.logger=DEBUG,consol

# Netcat To Avro测试
原理:
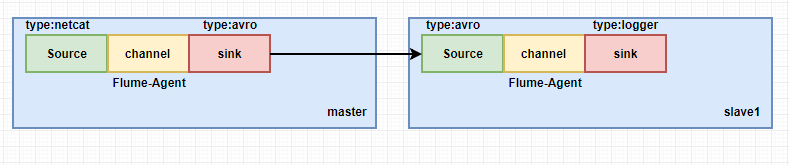
#master
1、创建flume-netcat2avro.conf文件
添加内容:
# Name the components on this agent
a1.sources = r1
a1.sinks = k1
a1.channels = c1

# Describe/configure the source
a1.sources.r1.type = netcat
a1.sources.r1.bind = 192.168.112.10
a1.sources.r1.port = 44444
a1.sources.r1.channels = c1

#Use a channel which buffers events in memory
a1.channels.c1.type = memory
a1.channels.c1.keep-alive = 10
a1.channels.c1.capacity = 100000
a1.channels.c1.transactionCapacity = 100000

# Describe /configure the sink/next source
a1.sinks.k1.type = avro
a1.sinks.k1.channel = c1
a1.sinks.k1.hostname = 192.168.112.11
a1.sinks.k1.port = 44444
2、在master的一个终端启动flume:
./bin/flume-ng agent -c conf -f conf/flume-netcat2avro.conf -n a1 -Dflume.root.logger=INFO,console
#slave1
3、创建flume-netcat2avro.conf文件
添加内容:
# Name the components on this agent
a2.sources = r1
a2.sinks = k1
a2.channels = c1

#Describe/configure the source
a2.sources.r1.type = avro
a2.sources.r1.channels = c1
a2.sources.r1.bind = 192.168.112.11
a2.sources.r1.port = 44444

# Describe the sink
a2.sinks.k1.type = logger
a2.sinks.k1.channel = c1

# Use a channel which buffers events in memory
a2.channels.c1.type = memory
a2.channels.c1.keep-alive = 10
a2.channels.c1.capacity = 100000
a2.channels.c1.transactionCapacity = 100000
4、在slave1的一个终端启动flume:
./bin/flume-ng agent -c conf -f conf/flume-netcat2avro.conf -n a2 -Dflume.root.logger=INFO,console
5、再打开一个master终端,作为消息生产者,因为master的source源类型是netcat,所以连接用telnet方式:
telnet master:4444

查看刚才启动flume的slave1终端:
