一. 概述
LinkedList 是 Java 集合中比较常用的数据结构,与 ArrayList 一样,实现了 List 接口,只不过 ArrayList 是基于数组实现的,而 LinkedList 是基于链表实现的。所以 LinkedList 插入和删除方面要优于 ArrayList,而随机访问上则 ArrayList 性能更好。
除了 LIst 接口之外,LinkedList 还实现了 Deque,Cloneable,Serializable 三个接口。这说明该数据结构支持队列,克隆和序列化操作的。与 ArrayList 一样,允许 null 元素的存在,且是不支持多线程的。
二. 源码解读
属性
LinkedList 提供了以下三个成员变量。size,first,last。
transient int size = 0;
transient Node<E> first;
transient Node<E> last;
其中 size 为 LinkedList 的大小,first 和 last 分别为链表的头结点和尾节点。Node 为节点对象。
private static class Node<E> {
E item;
Node<E> next;
Node<E> prev;
Node(Node<E> prev, E element, Node<E> next) {
this.item = element;
this.next = next;
this.prev = prev;
}
}
Node 是 LInkedList 的内部类,定义了存储的数据元素,前一个节点和后一个节点,典型的双链表结构。
构造方法
public LinkedList() {}
public LinkedList(Collection<? extends E> c) {
this();
addAll(c);
}
LinkedList 提供了两个构造方法:LinkedList() 和 LinkedList(Collection<? extends E> c)。
LinkedList() 仅仅构造一个空的列表,没有任何元素。size = 0。first 和 last 都为 null。
后一个构造方法构造一个包含指定 Collection 中所有元素的列表,该构造方法首先会调用空的构造方法,然后通过 addAll() 的方式把 Collection 中的所有元素添加进去。
调用 addAll() 方法,传入当前的节点个数 size,此时 size 为
检查 index 是否越界
将 collection 转换成数组
遍历数组,将数组里面的元素创建为节点,并按照顺序连起来。
修改当前的节点个数 size 的值
操作次数 modCount 自增 1.
public boolean addAll(Collection<? extends E> c) {
return addAll(size, c);
}
public boolean addAll(int index, Collection<? extends E> c) {
checkPositionIndex(index);
Object[] a = c.toArray();
int numNew = a.length;
if (numNew == 0)
return false;
Node<E> pred, succ;
if (index == size) {
succ = null;
pred = last;
} else {
succ = node(index);
pred = succ.prev;
}
for (Object o : a) {
@SuppressWarnings("unchecked") E e = (E) o;
Node<E> newNode = new Node<>(pred, e, null);
if (pred == null)
first = newNode;
else
pred.next = newNode;
pred = newNode;
}
if (succ == null) {
last = pred;
} else {
pred.next = succ;
succ.prev = pred;
}
size += numNew;
modCount++;
return true;
}
add 操作
添加元素到链表末尾
public boolean add(E e) {
linkLast(e);
return true;
}
void linkLast(E e) {
final Node<E> l = last;
final Node<E> newNode = new Node<>(l, e, null);
last = newNode;
if (l == null)
first = newNode;
else
l.next = newNode;
size++;
modCount++;
}
add 方法直接调用了 linkLast 方法,而 linkLast 方法是不对外开放的。该方法做了三件事情,新增一个节点,改变其前后引用,将 size 和 modCount 自增 1。其中 modCount 是记录对集合操作的次数。
在指定的位置插入元素
public void add(int index, E element) {
checkPositionIndex(index);
if (index == size)
linkLast(element);
else
linkBefore(element, node(index));
}
private void checkPositionIndex(int index) {
if (!isPositionIndex(index))
throw new IndexOutOfBoundsException(outOfBoundsMsg(index));
}
private boolean isPositionIndex(int index) {
return index >= 0 && index <= size;
}
void linkBefore(E e, Node<E> succ) {
// assert succ != null;
final Node<E> pred = succ.prev;
final Node<E> newNode = new Node<>(pred, e, succ);
succ.prev = newNode;
if (pred == null)
first = newNode;
else
pred.next = newNode;
size++;
modCount++;
}
首先检查下标是否越界,然后判断如果 index == size 则添加到末尾,否则将该元素插入的 index 的位置。其中 node(index) 是获取 index 位置的节点,linkBefore 负责把元素 e 插入到 succ 之前。
Node<E> node(int index) {
// assert isElementIndex(index);
if (index < (size >> 1)) {
Node<E> x = first;
for (int i = 0; i < index; i++)
x = x.next;
return x;
} else {
Node<E> x = last;
for (int i = size - 1; i > index; i--)
x = x.prev;
return x;
}
}
可以看出 node() 方法这里写的还是挺赞的,不是傻乎乎的从头到尾或者从尾到头遍历链表,而是将 index 与 当前链表的一半做对比,比一半小从头遍历,比一半大从后遍历。对于数据量很大时能省下不少时间。
get 操作
很简单,首先获取节点,然后返回节点的数据即可。
public E get(int index) {
checkElementIndex(index);
return node(index).item;
}
remove 操作
移除指定位置的元素
public E remove(int index) {
checkElementIndex(index);
return unlink(node(index));
}
E unlink(Node<E> x) {
// assert x != null;
final E element = x.item;
final Node<E> next = x.next;
final Node<E> prev = x.prev;
if (prev == null) {
first = next; // 如果移除的是头节点,那么头结点后移
} else {
prev.next = next;
x.prev = null; // 释放节点的前一个元素
}
if (next == null) {
last = prev; // 如果移除的是尾节点,尾结点前移
} else {
next.prev = prev;
x.next = null; // 释放节点的后一个元素
}
x.item = null; // 释放节点数据
size--;
modCount++;
return element;
}
先检查下标是否越界,然后调用 unlink 释放节点。
移除指定元素
public boolean remove(Object o) {
if (o == null) {
for (Node<E> x = first; x != null; x = x.next) {
if (x.item == null) {
unlink(x);
return true;
}
}
} else {
for (Node<E> x = first; x != null; x = x.next) {
if (o.equals(x.item)) {
unlink(x);
return true;
}
}
}
return false;
}
判断要移除的元素是否为 null,然后在遍历链表,找到钙元素第一次出现的位置,移除并返回 true。
像其他的常用方法如:getFirst, getLast, removeFirst, removeLast, addFirst, addLast 等都很简单,扫一眼源码就能懂,我这里就不写了。
迭代器
LInkedList 的 iterator() 方法是在其父类 AbstractSequentialList 中定义的,最终一路 debug 到 LinkedList 类这里。其中 index 为 零。
public ListIterator<E> listIterator(int index) {
checkPositionIndex(index);
return new ListItr(index);
}
我们来看看 ListItr。
private Node<E> lastReturned;
private Node<E> next;
private int nextIndex;
private int expectedModCount = modCount;
ListItr(int index) {
// assert isPositionIndex(index);
next = (index == size) ? null : node(index);
nextIndex = index;
}
public boolean hasNext() {
return nextIndex < size;
}
public E next() {
checkForComodification();
if (!hasNext())
throw new NoSuchElementException();
lastReturned = next;
next = next.next;
nextIndex++;
return lastReturned.item;
}
final void checkForComodification() {
if (modCount != expectedModCount)
throw new ConcurrentModificationException();
}
}
篇幅有限 ,我就只贴主要代码了。由源码可以看出初始化 ListItr 时,将 nextIndex 指向 index, 也就是零。如果该集合为空,那么 index == size 为 true,next 指向 null,否则 next 指向下标为零的元素,也就是第一个。
hasNext 直接返回 nextIndex < size 简单明了。下面看看 next 方法,首先检查 expectedModCount 与 modCount 是否相等,看似无关紧要的代码保证了集合在迭代过程中不被修改[包括新增删除节点等]。然后将 lastReturned 指向 next,next 后移一个节点,nextIndex 自增 1,并返回 lastReturned 节点的元素。
总结
1、从源码可以看出 LinkedList 是基于链表实现的。如下图: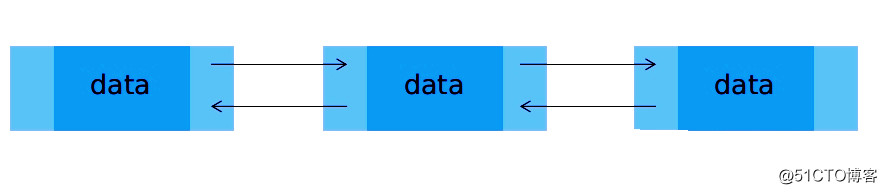
2、在查找和删除某元素时,区分该元素为 null和不为 null 两种情况来处理,LinkedList 中允许元素为 null。
3、基于链表实现不存在扩容问题。
4、查找时先判断该节点位于前半部分还是后半部分,加快了速度
5、因为基于链表,所以插入删除极快,查找比较慢。
6、实现了栈和队列的相关方法,所以可作为栈,队列,双端队列来用
了解更多