打造个人多媒体服务器之二
背景:
我家里有台服务器存储了好多的数据,N多的资源.主要是学习视频. 有时候人不在家的时候就看不到了,这当然不能阻止我 学习(
瞎折腾)的热情, 而且还不能下载下来观看,因为存储和时间的关系. 最好还得能倍速播放. 反正一阵折腾后,可以美滋滋看视频了.
相关架构:
- 内网资料服务器:中国大内网之称的
中国移动宽带[100m下行,20m上行] [移动赠送] - [备用]中专(转发)服务器1: 阿里云 5m那种学生机. [学生机 100多块]
- [主用]中国电信家用宽带1条:500m下载,20m上传. [亲戚家闲置,]
技术/软件:
流媒体服务器 Nginx+Nginx-rtmp-module
打洞或转发 frp
跳转电信宽带中专 flask
服务器ip更新 Zabbix [因为之前搭建了zabbix,所以就用zabbix获取ip好了]
上一部分:https://www.cnblogs.com/lovesKey/p/11027348.html
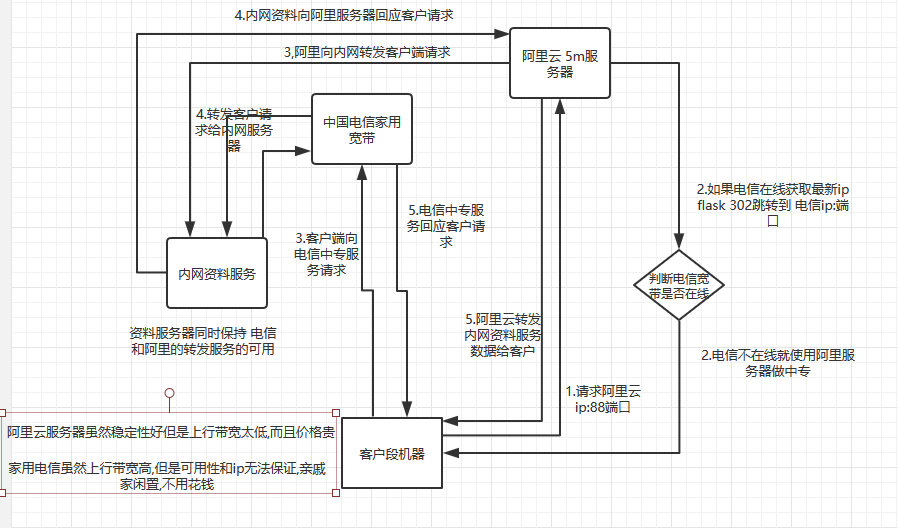
一个简单的流程图 (实在不会画)
使用效果:
家用电信ip转发 2m/s 的样子,看视频完全没问题.而且还很爽!!!
阿里云ip转发 600k/s 的样子,正常看也没什么问题,有时候快进需要缓冲一小下. 而且播放视频的时候把带宽用尽了,影响到其它服务了. [学生机 一百多文一年,5M宽带还是很便宜的呢.]
看图:
客户端使用

之前的问题: 如flv,mpeg编码的mp4文件都没办法直接点击播放的.(自己也不会写前端播放器.)
现在实现是这样的.(右键点击链接就可以播放,而且其他视频流文件也可调用vlc 很爽)
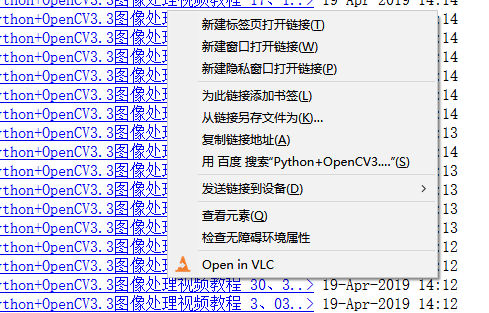
调用了 vlc 播放器
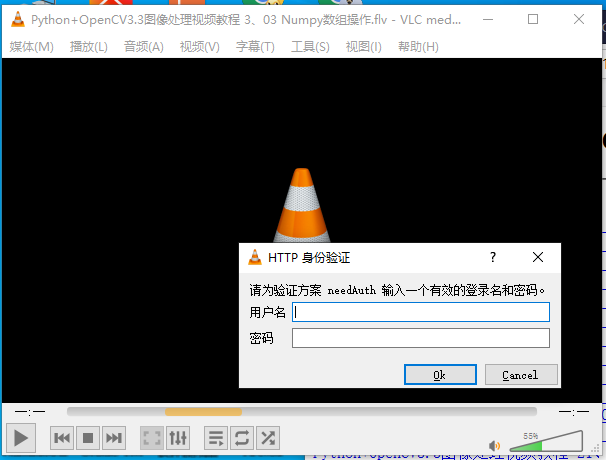
看可以播放了.

最赞的是 vlc几乎可以播放所有格式的视频了. 而且也可以Linux下使用的.
现在架构的简述
服务端Nginx+frp(打洞转发工具,把内外的服务器暴露到外网)
高可用:用flask来切换,阿里云或家用电信宽带转发
客户端火狐浏览器(Chrome也是可以的)+插件Open in VLC media player+vlc播放器
服务端相关的配置文件:
内网服务器:
两个frpc服务需要管理,一个使用supervisord,一个使用systemd管理.
- supervisor管理
supervisor配置文件(管理链接到电信ip的frpc服务)
vim /etc/supervisor/supervisord.conf
[program:frpc]
directory = /home/makeit/apps/frp_0.27.0_linux_amd64/
command = /home/makeit/apps/frp_0.27.0_linux_amd64/frpc -c /home/makeit/apps/frp_0.27.0_linux_amd64/frpc.ini
autostart = true
startsecs = 10
autorestart = true
startretries = 3
user = root
redirect_stderr = true
stdout_logfile_maxbytes = 20MB
stdout_logfile_backups = 20
stdout_logfile = /home/makeit/apps/frp_0.27.0_linux_amd64/frac.log

#用来动态重启frpc服务. 因为家庭电信ip经常会有变化,当变化的时候需要修改frpc配置文件并重新启动frpc服务是之可用.

[program:keepSV]
directory = /home/makeit/apps/
command = /usr/bin/python3 /home/makeit/apps/keepSV.py
autostart = true
startsecs = 10
autorestart = true
startretries = 3
user = root
redirect_stderr = true
stdout_logfile_maxbytes = 20MB
stdout_logfile_backups = 2
stdout_logfile = /home/makeit/apps/keepSV.log
- systemd管理
vim /lib/systemd/system/frpc.service
[Unit]
Description=Frp Client Service
After=network.target

[Service]
Type=simple
User=root
Restart=on-failure
RestartSec=5s
ExecStart=/usr/bin/frpc -c /etc/frp/frpc.ini
ExecReload=/usr/bin/frpc reload -c /etc/frp/frpc.ini

[Install]
WantedBy=multi-user.target
vim /etc/frp/frpc.ini
[common]
server_addr = 阿里云的ip
server_port = 9000

log_file = /var/logs/frpc.log

# trace, debug, info, warn, error
log_level = info

log_max_days = 3

# for authentication
token = 2019

[rtmp_udp]
type = udp
local_ip = 127.0.0.1
local_port = 1935
# if remote_port is 0, frps will assign a random port for you
remote_port = 1935

[testnginx]
# tcp | udp | http | https | stcp | xtcp, default is tcp
type = tcp
local_ip = 127.0.0.1
local_port = 8080
# true or false, if true, messages between frps and frpc will be encrypted, default is false
use_encryption = true
# if true, message will be compressed
use_compression = true
# remote port listen by frps
remote_port = 6088
# frps will load balancing connections for proxies in same group
#group = test_group
# group should have same group key
#group_key = 123456
# enable health check for the backend service, it support 'tcp' and 'http' now
# frpc will connect local service's port to detect it's healthy status
health_check_type = tcp
# health check connection timeout
health_check_timeout_s = 3
# if continuous failed in 3 times, the proxy will be removed from frps
health_check_max_failed = 3
# every 10 seconds will do a health check
health_check_interval_s = 10
frpc链接电信ip的配置文件
# [common] is integral section
[common]
# A literal address or host name for IPv6 must be enclosed
# in square brackets, as in "[::1]:80", "[ipv6-host]:http" or "[ipv6-host%zone]:80"
server_addr = 电信ip
server_port = 8088

# if you want to connect frps by http proxy or socks5 proxy, you can set http_proxy here or in global environment variables
# it only works when protocol is tcp
# http_proxy = http://user:[email protected]:8080
# http_proxy = socks5://user:[email protected]:1080

# console or real logFile path like ./frpc.log
log_file = /var/logs/frpc.log

# trace, debug, info, warn, error
log_level = info

log_max_days = 3

# for authentication
token = 20192019

[rtmp_udp]
type = udp
local_ip = 127.0.0.1
local_port = 1935
# if remote_port is 0, frps will assign a random port for you
remote_port = 1935

[testnginx]
# tcp | udp | http | https | stcp | xtcp, default is tcp
type = tcp
local_ip = 127.0.0.1
local_port = 8080
# true or false, if true, messages between frps and frpc will be encrypted, default is false
use_encryption = true
# if true, message will be compressed
use_compression = true
# remote port listen by frps
remote_port = 6088
# frps will load balancing connections for proxies in same group
#group = test_group
# group should have same group key
#group_key = 123456
# enable health check for the backend service, it support 'tcp' and 'http' now
# frpc will connect local service's port to detect it's healthy status
health_check_type = tcp
# health check connection timeout
health_check_timeout_s = 3
# if continuous failed in 3 times, the proxy will be removed from frps
health_check_max_failed = 3
# every 10 seconds will do a health check
health_check_interval_s = 10
Nginx 部分配置文件 相关参考 https://www.cnblogs.com/lovesKey/p/11027348.html
http {
    include       mime.types;
    default_type  application/octet-stream;

    #log_format  main  '$remote_addr - $remote_user [$time_local] "$request" '
    #                  '$status $body_bytes_sent "$http_referer" '
    #                  '"$http_user_agent" "$http_x_forwarded_for"';

    #access_log  logs/access.log  main;

    sendfile        on;
    #tcp_nopush     on;

    #keepalive_timeout  0;
    keepalive_timeout  65;

    gzip  on;

    server {
        listen       8080;
        server_name  localhost;

        charset utf8;

        #access_log  logs/host.access.log  main;

        location / {
            root   /mnt/s2t;
            autoindex on;
            auth_basic "needAuth";
            auth_basic_user_file /usr/local/nginx/conf/passwd.db;
            index  index.html index.htm;
        }
监视电信ip变动,将变动后的ip写到frpc配置文件内后重启frpc服务.
vim /home/makeit/apps/keepSV.py
#
# by:lvusyy
#
import json
import os
import time

import requests
import sys, argparse


class Zabbix_Api:
    def __init__(self):
        self.url = 'http://zabbix服务器ip/zabbix/api_jsonrpc.php'
        self.header = {"Content-Type": "application/json"}
        self.id = 1
        self.auth=self.user_login()

    def json_obj(self,method,auth=True,params={}):
        obj = {'jsonrpc': '2.0',
               'method': method,
               'params': params,
               'auth': auth,
               'id': self.id}
        if not auth:
            del obj["auth"]
        return obj

    def user_login(self):
        data=self.json_obj(method="user.login",auth=False, params={"user": "zabbix账号", "password": "zabiix密码"})
        return json.loads(requests.post(url=self.url, headers=self.header, data=json.dumps(data)).text)["result"]

    def get_host(self):
        data=self.json_obj(method="host.get",
            params={
                "output": ["hostid", "name"]
            },
            auth=self.auth)

        return json.loads(requests.post(url=self.url, headers=self.header, data=json.dumps(data)).text)

    def get_mem_total(self,hostid):
        data=self.json_obj(method="item.get",
            params={
                "output": "extend",
                "hostids": hostid,
                "search": {
                    "key_": "vm.memory.size[total]"
                }
            },
            auth=self.auth)
        return int(json.loads(requests.post(url=self.url, headers=self.header, data=json.dumps(data)).text)["result"][0]["lastvalue"])/1024/1024/1024

    def get_ip(self,hostid):
        data=self.json_obj(method="item.get",
            params={
                "output": "extend",
                "hostids": hostid,
                "search": {
                    "key_": "ip"
                }
            },
            auth=self.auth)
        return json.loads(requests.post(url=self.url, headers=self.header, data=json.dumps(data)).text)["result"][0]['lastvalue']


def getIP(sv,tgName=''):
    tgHostId = 0
    hosts = sv.get_host().get('result', {})
    for _host in hosts:
        if tgName in _host.get('name', ''):
            tgHostId = _host.get('hostid', 0)
            break
    return (sv.get_ip(tgHostId))  # '10269'


def changeConf():
    '修改配置文件,使用模板方式替换,替换后重启frpc服务然后把新ip地址传给阿里云'
    confPach='/home/makeit/apps/frp_0.27.0_linux_amd64/frpc2.ini'
    os.system('cp '+confPach+' '+confPach.replace('frpc2','frpc'))
    os.system('sed -i  s/wutoon\.com/'+ip+'/g  /home/makeit/apps/frp_0.27.0_linux_amd64/frpc.ini')
    os.system('supervisorctl restart frpc')
    time.sleep(3) #sleep 3 s
    requests.get('http://flaskip:88/ip?ip='+ip) #when fail do nothing

ip='阿里云的ip地址'
def keepSVOnline(sv,tgName):
    '保持服务可用'
    global ip

    while True:
        if ip not in getIP(sv,tgName):
            ip=getIP(sv,tgName)
            changeConf()

        time.sleep(8)


if __name__ == '__main__':
    sv=Zabbix_Api()
    tgName='pxcnnet'

    keepSVOnline(sv,tgName) #multi thread
阿里云配置
flask服务 负责跳转(高可用?)
flask 安装 pip install -i https://pypi.tuna.tsinghua.edu.cn/simple flask
#by:lvusyy
from flask import Flask
from flask import request
from flask import  redirect
app = Flask(__name__)
IP = '阿里云服务器的ip.com'

@app.route('/')
def hello_world():
    return redirect("//"+IP+":6088")

@app.route('/ip')
def ip():
    global IP
    _ip=request.args.get('ip',default='',type=str)
    if _ip:
        IP=_ip
        return 'ok'
    return 'fail'

if __name__ == '__main__':
    app.run(host="0.0.0.0",port=88)
frps.ini
[common]
# A literal address or host name for IPv6 must be enclosed
# in square brackets, as in "[::1]:80", "[ipv6-host]:http" or "[ipv6-host%zone]:80"
bind_addr = 0.0.0.0
bind_port = 9000

# udp port to help make udp hole to penetrate nat
bind_udp_port = 9001

# udp port used for kcp protocol, it can be same with 'bind_port'
# if not set, kcp is disabled in frps
kcp_bind_port = 9000
token = 2019
客户端软件下载和配置:
火狐浏览器下载地址:http://www.firefox.com.cn/
Open in VLC media player 插件地址:https://addons.mozilla.org/zh-CN/firefox/addon/open-in-vlc/
vlc播放下载地址:http://get.videolan.org/vlc/3.0.7.1/win64/vlc-3.0.7.1-win64.exe
Open in VLC media player 设置

上面配置vlc路径如果是默认安装路径就不用修改即可.
调用组件下载:https://github.com/andy-portmen/native-client/releases


到此所有操作都已经完成了. 找到一个链接点击右键 open in vlc 就可调用vlc播放器播放了.
Linux用户的话.其实Linux用户都是大神.(不需要特殊说明, 解压Linux.zip 运行install.sh即可.)
On Linux and Mac, you can define custom root directory by adding --custom-dir= to the installer script
Example: ./install.sh --custom-dir=~/Desktop/
enjoy!!!