http://ilovejavaforever.iteye.com/blog/733247
一、 Hadoop环境搭建
首先在Apache官网下载hadoop的包hadoop-0.20.2.tar.gz。
解压hadoop-0.20.2.tar.gz包,具体命令如下:
tar zxvf hadoop-0.20.2.tar.gz
其中要注意的是,tar 包用xvf ,gz包用zxvf。
在安装中,如果遇到识别问题,或者无法解压,很有可能是权限问题,解决方案是修改此文件的使用权限,命令如下:
chmod 777 hadoop-0.20.2.tar.gz
其中,777为所有权限。
如果依然报错,如:Archive contains obsolescent base-64 headers;Error exit delayed from previous errors。
这种情况,一般是压缩包损坏的问题。因为大多数人会将包下载到windows环境,再通过ftp等方法上传到Linux环境。容易产生包损坏。建议大家直接下载到Linux即可。具体命令如下:
wget http://labs.renren.com/apache-mirror/hadoop/core/hadoop-0.20.2/hadoop-0.20.2.tar.gz
直接下载到当前目录。
当文件准备好之后,我们要修改配置,将Hadoop 简单run起来。
首先,我们进入hadoop-0.20.2/conf目录当中,其中会存在如下配置文件:

首先修改masters和slaves,这个是指定我们的m和s的ip地址,这里我们就以单台机器为例子,在文件中直接输入当前机器的IP。
之后我们修改mapred-site.xml文件,具体配置如下

- <SPAN style="FONT-SIZE: medium"><?xml version="1.0"?>
- <?xml-stylesheet type="text/xsl" href="configuration.xsl"?>
- <!-- Put site-specific property overrides in this file. -->
- <configuration>
- <property>
- <name>mapred.job.tracker</name>
- <value>hdfs://192.168.216.57:8012</value>
- <description>The host and port that the MapReduce job tracker runs
- at. If "local", then jobs are run in-process as a single map
- and reduce task.
- Pass in the jobtracker hostname via the
- -Dhadoop.jobtracker=JOBTRACKER_HOST java option.
- </description>
- </property>
- </configuration></SPAN>
<?xml version="1.0"?>
<?xml-stylesheet type="text/xsl" href="configuration.xsl"?>

<!-- Put site-specific property overrides in this file. -->

<configuration>
<property>
        <name>mapred.job.tracker</name>
        <value>hdfs://192.168.216.57:8012</value>
        <description>The host and port that the MapReduce job tracker runs
            at. If "local", then jobs are run in-process as a single map
            and reduce task.
            Pass in the jobtracker hostname via the
            -Dhadoop.jobtracker=JOBTRACKER_HOST java option.
        </description>
    </property>
</configuration>
job.tracker是关键,mapReduce会将一个job,通过map(),打散为n个task。
之后是对文件core-site.xml的配置,详细配置如下:
- <SPAN style="FONT-SIZE: medium"><?xml version="1.0"?>
- <?xml-stylesheet type="text/xsl" href="configuration.xsl"?>
- <!-- Put site-specific property overrides in this file. -->
- <configuration>
- <property>
- <name>fs.default.name</name>
- <value>hdfs://localhost:9100</value>
- </property>
- <property>
- <name>mapred.job.tracker</name>
- <value>localhost:9101</value>
- </property>
- <property>
- <name>dfs.replication</name>
- <value>1</value>
- </property>
- <property>
- <name>hadoop.tmp.dir</name>
- <value>/home/admin/tmp/</value>
- <description>A base for other temporary directories. Set to a
- directory off of the user's home directory for the simple test.
- </description>
- </property>
- </configuration></SPAN>
<?xml version="1.0"?>
<?xml-stylesheet type="text/xsl" href="configuration.xsl"?>

<!-- Put site-specific property overrides in this file. -->

<configuration>
<property>
     <name>fs.default.name</name>
     <value>hdfs://localhost:9100</value>
 </property>

 <property>
    <name>mapred.job.tracker</name>
    <value>localhost:9101</value>
 </property>

 <property>
    <name>dfs.replication</name>
    <value>1</value>
 </property>

 <property>
     <name>hadoop.tmp.dir</name>
     <value>/home/admin/tmp/</value>
     <description>A base for other temporary directories. Set to a
           directory off of the user's home directory for the simple test.
     </description>
 </property>

 </configuration>
这个主要是配置我们的文件系统。其中,fs.default.name的value,不可以写IP地址,要写域名。域名的查询,具体命令如下:
cd ~
cd etc
vi hosts
在hosts文件中,找到自己IP对应的域名。
到此,Hadoop本身的配置就算完成了。但hadoop会在master/slaves之间进行文件的操作,在机器之间操作时候,就必须做到免登陆。对此,我们就得设置相应的公钥私钥。
具体命令如下:
ssh-keygen -t rsa -P ''
-P表示密码,-P '' 就表示空密码,也可以不用-P参数,这样就要三车回车,用-P就一次回车。它在/~ 下生成.ssh目录,.ssh下有id_rsa和id_rsa.pub。
如果是多台机器,则需要将公钥id-rsa.pub通过scp到其他机器的相同目录。
之后,追加公钥到相应文件,具体如下:
cat id_rsa.pub >> .ssh/authorized_keys
chmod 600 .ssh/authorized_keys
其中,authorized_keys要的权限是600
第一次登录是时要你输入yes,之后就不用了。
OK,所有均搞定了,进入hadoop-0.20.2/bin路径,直接执行start-all.sh脚本,即可启动Hadoop的服务了。
我们可以通过web的方式,对Hadoop的运转进行监控,具体url如下:
控制台:http://cap216057.sqa:50030/jobtracker.jsp
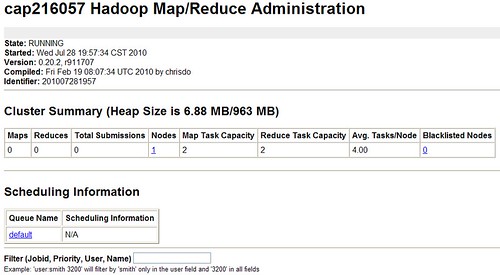
数据节点:http://cap216057.sqa:50070/dfshealth.jsp
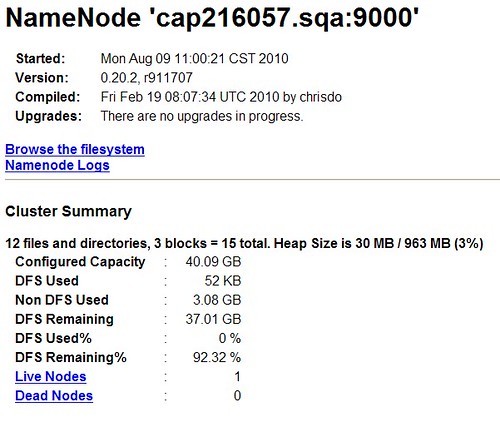
cap216057.sqa可以再hosts里配置,或者直接访问IP地址。
二、 Hive搭建
Hive搭建在Hadoop的基础之上,相对就会简单很多。只需要设置Hadoop的HADOOP_HOME和HIVE_HOME即可了。
首先下载、解压,此操作与商品Hadoop的操作一样。值得注意的是,Apache的官网上会提供bin和dev两种版本的压缩包。建议使用bin版本。
Wget http://labs.renren.com/apache-mirror/hadoop/hive/hive-0.5.0/hive-0.5.0-bin.tar.gz
完成之后,如下操作:
export HADOOP_HOME=/home/admin/hadoop-0.20.0/
export HIVE_HOME=/home/admin/hive-0.5.0-bin
完成命令,直接在hive/bin目录下启动hive,启动端口任意写一个未被占用的即可。
./hive --service hiveserver 10000 &
三、 测试
在hive/bin目录下,输入./hive,进入hive命令的控制台。执行hql,就是hive的sql
具体如下:
create tables user(id,int);
show tables;
值得注意的是,语句结尾的分号,万万不可遗漏。
看看结果吧,哈哈,大功告成咯!
转载于:https://www.cnblogs.com/licheng/archive/2011/11/09/2242315.html