一、前言
二、框架结构及实现流程
三、总结
一、前言
当我们了解了Web应用和Web框架,以及HTTP协议的原理之后,我们可以自己动手DIY一个最简单的WEB框架,以加深对Web框架的理解,并为即将学习的Django探探路。
二、框架结构及实现流程
1.框架结构的内容如下图所示
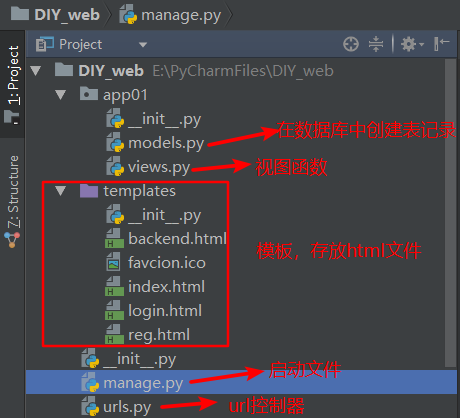
我们DIY的这个Web框架按照启动的先后顺序,大致分为这样几个部分,分别是models.py、manage.py、urls.py、views.py、templates(html文件)五个部分,下面我们分别对这五个部分进行实现,最后,进行运行测试,验证框架的的可用性。
2.实现流程
(1) models.py -- 与数据库相关的,在我们的项目启动前,利用models.py在数据库中创建表结构,注意,仅运行一次。
#!/usr/bin/env python3
#!-*- coding:utf-8-*-
# write by cc

import pymysql

# 1.建立连接
conn = pymysql.connect(
    host = 'localhost',
    port = 3306,
    user = 'cc1',
    password = 'cc111',
    db = 'db1',
    charset = 'utf8'
)

# 2.获取游标
cursor = conn.cursor()
# cursor = conn.cursor(pymysql.cursor.DictCursor) # 设游标类型为字典类型

# 3.执行sql语句
sql = "create table users(id int,user char(12),pwd char(12))"
rows = cursor.execute(sql)
print(rows) # 打印受影响的记录条数

# 4.提交(必须提交,才能实现操作)
conn.commit()

# 5.关闭游标和连接
cursor.close()
conn.close()
(2) manage.py -- 项目的启动文件
from wsgiref.simple_server import make_server

from urls import url_list

def application(environ,start_response):
    path = environ.get("PATH_INFO")
    print(path)
    start_response("200 OK",[('Content-Type','text/html')])

    func = None
    for item in url_list:
        if path == item[0]:
            func = item[1]
            break
    if func:
        return [func(environ)]
    else:
        return [b'404 Not found']

if __name__ == '__main__':
    httpd = make_server("",8080,application) # 指定端口
    print('Serving HTTP on port 8080...')
    httpd.serve_forever() # 开启监听
(3) urls.py -- url控制器,反映路径与视图函数的映射关系
from app01.views import *

url_list = [
    ('/favcion.ico',fav),
    ('/index',index),
    ('/login',login),
    ('/reg',reg),
    ('/timer',timer),
    ('/auth',auth)
]
(4) views.py -- 视图函数,固定接收一个形式参数:environ
from urllib.parse import parse_qs
def fav(environ):
    with open('templates/favcion.ico','rb') as f:
        data = f.read()
    return data

def index(environ):
    with open('templates/index.html','rb') as f:
        data = f.read()
    return data

def login(environ):
    with open('templates/login.html','rb') as f:
        data = f.read()
    return data

def reg(environ):
    with open('templates/reg.html','rb') as f:
        data = f.read()
    return data

def timer(environ):
    import datetime
    now = datetime.datetime.now().strftime("%y-%m-%d %X")
    return now.encode('utf-8')

def auth(environ):
    try:
        request_body_size = int(environ.get('CONTENT_LENGTH',0))
    except(ValueError):
        request_body_size = 0
    request_body = environ['wsgi.input'].read(request_body_size)
    data = parse_qs(request_body)

    # 解析出用户输入的用户名和密码
    user = data.get(b'user')[0].decode('utf8')
    pwd = data.get(b'pwd')[0].decode('utf8')


    # 连接数据库
    import pymysql
    conn = pymysql.connect(host='localhost',port=3306,user='cc1',password='cc111',db='db1',charset='utf8')

    # 创建游标
    cursor = conn.cursor()

    # 执行数据查询、插入等操作
    sql = 'select * from users where user=%s and pwd=%s'
    cursor.execute(sql,(user,pwd))

    # 验证是否能取出相关记录
    if cursor.fetchone():
        print(cursor.fetchone())
        f = open('templates/backend.html','rb')
        data = f.read()
        data = data.decode('utf8')
        return data
    else:
        return b'user or password is wrong'
(5) templates -- 储存 html 文件,当用户输入的路径正确存在与url控制器中时,为用户展示指定的页面。
favcion.ico 是一个缩略图,可自由指定。
index.html
<!DOCTYPE html>
<html lang="en">
<head>
    <meta charset="UTF-8">
    <title>首页</title>
</head>
<body>
    <h1>Hello world!</h1>
    <h2>Boys and girls!</h2>
    <h3><a href="https://www.cnblogs.com/schut"/>This is my web</a></h3>
    <img src="https://pic.cnblogs.com/avatar/1209144/20170813234607.png">
</body>
</html>
login.html
<!DOCTYPE html>
<html lang="en">
<head>
    <meta charset="UTF-8">
    <title>登录</title>
</head>
<body>
    <h1>Hello world!</h1>
    <h2>Boys and girls!</h2>
    <form action="http://127.0.0.1:8080/auth" method="post">
        姓名<input type="text" name="user">
        密码<input type="password" name="pwd">
        <input type="submit">
    </form>
</body>
</html>
reg.html
<!DOCTYPE html>
<html lang="en">
<head>
    <meta charset="UTF-8">
    <title>注册页面</title>
</head>
<body>
    <h3>欢迎来到注册页面</h3>
    <form action="" method="post">
        用户名:<input type="text" name="username"><br/>
        密 码:<input type="password" name="pwd"><br/>
        再次输入密码:<input type="password" name="pwd2"><br/>
        <input type="submit">
        <input type="reset">
    </form>
</body>
</html>
backend.html
<!DOCTYPE html>
<html lang="en">
<head>
    <meta charset="UTF-8">
    <title>index</title>
</head>
<body>
    <h2>欢迎登录</h2>
</body>
</html>
三、总结
以上DIY的简易框架,大致可以分为五个部分,各自承担不同的作用,缺一不可。
manage.py -- 启动文件,封装socket

1   urls.py -- 路径与视图函数的映射关系 ------------- url控制器
2   views.py -- 视图函数,固定接收一个形式参数:environ ------- 视图函数
3   templates文件夹 -- html文件 -------模板
4   models --在项目启动前,在数据库中创建表结构  ----- 与数据库相关