一,概述
TabBar,是材料设计(Material design)中很常用的一种横向标签页。在Android原生开发中,我们常用ViewPage或者一些常用的标签页开源库,来实现并行界面的横向滑动展示,在iOS原生开发中我们可以基于UICollectionView/UIButton来封装实现这一功能,在Flutter的世界中,TabBar是被定义在Material Component中,所以他的使用需要在MaterialApp中。通常,我们会在AppBar的底部部分结合TabBarView来使用TabBar。
二,Tab关键元素
- TabController
这是Tab页的控制器,用于定义Tab标签和内容页的坐标,还可配置标签页的切换动画效果等。
TabController一般放入有状态控件中使用,以适应标签页数量和内容有动态变化的场景,如果标签页在APP中是静态固定的格局,则可以在无状态控件中加入简易版的DefaultTabController以提高运行效率,毕竟无状态控件要比有状态控件更省资源,运行效率更快。
- TabBar
Tab页的Title控件,切换Tab页的入口,一般放到AppBar控件下使用,内部有*Title属性。其子元素按水平横向排列布局,如果需要纵向排列,请使用Column或ListView控件包装一下。子元素为Tab类型的数组。
- TabBarView
Tab页的内容容器,其内放置Tab页的主体内容。子元素可以是多个各种类型的控件。
三,构造函数
- TabController
- DefalutTabController
 const DefaultTabController({
    Key key,
    @required this.length,
    this.initialIndex = 0,
    @required this.child,
  }) : assert(initialIndex != null),
       assert(length >= 0),
       assert(initialIndex >= 0 && initialIndex < length),
       super(key: key);
- TabController
TabController({ int initialIndex = 0, @required this.length, @required TickerProvider vsync })
    : assert(length != null && length >= 0),
      assert(initialIndex != null && initialIndex >= 0 && (length == 0 || initialIndex < length)),
      _index = initialIndex,
      _previousIndex = initialIndex,
      _animationController = AnimationController.unbounded(
        value: initialIndex.toDouble(),
        vsync: vsync,
      );
- DefalutTabController
- TabBar
/**
    const TabBar({
    Key key,
    @required this.tabs,//显示的标签内容,一般使用Tab对象,也可以是其他的Widget
    this.controller,//TabController对象
    this.isScrollable = false,//是否可滚动
    this.indicatorColor,//指示器颜色
    this.indicatorWeight = 2.0,//指示器高度
    this.indicatorPadding = EdgeInsets.zero,//底部指示器的Padding
    this.indicator,//指示器decoration,例如边框等
    this.indicatorSize,//指示器大小计算方式,TabBarIndicatorSize.label跟文字等宽,TabBarIndicatorSize.tab跟每个tab等宽
    this.labelColor,//选中label颜色
    this.labelStyle,//选中label的Style
    this.labelPadding,//每个label的padding值
    this.unselectedLabelColor,//未选中label颜色
    this.unselectedLabelStyle,//未选中label的Style
    }) : assert(tabs != null),
    assert(isScrollable != null),
    assert(indicator != null || (indicatorWeight != null && indicatorWeight > 0.0)),
    assert(indicator != null || (indicatorPadding != null)),
    super(key: key);
 */
- Tab
const Tab({
    Key key,
    this.text,
    this.icon,
    this.child,
  }) : assert(text != null || child != null || icon != null),
       assert(!(text != null && null != child)), // TODO(goderbauer): https://github.com/dart-lang/sdk/issues/34180
       super(key: key);
- Tab
- TabBarView
  const TabBarView({
    Key key,
    @required this.children, //Tab页内容页组件数组集合
    this.controller, //TabController对象
    this.physics,
    this.dragStartBehavior = DragStartBehavior.start,
  }) : assert(children != null),
       assert(dragStartBehavior != null),
       super(key: key);
四,创建标签栏
- 1.创建TabController
- 使用默认的DefaultController
 /**2.创建Tabbar */
  @override
  Widget build(BuildContext context) {
    // TODO: implement build
    return new DefaultTabController(
        length: myTabs.length,
        child:  new Scaffold(
          //AppBar
          appBar:new AppBar(
            title: new Text('顶部标签栏'),
            bottom: new TabBar(
              tabs: myTabs, //标签数组
              indicatorColor: Colors.blue,//指示器的颜色
              isScrollable: true,//是否滑动
            ),
          ) ,

  /**3.绑定Tabbar 和 TabBarView */
          //body
          body: new TabBarView(
            children: myTabs.map((Tab tab){
                return new Center( child: new Text(tab.text));
            }).toList(),
          ),
        ),
    );
  }
- 使用自定义的TabController的
class TabBarDemoState extends State<TabBarDemo>
    with SingleTickerProviderStateMixin {
  TabController _tabController; //定义tabcontroller变量

  @override
  void dispose() {
    _tabController.dispose(); //销毁
    super.dispose();
  }

  void initState() {
    super.initState();
    _tabController = new TabController(vsync: this, length: 3); //创建
  }

  @override
  Widget build(BuildContext context) {
    return new Scaffold(
      appBar: new AppBar(
        title: new Text('顶部tab切换'),
        bottom: new TabBar(
          tabs: <Widget>[
            new Tab(
              icon: new Icon(Icons.directions_bike),
            ),
            new Tab(
              icon: new Icon(Icons.directions_boat),
            ),
            new Tab(
              icon: new Icon(Icons.directions_bus),
            ),
          ],
          controller: _tabController, //tabbar与自定义的tabcontroller绑定
        ),
      ),
      body: new TabBarView(
        controller: _tabController, //tabbarView与 自定义的tabController绑定
        children: <Widget>[
          new Center(child: new Text('自行车')),
          new Center(child: new Text('船')),
          new Center(child: new Text('巴士')),
        ],
      ),
    );
  }
- 使用默认的DefaultController
- 2.构建Tab数据/TabBarView数据
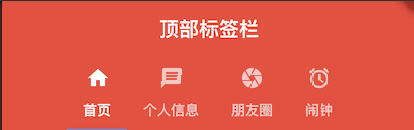
/**1. 创建Tab数据 */
  final List<Tab> myTabs = <Tab>[
      new Tab(icon: new Icon(Icons.home),
      text:'首页',
      ),
      new Tab(
        icon: new Icon(Icons.message),
         text:'个人信息',
      ),

      new Tab(
        icon: new Icon(Icons.camera),
        text:'朋友圈',
      ),
      new Tab(
        icon: new Icon(Icons.access_alarm),
        text: '闹钟',
      )
  ];
- 3. 创建Tabbar
appBar:new AppBar(
            title: new Text('顶部标签栏'),
            bottom: new TabBar(
              tabs: myTabs, //标签数组
              indicatorColor: Colors.blue,//指示器的颜色
              isScrollable: true,//是否滑动
            ),
)
- 4.绑定TabBar 和 TabBarView
/**3.绑定Tabbar 和 TabBarView */
          //body
          body: new TabBarView(
            children: myTabs.map((Tab tab){
                return new Center( child: new Text(tab.text));
            }).toList(),
          ),
- 5.全部代码
import 'package:flutter/material.dart';

void main() => runApp(MyApp());

class MyApp extends StatelessWidget {
    @override
    Widget build(BuildContext context) {
    // TODO: implement build
    return new MaterialApp(
      title: '顶部标签栏',
      theme: new ThemeData(
        primaryColor: Colors.red
      ),
      home: new App(),
    );
  }
}

class App extends StatelessWidget {

  /**1. 创建Tab数据 */
  final List<Tab> myTabs = <Tab>[
      new Tab(icon: new Icon(Icons.home),
      text:'首页',
      ),
      new Tab(
        icon: new Icon(Icons.message),
         text:'个人信息',
      ),

      new Tab(
        icon: new Icon(Icons.camera),
        text:'朋友圈',
      ),
      new Tab(
        icon: new Icon(Icons.access_alarm),
        text: '闹钟',
      )
  ];

  /**2.创建Tabbar */
  @override
  Widget build(BuildContext context) {
    // TODO: implement build
    return new DefaultTabController(
        length: myTabs.length,
        child:  new Scaffold(
          //AppBar
          appBar:new AppBar(
            title: new Text('顶部标签栏'),
            bottom: new TabBar(
              tabs: myTabs, //绑定标签数组
              indicatorColor: Colors.blue,//指示器的颜色
              isScrollable: true,//是否滑动
            ),
          ) ,

  /**3.绑定Tabbar 和 TabBarView */
          //body
          body: new TabBarView(
            children: myTabs.map((Tab tab){
                return new Center( child: new Text(tab.text));
            }).toList(),
          ),
        ),
    );
  }
}
五,总结
TabBarView和TabBar都有一个TabController的参数,TabbarView和TabBar就是由TabController来控制同步,点击某个Tab后,要同步显示对应的TabBarView,创建TabController有两种方式:
- 第一种:使用系统自带的DefaultTabController,在Scaffold套一层DefaultTabController,这种方式TabBarView会自动查找这个tabController。
@override
Widget build(BuildContext context) {
   return new DefaultTabController();
}
- 第二种是自己定义一个TabController,实现SingleTickerProviderStateMixin
参考上面“使用自定tabcontroller代码”