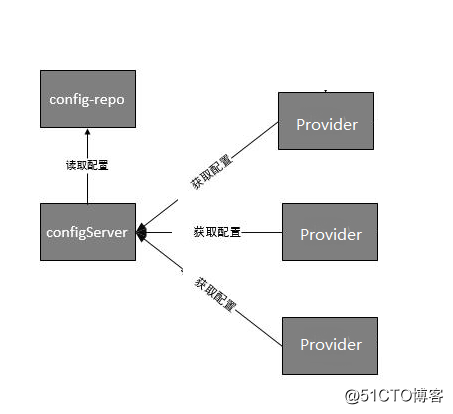
前面的《配置中心》和《服务注册&服务提供者》这两篇分别讲解了配置中心和服务提供者,但是服务提供者使用的配置文件还是本地的,没有使用配置中心的配置文件。今天看看如何实现服务提供者使用配置中心的配置文件。
1、 新建项目sc-eureka-client-provider-config,项目对应的pom.xml文件如下
<project xmlns="http://maven.apache.org/POM/4.0.0" xmlns:xsi="http://www.w3.org/2001/XMLSchema-instance"
    xsi:schemaLocation="http://maven.apache.org/POM/4.0.0 http://maven.apache.org/xsd/maven-4.0.0.xsd">
    <modelVersion>4.0.0</modelVersion>

    <groupId>spring-cloud</groupId>
    <artifactId>sc-eureka-client-provider-config</artifactId>
    <version>0.0.1-SNAPSHOT</version>
    <packaging>jar</packaging>

    <name>sc-eureka-client-provider-config</name>
    <url>http://maven.apache.org</url>

    <parent>
        <groupId>org.springframework.boot</groupId>
        <artifactId>spring-boot-starter-parent</artifactId>
        <version>2.0.4.RELEASE</version>
    </parent>

    <dependencyManagement>
        <dependencies>
            <dependency>
                <groupId>org.springframework.cloud</groupId>
                <artifactId>spring-cloud-dependencies</artifactId>
                <version>Finchley.RELEASE</version>
                <type>pom</type>
                <scope>import</scope>
            </dependency>
        </dependencies>
    </dependencyManagement>

    <properties>
        <project.build.sourceEncoding>UTF-8</project.build.sourceEncoding>
        <maven.compiler.source>1.8</maven.compiler.source>
        <maven.compiler.target>1.8</maven.compiler.target>
    </properties>

    <dependencies>
<!-- 说明是一个 eureka client -->
        <dependency>
            <groupId>org.springframework.cloud</groupId>
            <artifactId>spring-cloud-starter-netflix-eureka-client</artifactId>
        </dependency>

        <!-- spring boot实现Java Web服务 -->
        <dependency>
            <groupId>org.springframework.boot</groupId>
            <artifactId>spring-boot-starter-web</artifactId>
            <!-- 把tomcat-jdbc连接池排除掉,这样spring-boot就会寻找是否有HikariCP可用 -->
            <exclusions>
                <exclusion>
                    <groupId>org.apache.tomcat</groupId>
                    <artifactId>tomcat-jdbc</artifactId>
                </exclusion>
            </exclusions>
        </dependency>

        <dependency>
            <groupId>com.zaxxer</groupId>
            <artifactId>HikariCP</artifactId>
        </dependency>

        <dependency>
            <groupId>mysql</groupId>
            <artifactId>mysql-connector-java</artifactId>
        </dependency>

        <dependency>
            <groupId>org.mybatis</groupId>
            <artifactId>mybatis-spring</artifactId>
            <version>1.3.2</version>
        </dependency>

        <dependency>
            <groupId>org.mybatis.spring.boot</groupId>
            <artifactId>mybatis-spring-boot-starter</artifactId>
            <version>1.3.2</version>
        </dependency>

        <dependency>
            <groupId>org.springframework.cloud</groupId>
            <artifactId>spring-cloud-starter-config</artifactId>
        </dependency>
    </dependencies>
</project>
备注:可以看到pom.xml中引入了spring-cloud-starter-config,这个引入在《如何获取配置中心的配置》博文中说到。引入这个配置项说明只要在配置文件中做相应的配置就可以获取到配置中心的配置项。
2、 新建springboot启动类型ProviderConfigApplication.java
package sc.provider.config;

import org.mybatis.spring.annotation.MapperScan;
import org.springframework.boot.SpringApplication;
import org.springframework.boot.autoconfigure.SpringBootApplication;
import org.springframework.cloud.netflix.eureka.EnableEurekaClient;

@EnableEurekaClient
@SpringBootApplication
@MapperScan(basePackages="sc.provider.config.dao")
public class ProviderConfigApplication {

    public static void main(String[] args) {
        SpringApplication.run(ProviderConfigApplication.class, args);
    }

}
3、 新建配置文件bootstrap.yml
server:
    port: 8500

eureka:
    client:
        serviceUrl:
            defaultZone: http://localhost:5001/eureka/

spring:
    application:
        name: sc-eureka-client-provider-config
    cloud:
        config:
            name: sc-eureka-client-provider-config
            label: master # 配置文件所在分支
            #uri: http://127.0.0.1:8100/  #配置服务中心
            profile: dev  # dev根据具体情况来修改
            #profile: prd  # dev根据具体情况来修改
            discovery:
                serviceId: sc-config-server #配置服务实例名称
                enabled: true  #开启配置服务发现
备注:配置文件用有如下配置项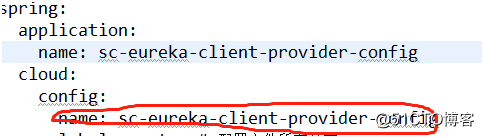
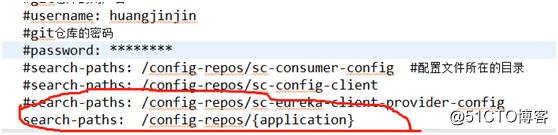
该配置项将会作为配置中心config server的配置文件bootstrap.yml中的search-paths的一个占位符{application}的值
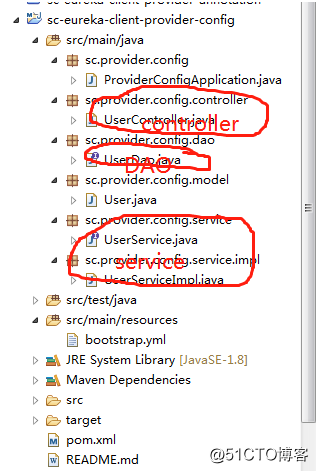
4、 其他项目文件如下图
5、 修改配置中心sc-config-server的配置文件bootstrap.yml
#服务端口
server:
    port: 8100

#服务注册中心
eureka:
    client:
        registerWithEureka: true #是否将自己注册到Eureka服务中,默认为true
        fetchRegistry: true #是否从Eureka中获取注册信息,默认为true
        serviceUrl:
            defaultZone: http://localhost:5001/eureka/
    instance:
        prefer-ip-address: true #将自己的ip地址注册到Eureka服务中
        ipAddress: 127.0.0.1

spring:
    application:
        name: sc-config-server #服务名称
    cloud:
        config:
            label: master #配置文件所在的分支
            server:
                git:
                    #uri: https://gitee.com/hjj520/spring-cloud-2.x.git #服务的git仓库地址
                    uri: https://gitee.com/hjj520/spring-cloud-2.x #服务的git仓库地址
                    #git仓库的用户名
                    #username: huangjinjin
                    #git仓库的密码
                    #password: ********
                    #search-paths: /config-repos/sc-consumer-config  #配置文件所在的目录
                    #search-paths: /config-repos/sc-config-client
                    #search-paths: /config-repos/sc-eureka-client-provider-config
                    search-paths:  /config-repos/{application}
6、 在git仓库新建如下内容,并提交到git仓库中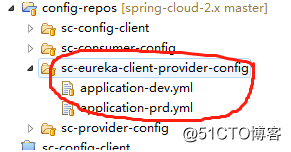
applicaton-dev.yml和application-prd.yml的内容是一样的(dev代表开发环境,prd代表生产环境,实际项目中这两个文件一定是不一样的)
spring:
    datasource:
        driverClassName: com.mysql.jdbc.Driver
        url: jdbc:mysql://localhost:3306/sc?serverTimezone=UTC&useUnicode=true&characterEncoding=UTF-8
        username: root
        password: root
        type: com.zaxxer.hikari.HikariDataSource
        hikari:
            minimum-idle: 5
            maximum-pool-size: 15
            auto-commit: true
            idle-timeout: 30000
            pool-name: DatebookHikariCP
            max-lifetime: 1800000
            connection-timeout: 30000
            connection-test-query: SELECT 1
7、 先分别启动注册中心sc-eureka-server和配置中心sc-config-server
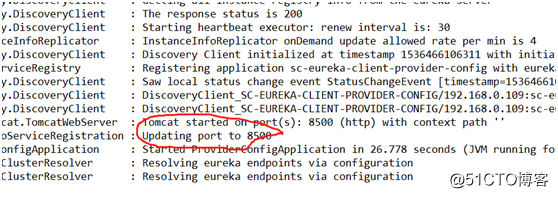
8、 启动sc-eureka-client-provider-config项目在控制台可以看到如下输出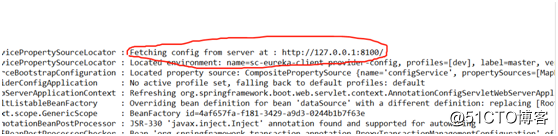
说明项目已经通过配置中心获取git仓库的配置文件,如果看到如下输出说明启动成功
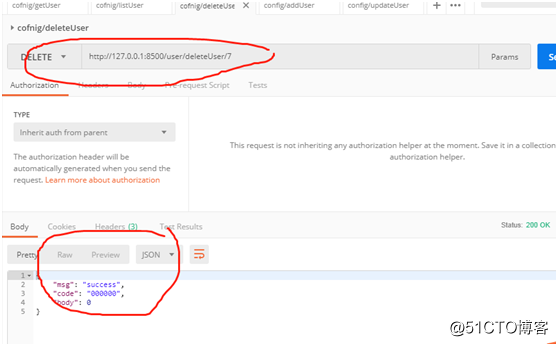
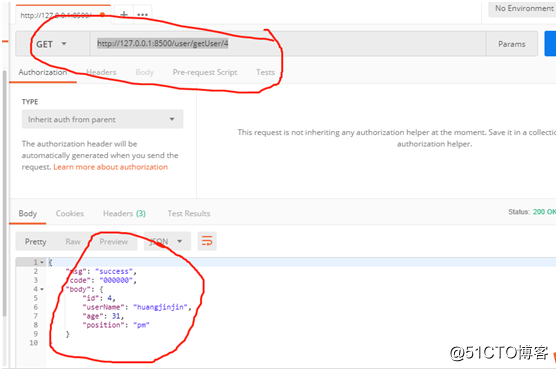
9、 通过postman访问相关restful接口验证是否能正常访问
查询:
http://127.0.0.1:8500/user/getUser/4
列表:
http://127.0.0.1:8500/user/listUser/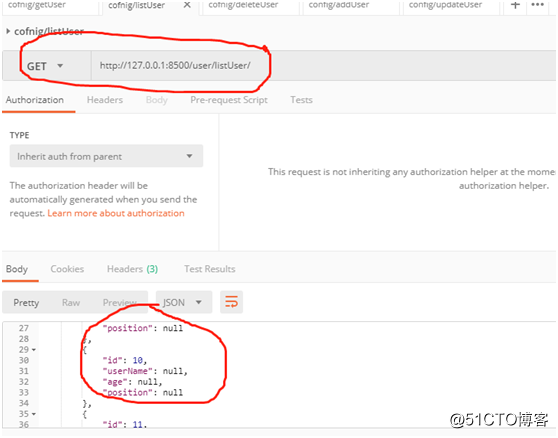
添加:
http://127.0.0.1:8500/user/addUser

更新:
http://127.0.0.1:8500/user/updateUser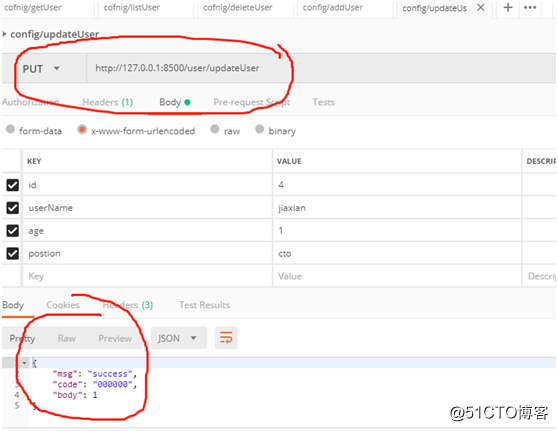
删除:
http://127.0.0.1:8500/user/deleteUser/7