系统维护不能总是重复一次又一次同样的操作。当然脚本能给我们省去很多重复的工作。但是脚本的运行在不同的平台时,很多时候需要我们去稍作修改,有时一个脚本的编写本身就很费事,而这项工作只需要操作这一次。这时我们为了提高效率、减少重复的事情。减少错误、积累知识、部分自动化工作已经满足不了我们。我们需要彻底的应用自动化软件维护工具。下面我们一起来学习自动化及批量部署的软件。
自动化管理及快速的部署软件有很多,比较出名的有cfengine,但是cfengine的语法比较晦涩,于是出现了puppet 。puppet的语法简单,对管理内容的抽象很好,很容易理解代码,因此最近正迅速的流行开来。
puppet
是一个为实现数据中心自动化管理而设计的配置管理软件。基于
c/s
架构。
puppet
的服务器端保存着所有的对客户端服务器的配置代码,在
puppet
里面叫做
manifest.
客户端下载
manifest
之后,可以根据
manifest
对服务器进行配置,例如软件包管理,用户管理和文件管理等等。
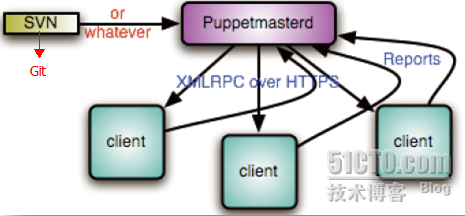
puppet的工作流程如下:
- 客户端puppetd调用facter,facter探测出主机的一些变量,例如主机名,内存大小,ip地址等。pupppetd 把这些信息通过ssl连接发送到服务器端;
- 服务器端的puppetmaster 检测客户端的主机名,然后找到manifest里面对应的node配置,并对该部分内容进行解析,facter送过来的信息可以作为变量处理,node牵涉到的代码才解析,其他没牵涉的代码不解析。解析分为几个阶段,语法检查,如果语法错误就报错。如果语法没错,就继续解析,解析的结果生成一个中间的“伪代码”,然后把伪代码发给客户端;
- 客户端接收到“伪代码”,并且执行,客户端把执行结果发送给服务器;
- 服务器端把客户端的执行结果写入日志。
提示:保证安全,client和master之间是基于ssl和证书的,只有经master证书认证的 client可以与master通信;
puppet会让系统保持在你所期望的某种状态并一直维持下去,如检测某个文件并保证其一直存在,保证ssh 服务始终开启,如果文件被删除了或者ssh服务被关闭了,puppet下次执行时(默认30分钟),会重新创建该文件或者启动ssh服务。
puppet是puppet Labs 基于ruby语言开发的自动化系统配置工具,可以以C/S 模式或独立模式运行,支持对所有 UNIX 及类 UNIX 系统的配置管理,可以管理配置文件,用户、cron任务、软件包、系统服务等。
典型的puppet架构
ssl认证过程:
client:
向服务器发起签名请求
puppetd --test --server master.puppet.com
server:
查看有没有来验证的客户端
puppetca -l
给客户端client签名验证
puppetca -s client.puppet.com
实例演示:
客户机和服务器运行环境:
RHEL6 (
防火墙和
SELINUX
关闭
)
软件:
puppet-2.7.12.tar.gz
facter-1.6.6.tar.gz
采用两台服务器,一台是
server.sxkj.com
用来安装
puppet-server
服务;
一台是
client.sxkj.com
用来安装
puppet
客户端。
puppet
要求所有机器有完整的域名(
FQDN
)
,
生产环境做内部
DNS
比较好,保持两台主机时间同步
。
yum源、dns和ntp的搭建这里不再罗嗦
client: client.cluster.com
server: server.cluster.com
puppet使用ruby语言写的需要安装ruby及相关库支持 client server都要安装
yum install ruby* -y
client和server安装facter和puppet
tar xf facter-1.6.6.tar.gz -C /usr/src
cd /usr/src/facter-1.6.6/
ruby install.rb
tar xf puppet-2.7.12.tar.gz -C /usr/src
cd /usr/src/puppet-2.7.12/
ruby install.rb
puppet配置
server配置 server配置 [root@server puppet-2.7.12]# cp conf/redhat/*.conf /etc/puppet/ //配置puppet的启动服务脚本 [root@server puppet-2.7.12]# cp conf/redhat/server.init /etc/init.d/puppetmaster [root@server puppet-2.7.12]# chmod 755 /etc/init.d/puppetmaster [root@server puppet-2.7.12]# chkconfig --add puppetmaster [root@server puppet-2.7.12]# chkconfig puppetmaster on [root@server puppet-2.7.12]# chkconfig --list | grep puppetmaster puppetmaster 0:关闭 1:关闭 2:启用 3:启用 4:启用 5:启用 6:关闭 生成puppet账户: [root@server puppet]# puppetmasterd --mkusers [root@server puppet]# grep puppet /etc/passwd /etc/shadow /etc/passwd:puppet:x:501:501::/home/puppet:/bin/bash /etc/shadow:puppet:!!:15502:0:99999:7::: [root@server puppet-2.7.12]# cd /etc/puppet/ [root@server puppet]# ls auth.conf fileserver.conf manifests puppet.conf // auth.conf --> client访问puppet server的ACL配置文件 // fileserver.conf --> puppet server 作为文件服务器的ACL配置文件 // manifests --> puppet脚本主文件目录,至少需要包含site.pp文件 // puppet.conf --> puppet服务器配置文件 启动: [root@server puppet]# service puppetmaster restart 停止 puppetmaster: [确定] 启动 puppetmaster: [确定] [root@server puppet]# netstat -ntpl | grep ruby tcp 0 0 0.0.0.0:8140 0.0.0.0:* LISTEN 2915/ruby [root@server puppet]# service puppetmaster restart 停止 puppetmaster: [确定] 启动 puppetmaster: [确定] [root@server puppet]# netstat -ntpl | grep ruby tcp 0 0 0.0.0.0:8140 0.0.0.0:* LISTEN 2915/ruby
client配置 [root@client puppet-2.7.12]# cp conf/redhat/*conf /etc/puppet/ [root@client puppet-2.7.12]# cp conf/namespaceauth.conf /etc/puppet/ //配置客户端脚本 [root@client puppet-2.7.12]# cp conf/redhat/client.init /etc/init.d/puppet [root@client puppet-2.7.12]# chmod a+x /etc/init.d/puppet [root@client puppet-2.7.12]# chkconfig --add puppet [root@client puppet-2.7.12]# chkconfig puppet on [root@client puppet-2.7.12]# chkconfig --list | grep puppet puppet 0:关闭 1:关闭 2:启用 3:启用 4:启用 5:启用 6:关闭 [root@client puppet-2.7.12]# vi /etc/puppet/namespaceauth.conf #修改内容如下 [fileserver] allow * [puppetmaster] allow * [puppetrunner] allow * [puppetbucket] allow * [puppetreports] allow * [resource] allow * [root@client puppet-2.7.12]# puppetmasterd --mkusers [root@client puppet]# rm -rf /var/lib/puppet/ssl/* //删除客户端/var/lib/puppet/ssl目录下的文件,否则可能会报错 /etc/init.d/puppet start[root@client ~]#
puppetd --test --server server.sxkj.com //客户端向server端发送请求 //puppet 客户端使用 HTTPS 和服务端(master)通信,为了和服务器端通信必须有合法的 SSL认证, 第一次运行puppet 客户端的时候会生成一个SSL 证书并指定发给 puppet 服务端。agent发起了一个证 书验证请求并且使用一个私钥来加密连接。puppet使用SSL证书来验证master和agent之间的连接。agent 向master发出证书验证请求,然后等待master签名并返回证书。 warning: peer certificate won't be verified in this SSL session info: Caching certificate for ca warning: peer certificate won't be verified in this SSL session warning: peer certificate won't be verified in this SSL session info: Creating a new SSL certificate request for client.sxkj.com info: Certificate Request fingerprint (md5): 6A:E9:72:E1:C4:60:06:30:C0:BB:11:BA:3A:06:ED:18 //客户端创建了证书 warning: peer certificate won't be verified in this SSL session warning: peer certificate won't be verified in this SSL session warning: peer certificate won't be verified in this SSL session Exiting; no certificate found and waitforcert is disabled [root@server ~]# puppetca -l //服务器查看 client.cluster.com (52:E6:6C:2C:DA:D0:44:7D:5A:02:84:BD:A2:F5:33:8C) [root@server ~]# puppetca -s -a //发送接受请求 notice: Signed certificate request for client.sxkj.com notice: Removing file puppet::SSL::CertificateRequest client.sxkj.com at '/var/lib/puppet/ssl/ca/requests/client.cluster.com.pem' // puppet 服务端接受到客户端的证书后必须签字(sign)才能允许客户端接入 //puppetca –s –a //对所有客户端全部签名 //puppetca –s client.sxkj.com //只签名某个客户端
[root@server ~]# puppet cert list --all
+ server.cluster.com (19:14:2F:05:2E:6C:F8:1F:04:58:E3:8E:FB:DE:F5:95) (alt n
ames: DNS:puppet, DNS:puppet.cluster.com, DNS:client.cluster.com
)
+ client.cluster.com (D2:C8:0E:F1:49:3C:C2:88:42:76:2B:D9:D0:F4:E5:E8)
puppet测试
puppet
使用一种描述性语言来定义配置项,配置项在
puppet
中被称为
"
资源
"
。
puppet
提供了很多资源类型
fiel资源测试
文件的基本语法结构
类型
{
标题:
属性
=>
值,
} [root@server ~]#
vi /etc/puppet/manifests/site.pp
node default {
file { // 定义一个资源,需要指定资源的类型
"/var/www/index.html": //资源的title,注意后面是冒号
content=>"hello,this is a test page!\n" //网页文件的内容
}
node default {
file { // 定义一个资源,需要指定资源的类型
"/var/www/index.html": //资源的title,注意后面是冒号
content=>"hello,this is a test page!\n" //网页文件的内容
}
}
客户端主动执行
[root@client ~]# puppetd --test --server server.cluster.com
warning: peer certificate won't be verified in this SSL session
info: Caching certificate for server.cluster.com
info: Caching certificate_revocation_list for ca
info: Caching catalog for station185.cluster.com
info: Applying configuration version '1357100899'
notice: /Stage[main]//Node[default]/File[/var/www/html/index.html]/ensure:
defined content as '{md5}c7e578db91d92f2ea46417529fc318cb'
info: Creating state file /var/lib/puppet/state/state.yaml
[root@client ~]# service httpd start
正在启动 httpd: [确定]
其他的电脑访问client.cluster.com的网页
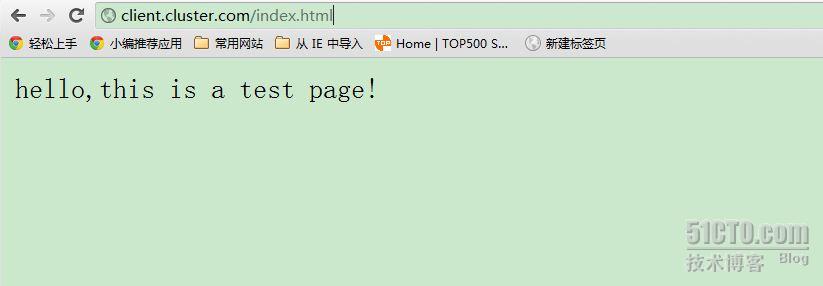 //网页文件已经分发下去
文件分发测试
[root@server~]#
cat /var/www/html/index2
I'm test 2 page
[root@server ~]#
[files]
path /var/www/html/
allow *.cluster.com
[root@server ~]# cat /etc/puppet/manifests/site.pp
node default {
file {
"/var/www/html/index2":
source=>"puppet://server.cluster.com/var/www/html/index.html"
}
}
[root@client ~]# puppetd --test --server server.sxkj.com
notice: Ignoring --listen on onetime run
info: Caching catalog for client.cluster.com
info: Applying configuration version '1332991088'
notice: /Stage[main]//Node[default]/File[/var/www/html/index2]/ensure:
defined content as '{md5}e4d7f1b4ed2e42d15898f4b27b019da4'
[root@client ~]# rm -rf /var/www/html/*
[root@client ~]# puppetd --test --server server.cluster.com
notice: Ignoring --listen on onetime run
info: Caching catalog for client.sxkj.com
info: Applying configuration version '1332997931'
notice: /Stage[main]//File[/var/www/html/index2]/ensure: defined content
as '{md5}118e847807383ab42d0d2a0284d7b30c'
notice: Finished catalog run in 5.59 seconds
还要很多其他的部署
修改文件权限
cat /etc/puppet/manifests/site.pp
node "client.cluster.com" {
file {
"/tmp/testfile":
source => "puppet://server.sxkj.com/files/testfile",
owner => puppet,
group => puppet,
mode => 600
}
}
[root@server ~]# vi /tmp/test.sh
[root@server ~]# cat /tmp/test.sh
#!/bin/bash
touch /root/{11,22,33}
[root@server ~]# cat /etc/puppet/manifests/site.pp
node "client.sxkj.com" {
file {
"/tmp/test.sh":
source => "puppet://server.sxkj.com/files/test.sh",
notify => Exec["exec-touch"] //触发exec-touch这个动作
}
exec {
"exec-touch":
cwd => "/tmp/", //当前工作目录
command => "sh /tmp/test.sh", //执行命令
user => "root", //以root用户身份执行
path => "/usr/local/sbin:/usr/local/bin:/sbin:/bin:/usr/sbin:/usr/bin"
//命令执行的路径
}
}
service
资源
service {
"vsftpd":
ensure => "running"; //启动客户端vsftpd
"httpd":
ensure => "stopped"; //关闭客户端httpd
}
package资源软件包的安装卸载
[root@server ~]# cat /etc/puppet/manifests/site.pp
node "client.cluster.com" {
package {
["httpd","vsftpd"]:
ensure => absent;
//卸载,如果卸载的时候有依赖可以换用purged
["mysql"]:
ensure => installed; //安装
}
}
puppet 文件同步 ---rsync需要下载rsync模块 同步效率比直接用rsync要差
[root@server ~]# mkdir -p /etc/puppet/modules/
[root@server ~]# cd /etc/puppet/modules/
//进入模块路径
[root@server modules]# git clone https://github.com/onyxpoint/pupmod-concat &&
mv pupmod-concat concat //下载并重命名为concat
[root@server modules]# git clone https://github.com/onyxpoint/pupmod-rsync &&
mv pupmod-rsync rsync //下载并重命名为rsync
[root@server modules]# ls /etc/puppet/modules/
concat rsync
node 'server.cluster.com' { //需要安装rsync server的主机名
include 'rsync::server' //执行rsync::server类
# Set up the global configuration options.
rsync::server::global { 'global':
address => '10.1.1.18' //设置rsync server的主机IP地址
}
# Now set up some rsync shares
rsync::server::section { 'default': //共享目录default
comment => 'The default file path',
path => '/etc/puppet/modules/', //真实路径
hosts_allow => '10.1.1.185' //允许访问的客户端IP
}
}
node 'client.cluster.com' { //客户端主机名
include 'rsync'
rsync { 'default':
source => 'default', //服务器上的rsync模块名
target => '/tmp/', //同步到客户端的/tmp目录
server => '10.1.1.18' //rsync server的主机IP
}
}
server
端运行
puppet
puppetd --test --server server.sxkj.com 自动生成
rsyncd.conf文件