一、设置在.yml文件中,缩进为两个空格
[devops@server1 ansible]$ cd
[devops@server1 ~]$ vim .vimrc
autocmd filetype yaml set ai ts=2 sw=2 et  ##设置yaml文件编写格式,缩进格数为2
二、由于脚本执行,所以需要设置自动切换用户权限。
[devops@server1 ansible]$ vim ansible.cfg
[defaults]
inventory=inventory
host_key_checking=False

[privilege_escalation]
become=True
become_method=sudo
become_user=root
become_ask_pass=False
三、编写脚本,实现自动化配置。
[devops@server1 ansible]$ vim playbook.yml
---
- name: apache playbook
  hosts: webservers	#表示在这个主机组里面配置
  tasks:
    - name: install httpd	#下载httpd
      yum:
        name: httpd
        state: present

    - name: start httpd			#打开httpd并设置开机自启
      service:
        name: httpd
        state: started
        enabled: true

    - name: enabled firewalld		#打开防火墙,并设置开机自启
      service:
        name: firewalld
        state: started
        enabled: true

    - name: configure firewalld		#将httpd加入防火墙白名单
      firewalld:
        service: http
        state: enabled
        permanent: true
        immediate: true

    - name: copy index.html		#设置发布页面
      copy:
        content: "<h1>www.westos.org</h1>\n"
        dest: /var/www/html/index.html
检查是否有语法错误
[devops@server1 ansible]$ ansible-playbook --syntax-check playbook.yml
##执行脚本
[devops@server1 ansible]$ ansible-playbook playbook.yml

查看:
1.查看是否安装httpd并启动

2.查看防火墙是否启动

3.查看httpd是否加入白名单,并查看发布页面

四、设置触发器
1、先将服务端的一个文件复制到客户端
在playbook.yml中添加下面内容
 - name: file copy	#将files/hahaha复制到/etc/passwd
      copy:
        src: files/hahaha
        dest: /etc/hahaha
        owner: root
        group: root
        mode: 644
建立文件。
[devops@server1 ansible]$ cd files/
[devops@server1 ansible]$ vim hahaha
hahaha
#查看是否有语法错误
[devops@server1 ansible]$ ansible-playbook --syntax-check playbook.yml
##执行脚本
[devops@server1 ansible]$ ansible-playbook playbook.yml
测试:
[root@server2 ~]# cat /etc/hahaha
hahahahah
添加触发器。
- name: apache playbook
  hosts:  webservers
  tasks:
    - name: install httpd
      yum:
        name: httpd
        state: present

    - name: start httpd
      service:
        name: httpd
        state: started
        enabled: true

    - name: enabled firewalld
      service:
        name: firewalld
        state: started
        enabled: true

    - name: configure firewalld
      firewalld:
        service: http
        state: enabled
        permanent: true
        immediate: true

    - name: copy index.html
      copy:
        content: "<h1>www.westos.org</h1>\n"
        dest: /var/www/html/index.html

    - name: file copy
      copy:
        src: files/hahaha
        dest: /etc/hahaha
        owner: root
        group: root
        mode: 644
      notify: restart httpd	#调用下面触发器

  handlers:					#可以看作是一个函数
    - name: restart httpd
      service:
        name: httpd
        state: restarted
更改文件内容
[devops@server1 files]$ vim hahaha
[devops@server1 files]$ cat hahaha
hello hahahahah

[devops@server1 ansible]$ ansible-playbook --syntax-check playbook.yml

[devops@server1 ansible]$ ansible-playbook playbook.yml
##内容发生改变
TASK [cofigure httpd] **********************************************************
changed: [server3]
##执行重启
RUNNING HANDLER [restart httpd] ************************************************
changed: [server3]

PLAY RECAP *********************************************************************
server3                    : ok=8    changed=2    unreachable=0    failed=0
查看:

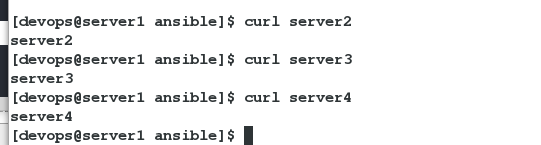
五、使每个客户端的发布页面不一样
1、将发布内容改成主机名
[devops@server1 ansible]$ vim playbook.yml
更改如下配置:
    - name: create index.html
      copy:
        content: "{{ ansible_facts['hostname'] }}\n"
        dest: /var/www/html/index.html
发布
[devops@server1 ansible]$ ansible-playbook playbook.yml
测试
2、将发布内容改成主机名,ip
查看本机系统变量
[devops@server1 ansible]$ ansible test -m setup|less
参照上面修改以下内容
- name: create index.html
      copy:
        content: "{{ ansible_facts.hostname }} {{ ansible_facts['default_ipv4']['address'] }}\n"
        dest: /var/www/html/index.html

六、单独发布文件里的一个模块
[devops@server1 ansible]$ vim playbook.yml
- name: create index.html
      copy:
        content: "{{ ansible_facts.hostname }} {{ ansible_facts['default_ipv4']['address'] }}\n"
        dest: /var/www/html/index.html
      tags: one
在发布时加上-t
[devops@server1 ansible]$ ansible-playbook playbook.yml -t one

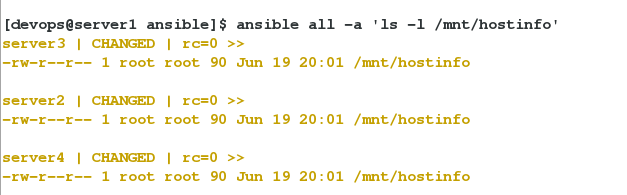
七、编写yml文件,实现读取系统参数
[devops@server1 ansible]$ mkdir templates
[devops@server1 ansible]$ vim hostinfo.yml
---
- hosts: all
  tasks:
    - name: create infofile
      template:
        src: templates/info.j2
        dest: /mnt/hostinfo
[devops@server1 ansible]$ cd templates/
[devops@server1 templates]$ vim info.j2
主机名: {{ ansible_facts['hostname'] }}
主机IP地址: {{ ansible_facts['default_ipv4']['address'] }}
根分区大小: {{ ansible_facts['devices']['dm-0']['size'] }}
系统内核: {{ ansible_facts['distribution_version'] }}
语法检测及推送:
devops@server1 ansible]$ ansible-playbook hostinfo.yml --syntax-check

playbook: hostinfo.yml
[devops@server1 ansible]$ ansible-playbook hostinfo.yml

八、根据系统变量的不同,对不同的主机配置不同的服务:
[devops@server1 ansible]$ vim install.yml

---
- hosts: all
  tasks:
    - name: install httpd
      yum:
        name: httpd
        state: present
      when: ansible_facts['hostname'] == 'server2'

    - name: install mariadb
      yum:
        name: mariadb
        state: present
      when: ansible_facts['hostname'] == 'server3'
语法检测,推送
