1、playbook-剧本介绍
playbooks是 一个不同于使用Ansible命令行执行方式的模式,其功能更强大灵活。简单来说,playbook是一个非常简单的配置管理和多主机部署系统,不同于任何已经存在的模式,可作为一个适合部署复杂应用程序的基础。Playbook可以定制配置,可以按照指定的操作步骤有序执行,支持同步和异步方式。值得注意的是playbook是通过YAML格式来进行描述定义的。
1.1、核心元素
- hosts:执行的远程主机列表
- tasks:任务,由模板定义的操作列表
- variables:变量,内置变量或者自定义变量在playboook中调用
- templates:模板,即 使用模板语法的文件;可替换模板中的变量并实现一些简单逻辑的而文件
- handlers:处理器,和notify结合使用 ;当某条件满足时,触发执行的操作
- tags:标签,指定某条件下,用于选择运行playbook中的部分代码。Ansible具有幂等性,因此会自动跳过没有变化的部分,即便如此,有些代码为测试其确实没有发生变化的时间依然会非常的长。此时,如果确信其没有变化,就可以通过tags跳过这些代码片段
- roles:角色
ansible-playbook -t tagsname useradd.yaml
1.2、基础组件
- hosts:playbook中的每个play的目的都是为了让某个或者某些主机在某个指定的用户身份执行任务。hosts用于指定任务的主机,须事先定义在主机清单中
形式如下:
hosts: websrvs
- remote_user:可用于hosts和tasks中,也可以通过指定sudo的方式在远程主机上执行,其可用于paly全局或某任务;此外甚至可以在sudo时使用sudo_user指定sudo时切换的用户
形式如下:
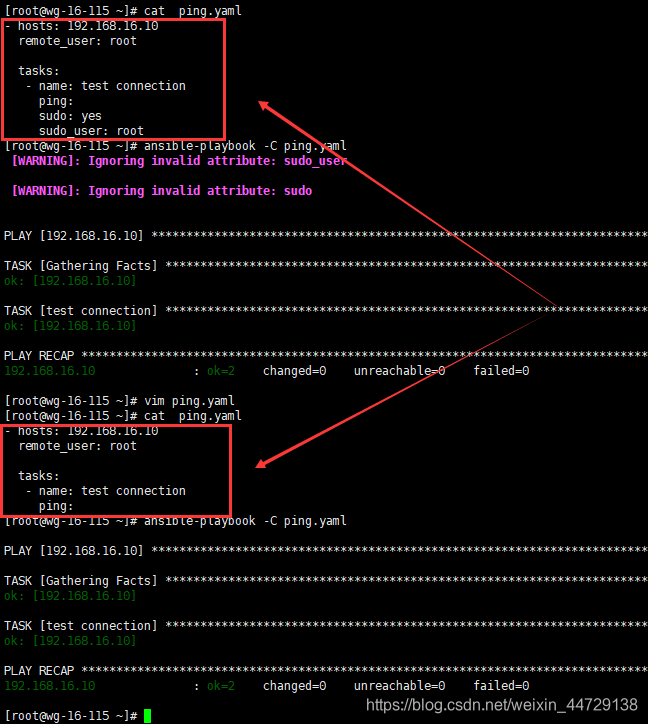
hosts: 192.168.16.10
remote_user: root

tasks:
  name: test connection
  ping:
remote_user: root
sudo: yes
sudo_user: root
3. tasks:任务列表;格式有两种:
action: module argument
module: argument 建议使用
注意:shell和command模块后面跟命令,而非key=value
某任务的状态在运行后changed时,可通过‘notify’通知给相应的handlers
任务可以通过‘tags’打标签,而后可在absible-playbook命令上使用-t指定进行调用
示例:
tasks:
  - name: disable selinux
    command: /sbin/setenforce 0
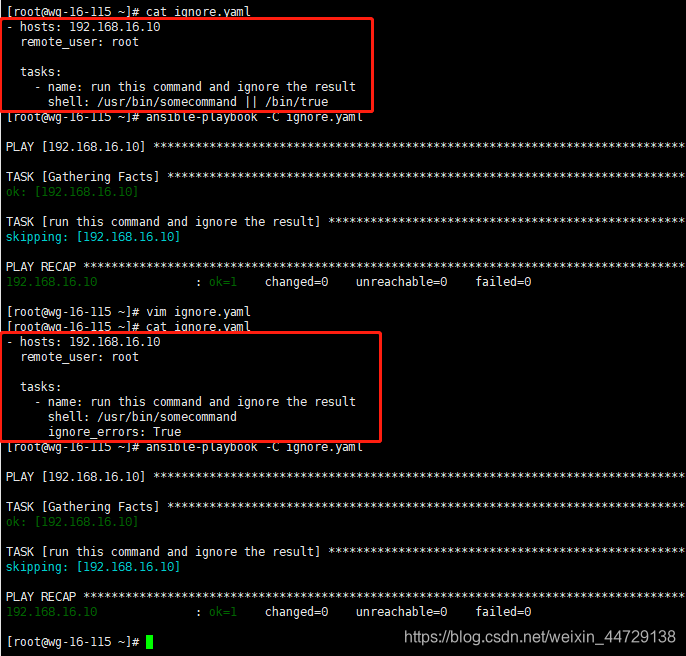
如果命令或者脚本的退出码不为零,可以使用一下方式替代
tasks:
  - name: run this command and ignore the result
    shell: /usr/bin/somecommand || /bin/true
或者
tasks:
  - name: run this command and ignore the result
    shell: /usr/bin/somecommand
    ignore_errors: True
1.3、yaml语法
YAML的语法和其他高阶语言类似并且可以简单表达清单、散列表、标量等数据结构,其结构通过空格来展示。(列表用横杆表示,键值对用冒号分割,键值对里又可以嵌套另外的键值对)
YAML文件扩展名通常为.yaml或者.yml。下面为示例
一定要对齐,只能使用空格
name: wkx   #冒号后有空格
age: 28
gender: male
spouse:
  name: rlt
  age: 27
  gender: female
children:
  - name: dabao   #横杠后有空格
    age: 4
    gender: femle
  - name: xiaobao
    age: 1
gender: male
1.4、playbook的运行方式
ansible-playbook <filename.yaml> … [options]
常用选项:
–check 只检测可能会发生的改变,但不真正执行操作
–list-hosts 列出运行任务的主机
–limit 主机列表,只针对主机列表中的主机执行
-v 显示过程 -vv -vvv 更详细
ansible-playbook file.yaml --check 只检测
Ansible-playbook file.yaml 执行
Ansible-playbook file.yaml --limit websevs 仅websevs主机执行
1.5、Playbook VS shellscript
Shell脚本
#!/bin/bash
# install apache
yum -y install httpd
#copy conf file
cp /tmp/http.conf /etc/httpd/conf/httpd.conf
#start service
systemctl enable httpd
systemctl start httpd
Palybook
- hosts: wensevs
  remote_user: root

  tasks:
   - name: install apache
     yum: name=httpd

   - name: copy conf file
     copy: src=/tmp/http.conf dest=/etc/httpd/conf/httpd.conf

   - name: start service
     service: name=httpd state=started enabled=yes
2、handles和notify结合条件使用
Handlers:是task列表,这些task与前述的task并没有本质的区别,用于当关注的资源发生变化时,才会采取一定的操作
Notify:此action被用于每个play的最后被触发,这样可以避免多次有改变发生时每次都执行指定的操作,尽在所有变化发生后完成一次性的执行指定操作。在notify中列出的操作称为handler,也即notify中调用handler中定义的操作。
示例:
Handles和notify的使用:
- hosts: websrvs
  remote_user: root

  tasks:
   - name: add group nginx
     tags: user
     user: name=nginx state=present

   - name: add user nginx
     group: name=nginx state=present group=nginx

   - name: install nginx
     yum: name=nginx state=present

   - name: copy file
     copy: src=/tmp/nginx.conf dest=/etc/nginx/nginx.conf
     notify:
      - restart nginx
      - check nginx process
    handlers:
     - name: restart nginx    #必须和notify中定义的名字一致
       service: name=nginx status=restarted enabled=yes
     - check nginx process
       shell: killall -0 nginx > /tmp/nginx.log
Tags的使用
 1. hosts: wensrvs
  remote_user: root

  tasks:
 2. name: install httpd
     yum: name=httpd status=present

 3. name: copy conf file
     copy: src=files/httpd.conf dest=/etc/httpd/conf/httpd.conf
     tags: conf

 4. name: start service
     tags: service
     service: name=httpd state=started enabled=yes
3、playbook中变量使用
3.1、变量
变量名:仅能由字母、数字和下划线组成,且只能以字母开头
变量来源:
- ansible setup 模块下的变量都可以使用
- /etc/ansible/hosts中定义的
普通变量:主机组中主机单独定义,优先级高于公共变量
公共组变量:针对主机组中所有的主机定义统一变量 - 通过命令行指定变量,优先级最好
ansible-playbook -e varname=value - 在playbook中定义
var:
var1: value1
var2: value2 - 在role中定义
3.2、变量的调用方式
- 通过{{ variable_name }}调用变量,且变量名前后必须有空格,有时候使用”{{ variable_name }}”才能生效
- anible-playbook -e 选项指定
ansible-playbook -e “hosts=www user=wkx” test.yaml
3.3、使用变量
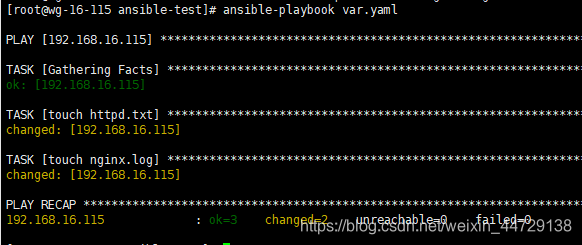
- 使用变量文件
cat vars.yaml
var1: httpd
var2: nginx

cat var.yaml
- hosts: 192.168.16.115
  remote_user: root
  vars_files:
    - vars.yaml
  tasks:
    - name: touch httpd.txt
      file: name={{var1}}.txt state=touch   #默认创建在当前用户下
    - name: touch nginx.log
      file: name={{var2}}.log state=touch
2. 使用setup变量
cat var.yaml
- hosts: 192.168.16.115
  remote_user: root

  tasks:
    - name: create log file
      file: name=/root/ansible-test/{{ ansible_fqdn }} state=touch  #{{ ansible_fqdn }}为setup模块中域名的一个内置变量

3. 命令行使用变量
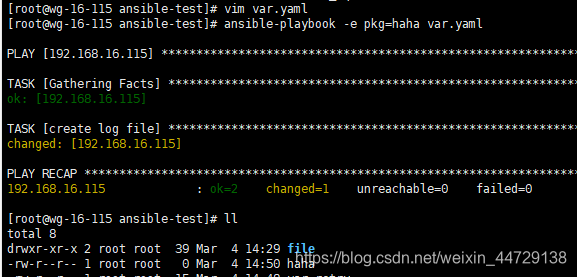
cat var.yaml
- hosts: 192.168.16.115
  remote_user: root

  tasks:
    - name: create log file
      file: name=/root/ansible-test/{{ pkg }} state=touch
ansible-playbook -e pkg=haha var.yaml
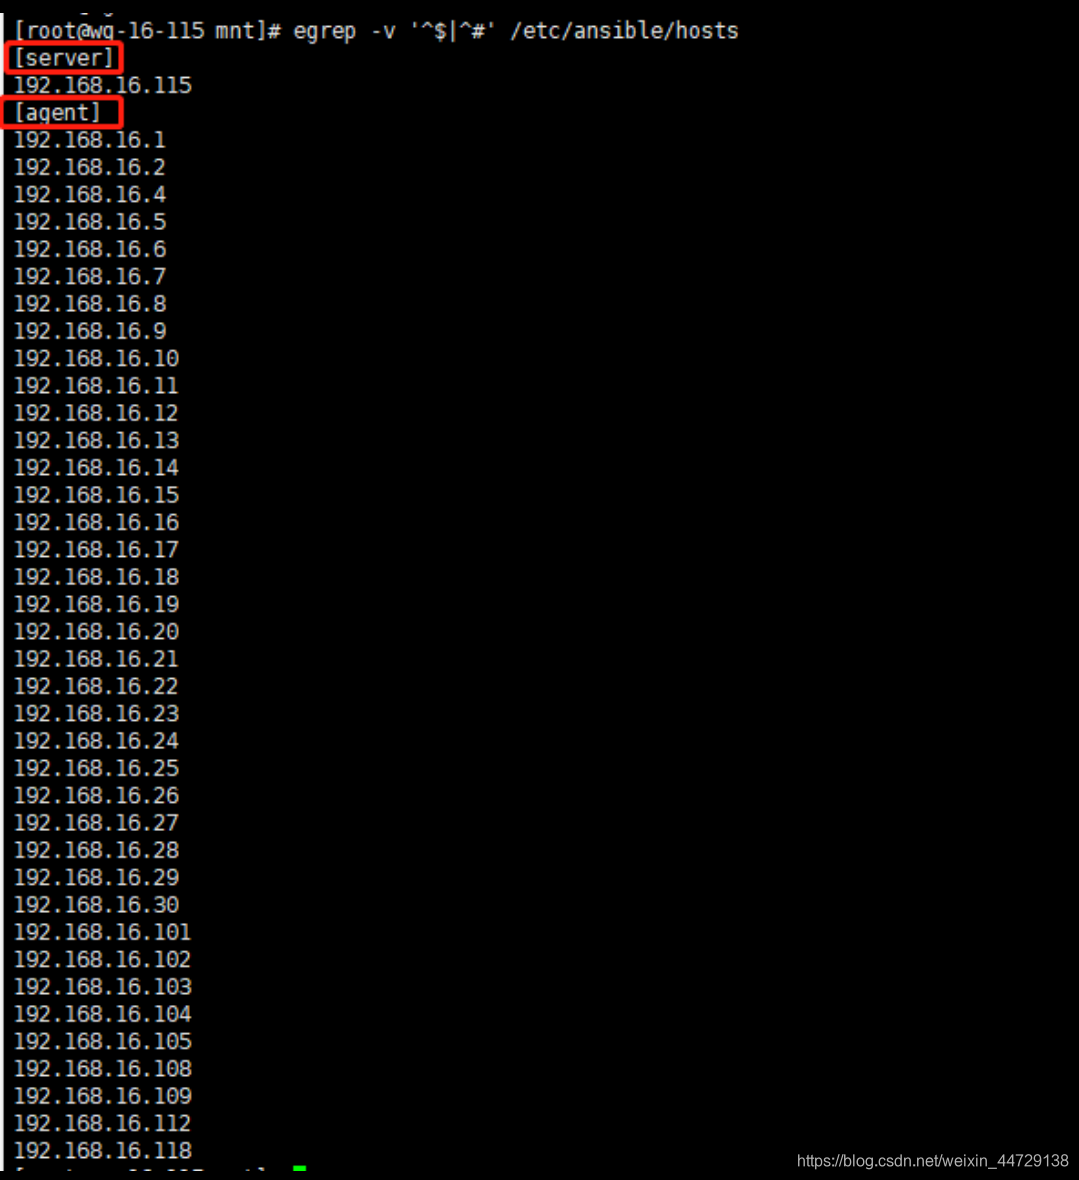
4. hosts中的变量(/etc/asible/hosts)
[websrvs:vars]  #公共(组)变量
mark="-"
[websrvs]   #普通变量
192.168.16.115 hname=wg sname=115
192.168.16.118 hname=wg sname=118
ansible websrvs -m hostname -a ‘name= {{ hname }}{{ mark }}16{{ mark }}{{sname}}’

3.4、模板文件templetes
文本文件,嵌套有脚本(使用模板编程语言编写)
Jinja2语音,使用 字面量,有下面形式
字符串:使用单引号或者双引号
数字:整数、浮点数
列表:[haha,xixi,hehe,lele]
元组:(haha,xixi,hehe,lele)
字典:{name:wkx,gender:male}
布尔型:true、false
算术运算:+、-、*、/、//、%、** 分别是加减乘除整除求余幂
比较操作:==,!=,>,<,>=,<=
逻辑运算:and,or,not
流表达式:for,if,when
- When
条件测试:如果需要根据变量、facts或此前任务的执行结果来作为某task执行与否的前提时要用到条件测试,通过when语句实现,在task中使用,jinja2的语法格式
示例:
cat var.yaml
- hosts: 192.168.16.115
 remote_user: root

  tasks:
  - name: "create file"
   file: name="/root/ansible-test/xixi" state=touch
   when: ansible_os_family == "RedHat"

2. 迭代嵌套自变量
示例1:
- hosts: 192.168.16.115
remote_user: root
tasks:
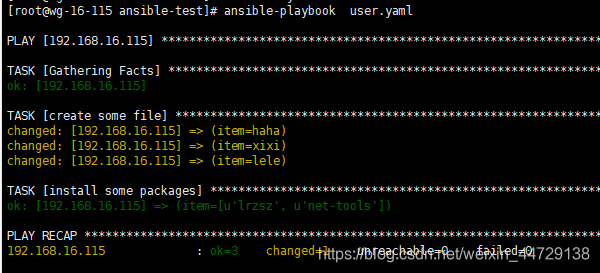
- name: "create some file"
file: name=/root/ansible-test/{{ item }} state=touch #创建文件,嵌套变量在下面
when: ansible_distribution_major_version == "7" #匹配条件,条件满足时执行
with_items:
- haha
- xixi
- lele
- name: install some packages
yum: name={{ item }}
with_items:
- lrzsz
- net-tools
示例2:
cat user.yaml
- hosts: 192.168.16.115
remote_user: root
tasks:
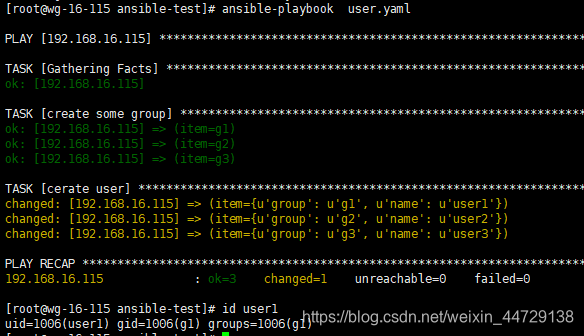
- name: "create some group"
group: name={{ item }}
when: ansible_distribution_major_version == "7"
with_items:
- g1
- g2
- g3
- name: cerate user
user: name={{ item.name }} group={{ item.group }}
with_items:
- { name: "user1",group: "g1"}
- { name: "user2",group: "g2"}
- { name: "user3",group: "g3"}
Playbook中template for if
{% for vhost in nginx_vhosts %}
server{
listen {{ vhost.listen | default(‘80 default_server’)}};

{% if vhost.server_name is defined %}
Server_name{{ vhost.server_name }};
{% endif %}

{% if vhost.root is defined %}
root {{ vhost.root }}
{% endif %}
示例1:
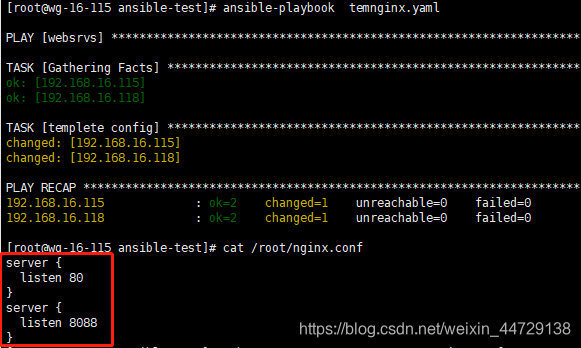
cat temnginx.yaml
---
- hosts: websrvs
remote_user: root
vars:
  nginx_hosts:
    - 80
    - 8088
    -
tasks:
  - name: templete config
    template: src=/root/ansible-test/nginx.conf.j2 dest=/root/nginx.conf

cat nginx.conf.j2
{% for vhost in nginx_hosts %}
server {
  listen {{ vhost }}
}
{% endfor %}
生成为文件为
cat /root/nginx.conf
server {
  listen 80
}
server {
  listen 8088
}
示例2:
cat temnginx.yaml
---
- hosts: websrvs
  remote_user: root
  vars:
    nginx_hosts:
      - web1:
        listen: 8080
        root: "/var/www/nginx/web1/"
      - web2:
        listen: 8080
        server_name: "www.wkx.com"
        root: "/var/www/nginx/web2/"

  tasks:
    - name: templete config
      template: src=/root/ansible-test/nginx.conf.j2 dest=/root/nginx.conf
cat nginx.conf.j2
{% for vhost in nginx_hosts %}
server {
  listen {{ vhost.listen }}
  {% if vhost.server_name is defined %}
  server_name {{ vhost.server_name }}
  {% endif %}
  root {{ vhost.root }}
}
{% endfor %}

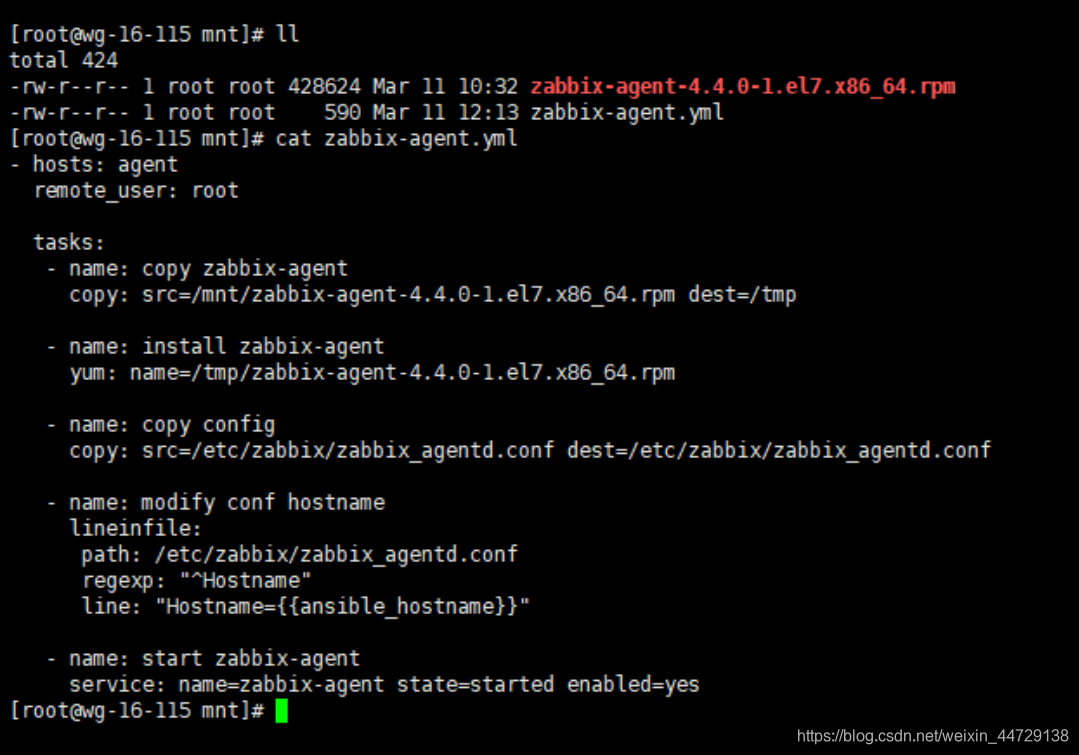
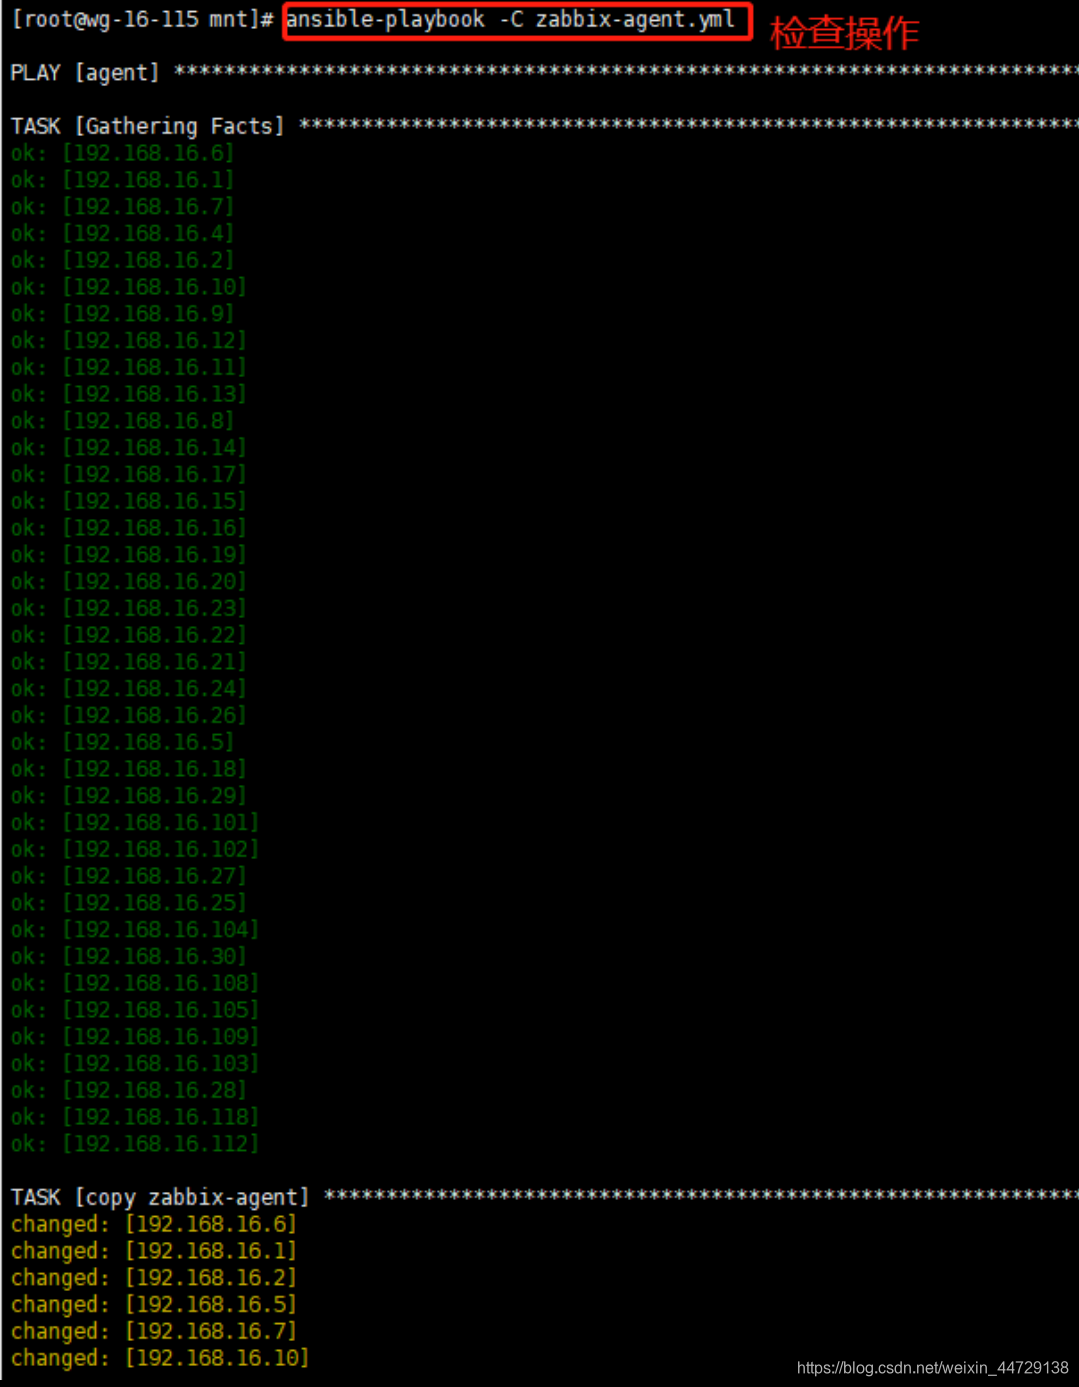
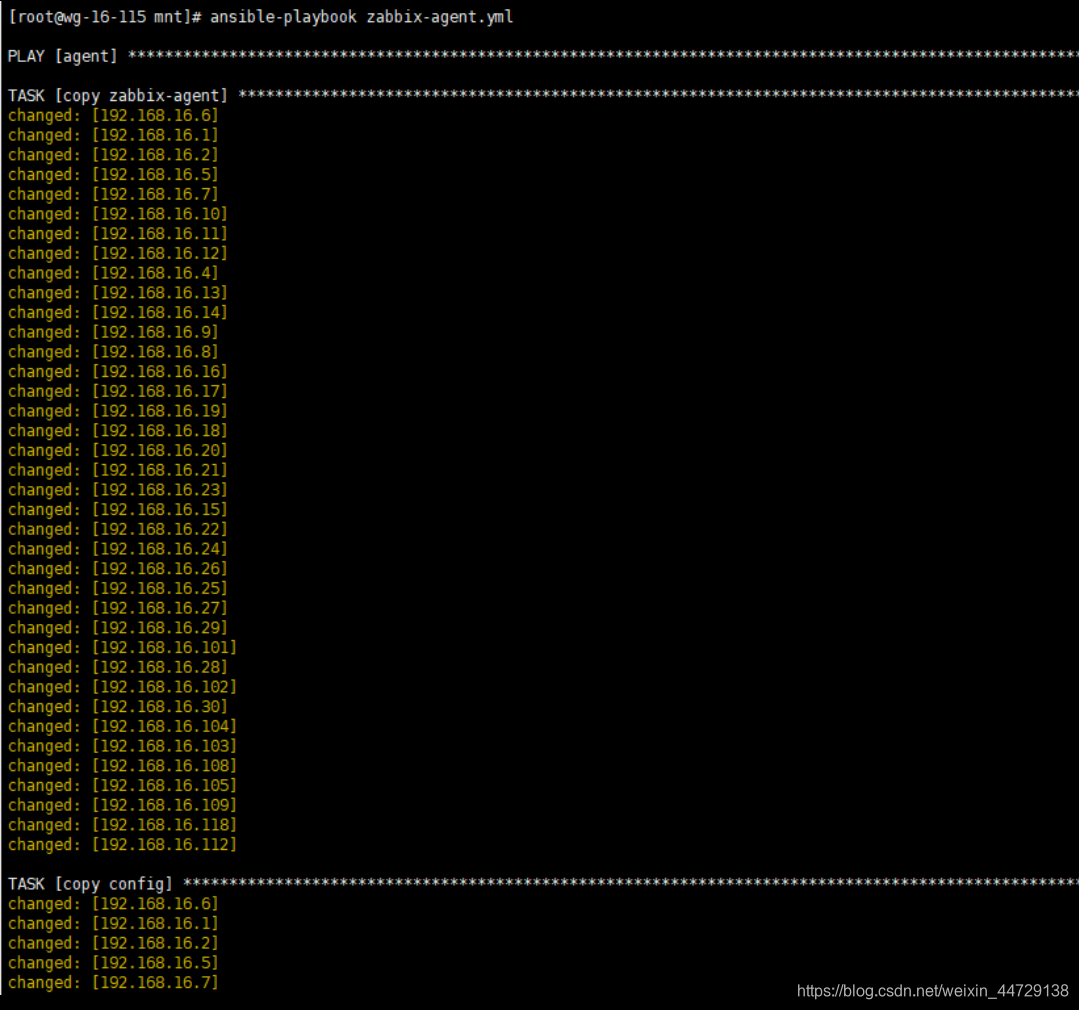
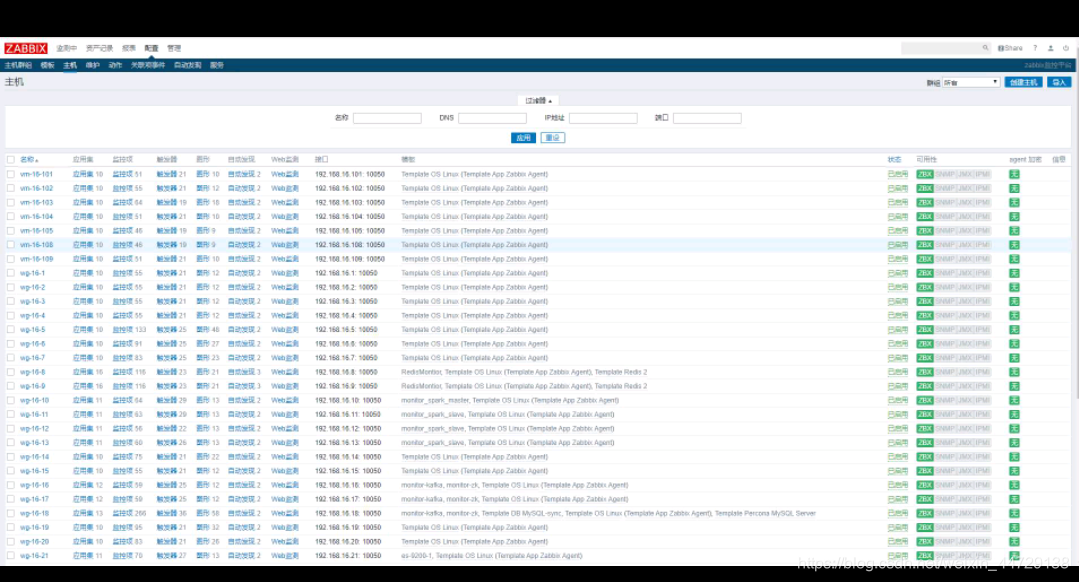
4、通过ansible-playbook实现对zabbix-agent批量安装
cat zabbix-agent.yml
- hosts: agent
  remote_user: root

  tasks:
   - name: copy zabbix-agent
     copy: src=/mnt/zabbix-agent-4.4.0-1.el7.x86_64.rpm dest=/tmp

   - name: install zabbix-agent
     yum: name=/tmp/zabbix-agent-4.4.0-1.el7.x86_64.rpm

   - name: copy config
     copy: src=/etc/zabbix/zabbix_agentd.conf dest=/etc/zabbix/zabbix_agentd.conf

   - name: modify conf hostname
     lineinfile:
     path: /etc/zabbix/zabbix_agentd.conf
     regexp: "^Hostname"
     line: "Hostname={{ansible_hostname}}"

   - name: start zabbix-agent
     service: name=zabbix-agent state=started enabled=yes
5、role
ansible自1.2版本后引入的新特性。用于层次性、结构性的组织playbook。Roles能够根据层次型结构自动装载变量文件、tasks以及handlers等。要使用roles只需要在playbook中使用include指令即可。简单来说,roles就是通过分别将变量、文件、任务、模板以及处理器放置于单独的目录中,并可以便捷的include他们的一种机制。角色一般基于主机结构构建服务的场景中,但也可以是用于构建守护进程等场景中。
复杂场景:建议使用roles,代码复用度高
变更主机及主机组
如命名不规范维护或传承成本高
某些功能需要多个playbook,通过include实现
Ansible的roles目录结构
每个角色,以特定的层级目录结构进行组织
Roles目录结构:
playbook.yaml
roles/
project/   项目名称,有以下子目录
tasks/  定义task、role的基本元素,至少包含一个名为main.yaml的文件;其他需要的文件在此通过include进行包含
files/  存放由copy或者script模块调用的文件
vars/ 不常用,定义变量;至少包含一个名为main.yaml的文件;其他需要的文件在此通过include进行包含
default/ 不常用,设定默认变量时使用此目录中的main.yaml
templates/  template模块查找所需要的模板问文件的目录
handlers/
meta/  不常用,定义当前角色的特殊设定以及依赖关系;至少包含一个名为main.yaml的文件;其他需要的文件在此通过include进行包含
