本文记录如何用树莓派和下图的显示屏展示内容。

用到的设备:
- OLED显示屏模块,IIC接口,128*32点阵,驱动芯片SSD1306(购买链接)
- 树莓派 3 Model B+,有外接显示屏、鼠标(如果没有可以用个人电脑连接树莓派,Mac 系统的可点击参考《Mac 通过 VNC 打开树莓派远程桌面(不用独立显示屏)》)
连接设备

如上图所示,这个 OLED 有五个 Pin,和树莓派引脚分别对映如下:
| OLED Pin | 树莓派 GPIO Pin (Board 编码) | 备注 |
| 3.3v | 1 或 17 | 3.3 v |
| GND | 6 或 9/14/20/25/30/34/39 | Ground |
| SCL | 5 | I2C SCL |
| SDA | 3 | I2C SCA |
| RES | 18 | Reset,我的代码中没有用到这个 |
市面上大多数 OLED 有4个或6个 Pin,连接方式略有不同,4个的少一个 RES,其他都一样,如下图。

Enable I2C Interface
有两种方式:
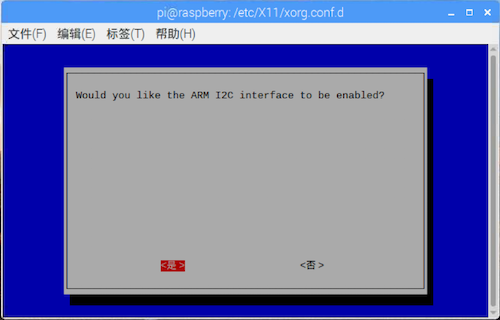
1. 树莓派终端中执行 sudo raspi-config ,选择 Interfacing Options > I2C ,出现如下界面,确认后重启。
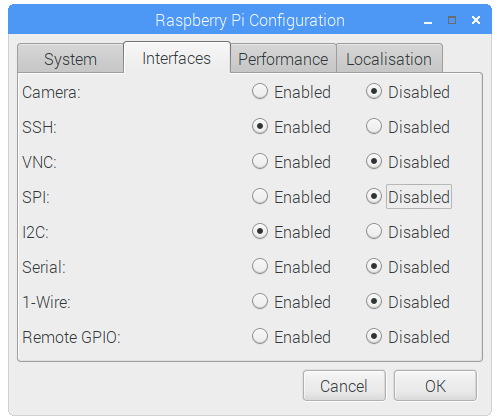
2. 桌面版树莓派可点击桌面左上角菜单键,再选择“首选项/Preferences" > "Raspberry Pi Configuration",然后再弹出的窗口中选择 Interfaces 标签,I2C 选项中选择 Enable,如下图。
树莓派环境准备
根据参考资料【1】中的提示,我检查了所有需要安装的基本库,基本上都是最新版本的,只下载了其中一个叫 python-smbus 的库。
安装可以进行在 Python 2.7 或 Python 3 里,但因为推荐使用 Python 3。
Python 3 的可以执行下面的一系列命令进行自查:
sudo apt install -y python3-dev
sudo apt install -y python-imaging python-smbus i2c-tools
sudo apt install -y python3-pil
sudo apt install -y python3-pip
sudo apt install -y python3-setuptools
sudo apt install -y python3-rpi.gpio
Python 2.7 的:
sudo apt install -y python-dev
sudo apt install -y python-imaging python-smbus i2c-tools
sudo apt install -y python-pil
sudo apt install -y python-pip
sudo apt install -y python-setuptools
树莓派下载安装 SSD1306 屏幕驱动库
有很多开源的 SSD1306 屏幕驱动库,我使用的是 Adafruit 的 Python 库,可以用于 128x32 和 128x64 的显示屏。地址是:https://github.com/adafruit/Adafruit_Python_SSD1306。
下载安装方式有两种:
- 直接从 gitHub 上 clone 到本地
- git clone https://github.com/adafruit/Adafruit_Python_SSD1306.git
- cd Adafruit_Python_SSD1306
- Python 3 下: sudo python3 setup.py install Python 2 下:sudo python setup.py install
- 用 pip 下载
- sudo pip install Adafruit-SSD1306
我用到是第一种下载安装方式。
测试代码
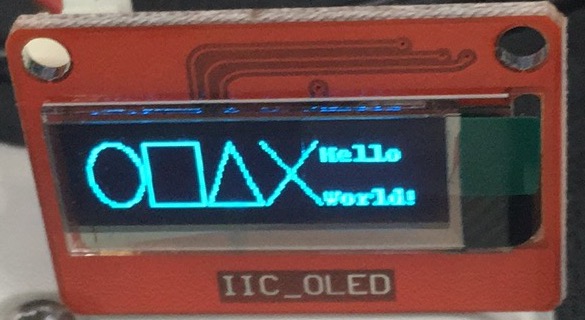
下载的 Python 库中有很多现成的例子,在 examples 文件夹中。终端进入该文件夹下,执行 python shapes.py 或 python3 shapes.py 显示屏会显示如下界面:
还有别的例子都可以尝试一下。
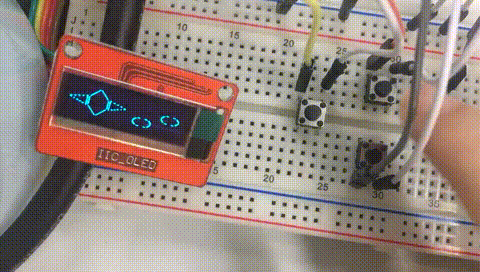
其中有一个 buttons.py 例子可以配合按键一起测试。我就拿了四个轻触四脚按键测试了一下,代码中显示可以用七个按钮控制。
先展示一下效果:
具体操作如下:
用编辑器打开 buttons.py,观察代码,如下图,
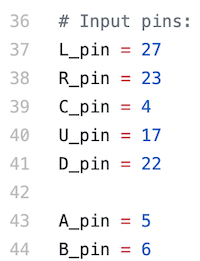
可以猜出 L, R, C, U, D 分别表示 Left, Right, Center, Up, Down,因为我只有四个按钮,我就只连接了上下左右这四个按钮,按照代码中给的 BCM 号连接上对应的 GPIO 引脚,效果如下图。
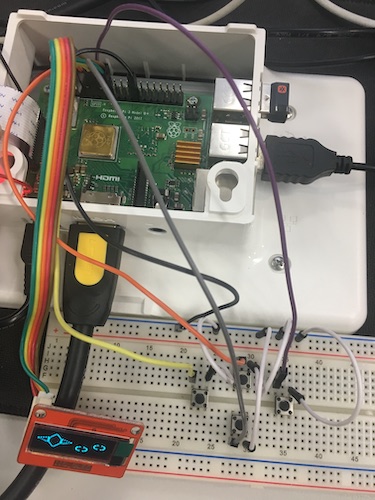
同时参考所有给出的例子,你就实现按钮等元件控制显示内容等效果。
在显示屏上显示文字
在 shapes.py 文件中有关于显示字母的例子,我们可以在这个代码上进行修改。
原代码内容:
# Load default font.
font = ImageFont.load_default()

# Alternatively load a TTF font.  Make sure the .ttf font file is in the same directory as the python script!
# Some other nice fonts to try: http://www.dafont.com/bitmap.php
#font = ImageFont.truetype('Minecraftia.ttf', 8)
想要显示中文,就需要下载中文的字体,有很多免费网站可以下载到,需要是 ttf 文件。我下载了一个楷体的 ttf,然后需要将这个 ttf 文件和代码放在同一路径下(如果不同路径,代码中的路径需要修改正确),修改代码如下:
# Load default font.
#font = ImageFont.load_default()

# Alternatively load a TTF font.  Make sure the .ttf font file is in the same directory as the python script!
# Some other nice fonts to try: http://www.dafont.com/bitmap.php
font = ImageFont.truetype('Kaiti.ttf', 30)
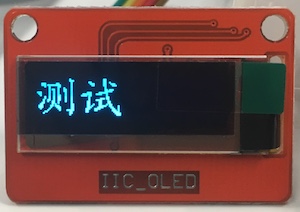
展示文字的代码可以是 draw.text((x,top), u'测试', font=font, fill=255) ,运行结果如下。
完整的参考代码可点击下方+展开显示。


 1 import RPi.GPIO as GPIO
 2
 3 import time
 4
 5 import Adafruit_GPIO.SPI as SPI
 6 import Adafruit_SSD1306
 7
 8 from PIL import Image
 9 from PIL import ImageDraw
10 from PIL import ImageFont
11
12 # Raspberry Pi pin configuration:
13 RST = 24
14 # 128x32 display with hardware I2C:
15 disp = Adafruit_SSD1306.SSD1306_128_32(rst=RST)
16
17 # Initialize library.
18 disp.begin()
19
20 # Clear display.
21 disp.clear()
22 disp.display()
23
24 # Create blank image for drawing.
25 # Make sure to create image with mode '1' for 1-bit color.
26 width = disp.width
27 height = disp.height
28 image = Image.new('1', (width, height))
29
30 # Get drawing object to draw on image.
31 draw = ImageDraw.Draw(image)
32
33 # Load default font.
34 #font = ImageFont.load_default()
35
36 # Alternatively load a TTF font.  Make sure the .ttf font file is in the same directory as the python script!
37 # Some other nice fonts to try: http://www.dafont.com/bitmap.php
38 font = ImageFont.truetype('kaiti.ttf', 30)
39
40 # First define some constants to allow easy resizing of shapes.
41 padding = 0
42 top = padding
43 bottom = height-padding
44
45 # Move left to right keeping track of the current x position for drawing shapes.
46 # 增加 x 值可以将文字向右移动
47 x = 0
48
49 draw.text((x, top), u'测试', font=font, fill=255) # 字段前加 u 表示是文字
50 disp.image(image)
51 disp.display()