《Linux就该这么学》!
学习网址:https://www.linuxprobe.com/
灰常不错的网站和学习课程~~~!


第10章 使用Apache服务部署静态网站
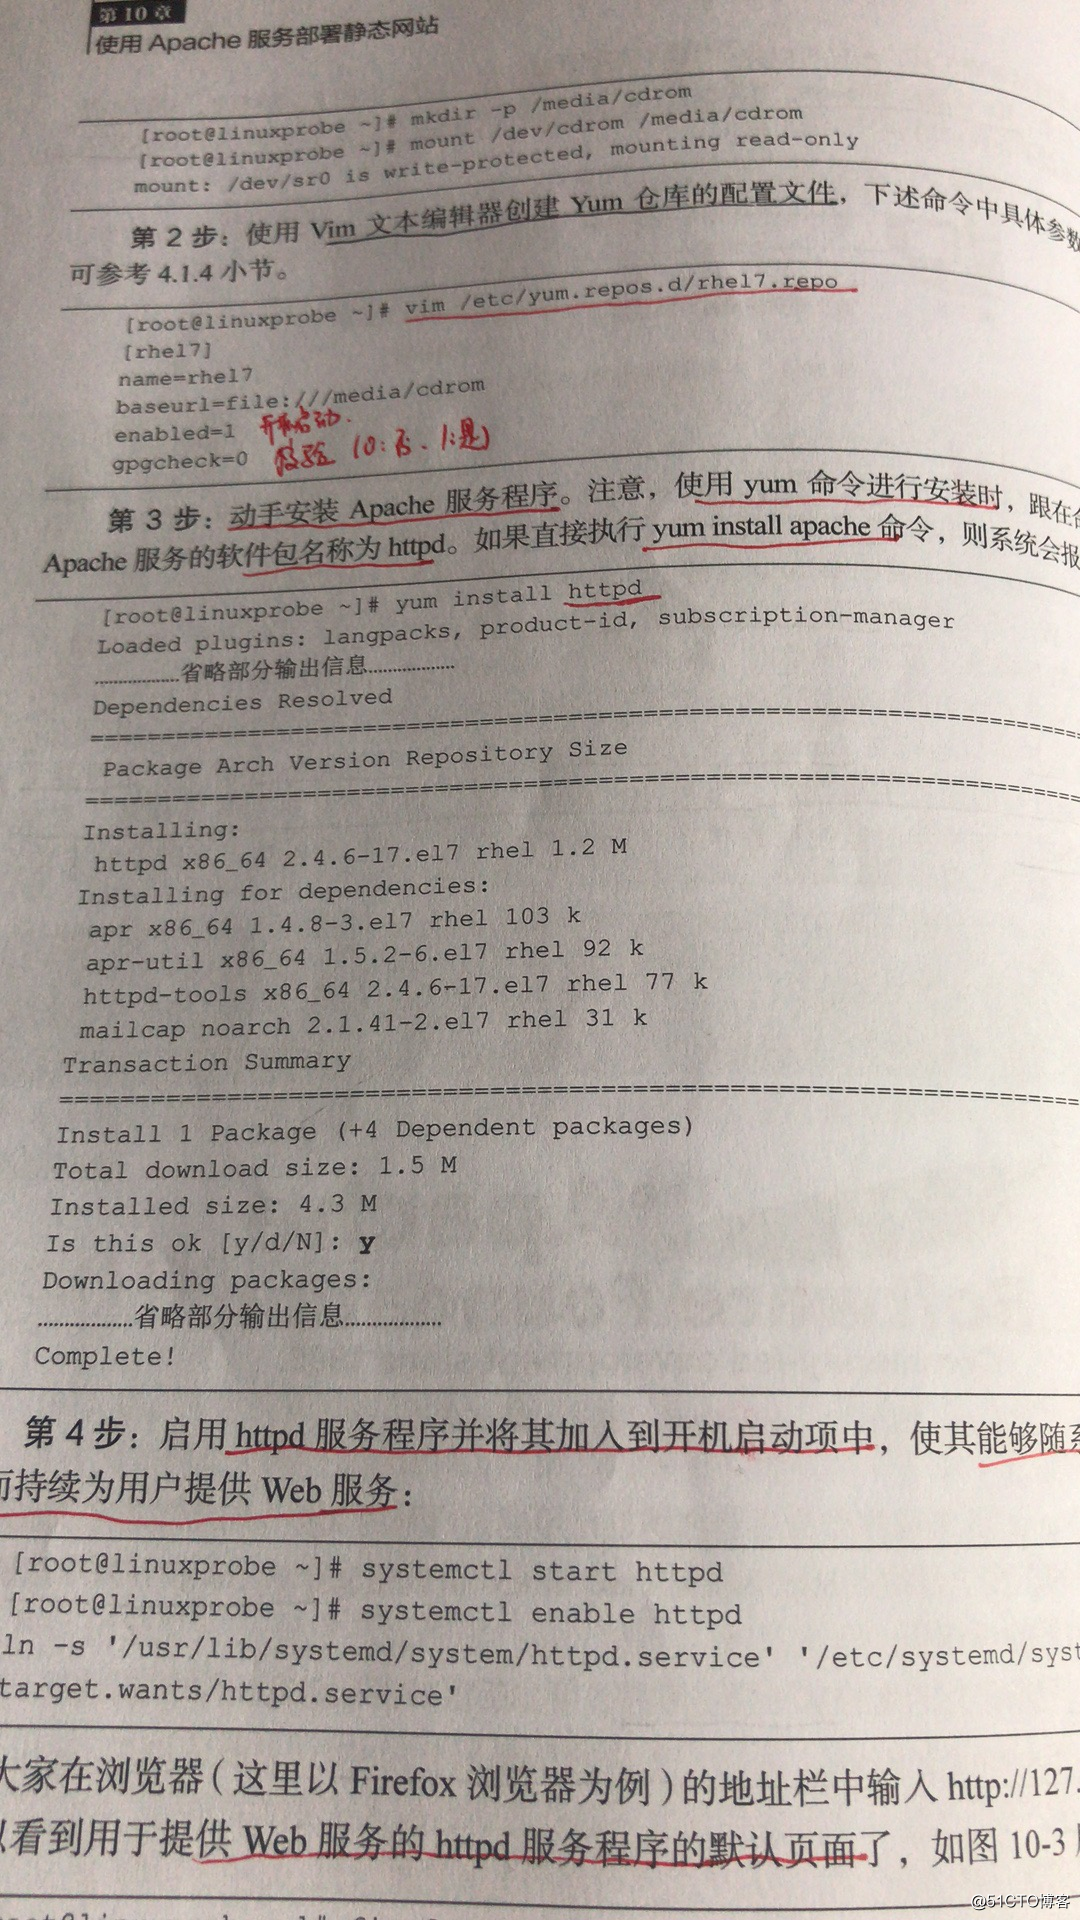
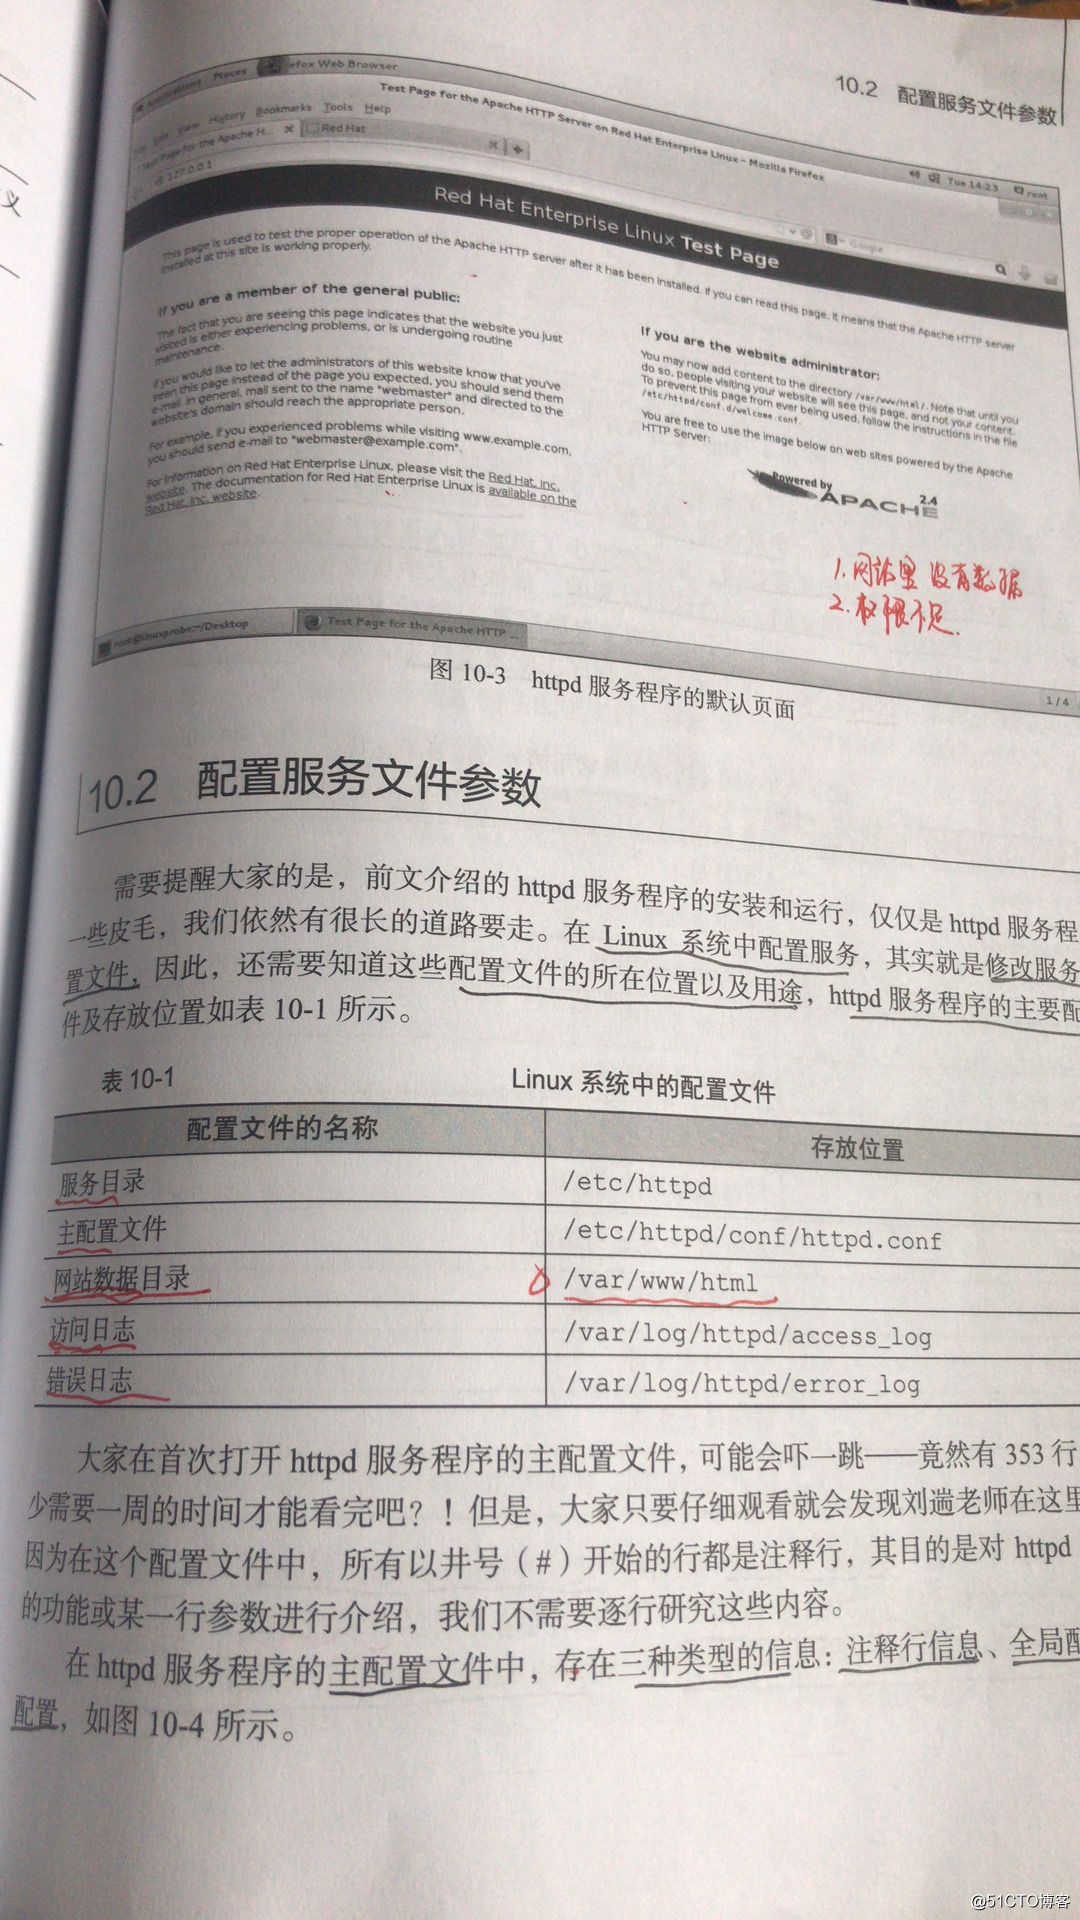
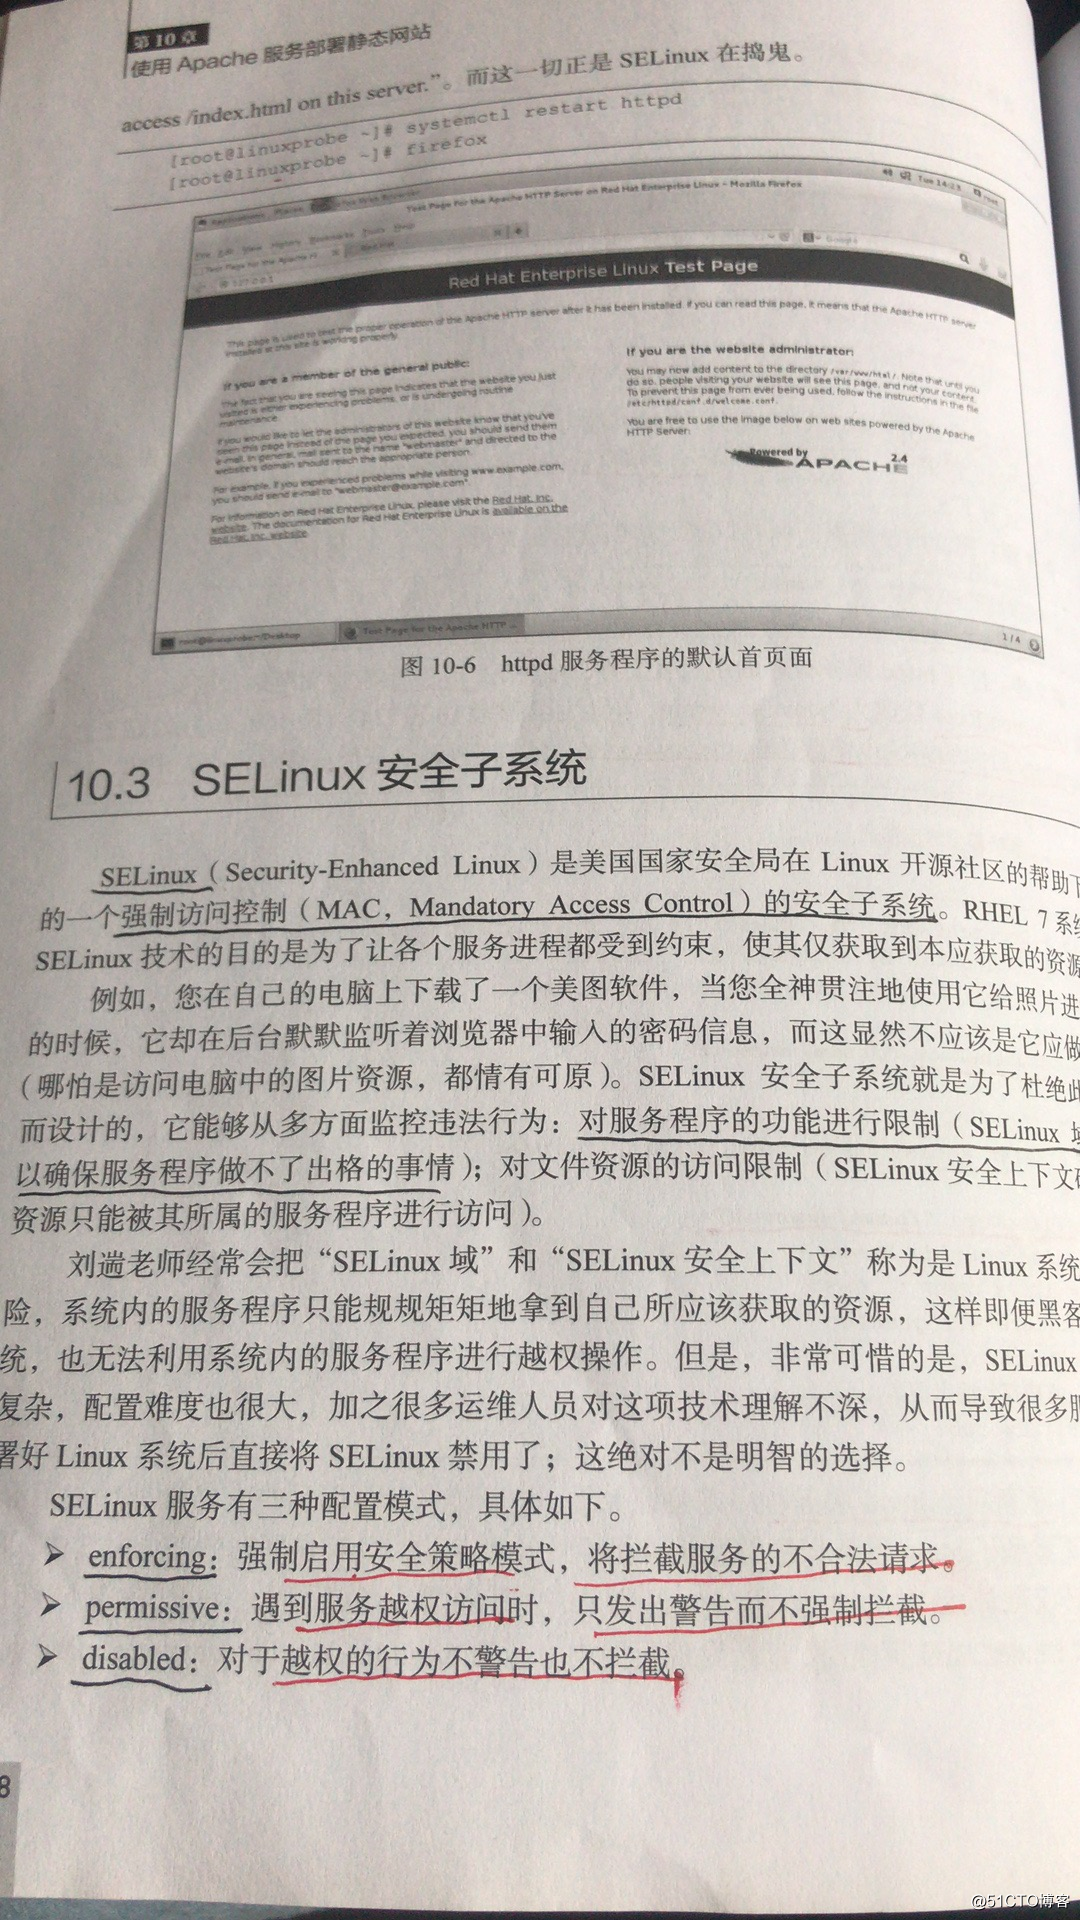
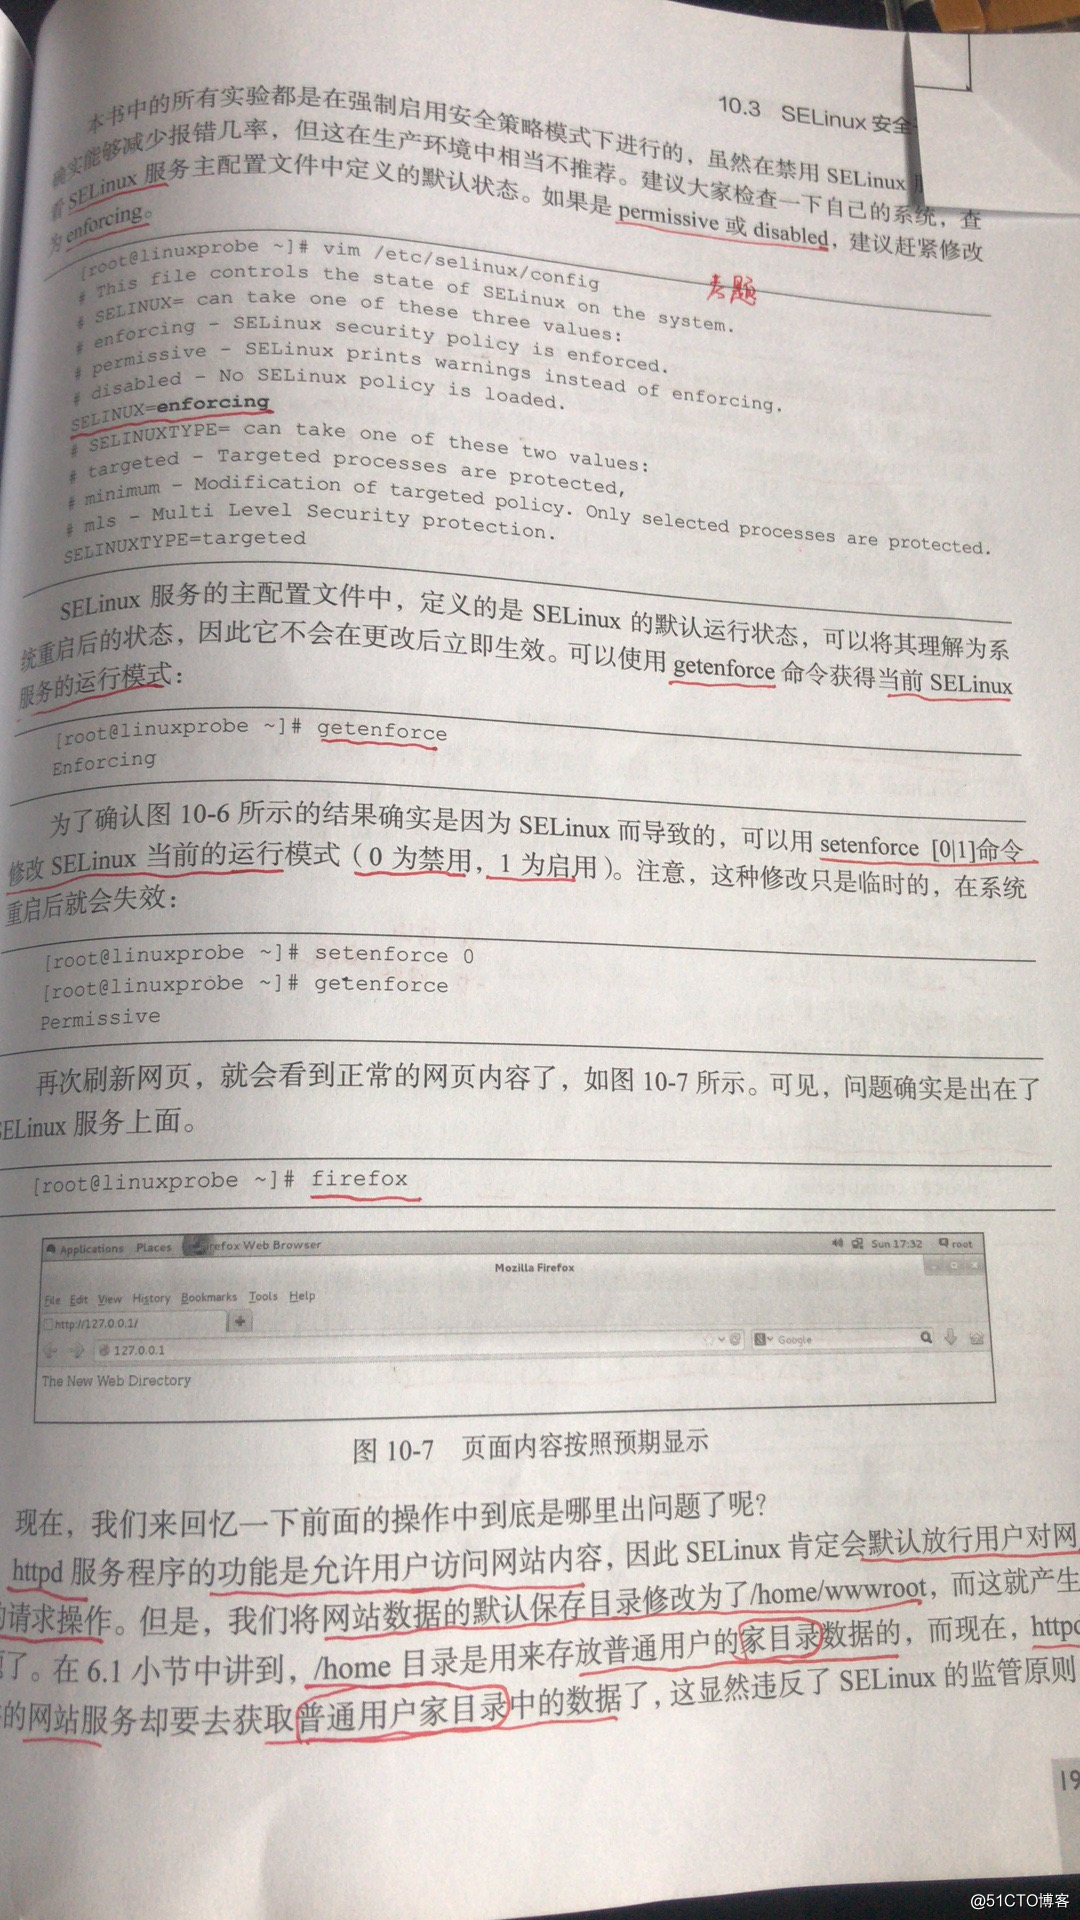
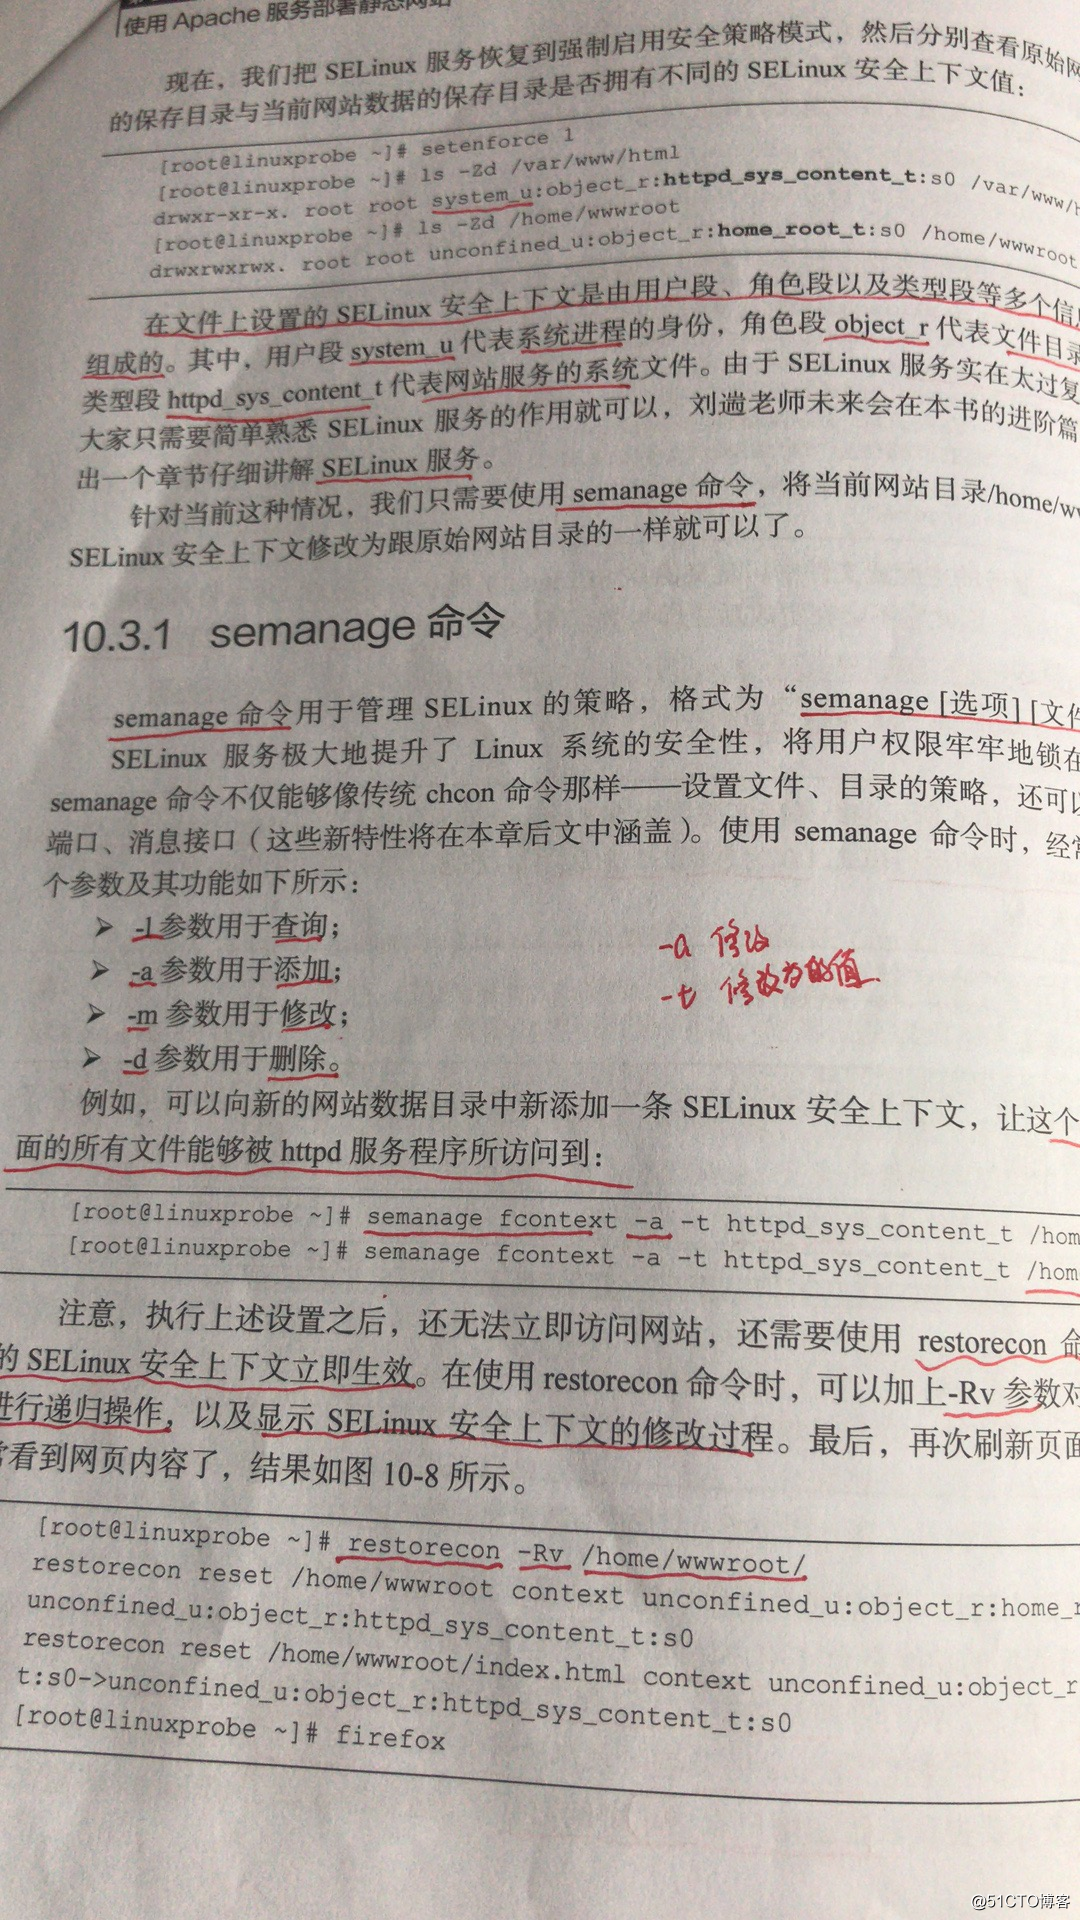
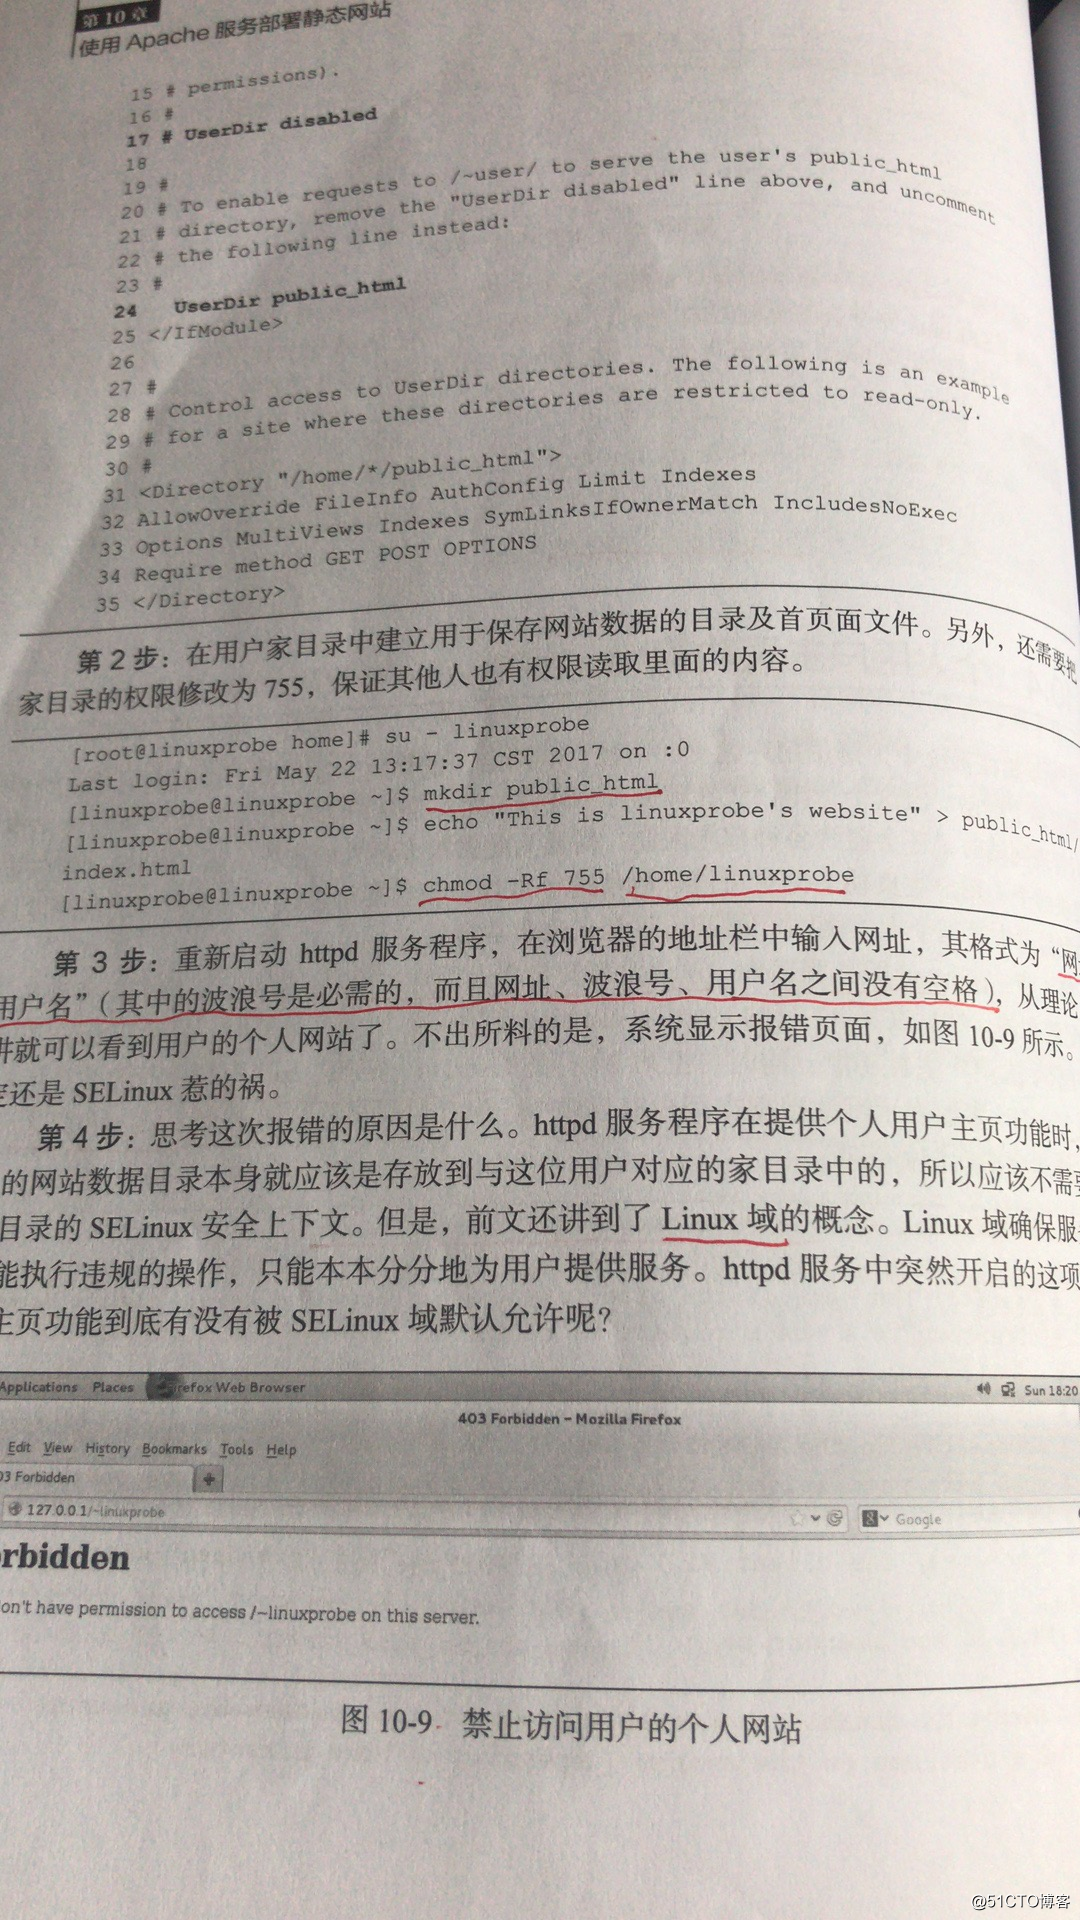
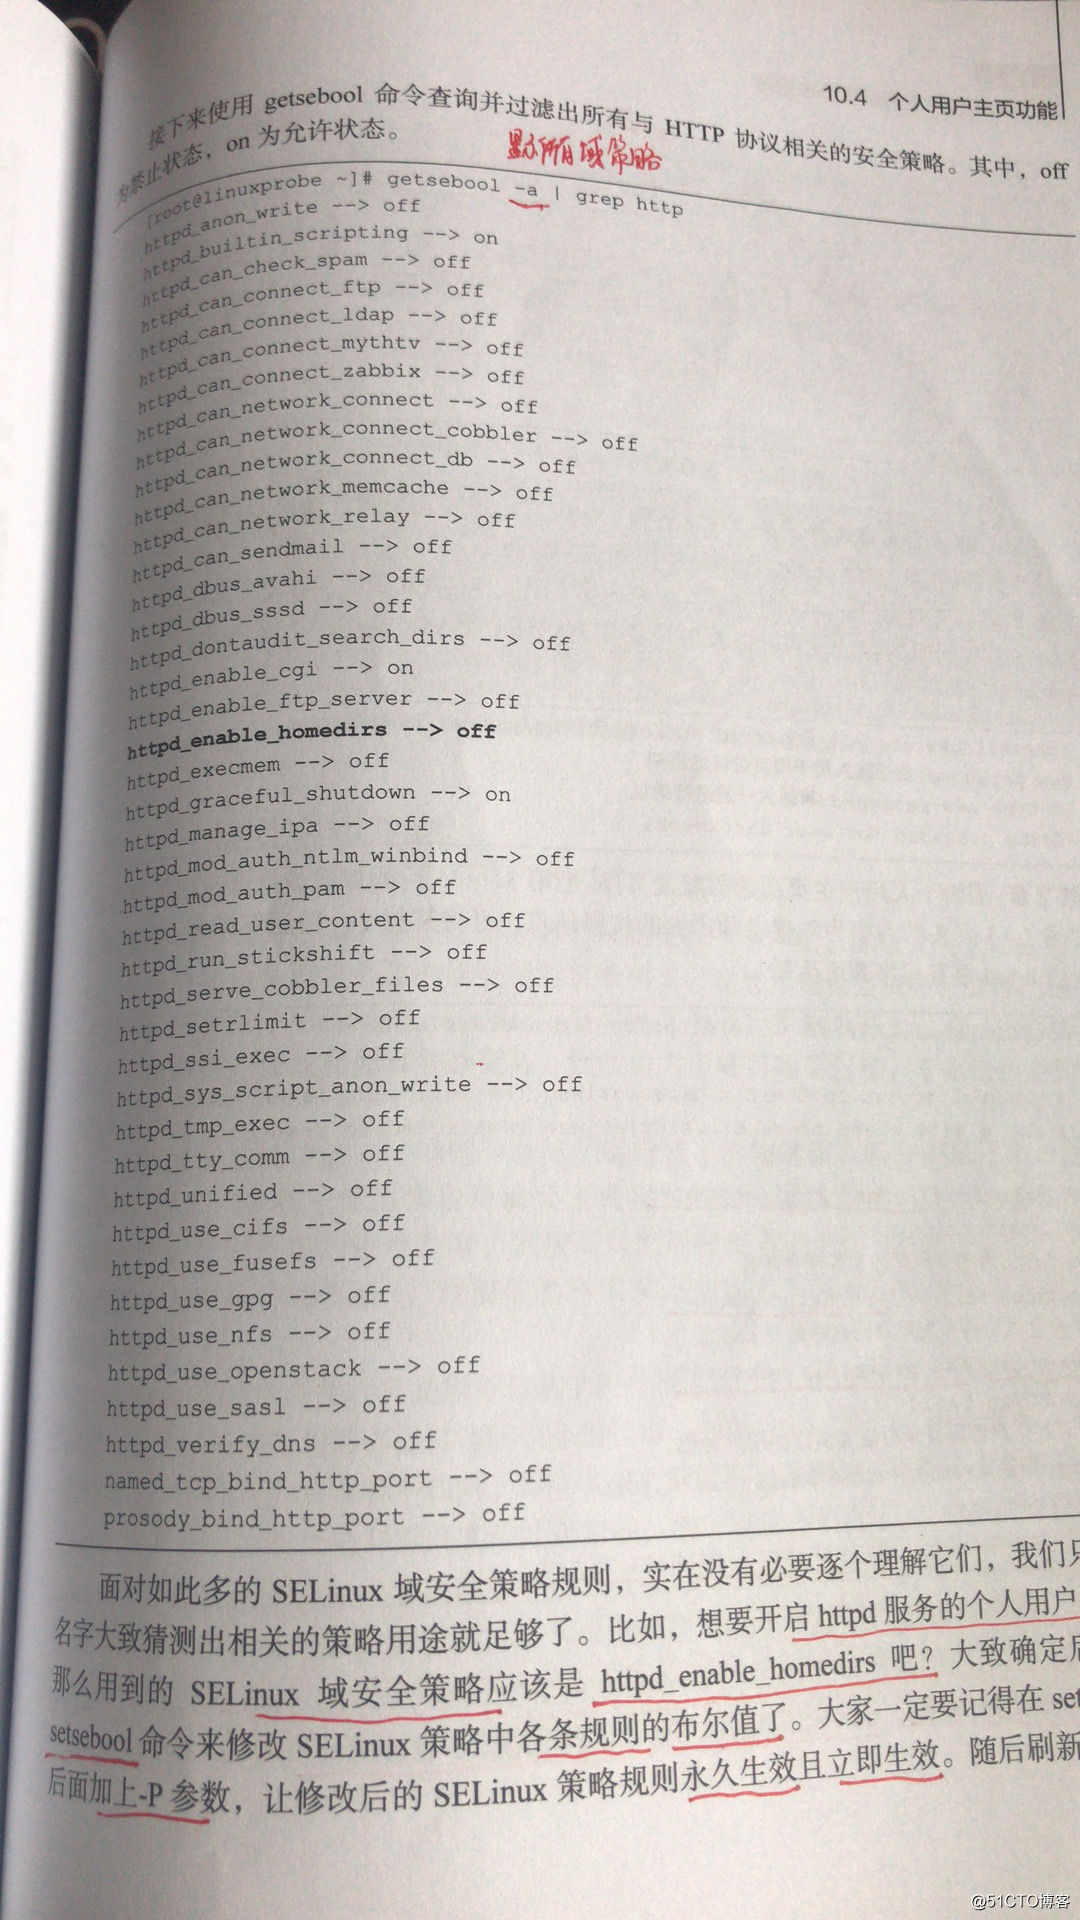
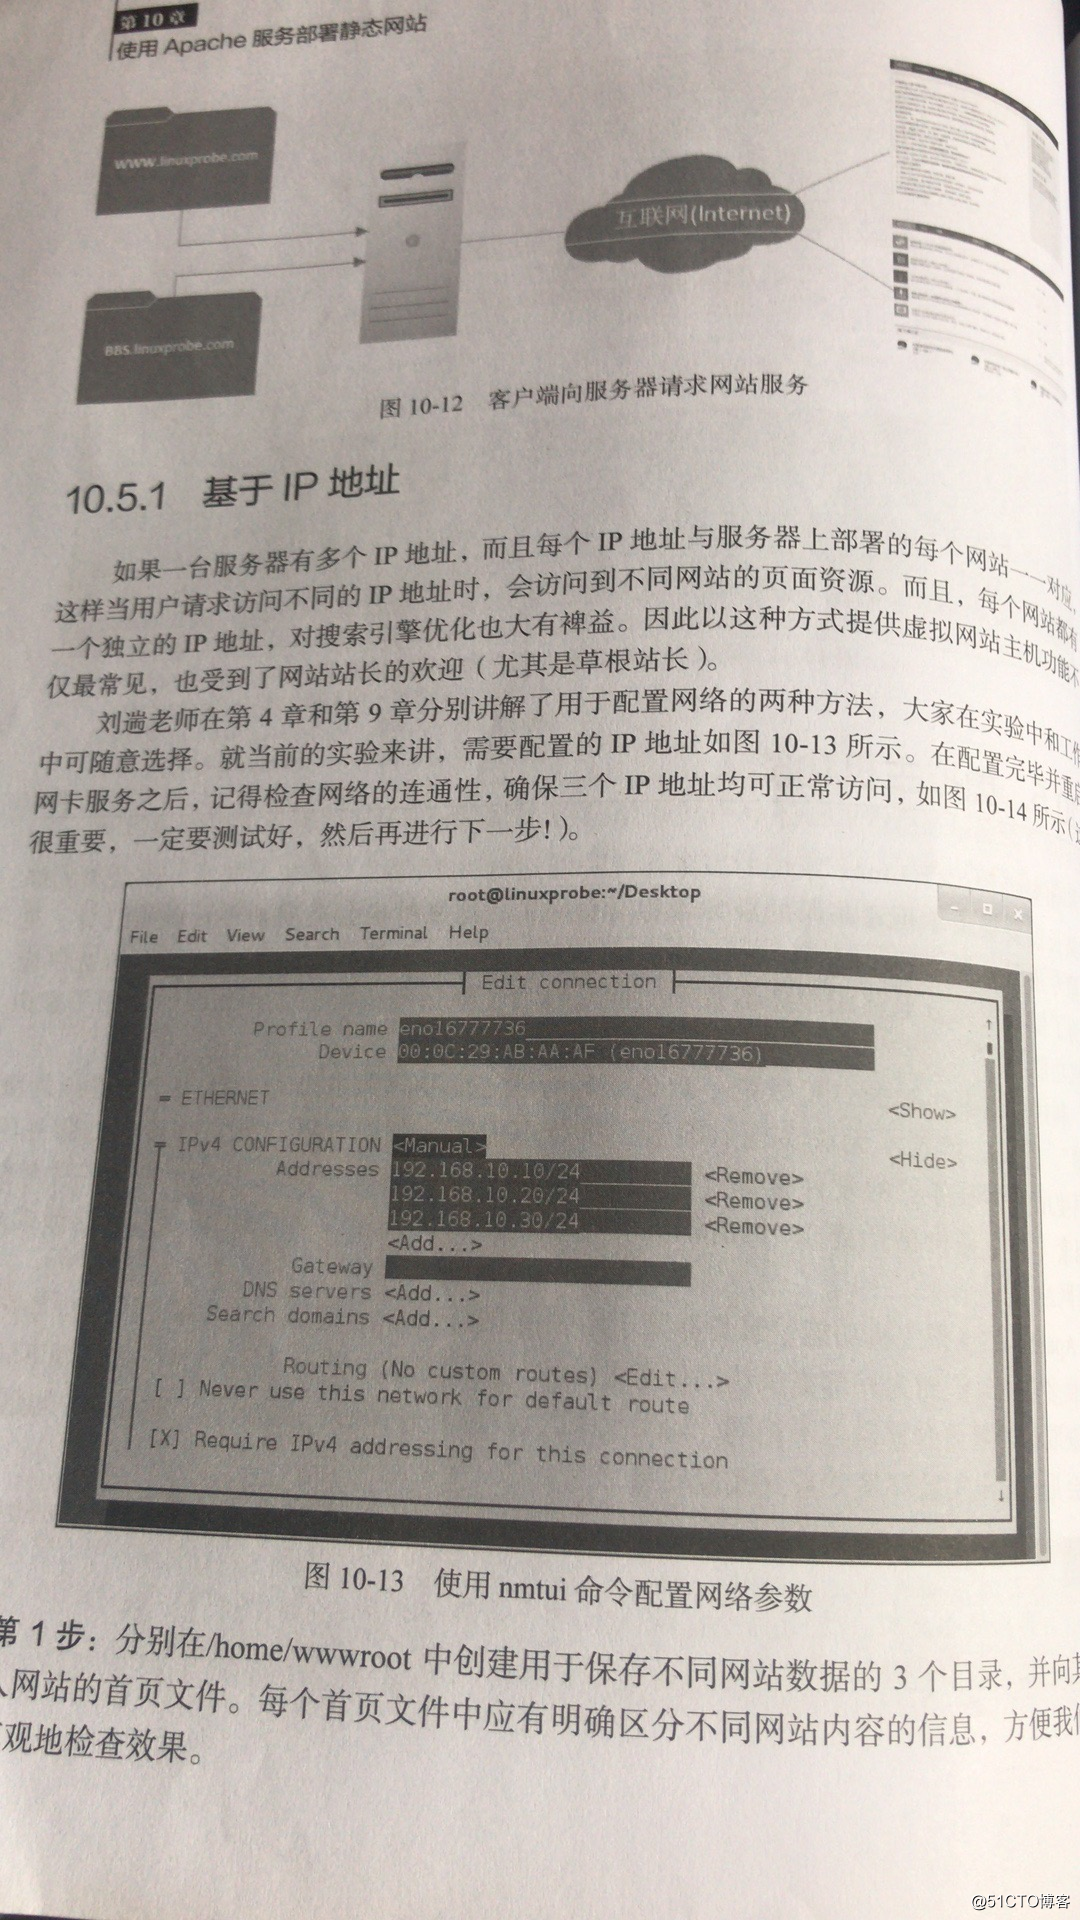
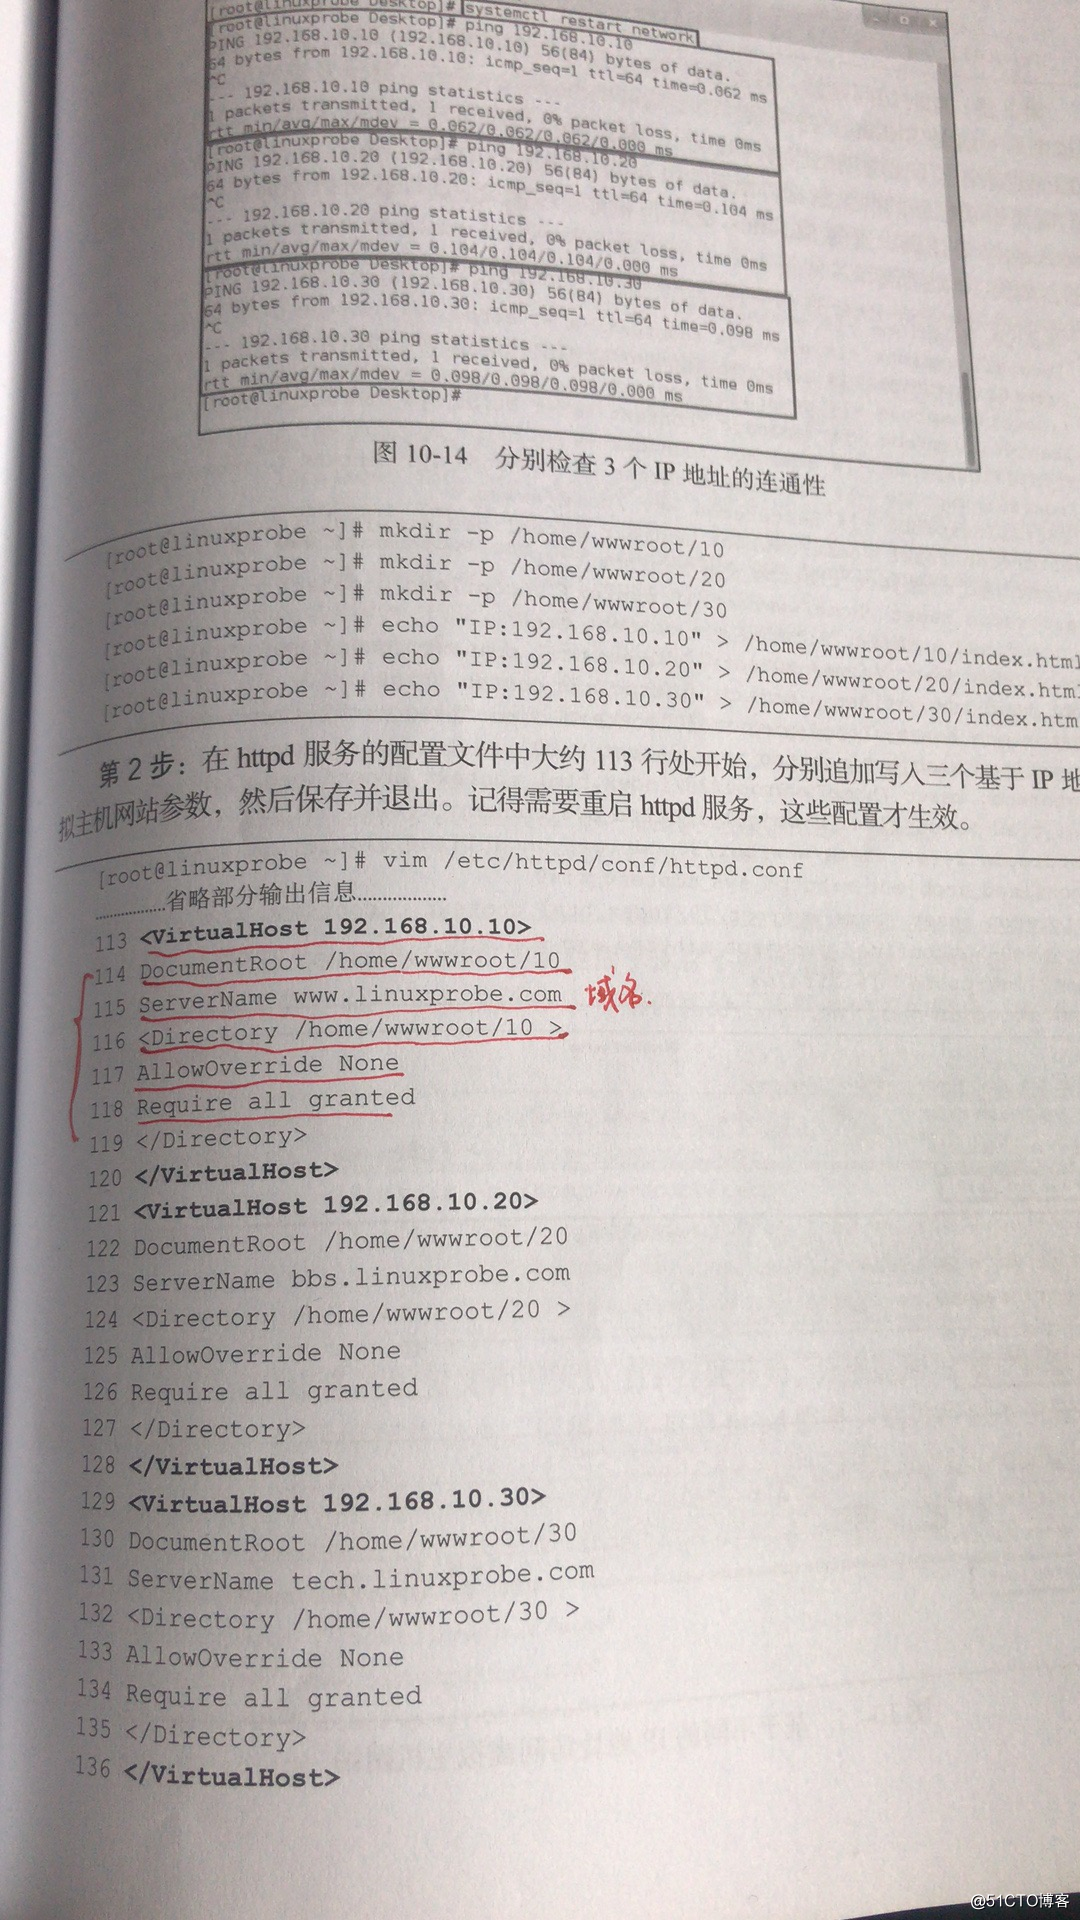
网站服务:通过浏览器访问服务器,传送10.1 网站服务程序 目前能够提供Web网络服务的程序有IIS、Nginx和Apache等。其中,IIS(Internet Information Services,互联网信息服务)是Windows系统中默认的Web服务程序,这是一款图形化的网站管理工具,不仅可以提供Web网站服务,还可以提供FTP、NMTP、SMTP等服务。但是,IIS只能在Windows系统中使用,而我们这本书的名字是《Linux就该这么学》,所以它也就不在我们的学习范围之内了。 Apache服务程序可以运行在Linux系统、UNIX系统甚至是Windows系统中,支持基于IP、域名及端口号的虚拟主机功能,支持多种认证方式,集成有代理服务器模块、安全Socket层(SSL),能够实时监视服务状态与定制日志消息,并有着各类丰富的模块支持。 Apache程序是在RHEL 5、6、7系统的默认Web服务程序,其相关知识点一直也是RHCSA和RHCE认证考试的重点内容。Apache 美国 动态Nignx 俄罗斯 静态网页128M内存的空间可以装一个网站。 静态:html 图片动态:数据库(php)第1步:把光盘设备中的系统镜像挂载到/media/cdrom目录。[root@localhost 桌面]# mkdir -p /media/cdrom[root@localhost 桌面]# mount /dev/cdrom /media/cdrom/mount: /dev/sr0 写保护,将以只读方式挂载[root@localhost 桌面]# vim /etc/fstab# Created by anaconda on Mon Apr 22 15:33:10 2019## Accessible filesystems, by reference, are maintained under '/dev/disk'# See man pages fstab(5), findfs(8), mount(8) and/or blkid(8) for more info#/dev/mapper/rhel-root / xfs defaults 1 1UUID=476aa953-9954-4170-bfc7-69ec6cedad75 /boot xfs defaults,uquota 1 2/dev/mapper/rhel-swap swap swap defaults 0 0/dev/sdb1 /guazai ext4 defaults 0 0/dev/sdb5 swap swap defaults 0 0/dev/sdb6 /newFS xfs defaults 0 0/dev/cdrom /media/cdrom iso9660 defaults 0 0第2步:使用Vim文本编辑器创建Yum仓库的配置文件[root@localhost 桌面]# vim /etc/yum.repos.d/rhel7.repo[rhel]name=rhel7baseurl=file:///media/cdromenable=1gpgcheck=0第3步:动手安装Apache服务程序。注意,使用yum命令进行安装时,跟在命令后面的Apache服务的软件包名称为httpd。如果直接执行yum ×××tall apache命令,则系统会报错。[root@localhost 桌面]# yum ×××tall httpd已加载插件:langpacks, product-id, subscription-managerThis system is not registered to Red Hat Subscription Management. You can use subscription-manager to register.Repository rhel is listed more than once in the configuration正在解决依赖关系--> 正在检查事务---> 软件包 httpd.x86_64.0.2.4.6-17.el7 将被 安装--> 解决依赖关系完成依赖关系解决================================================================Package 架构 版本 源 大小================================================================正在安装:httpd x86_64 2.4.6-17.el7 rhel 1.2 M事务概要================================================================安装 1 软件包总下载量:1.2 M安装大小:3.7 MIs this ok [y/d/N]: yDownloading packages:Running transaction checkRunning transaction testTransaction test succeededRunning transaction 正在安装 : httpd-2.4.6-17.el7.x86_64 1/1 验证中 : httpd-2.4.6-17.el7.x86_64 1/1已安装: httpd.x86_64 0:2.4.6-17.el7 完毕!第4步:启用httpd服务程序并将其加入到开机启动项中,使其能够随系统开机而运行,从而持续为用户提供Web服务:[root@localhost 桌面]# systemctl restart httpd[root@localhost 桌面]# systemctl enable httpdln -s '/usr/lib/systemd/system/httpd.service' '/etc/systemd/system/multi-user.target.wants/httpd.service'在浏览器(这里以Firefox浏览器为例)的地址栏中输入http://127.0.0.1并按回车键,就可以看到用于提供Web服务的httpd服务程序的默认页面了10.2 配置服务文件参数1、网站没有数据2、权限不足在Linux系统中配置服务,其实就是修改服务的配置文件,因此,还需要知道这些配置文件的所在位置以及用途,httpd服务程序的主要配置文件及存放位置如表10-1所示。网站的存放路径:var/www/html表10-1 Linux系统中的配置文件服务目录/etc/httpd主配置文件/etc/httpd/conf/httpd.conf网站数据目录/var/www/html访问日志/var/log/httpd/access_log错误日志/var/log/httpd/error_log查看网站数据是空的,没有数据。[root@localhost ~]# cd /var/www/html[root@localhost html]# ls网站的数据是在index.html文件中。表10-2 配置httpd服务程序时最常用的参数以及用途描述ServerRoot服务目录ServerAdmin管理员邮箱User运行服务的用户Group运行服务的用户组ServerName网站服务器的域名DocumentRoot网站数据目录Listen监听的IP地址与端口号DirectoryIndex默认的索引页页面ErrorLog错误日志文件CustomLog访问日志文件Timeout网页超时时间,默认为300秒从表10-2中可知,DocumentRoot参数用于定义网站数据的保存路径,其参数的默认值是把网站数据存放到/var/www/html目录中;而当前网站普遍的首页面名称是index.html,因此可以向/var/www/html目录中写入一个文件,替换掉httpd服务程序的默认首页面,该操作会立即生效。在执行上述操作之后,再在Firefox浏览器中刷新httpd服务程序,可以看到该程序的首页面内容已经发生了改变,如图10-5所示。[root@localhost html]# vim index.htmlWelcome To LinuxProbe.Comdminglmignmlknglngmkgnlknglsnkdnkgankgdowapnglknglanbkgaodeng;sangngalkn第1步:建立网站数据的保存目录,并创建首页文件。[root@localhost html]# mkdir /home/wwwroot[root@localhost html]# systemctl restart httpd[root@localhost html]# cd /home/wwwroot[root@localhost wwwroot]# cp /var/www/html/index.html /home/wwwroot/[root@localhost wwwroot]# lsindex1.html index.html linuxprobe[root@localhost wwwroot]# cat index.htmlThe New Web Directory第2步:打开httpd服务程序的主配置文件,将约第119行用于定义网站数据保存路径的参数DocumentRoot修改为/home/wwwroot,同时还需要将约第124行用于定义目录权限的参数Directory后面的路径也修改为/home/wwwroot。配置文件修改完毕后即可保存并退出。网站数据保存在/var/www/html目录中,把保存网站数据的目录修改为 /home/wwwroot修改前:修改后:[root@localhost html]# vim /etc/httpd/conf/httpd.conf116 # documents. By default, all requests are taken from this di rectory, but117 # symbolic links and aliases may be used to point to other l ocations.118 #119 DocumentRoot "/home/wwwroot"120121 #122 # Relax access to content within /var/www.123 #124 <Directory "/home/wwwroot">125 AllowOverride None126 # Allow open access:127 Require all granted128 </Directory>129130 # Further relax access to the default document root:131 <Directory "/var/www/html">132 #133 # Possible values for the Options directive are "None", "All",134 # or any combination of:[root@localhost ~]# systemctl restart httpd.service第3步:重新启动httpd服务程序并验证效果,浏览器刷新页面后的内容如图10-6所示。奇怪!为什么看到了httpd服务程序的默认首页面?按理来说,只有在网站的首页面文件不存在或者用户权限不足时,才显示httpd服务程序的默认首页面。我们在尝试访问http://127.0.0.1/index.html页面时,竟然发现页面中显示“Forbidden,You don't have permission to access /index.html on this server.”。而这一切正是SELinux在捣鬼。10.3 SELinux安全子系统SELinux服务有三种配置模式,具体如下。enforcing:强制启用安全策略模式,将拦截服务的不合法请求。permissive:遇到服务越权访问时,只发出警告而不强制拦截。disabled:对于越权的行为不警告也不拦截。SELinux对于文件和服务起到防火墙的作用。通过下面两个保护机制:SELinux 域: SELinux 安全上下文:开启SELinux[root@localhost ~]# vim /etc/selinux/config# This file controls the state of SELinux on the system.# SELINUX= can take one of these three values:# enforcing - SELinux security policy is enforced.# permissive - SELinux prints warnings ×××tead of enforcing.# disabled - No SELinux policy is loaded.SELINUX=enforcing# SELINUXTYPE= can take one of these two values:# targeted - Targeted processes are protected,# minimum - Modification of targeted policy. Only selected processes are protected.# mls - Multi Level Security protection.SELINUXTYPE=targeted1、修改SELinux域查看SELinux是否开启:[root@localhost ~]# getenforceEnforcing设置SELinux是否开启:[root@localhost ~]# setenforceusage: setenforce [ Enforcing | Permissive | 1 | 0 ][root@localhost ~]# setenforce 0[root@localhost ~]# setenforce 1SELinux 域:管理服务的功能的,SELinux 安全上下文:管理文件可以被谁查看。我们把SELinux服务恢复到强制启用安全策略模式,然后分别查看原始网站数据的保存目录与当前网站数据的保存目录是否拥有不同的SELinux安全上下文值:[root@localhost ~]# ls -ldZ /var/www/htmldrwxr-xr-x. root root system_u:object_r:httpd_sys_content_t:s0 /var/www/html[root@localhost ~]# ls -ldZ /home/wwwroot/drwxrwxrwx. root root unconfined_u:object_r:user_home_dir_t:s0 /home/wwwroot/semanage命令semanage命令用于管理SELinux的策略,格式为“semanage [选项] [文件]”。SELinux服务极大地提升了Linux系统的安全性,将用户权限牢牢地锁在笼子里。semanage命令不仅能够像传统chcon命令那样—设置文件、目录的策略,还可以管理网络端口、消息接口(这些新特性将在本章后文中涵盖)。使用semanage命令时,经常用到的几个参数及其功能如下所示:-l参数用于查询;-a参数用于添加;-m参数用于修改;-d参数用于删除。2、修改SELinux的安全上下文:可以向新的网站数据目录中新添加一条SELinux安全上下文,让这个目录以及里面的所有文件能够被httpd服务程序所访问到:[root@localhost wwwroot]# semanage fcontext -a -t httpd_sys_content_t /home/wwwroot[root@localhost wwwroot]# semanage fcontext -a -t httpd_sys_content_t /home/wwwroot/*[root@localhost wwwroot]# restorecon -Rv /home/wwwroot/restorecon reset /home/wwwroot/index.html context unconfined_u:object_r:user_home_t:s0->unconfined_u:object_r:httpd_sys_content_t:s0[root@localhost ~]# cd /home/wwwroot[root@localhost wwwroot]# lsindex1.html index.html linuxprobe[root@localhost wwwroot]# rm -rf linuxprobe[root@localhost wwwroot]# rm -rf index.html[root@localhost wwwroot]# cat index.htmlThe New Web Directory/home/wwwroot 网站数据目录下的网站首页名称是index.html,该文件只能有一个。添加完安全上下文以后,发现刷新网站仍然看不到网站内容,无法立即访问网站。还需要使用restorecon命令将设置好的SELinux安全上下文立即生效。在使用restorecon命令时,可以加上-Rv参数对指定的目录进行递归操作,以及显示SELinux安全上下文的修改过程。最后,再次刷新页面,就可以正常看到网页内容了10.4 个人用户主页功能Apache服务:的主配置文件是/etc/httpd/conf/httpd.conf,并不是所有的配置都保存在主配置文件中。第1步:在httpd服务程序中,默认没有开启个人用户主页功能。为此,我们需要编辑下面的配置文件,然后在第17行的UserDir disabled参数前面加上井号(#),表示让httpd服务程序开启个人用户主页功能;同时再把第24行的UserDir public_html参数前面的井号(#)去掉(UserDir参数表示网站数据在用户家目录中的保存目录名称,即public_html目录)。最后,在修改完毕后记得保存。[root@localhost wwwroot]# vim /etc/httpd/conf.d/userdir.conf 1 # 2 # UserDir: The name of the directory that is appended o nto a user's home 3 # directory if a ~user request is received. 4 # 5 # The path to the end user account 'public_html' direct ory must be 6 # accessible to the webserver userid. This usually mea ns that ~userid 7 # must have permissions of 711, ~userid/public_html mus t have permissions 8 # of 755, and documents contained therein must be world -readable. 9 # Otherwise, the client will only receive a "403 Forbid den" message.10 #11 <IfModule mod_userdir.c>12 #13 # UserDir is disabled by default since it can confi rm the presence14 # of a username on the system (depending on home di rectory15 # permissions).16 #17 #UserDir disabled1819 #20 # To enable requests to /~user/ to serve the user's public_html21 # directory, remove the "UserDir disabled" line abo ve, and uncomment22 # the following line ×××tead:23 #24 UserDir public_html25 </IfModule>2627 #28 # Control access to UserDir directories. The following is an example29 # for a site where these directories are restricted to read-only.30 #31 <Directory "/home/*/public_html">32 AllowOverride FileInfo AuthConfig Limit Indexes33 Options MultiViews Indexes SymLinksIfOwnerMatch Inc ludesNoExec34 Require method GET POST OPTIONS35 </Directory>[root@localhost ~]# systemctl restart httpd第2步:在用户家目录中建立用于保存网站数据的目录及首页面文件。另外,还需要把家目录的权限修改为755,保证其他人也有权限读取里面的内容。[root@localhost ~]# su - linuxprobe上一次登录:三 6月 12 19:18:08 CST 2019pts/0 上[linuxprobe@localhost ~]$ mkdir public_html[linuxprobe@localhost ~]$ lsa d g j m public_html 模板 文档 桌面b e h k n xiaosu 视频 下载c f i l peiexianzhi 公共 图片 音乐[linuxprobe@localhost ~]$ cd public_html[linuxprobe@localhost public_html]$ vim index.htmlzheshi chuangjian mulu .chuangjian geren wangzhan mulu ..[linuxprobe@localhost ~]$ chmod -Rf 755 /home/linuxprobe第3步:重新启动httpd服务程序,在浏览器的地址栏中输入网址,其格式为“网址/~用户名”(其中的波浪号是必需的,而且网址、波浪号、用户名之间没有空格),从理论上来讲就可以看到用户的个人网站了。不出所料的是,系统显示报错页面,如图10-9所示。这一定还是SELinux惹的祸。在SELinux中放行域的限制。[root@localhost linuxprobe]# setenforce 0 [root@localhost linuxprobe]# setenforce 1第4步:思考这次报错的原因是什么。httpd服务程序在提供个人用户主页功能时,该用户的网站数据目录本身就应该是存放到与这位用户对应的家目录中的,所以应该不需要修改家目录的SELinux安全上下文。但是,前文还讲到了SELinux域的概念。SELinux域确保服务程序不能执行违规的操作,只能本本分分地为用户提供服务。httpd服务中突然开启的这项个人用户主页功能到底有没有被SELinux域默认允许呢?显示当前所有SELinux 的域的策略的名称以及具体的项目。[root@localhost linuxprobe]# getsebool -a |grep httphttpd_anon_write --> offhttpd_builtin_scripting --> onhttpd_can_check_spam --> offhttpd_can_connect_ftp --> offhttpd_can_connect_ldap --> offhttpd_can_connect_mythtv --> offhttpd_can_connect_zabbix --> offhttpd_can_network_connect --> offhttpd_can_network_connect_cobbler --> offhttpd_can_network_connect_db --> offhttpd_can_network_memcache --> offhttpd_can_network_relay --> offhttpd_can_sendmail --> offhttpd_dbus_avahi --> offhttpd_dbus_sssd --> offhttpd_dontaudit_search_dirs --> offhttpd_enable_cgi --> onhttpd_enable_ftp_server --> offhttpd_enable_homedirs --> offhttpd_execmem --> offhttpd_graceful_shutdown --> onhttpd_manage_ipa --> offhttpd_mod_auth_ntlm_winbind --> offhttpd_mod_auth_pam --> offhttpd_read_user_content --> offhttpd_run_stickshift --> offhttpd_serve_cobbler_files --> offhttpd_setrlimit --> offhttpd_ssi_exec --> offhttpd_sys_script_anon_write --> offhttpd_tmp_exec --> offhttpd_tty_comm --> offhttpd_unified --> offhttpd_use_cifs --> offhttpd_use_fusefs --> offhttpd_use_gpg --> offhttpd_use_nfs --> offhttpd_use_openstack --> offhttpd_use_sasl --> offhttpd_verify_dns --> offnamed_tcp_bind_http_port --> offprosody_bind_http_port --> off[root@localhost linuxprobe]# setsebool -P httpd_enable_homedirs=on有时,网站的拥有者并不希望直接将网页内容显示出来,只想让通过身份验证的用户访客看到里面的内容,这时就可以在网站中添加口令功能了第1步:先使用htpasswd命令生成密码数据库。-c参数表示第一次生成;后面再分别添加密码数据库的存放文件,以及验证要用到的用户名称(该用户不必是系统中已有的本地账户)。密码:redhat[root@localhost 桌面]# htpasswd -c /etc/httpd/passwd abelNew password:Re-type new password:Adding password for user linuxprobe第2步:编辑个人用户主页功能的配置文件。把第31~35行的参数信息修改成下列内容,其中井号(#)开头的内容为刘遄老师添加的注释信息,可将其忽略。随后保存并退出配置文件,重启httpd服务程序即可生效。未修改之前,原始文件:1 # 2 # UserDir: The name of the directory that is appended onto a user's home 3 # directory if a ~user request is received. 4 # 5 # The path to the end user account 'public_html' directory must be 6 # accessible to the webserver userid. This usually means that ~userid 7 # must have permissions of 711, ~userid/public_html must have permissions 8 # of 755, and documents contained therein must be world-readable. 9 # Otherwise, the client will only receive a "403 Forbidden" message.10 #11 <IfModule mod_userdir.c>12 #13 # UserDir is disabled by default since it can confirm the presence14 # of a username on the system (depending on home directory15 # permissions).16 #17 #UserDir disabled1819 #20 # To enable requests to /~user/ to serve the user's public_html21 # directory, remove the "UserDir disabled" line above, and uncomment22 # the following line ×××tead:23 #24 UserDir public_html25 </IfModule>2627 #28 # Control access to UserDir directories. The following is an example29 # for a site where these directories are restricted to read-only.30 #31 <Directory "/home//public_html">32 AllowOverride FileInfo AuthConfig Limit Indexes33 Options MultiViews Indexes SymLinksIfOwnerMatch IncludesNoExec34 Require method GET POST OPTIONS35 </Directory>修改后配置文件:[root@localhost wwwroot]# vim /etc/httpd/conf.d/userdir.conf 1 # 2 # UserDir: The name of the directory that is appended onto a user's home 3 # directory if a ~user request is received. 4 # 5 # The path to the end user account 'public_html' directory must be 6 # accessible to the webserver userid. This usually means that ~userid 7 # must have permissions of 711, ~userid/public_html must have permissions 8 # of 755, and documents contained therein must be world-readable. 9 # Otherwise, the client will only receive a "403 Forbidden" message.10 #11 <IfModule mod_userdir.c>12 #13 # UserDir is disabled by default since it can confirm the presence14 # of a username on the system (depending on home directory15 # permissions).16 #17 #UserDir disabled1819 #20 # To enable requests to /~user/ to serve the user's public_html21 # directory, remove the "UserDir disabled" line above, and uncomment22 # the following line ×××tead:23 #24 UserDir public_html25 </IfModule>2627 #28 # Control access to UserDir directories. The following is an example29 # for a site where these directories are restricted to read-only.30 #31 <Directory "/home//public_html">32 AllowOverride all33 authuserfile /etc/httpd/passwd34 authusername nihao qing shuru yonghuming35 authtype basic36 require user abel37 </Directory>用户名:abel密码:redhat10.5 虚拟网站主机功能Apache的虚拟主机功能是服务器基于用户请求的不同IP地址、主机域名或端口号,实现提供多个网站同时为外部提供访问服务的技术,如图10-12所示,用户请求的资源不同,最终获取到的网页内容也各不相同。10.5.1 基于IP地址配置主机网卡的IP地址:[root@localhost ~]# vim /etc/sysconfig/network-scripts/ifcfg-bond0[root@localhost ~]# system restart network[root@localhost ~]# ping 192.168.1.120PING 192.168.1.120 (192.168.1.120) 56(84) bytes of data.64 bytes from 192.168.1.120: icmp_seq=1 ttl=64 time=0.032 ms64 bytes from 192.168.1.120: icmp_seq=2 ttl=64 time=0.034 ms64 bytes from 192.168.1.120: icmp_seq=3 ttl=64 time=0.034 ms64 bytes from 192.168.1.120: icmp_seq=4 ttl=64 time=0.036 ms64 bytes from 192.168.1.120: icmp_seq=5 ttl=64 time=0.050 ms64 bytes from 192.168.1.120: icmp_seq=6 ttl=64 time=0.050 ms^C--- 192.168.1.120 ping statistics ---6 packets transmitted, 6 received, 0% packet loss, time 5000msrtt min/avg/max/mdev = 0.032/0.039/0.050/0.009 ms[root@localhost ~]# ping 192.168.1.140PING 192.168.1.140 (192.168.1.140) 56(84) bytes of data.64 bytes from 192.168.1.140: icmp_seq=1 ttl=64 time=0.030 ms64 bytes from 192.168.1.140: icmp_seq=2 ttl=64 time=0.036 ms64 bytes from 192.168.1.140: icmp_seq=3 ttl=64 time=0.081 ms64 bytes from 192.168.1.140: icmp_seq=4 ttl=64 time=0.048 ms^C--- 192.168.1.140 ping statistics ---4 packets transmitted, 4 received, 0% packet loss, time 2999msrtt min/avg/max/mdev = 0.030/0.048/0.081/0.021 ms[root@localhost ~]# ping 192.168.1.150PING 192.168.1.150 (192.168.1.150) 56(84) bytes of data.64 bytes from 192.168.1.150: icmp_seq=1 ttl=64 time=0.031 ms64 bytes from 192.168.1.150: icmp_seq=2 ttl=64 time=0.034 ms64 bytes from 192.168.1.150: icmp_seq=3 ttl=64 time=0.091 ms64 bytes from 192.168.1.150: icmp_seq=4 ttl=64 time=0.070 ms64 bytes from 192.168.1.150: icmp_seq=5 ttl=64 time=0.038 ms64 bytes from 192.168.1.150: icmp_seq=6 ttl=64 time=0.035 ms64 bytes from 192.168.1.150: icmp_seq=7 ttl=64 time=0.035 ms64 bytes from 192.168.1.150: icmp_seq=8 ttl=64 time=0.075 ms^C--- 192.168.1.150 ping statistics ---8 packets transmitted, 8 received, 0% packet loss, time 7000msrtt min/avg/max/mdev = 0.031/0.051/0.091/0.022 ms[root@localhost ~]# mkdir -p /home/wwwroot/120[root@localhost ~]# mkdir -p /home/wwwroot/140[root@localhost ~]# mkdir -p /home/wwwroot/150[root@localhost ~]# echo "192.168.1.120 zhuji ">> /home/wwwroot/120/index.html[root@localhost ~]# echo "192.168.1.140 zhuji ">> /home/wwwroot/140/index.html[root@localhost ~]# echo "192.168.1.150 zhuji ">> /home/wwwroot/150/index.html[root@localhost wwwroot]# vim /etc/httpd/conf/httpd.conf119 DocumentRoot "/home/wwwroot"120121 #122 # Relax access to content within /var/www.123 <virtualhost 192.168.1.120>124 DocumentRoot /home/wwwroot/120125 Servername www.linuxprobe.com126 <directory /home/wwwroot/120>127 AllowOverride None128 Require all granted129 </directory>130 </virtualhost>131 <virtualhost 192.168.1.140>132 DocumentRoot /home/wwwroot/140133 Servername www.linuxprobe.com134 <directory /home/wwwroot/140>135 AllowOverride None136 Require all granted137 </directory>138 </virtualhost>139 <virtualhost 192.168.1.150>140 DocumentRoot /home/wwwroot/150141 Servername www.linuxprobe.com142 <directory /home/wwwroot/150>143 AllowOverride None144 Require all granted145 </directory>146 </virtualhost>147148 <Directory "/home/wwwroot">149 AllowOverride None150 # Allow open access:151 Require all granted152 </Directory>153154 # Further relax access to the default document root:155 <Directory "/var/www/html">[root@localhost /]# systemctl restart httpd[root@localhost ~]# semanage fcontext -a -t httpd_sys_content_t /home/wwwroot/120[root@localhost ~]# semanage fcontext -a -t httpd_sys_content_t /home/wwwroot/120/[root@localhost ~]# semanage fcontext -a -t httpd_sys_content_t /home/wwwroot/140[root@localhost ~]# semanage fcontext -a -t httpd_sys_content_t /home/wwwroot/140/[root@localhost ~]# semanage fcontext -a -t httpd_sys_content_t /home/wwwroot/150[root@localhost ~]# semanage fcontext -a -t httpd_sys_content_t /home/wwwroot/150/*[root@localhost ~]# restorecon -Rv /home/wwwroot10.5.2 基于主机域名