版权声明:本文为博主原创文章,转载请附上博文链接! https://blog.csdn.net/Little_fxc/article/details/88717997
SpringBoot配置文件的优先级
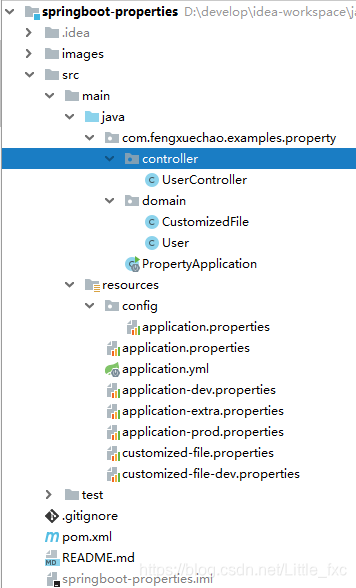
项目结构
配置文件的优先级
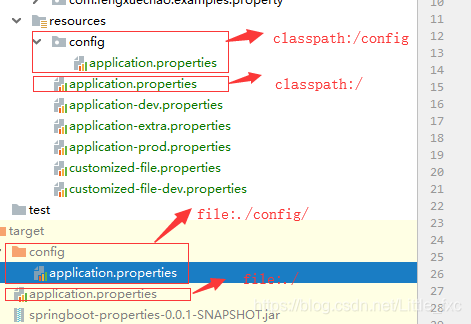
application.properties 和 application.yml 文件按照优先级从大到小顺序排列在以下四个位置:
- file:./config/ (当前项目路径config目录下);
- file:./ (当前项目路径下);
- classpath:/config/ (类路径config目录下);
- classpath:/ (类路径config下).
源代码展示:
public class ConfigFileApplicationListener
		implements EnvironmentPostProcessor, SmartApplicationListener, Ordered {
// Note the order is from least to most specific (last one wins)
private static final String DEFAULT_SEARCH_LOCATIONS = "classpath:/,classpath:/config/,file:./,file:./config/";

// 省略其它代码
}
以端口配置为例
- 在resources/config目录下配置文件设置端口为8888;
- 在resources/目录下配置文件设置端口为8080;
- 在类路径config目录下配置文件设置端口为6666;
- 在类路径下配置文件设置端口为5555;
运行结果:

自定义配置文件的绑定
-
CustomizedFile 类
/**
 * 自定义配置文件, 需要配合使用后@Configuration和@PropertySource("classpath:customized-file.properties")来指定
 * @author fengxuechao
 */
@Configuration
@ConfigurationProperties(prefix = "customizedFile")
@PropertySource("classpath:customized-file-${spring.profiles.active}.properties")
public class CustomizedFile {
    private String name;
    private String author;
    private String path;
    private String description;
    // 省略 setter/getter
}
看到
${spring.profiles.active},聪明的你一定知道这是 spring boot多环境自定义配置文件的实现方式。
生效的配置文件是${spring.profiles.active}所指定的配置文件,本文案例中生效的是customized-file-dev.properties。
接下来继续创建配置文件验证 -
customized-file.properties
customizedFile.name=自定义配置文件名 customizedFile.author=作者名 customizedFile.path=路径地址 customizedFile.description=看到这个就表明自定义配置文件成功了 -
customized-file-dev.properties
customizedFile.description=DEV:看到这个就表明自定义配置文件成功了 -
运行结果:

结论:只有
customized-file-dev.properties中配置的属性生效