SSH服务
课程目标
- 理解ssh服务的两种认证方式
- 掌握ssh服务的基本配置
- 掌握ssh服务客户端工具的使用
一、 SSH介绍
- ssh是Linux下远程管理的工具,相比Telnet安全,运维人员必备
- ssh全称secure shell ,安全的shell,是C/S架构,默认端口号 22,TCP/IP协议
- ssh其实用于商业,而OpenSSH即为开源的,在Linux中默认安装
- SSH有v1和v2版本
- ssh v1:有漏洞,容易受到攻击
- ssh v2:通过公钥加密(数字签名和密钥交换)的方式进行,确保服务器端的身份识别
二、SSH加密算法
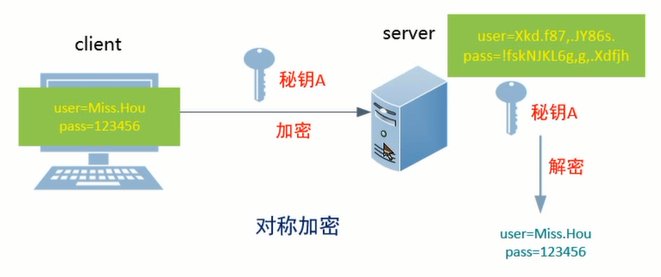
des 对称的公钥加密算法,安全低,数据传输速度快,==使用同一个秘钥进行加密或解密==
rsa 非对称的公钥加密算法,安全,数据传输速度慢,ssh默认的加密算法


公钥加密,用私钥解密前者加密后的秘钥
非对称加密
1.远程server收到client端用户的登录请求后,server端把自己的公钥发给用户
2、client端使用这个公钥,将密码进行加密
3、client将加密的密码发送给server端
4、远程server用自己的私钥,解密登录密码,然后验证其合法性
5、根据验证结果,给client相应的响应
非对称加密不是绝对安全

ssh是如何解决这个问题的?
三、SSH服务的认证方式
基于用户密码的认证
[root@CentOs6 ~]# ssh 192.168.1.101
The authenticity of host '192.168.1.101 (192.168.1.101)' can't be established.
RSA key fingerprint is 90:22:9b:2e:dd:7f:e7:fe:71:57:ac:ff:22:b5:c3:9b.
Are you sure you want to continue connecting (yes/no)? yes
Warning: Permanently added '192.168.1.101' (RSA) to the list of known hosts.
[email protected]'s password:
提示信息:无法确认主机的真实性,指纹是。。。。。,你确定要继续吗?
说明:理论上应该上对钥的确认,由于公钥通过RSA算法加密,太长,不好直接比较,所以给公钥一个hash的指纹,方便比较。
说明:当客户端输入yes确认对方的公钥指纹后,server端的公钥就会被存放到客户机的用户家目录里~/.ssh/known_hosts文件中,下次再访问就直接通过密码登录,不需要再确认公钥。
ssh不指定用户的话,访问之后默认当前用户,如果服务器端根本没有那个用户,那么无法连接。
- ssh [email protected] 或者 ssh -l root 192.168.1.101 (-l和用户名之间空格可无)

基于秘钥对的认证
需求:A主机免密码登录B主机


- 相关文件解读:
- id_rsa:保存私钥
- id_rsa.pub:保存公钥
- authorized_keys:保存已授权的客户端公钥
- known_hosts:保存已认证的远程主机公钥
- 相关文件解读:
四、SSH服务基本配置
环境准备:编辑-->虚拟网络编辑器-->仅主机模式(选中两个选项,子网10.1.1.0,自定义DHCP设置,range 10.1.1.2~10.1.1.10)-->修改主机名和网络环境(静态IP)
基于秘钥对认证(免密码登录)--->==重点掌握==
需求:client端有一个用户user01,该用户指定root用户免密码登录server端
环境:client:10.1.1.3 server:10.1.1.2
思路:
- client端生成一段秘钥
- 将生成的公钥远程拷贝到server端
步骤:
- client端的user01用户生成一对秘钥对
[user01@client ~]$ ssh-keygen Generating public/private rsa key pair. Enter file in which to save the key (/home/user01/.ssh/id_rsa): Created directory '/home/user01/.ssh'. Enter passphrase (empty for no passphrase): Enter same passphrase again: Your identification has been saved in /home/user01/.ssh/id_rsa. Your public key has been saved in /home/user01/.ssh/id_rsa.pub. The key fingerprint is: ad:26:e8:e1:c5:95:ca:8c:c9:3b:c8:d6:f9:fe:46:ce user01@client The key's randomart image is: +--[ RSA 2048]----+ | | | | | | | o | | S . | | . B o.. | | . o*.B+o | | +o++ oE | | . ++oo. | +-----------------+ [user01@client ~]$ ls .ssh/ id_rsa (私钥) id_rsa.pub (公钥)- 将刚刚生成的公钥远程拷贝到server端的root家目录里指定位置
(拷贝目的地是需求的用户)
[user01@client ~]$ scp .ssh/id_rsa.pub [email protected]:/root/.ssh/authorized_keys 或者 [user01@client ~]$ ssh-copy-id -i .ssh/id_rsa.pub [email protected] (推荐使用) The authenticity of host '10.1.1.2 (10.1.1.2)' can't be established. RSA key fingerprint is a5:98:06:58:84:35:d3:f4:4c:f8:43:a1:a5:12:f5:8e. Are you sure you want to continue connecting (yes/no)? yes Warning: Permanently added '10.1.1.2' (RSA) to the list of known hosts. [email protected]'s password: Now try logging into the machine, with "ssh '[email protected]'", and check in: .ssh/authorized_keys to make sure we haven't added extra keys that you weren't expecting. server端查看 [root@server ~]# cd .ssh [root@server .ssh]# ls authorized_keys [root@server .ssh]# cat authorized_keys ssh-rsa AAAAB3NzaC1yc2EAAAABIwAAAQEA4IcI4Jb5PLg4rcKBcqdmuyNIbNZleUGD9oCtGtLc7Ta57LKVxGrB9TIX4tO4fEVyl7xbu2j/EsOSIH29LNNiubv+zkBhMecO258pvy1tDu2W5xdufcyR1F3cjNulDEVwo8TdKwIQ8/2vqhILJ9mTFP2ptOrkktuqjQ++staaRBgai6Ve8aaoV+l7XEXyyj2sV9s/u1WSa0MH32uGdsJqS8B8VzRFPYHYIBOsMmGTeVCfNQ2NRXH8fYB7YZbiExMoGMZPttq8uaQ18HvPbNa6f1wtDcH8ECaHRiFQz/lV7wGZI/18Dz9M3oXrLnDBEOSR2dahOYjxSTwHnf/E48Y/kw== user01@client- 测试验证
[user01@client ~]$ ssh [email protected]
Last login: Thu Apr 18 19:19:26 2019 from 10.1.1.1
[root@server ~]#
备注:即使root用户的密码改变了也不影响
仔细思考原理,基于秘钥对
练习:
禁止root用户远程登录
了解软件相关知识
[root@server ~]# rpm -ql openssh-server
/etc/rc.d/init.d/sshd     // 启动脚本
/etc/ssh/sshd_config      // 配置文件
/usr/sbin/sshd                // 二进制命令

[root@server ~]# rpm -ql openssh-clients
/etc/ssh/ssh_config
/usr/bin/scp
/usr/bin/sftp
/usr/bin/slogin
/usr/bin/ssh
/usr/bin/ssh-add
/usr/bin/ssh-agent
/usr/bin/ssh-copy-id
/usr/bin/ssh-keyscan

[root@server ~]# which ssh-keygen     // 生成秘钥的工具
/usr/bin/ssh-keygen
[root@server ~]# rpm -qf /usr/bin/ssh-keygen
openssh-5.3p1-94.el6.x86_64
步骤:
[root@server ~]# cp /etc/ssh/sshd_config /opt/  // 备份
[root@server ~]# vim /etc/ssh/sshd_config         // 修改配置文件
#PermitRootLogin yes
PermitRootLogin no        // 权限设置为 no
重启服务
[root@server ~]# service sshd restart

[root@client ~]# ssh [email protected]    // 客户端尝试连接
[email protected]'s password:
Permission denied, please try again.  // 连接被拒绝
[email protected]'s password:
修改默认端口号
目的是为了安全。
[root@server ~]# vim /etc/ssh/sshd_config
#Port 22
Port 10022
[root@server ~]# service sshd restart

[root@client ~]# ssh [email protected]
ssh: connect to host 10.1.1.2 port 22: Connection refused
[root@client ~]# ssh [email protected] -p 10022
ssh: connect to host 10.1.1.2 port 10022: No route to host

1.网络问题
2.关闭服务器端防火墙,再次尝试,成功连接
ssh服务的访问控制
可以使用TCP_Wrappers工具做网络控制
/etc/hosts.allow 和 /etc/hosts.deny
如何判断一个服务支持TCP_Wrappers功能
rpm 包安装的服务:
[root@server ~]# ldd /usr/sbin/sshd | grep libwrap
    libwrap.so.0 => /lib64/libwrap.so.0 (0x00007f83b3ba9000)
源码包:
./configuer --enable-libxxxx // 配置时开启功能
需求:不允许10.1.1.3服务器来远程访问
vim /etc/hosts.deny
sshd:10.1.1.3
sshd:10.1.1.0/255.255.255.0(不支持写8、16、24) EXCEPT 10.1.1.3
sshd,vsftpd:.itcast.cc EXCEPT MissHou.itcast.cc(主机名)
[root@server ~]# man 5 hosts_access
[root@server ~]# vim /etc/hosts.deny
末尾添加sshd:10.1.1.3,保存退出,这是sshd程序的一个模块,无需重启sshd服务

测试验证
[root@client ~]# ssh [email protected] -p 10022
ssh_exchange_identification: Connection closed by remote host   //说明成功